nfs
Posted
tags:
篇首语:本文由小常识网(cha138.com)小编为大家整理,主要介绍了nfs相关的知识,希望对你有一定的参考价值。
##########nfs##########
网络文件系统(NFS)是Unix系统和网络附加存储文件管理器常用的网络文件系统,允许多个客户端通过网络共享文件访问。它可用于提供对共享二进制目录的访问,也可用于允许用户在同一工作组中从不同客户端访问其文件。
1.安装服务,设置火墙
[[email protected] smbshare]# systemctl start firewalld
[[email protected] smbshare]# yum install nfs-utils -y##服务的安装
[[email protected] smbshare]# systemctl start nfs-server
[[email protected] smbshare]# systemctl enable nfs-server
ln -s ‘/usr/lib/systemd/system/nfs-server.service‘ ‘/etc/systemd/system/nfs.target.wants/nfs-server.service‘
[[email protected] ~]# firewall-cmd --list-all##列出区域设置
public (default, active)
interfaces: eth0 eth1
sources:
services: dhcpv6-client ssh
ports: 8080/tcp
masquerade: no
forward-ports:
icmp-blocks:
rich rules:
1)
[[email protected] smbshare]# firewall-cmd --permanent --add-service=nfs##开启nfs服务
success
[[email protected] smbshare]# firewall-cmd --reload
success
[[email protected] smbshare]# firewall-cmd --list-all
public (default, active)
interfaces: eth0 eth1
sources:
services: dhcpv6-client nfs ssh
ports: 8080/tcp
masquerade: no
forward-ports:
icmp-blocks:
rich rules:
测试:
[[email protected] kiosk]# showmount -e 172.25.254.113
clnt_create: RPC: Port mapper failure - Unable to receive: errno 113 (No route to host)
2)
[[email protected] smbshare]# firewall-cmd --permanent --add-service=rpc-bind ##添加服务
success
[[email protected] smbshare]# firewall-cmd --reload
success
[[email protected] ~]# firewall-cmd --list-all
public (default, active)
interfaces: eth0 eth1
sources:
services: dhcpv6-client nfs rpc-bind ssh
ports: 8080/tcp
masquerade: no
forward-ports:
icmp-blocks:
rich rules:
测试:
[[email protected] kiosk]# showmount -e 172.25.254.113
clnt_create: RPC: Port mapper failure - Unable to receive: errno 113 (No route to host)
3)
[[email protected] smbshare]# firewall-cmd --permanent --add-service=mountd##添加服务mountd
success
[[email protected] smbshare]# firewall-cmd --reload
success
[[email protected] ~]# firewall-cmd --list-allpublic (default, active)
interfaces: eth0 eth1
sources:
services: dhcpv6-client mountd nfs rpc-bind ssh
ports: 8080/tcp
masquerade: no
forward-ports:
icmp-blocks:
rich rules:
测试:
[[email protected] kiosk]# showmount -e 172.25.254.113
Export list for 172.25.254.113:
2.nfs配置
[[email protected] ~]# mkdir /public
[[email protected] ~]# chmod 777 /public
[[email protected] ~]# vim /etc/exports
1 /public *(sync)##public共享给所有人并同步数据
[[email protected] ~]# exportfs -rv
exporting *:/public
测试:
[[email protected] Desktop]$ showmount -e 172.25.254.113
Export list for 172.25.254.113:
/public *
/public*.example.com(sync,rw)##public共享给example.com域名的所有主机 (同步数据,可读可写)
/public172.25.254.78(sync,ro)##public共享给172.25.254.78 (同步数据,只读)
/public*(sync,no_root_squsah,rw)##public共享给所有人,当客户端使用root挂载时不转换用户身份
/public*(sync,rw,anonuid=1000,anougid=1001)##public共享给所有人,uid=1000,gid=1001,用户必须在客户端存在
exportfs -rv##刷新服务,让更改生效
3.利用kerberos保护nfs输出
*在server上
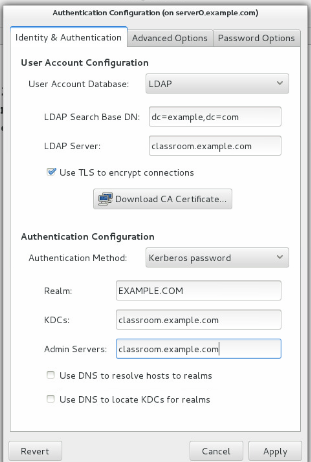
开启kerberos认证,得到ldap用户
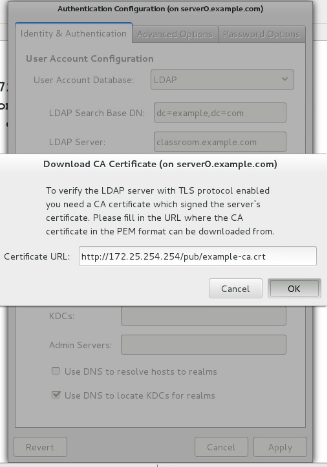
[[email protected] ~]# yum install sssd krb5-workstation.x86_64 authconfig-gtk.x86_64 -y
authconfig-gtk
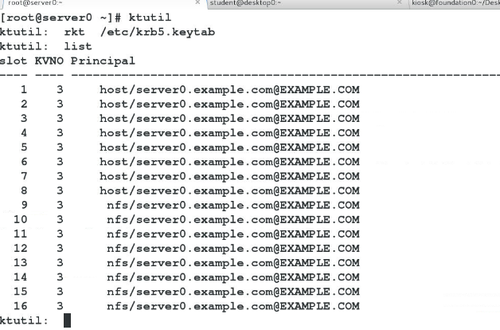
wget http://172.25.254.254/pub/keytabs/server0.keytab -O /etc/krb5.keytab

systemctl start nfs-secure-server
systemctl enable nfs-secure-server

[[email protected] ~]# vim /etc/exports
1 /public *(rw,sec=krb5p)
exportfs -rv
*在desktop上
开启kerberos认证,得到ldap用户
wget http://172.25.254.254/pub/keytabs/desktop0.keytab -O /etc/krb5.keytab
systemctl start nfs-secure-server
systemctl enable nfs-secure-server
[[email protected] ~]# vim /etc/exports
1 /public *(rw,sec=krb5p)
exportfs -rv
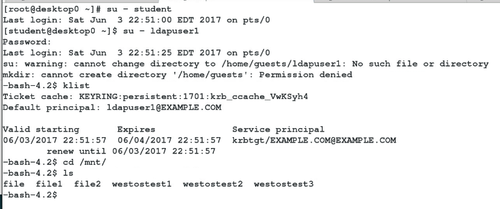
测试:

本文出自 “AELY木” 博客,请务必保留此出处http://12768057.blog.51cto.com/12758057/1933962
以上是关于nfs的主要内容,如果未能解决你的问题,请参考以下文章

