创建自己的OAuth2.0服务端
Posted alun-chen
tags:
篇首语:本文由小常识网(cha138.com)小编为大家整理,主要介绍了创建自己的OAuth2.0服务端相关的知识,希望对你有一定的参考价值。
如果对OAuth2.0有任何的疑问,请先熟悉OAuth2.0基础的文章:http://www.cnblogs.com/alunchen/p/6956016.html
1. 前言
本篇文章时对 客户端的授权模式-授权码模式 的创建,当然你理解的最复杂的模式之后,其他模式都是在授权码模式上面做一些小改动即可。对于授权码模式有任何的疑问,请看上面提到的文章。
注意:本文是创建OAuth的Server端,不是Client请求端。
2. 开始授权码模式的概念、流程
第2点其实就是复制了上一篇文章,为了提高阅读性,读过上一篇文章的可略过第2点。
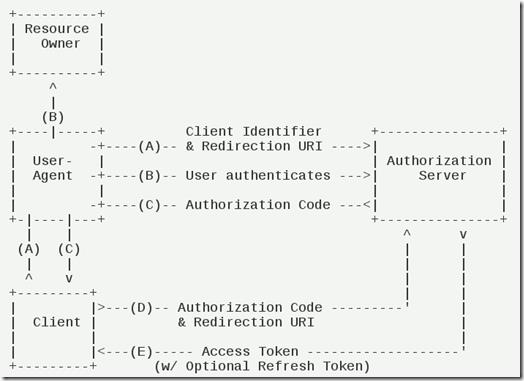
授权码模式(authorization code)是功能最完整、流程最严密的授权模式。它的特点就是通过客户端的后台服务器,与"服务提供商"的认证服务器进行互动。
流程图:
图说明:
(A)用户访问客户端,后者将前者导向认证服务器。
(B)用户选择是否给予客户端授权。
(C)假设用户给予授权,认证服务器将用户导向客户端事先指定的"重定向URI"(redirection URI),同时附上一个授权码。
(D)客户端收到授权码,附上早先的"重定向URI",向认证服务器申请令牌。这一步是在客户端的后台的服务器上完成的,对用户不可见。
(E)认证服务器核对了授权码和重定向URI,确认无误后,向客户端发送访问令牌(access token)和更新令牌(refresh token)。
下面是上面这些步骤所需要的参数。
A步骤中,客户端申请认证的URI,包含以下参数:
- response_type:表示授权类型,必选项,此处的值固定为"code"
- client_id:表示客户端的ID,必选项
- redirect_uri:表示重定向URI,可选项
- scope:表示申请的权限范围,可选项
- state:表示客户端的当前状态,可以指定任意值,认证服务器会原封不动地返回这个值。
例子:
GET /authorize?response_type=code&client_id=s6BhdRkqt3&state=xyz
        &redirect_uri=https%3A%2F%2Fclient%2Eexample%2Ecom%2Fcb HTTP/1.1
Host: server.example.com
C步骤中,服务器回应客户端的URI,包含以下参数:
- code:表示授权码,必选项。该码的有效期应该很短,通常设为10分钟,客户端只能使用该码一次,否则会被授权服务器拒绝。该码与客户端ID和重定向URI,是一一对应关系。
- state:如果客户端的请求中包含这个参数,认证服务器的回应也必须一模一样包含这个参数。
例子:
HTTP/1.1 302 Found
Location: https://client.example.com/cb?code=SplxlOBeZQQYbYS6WxSbIA
          &state=xyz
D步骤中,客户端向认证服务器申请令牌的HTTP请求,包含以下参数:
- grant_type:表示使用的授权模式,必选项,此处的值固定为"authorization_code"。
- code:表示上一步获得的授权码,必选项。
- redirect_uri:表示重定向URI,必选项,且必须与A步骤中的该参数值保持一致。
- client_id:表示客户端ID,必选项。
例子:
POST /token HTTP/1.1
Host: server.example.com
Authorization: Basic czZCaGRSa3F0MzpnWDFmQmF0M2JW
Content-Type: application/x-www-form-urlencoded

grant_type=authorization_code&code=SplxlOBeZQQYbYS6WxSbIA
&redirect_uri=https%3A%2F%2Fclient%2Eexample%2Ecom%2Fcb
E步骤中,认证服务器发送的HTTP回复,包含以下参数:
- access_token:表示访问令牌,必选项。
- token_type:表示令牌类型,该值大小写不敏感,必选项,可以是bearer类型或mac类型。
- expires_in:表示过期时间,单位为秒。如果省略该参数,必须其他方式设置过期时间。
- refresh_token:表示更新令牌,用来获取下一次的访问令牌,可选项。
- scope:表示权限范围,如果与客户端申请的范围一致,此项可省略。
例子:
HTTP/1.1 200 OK
     Content-Type: application/json;charset=UTF-8
     Cache-Control: no-store
     Pragma: no-cache

     {
       "access_token":"2YotnFZFEjr1zCsicMWpAA",
       "token_type":"example",
       "expires_in":3600,
       "refresh_token":"tGzv3JOkF0XG5Qx2TlKWIA",
       "example_parameter":"example_value"
     }
从上面代码可以看到,相关参数使用JSON格式发送(Content-Type: application/json)。此外,HTTP头信息中明确指定不得缓存。
3. 开始写自己的OAuth2.0服务端代码(C#)
如果有错误的地方,欢迎指正,作者也不保证完全正确。
这里介绍的是C#,当然你可以用你自己的语言写,大同小异。(没用到第三方关于OAuth2.0的框架)
作者在开始理解OAuth2.0的概念时,化了一段比较长的时间。从微信授权开始接触OAuth2.0的概念,后来写了一套第三方微信授权的小程序,慢慢消化OAuth2.0。
说实在的,OAuth2.0安全在于,提供了code、access_token,来绑定我们的用户信息。并且code、access_token有过期的时间。所以,关键在于理解code与access_token的作用。
开始代码,我们创建一个MVC的程序,这里叫做MyOAuth2Server。
3.1开始授权验证
第一步,开始授权验证,并且跳转到指定的授权页面。
先上代码,然后再分析:
        /// <summary>
        /// 第一步,开始授权验证
         /// 指定到用户授权的页面
         /// </summary>
        /// <param name="client_id"></param>
        /// <param name="response_type"></param>
        /// <param name="redirect_uri"></param>
        /// <param name="state"></param>
        /// <param name="scope"></param>
        /// <returns></returns>
        public ActionResult Authorize(string client_id, string response_type, string redirect_uri, string scope, string state = "")
        {
            if ("code".Equals(response_type))
            {
                //判断client_id是否可用
                if (!_oAuth2ServerServices.IsClientIdValied(client_id))
                    return this.Json("client_id 无效", JsonRequestBehavior.AllowGet);

                //保存用户请求的所有信息到指定容器(session)
                   Session.Add("client_id", client_id);
                Session.Add("response_type", response_type);
                Session.Add("redirect_uri", redirect_uri);
                Session.Add("state", state);
                Session.Add("scope", scope);
                //重定向到用户授权页面(当然你可以自定义自己的页面)
                return View("Authorize");
            }
            return View("Error");
        }
客户端会授权会请求我们授权验证方法,
首先,验证client_id是否可用,这里的client_id是为了保证安全性,确保请求端是服务端给予请求或者授权的权利。简单地说,就是请求端在用此服务端之前要申请唯一的一个client_id;
然后,在把客户端传过来的信息保存在Session(你也可以保存在其他地方);
最后,跳转到用户操作的,是否给予授权的页面(可以是点击一个确定授权的按钮,类似于微信授权。也可以是输入用户名&密码等的页面)。
下面我们看一下 return View("Authorize"); 这句代码所返回给用户许可的页面:
@{
    Layout = null;
}
<!DOCTYPE html>
<html>
<head>
    <meta name="viewport" content="width=device-width" />
    <title>授权验证</title>
</head>
<body>
    <div>
        你确定给用户授权吗?
        <form action="/OAuth2Server/Authenticate" method="post" id="login_form">
            <br /><br />
            <table class="form_field">
                <tr>
                    <td class="right">
                        User:
                    </td>
                    <td>
                        <input type="text" name="user" id="user" style="width: 12em;">
                    </td>
                </tr>
                <tr>
                    <td class="right">
                        Password:
                    </td>
                    <td>
                        <input type="password" name="password" id="password" style="width: 12em;">
                    </td>
                </tr>
                <tr></tr>
            </table>
            <div class="action">
                <input type="submit" value="授权" />
            </div>
            <br />
        </form>
    </div>
</body>
</html>
从上面可以看到,用户确定授权后会提交信息到Authenticate方法,下面我们看看Authenticate到底是做了什么。
3.2验证并返回code到请求端
我们这里是用户名与密码验证,当然你也可以用其他验证。(比如用户点击一个授权允许的按钮就可以了)
首先,在OAuth2.0服务端上验证用户输入的用户名与密码是否正确;
然后,生成code,并且设定code的生存时间,默认是30秒。(code只能用一次,之后要删除);
再绑定code与用户信息(用户唯一键);
最后,重定向回redirect_uri请求的地址,并且返回code与state。(state是请求端那边想要用于处理一些业务逻辑所用到的,当然可以为空)
上代码
        /// <summary>
        /// 第二步,用户确认授权后的操作。
         /// 用户确认授权后,则返回code、access_token,并重定向到redirect_uri所指定的页面
         /// </summary>
        /// <returns></returns>
        public ActionResult Authenticate()
        {
            var username = Request["user"] ?? "";
            var password = Request["password"] ?? "";

            //取得重定向的信息
            var redirect_uri = Session["redirect_uri"] ?? "";
            var state = Session["state"] ?? "";
            string code = TokenCodeUtil.GetCode();

            //验证用户名密码
            if (!_oAuth2ServerServices.IsUserValied(username, password))
                return this.Json("用户名或密码不正确", JsonRequestBehavior.AllowGet);

            //保存code到DB/Redis,默认存在30秒
            _oAuth2ServerServices.SaveCode(code);
            //绑定code与userid,因为后面查询用户信息的时候要用到,默认存在30秒
            _oAuth2ServerServices.BingCodeAndUser(username, code);
            //重定向
            string url = string.Format(HttpUtility.UrlDecode(redirect_uri.ToString()) + "?code={0}&state={1}", code, state);
            Response.Redirect(url);

            return null;
        }
上面,已经完成了code的使命,并且返回到了请求端。
下面,我们来看看怎么获取token。
3.3获取token
在请求端获取到code之后,请求端要获取token,因为获取了token请求端才能获取到用户信息等资料。
首先,把token设置成不能保持cache的状态,为了保证安全性;
然后,判断是获取token还是刷新token的状态;
再验证code是否过期,验证client_id、client_secret是否正确;
再生成token,把token存入容器(DB、Redis、Memory等)中;
在通过code来获取用户的信息,把用户信息(主键)与token做绑定;
最后,把code删除(code只能用一次,如果想再获取token只能第一步开始重新做),返回token。
上代码:
        /// <summary>
        /// 获取或刷新token。
         /// token可能保存在DB/Redis等
         /// </summary>
        /// <param name="code"></param>
        /// <param name="grant_type"></param>
        /// <param name="client_id"></param>
        /// <param name="client_secret"></param>
        /// <returns></returns>
        public ActionResult GetToken(string code, string grant_type, string client_id, string client_secret)
        {
            Response.ContentType = "application/json";
            Response.AddHeader("Cache-Control", "no-store");

            //获取token
            if (grant_type == "authorization_code")
            {
                //判断code是否过期
                if (!_oAuth2ServerServices.IsCodeValied(code, DateTime.Now))
                    return this.Json("code 过期", JsonRequestBehavior.AllowGet);
                //判断client_id与client_secret是否正确
                if (!_oAuth2ServerServices.IsClientValied(client_id, client_secret))
                    return this.Json("client_id、client_secret不正确", JsonRequestBehavior.AllowGet);
                //新建token
                string access_token = TokenCodeUtil.GetToken();
                //保存token,默认是30分钟
                _oAuth2ServerServices.SaveToken(access_token);
                //通过code获取userid,然后用token与userid做绑定,最后把code设置成消失(删除)
                string userId = _oAuth2ServerServices.GetUserIdFromCode(code);
                if (string.IsNullOrEmpty(userId))
                    return this.Json("code过期", JsonRequestBehavior.AllowGet);
                _oAuth2ServerServices.BingTokenAndUserId(access_token, userId);
                _oAuth2ServerServices.RemoveCode(code);

                //返回token
                return this.Json(access_token, JsonRequestBehavior.AllowGet);
            }
            //刷新token
            else if (grant_type == "refresh_token")
            {
                //新建token
                string new_access_token = TokenCodeUtil.GetToken();
                //替换保存新的token,默认是30分钟

                //返回新建的token
                return this.Json(new_access_token, JsonRequestBehavior.AllowGet);
            }
            return this.Json("error grant_type=" + grant_type, JsonRequestBehavior.AllowGet);
        }
3.4通过token获取用户信息
上面请求端已经获取到了token,所以这里只需要验证token,token验证通过就直接返回用户信息。
验证token包括验证是否存在、验证是否过期。
        /// <summary>
        /// 通过token获取用户信息
        /// </summary>
        /// <param name="oauth_token"></param>
        /// <returns></returns>
        public ActionResult UserInfo(string oauth_token)
        {
            if(!_oAuth2ServerServices.IsTokenValied(oauth_token, DateTime.Now))
                return this.Json("oauth_token无效", JsonRequestBehavior.AllowGet);
            UserInfo u = _oAuth2ServerServices.GetUserInfoFromToken(oauth_token);
            return this.Json(u, JsonRequestBehavior.AllowGet);
        }
4. 结语
到此,我们写OAuth2.0服务端的代码已经结束了。
附上源码:https://github.com/cjt321/MyOAuth2Server
下一篇将介绍请求端怎么请求我们的服务端,来测试流程、代码是否正确:http://www.cnblogs.com/alunchen/p/6957785.html
可以关注本人的公众号,多年经验的原创文章共享给大家。

以上是关于创建自己的OAuth2.0服务端的主要内容,如果未能解决你的问题,请参考以下文章
