Centos6与7的区别
Posted
tags:
篇首语:本文由小常识网(cha138.com)小编为大家整理,主要介绍了Centos6与7的区别相关的知识,希望对你有一定的参考价值。
#如有雷同纯属巧合不盛荣幸
upstart
1,CentOS6和ubntu14采用的是upstart技术代替了sysvinit进行引导,upstart对rc.sysinit做了大量的优化,缩短了系统初始化的启动时间。upstart的很多特性并没有凸显或直接支持
systemd
systemd是linux下的一种init软件,由Lennarrt Poettering带头开发。其开发的目标是提供更优秀的框架以表示系统服务见的依赖关系,并依此实现系统初始化时服务器并行启动同时降低了shell系统的开销效果,最终代替在常用的system V与BSD风格的init程序。
主要克服sysvinit的缺点
SystemD的很多概念来源于苹果的launchd。目标是尽可能启动更少进程;尽可能将更多进程并行启动(这是性能优于SysVinit的理念基础)。SystemD尽可能减少对Shell脚本的依赖。传统SysVinit使用inittab来决定运行哪些Shell脚本,大量使用Shell脚本被认为是效率低下无法并行的原因。SystemD使用了Linux专属技术,不再顾及POSIX兼容,只要能满足社会变革的需要,突破一些可能过时的技术约束,这也是当今创信理念的需要,相信市场会给出评判。
与多数发行版使用的System V风格init相比,SystemD采用了以下新技术:
采用Socket激活式与总线激活式服务,以提高相互依赖的各服务的并行运行性能;
用cgroups代替PID来追踪进程,因此即使是两次fork之后生成的守护进程也不会脱离systemd的控制。
从设计构思上说,由于SystemD使用了cgroup与fanotify等组件以实现其特性,所以只适用于Linux。有鉴于此,基于kFreeBSD分支的软件源无法纳入SystemD。
1. SystemD服务管理
systemctl is-enabled .service #查询服务是否开机启动
sudo systemctl enable .service #开机运行服务
sudo systemctl disable .service #取消开机运行
sudo systemctl start .service #启动服务
sudo systemctl stop .service #停止服务
sudo systemctl restart .service #重启服务
sudo systemctl reload .service #重新加载服务配置文件
systemctl status .service #查询服务运行状态
systemctl –failed
#显示启动失败的服务
2. 开机模块加载
/etc/modules-load.d/.conf,相当于原rc.conf中的MODULES变量
模块黑名单仍在/etc/modprobe.d/下,如blacklist.conf:
3. Locale
/etc/locale.conf,相当于原rc.conf中的LOCALE
4. 日志服务
systemd自带日志服务,参考systemd Journal
可以删除syslog-ng了
5. 主机名
/etc/hostname,相当于原来rc.conf中的HOSTNAME变量
6. 网络
3. 运行级别
SystemD用target替代了runlevel的概念,提供了更大的灵活性,如可以继承一个已有的target,并添加其它服务,来创建自己的target。
sudo systemctl list-units –type=target #查询当前target
sudo systemctl isolate graphical.target #改变当前target,重启无效
sudo systemctl enable multi-user.target #改变启动时默认target
sudo systemctl enable kdm.service #graphical是默认target,指定使用的display manager
单位处理
1. 单位的处理
创建单位用的系统配置文件位于/lib/systemd/system/,但/etc/systemd/system目录下的同名文件会优先于前者。
单位文件的定义通常比传统的SysVinit脚本要短得多。例如,用于通过NTP来同步网络时间的服务只有短短几行:
1 [Unit]
2 Description=Network Time Service
3
4 [Service]
5 ExecStart=/usr/bin/ntpd -n -u ntp:ntp -g
6
7 [Install]
8 WantedBy=multi-user.target
所有的单位文件都包含由[Unit]开头的一节,其中包含一般设置与简短介绍。
[Service]一节含有针对该服务要进行的任务的指定设置。
[Install]一节包含了SystemD在(反)安装时要解释的说明。
yum源上的优化
以前我们在Centos7以前的版本默认是通过官方 下载的rpm包,由于是国外的yum源所以下载时候很慢导致不能用,Centos7里做了优化,采用就近原则通过dns找到最近yum源开始进行下载
时间同步 Centos6 ntp
ntpq -p
Centos7 chrony
chrony sources
ü 时间修改
[CentOS-6.x]:
# vim /etc/sysconfig/clock
ZONE="Asia/Tokyo"
UTC=fales
# ln -s /usr/share/zoneinfo/Asia/Tokyo /etc/localtime
[CentOS-7.x]:
# timedatectl set-timezone Asia/Tokyo
# timedatectl status
ü 默认数据库
[CentOS-6.x]:mysql
[CentOS-7.x]:MariaDB
ü 服务管理
任务 | [CentOS-6.x] | [CentOS-7.x] |
服务自动启动 | chkconfig –level 3 httpd on | systemctl enable httpd.service |
服务不自动启动 | chkconfig –level 3 httpd off | systemctl disable httpd.service |
检查服务状态 | service httpd status | systemctl status httpd.service |
显示所有服务 | chkconfig –list | systemctl list-units –type=service |
启动某服务 | service httpd start | systemctl start httpd.service |
停止某服务 | service httpd stop | systemctl stop httpd.service |
重启某服务 | service httpd restart | systemctl restart httpd.service |
ü 防火墙
[CentOS-6.x]:iptables
[CentOS-7.x]:firewalld
安装:yum install firewalld
开启:systemctl start firewalld.service
关闭:systemctl stop firewalld.service
自启:systemctl enable firewalld.service
设置:
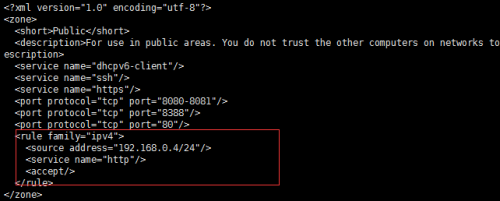
允许某ip访问某服务:
#firewall-cmd --permanent --zone=public --add-rich-rule="rule family="ipv4" source address="192.168.88.10/24" service name="http" accept"
删除上面设置的规则:
#firewall-cmd --permanent --zone=public --remove-rich-rule="rule family="ipv4" source address="192.168.88.10/24" service name="http" accept"
转发 tcp 22 端口至 3753
# firewall-cmd --zone=public --add-forward-port=port=22:proto=tcp:toport=3753
转发 22 端口数据至另一个 ip 的相同端口上
# firewall-cmd --zone=public --add-forward-port=port=22:proto=tcp:toaddr=192.168.1.100
转发 22 端口数据至另一 ip 的 2055 端口上
# firewall-cmd --zone=public --add-forward-port=port=22:proto=tcp:toport=2055:toaddr=192.168.1.100
防火墙预定义的服务配置文件是xml文件 目录在 /usr/lib/firewalld/services/网络命令
区域
网络区域定义了网络连接的可信等级。这是一个一对多的关系,这意味着一次连接可以仅仅是一个区域的一部分,而一个区域可以用于很多连接。
ü 网络命令
[CentOS-6.x]:
# netstat
# netstat -I
# netstat –n
# ifconfig –a
# route -n
[CentOS-7.x]:
# ip n
# ip -s l
# ss
# ip address show
# ip route show
ü 默认运行级别
systemctl set-default runlevel3.target
配置文件位置:/lib/systemd/system/runlevel*.target
ü
本文出自 “凌宇的技术博客” 博客,谢绝转载!
以上是关于Centos6与7的区别的主要内容,如果未能解决你的问题,请参考以下文章
