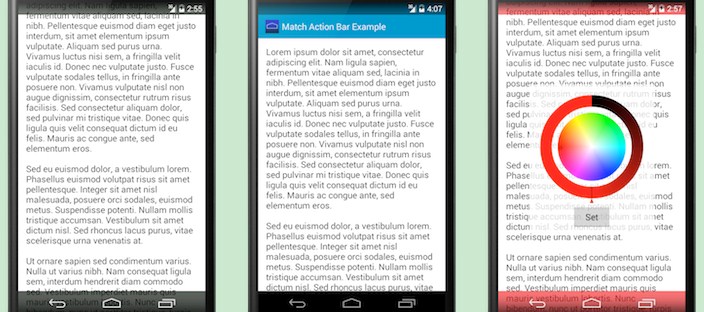
沉浸式状态栏
Posted
tags:
篇首语:本文由小常识网(cha138.com)小编为大家整理,主要介绍了沉浸式状态栏相关的知识,希望对你有一定的参考价值。
1、简单处理--BUG满天飞
这个特性是andorid4.4支持的,最少要api19才可以使用。
1、首先代码中添加
requestWindowFeature(Window.FEATURE_NO_TITLE);//隐藏标题栏
getWindow().addFlags(WindowManager.LayoutParams.FLAG_TRANSLUCENT_STATUS);//透明状态栏getWindow().addFlags(WindowManager.LayoutParams.FLAG_TRANSLUCENT_NAVIGATION);//透明导航栏setContentView(R.layout.activity_main);或者在主题中增加以下两个属性
<style name="AppTheme" parent="AppBaseTheme"><item name="android:windowTranslucentStatus">true</item>窗口透明的状态栏<item name="android:windowTranslucentNavigation">true</item>窗口透明的导航栏</style>2、然后在布局中第一个元素中添加如下属性
android:clipToPadding="true"android:fitsSystemWindows="true"属性的含义:
具体详见:http://blog.csdn.net/jdsjlzx/article/details/46778631
- clipToPadding:控件的绘制区域是否在paddin g里面,值为true时绘制的区域就包括padding区域;
- android:fitsSystemWindows:具体的作用就是你的contentview是否忽略actionbar、title、屏幕的底部虚拟按键,将整个屏幕当作可用的空间。正常情况,contentview可用的空间是去除了actionbar、title、底部按键的空间后剩余的可用区域,这个属性设置为true,则忽略,false则不忽略。简单来说,设置为true后,你的可用屏幕是整个屏幕,所以要注意,你的第一个控件是从状态栏那里开始布局的。
2、使用开源框架处理
https://github.com/jgilfelt/SystemBarTint
public class MatchActionBarActivity extends Activity {
@Overrideprotected void onCreate(Bundle savedInstanceState) {super.onCreate(savedInstanceState);setContentView(R.layout.activity_match_actionbar);//用户的API是否大于19,即android 4.4if (Build.VERSION.SDK_INT >= Build.VERSION_CODES.KITKAT) {setTranslucentStatus(true);SystemBarTintManager tintManager = new SystemBarTintManager(this);tintManager.setStatusBarTintEnabled(true);//允许对状态栏着色tintManager.setNavigationBarTintEnabled(true);//允许对导航栏(即返回键那一栏)着色tintManager.setStatusBarTintResource(R.color.statusbar_bg);//设置状态栏颜色tintManager.setNavigationBarTintResource(R.color.statusbar_bg);//设置导航栏的颜色//tintManager.setTintColor(0xff00ff00);//设置状态栏和导航栏的颜色}}//当Activity的theme="@style/ActionBarTheme"时,必须执行下面的代码才可以设置状态栏颜色private void setTranslucentStatus(boolean on) {Window win = getWindow();WindowManager.LayoutParams winParams = win.getAttributes();final int bits = WindowManager.LayoutParams.FLAG_TRANSLUCENT_STATUS;//透明状态栏if (on) winParams.flags |= bits;else winParams.flags &= ~bits;win.setAttributes(winParams);}}<ScrollView xmlns:android="http://schemas.android.com/apk/res/android"
android:layout_width="match_parent"android:layout_height="match_parent"android:fitsSystemWindows="true"><TextViewandroid:layout_width="wrap_content"android:layout_height="wrap_content"android:text="@string/ipsum"android:textSize="18sp" /></ScrollView><activity
android:name="com.readystatesoftware.systembartint.sample.MatchActionBarActivity"android:label="@string/match_actionbar_example"android:theme="@style/ActionBarTheme" ></activity><style name="ActionBarTheme" parent="android:Theme.Holo.Light.DarkActionBar">
<item name="android:actionBarStyle">@style/ActionBarStyle</item></style>
开源框架源码
其实就是一个类,SystemBarTintManager.java
import android.annotation.SuppressLint;
import android.annotation.TargetApi;import android.app.Activity;import android.content.Context;import android.content.res.Configuration;import android.content.res.Resources;import android.content.res.TypedArray;import android.graphics.drawable.Drawable;import android.os.Build;import android.util.DisplayMetrics;import android.util.TypedValue;import android.view.Gravity;import android.view.View;import android.view.ViewConfiguration;import android.view.ViewGroup;import android.view.Window;import android.view.WindowManager;import android.widget.FrameLayout.LayoutParams;import java.lang.reflect.Method;/*** Class to manage status and navigation bar tint effects when using KitKat* translucent system UI modes.**/public class SystemBarTintManager {static {// Android allows a system property to override the presence of the navigation bar.// Used by the emulator.// See https://github.com/android/platform_frameworks_base/blob/master/policy/src/com/android/internal/policy/impl/PhoneWindowManager.java#L1076if (Build.VERSION.SDK_INT >= Build.VERSION_CODES.KITKAT) {try {Class c = Class.forName("android.os.SystemProperties");Method m = c.getDeclaredMethod("get", String.class);m.setAccessible(true);sNavBarOverride = (String) m.invoke(null, "qemu.hw.mainkeys");} catch (Throwable e) {sNavBarOverride = null;}}}/*** The default system bar tint color value.*/public static final int DEFAULT_TINT_COLOR = 0x99000000;private static String sNavBarOverride;private final SystemBarConfig mConfig;private boolean mStatusBarAvailable;private boolean mNavBarAvailable;private boolean mStatusBarTintEnabled;private boolean mNavBarTintEnabled;private View mStatusBarTintView;private View mNavBarTintView;/*** Constructor. Call this in the host activity onCreate method after its* content view has been set. You should always create new instances when* the host activity is recreated.** @param activity The host activity.*/@TargetApi(19)public SystemBarTintManager(Activity activity) {Window win = activity.getWindow();ViewGroup decorViewGroup = (ViewGroup) win.getDecorView();if (Build.VERSION.SDK_INT >= Build.VERSION_CODES.KITKAT) {// check theme attrsint[] attrs = {android.R.attr.windowTranslucentStatus,android.R.attr.windowTranslucentNavigation};TypedArray a = activity.obtainStyledAttributes(attrs);try {mStatusBarAvailable = a.getBoolean(0, false);mNavBarAvailable = a.getBoolean(1, false);} finally {a.recycle();}// check window flagsWindowManager.LayoutParams winParams = win.getAttributes();int bits = WindowManager.LayoutParams.FLAG_TRANSLUCENT_STATUS;if ((winParams.flags & bits) != 0) {mStatusBarAvailable = true;}bits = WindowManager.LayoutParams.FLAG_TRANSLUCENT_NAVIGATION;if ((winParams.flags & bits) != 0) {mNavBarAvailable = true;}}mConfig = new SystemBarConfig(activity, mStatusBarAvailable, mNavBarAvailable);// device might not have virtual navigation keysif (!mConfig.hasNavigtionBar()) {mNavBarAvailable = false;}if (mStatusBarAvailable) {setupStatusBarView(activity, decorViewGroup);}if (mNavBarAvailable) {setupNavBarView(activity, decorViewGroup);}}/*** Enable tinting of the system status bar.** If the platform is running Jelly Bean or earlier, or translucent system* UI modes have not been enabled in either the theme or via window flags,* then this method does nothing.** @param enabled True to enable tinting, false to disable it (default).*/public void setStatusBarTintEnabled(boolean enabled) {mStatusBarTintEnabled = enabled;if (mStatusBarAvailable) {mStatusBarTintView.setVisibility(enabled ? View.VISIBLE : View.GONE);}}/*** Enable tinting of the system navigation bar.** If the platform does not have soft navigation keys, is running Jelly Bean* or earlier, or translucent system UI modes have not been enabled in either* the theme or via window flags, then this method does nothing.** @param enabled True to enable tinting, false to disable it (default).*/public void setNavigationBarTintEnabled(boolean enabled) {mNavBarTintEnabled = enabled;if (mNavBarAvailable) {mNavBarTintView.setVisibility(enabled ? View.VISIBLE : View.GONE);}}/*** Apply the specified color tint to all system UI bars.** @param color The color of the background tint.*/public void setTintColor(int color) {setStatusBarTintColor(color);setNavigationBarTintColor(color);}/*** Apply the specified drawable or color resource to all system UI bars.** @param res The identifier of the resource.*/public void setTintResource(int res) {setStatusBarTintResource(res);setNavigationBarTintResource(res);}/*** Apply the specified drawable to all system UI bars.** @param drawable The drawable to use as the background, or null to remove it.*/public void setTintDrawable(Drawable drawable) {setStatusBarTintDrawable(drawable);setNavigationBarTintDrawable(drawable);}/*** Apply the specified alpha to all system UI bars.** @param alpha The alpha to use*/public void setTintAlpha(float alpha) {setStatusBarAlpha(alpha);setNavigationBarAlpha(alpha);}/*** Apply the specified color tint to the system status bar.** @param color The color of the background tint.*/public void setStatusBarTintColor(int color) {if (mStatusBarAvailable) {mStatusBarTintView.setBackgroundColor(color);}}&nbs
以上是关于沉浸式状态栏的主要内容,如果未能解决你的问题,请参考以下文章
