Retrofit2 初印象
Posted KdanMin
tags:
篇首语:本文由小常识网(cha138.com)小编为大家整理,主要介绍了Retrofit2 初印象相关的知识,希望对你有一定的参考价值。
鄙人由于工作繁忙很久没写博客了还望大家谅解!之前csdn登不上,算了不说借口了,retrofit2相信已经很火了吧,而且上手也比较容易,之前可能大家都是用Volley,Okhttp、Okhttp3其实大同小异,最近由于项目需要,之前大家相信很多人在用鸿神的okhttpUitl工具类,其实鸿神也写过一篇关于Retrofit2的文章感兴趣的童鞋异移步到这里这么晚还开车真是不容易啊!没办法自己太菜了!我去!
注解
retrofit通过使用注解来简化请求,大体分为以下几类:
1.用于标注请求方式的注解
2.用于标记请求头的注解
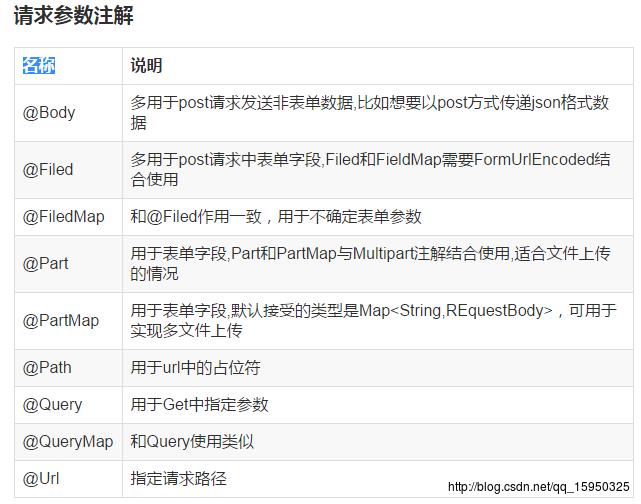
3.用于标记请求参数的注解
4.用于标记请求和响应格式的注解
请求方法注解
| @GET | get请求 |
|---|---|
| @PUT | put请求 |
| @POST | post请求 |
| @PATCH | patch请求,该请求是对put请求的补充,用于更新局部资源 |
| @delete | delete请求 |
| @HEAD | head请求 |
| @OPTIONS | option请求 |
| @HTTP | 通用注解,可以替换以上所有的注解,其拥有三个属性:method,path,hasBody |
请求头注解
| 注解 | 说明 |
|---|---|
| @Headers | 用于添加固定请求头,可以同时添加多个。通过该注解添加的请求头不会相互覆盖,而是共同存在 |
| @Header | 作为方法的参数传入,用于添加不固定值的Header,该注解会更新已有的请求头 |
请求参数头注解

请求和响应格式注解

简单使用
首先介绍的是get请求方式
 public interface AppInfoStore{
         /**Get请求不需要以/开头**/
        @GET("index.php?route=app/index/init")
            /**Call<T>里面是个泛型所以里面既可以是ReponseBody也可以是String或者JavaBean对象**/
        Call<AppInfo> init(@Query("version_code")String version_code);
        /**RXJava 观察者**/
        @GET("index.php?route=app/index/init")
        Observable<AppInfo> initRx(@Query("version_code")String version_code);
}- 第一步创建ApiClient
- 利用GsonFormat生成对应的Bean
- 然后在主Activity中进行接口联调
package zm.visoport.com.retrofitproject.weather;

import retrofit2.Retrofit;
import retrofit2.adapter.rxjava.RxJavaCallAdapterFactory;
import retrofit2.converter.gson.GsonConverterFactory;
import retrofit2.http.GET;
import retrofit2.http.Query;
import rx.Observable;
import zm.visoport.com.retrofitproject.register.AppInfo;

/**
 * @author zm
 */

public class AppInfoClient {

    static Retrofit mRetrofit = null;
    /**
    *创建Retrofit实例并返回
    **/
    public static Retrofit getAppInfo() {
        if (mRetrofit == null) {
            mRetrofit = new Retrofit.Builder()
           //添加rxjava的支持       .baseUrl("http://www.cnyouyao.com/").addCallAdapterFactory(RxJavaCallAdapterFactory.create()).addConverterFactory(GsonConverterFactory.create())
                    .build();
        }
        return mRetrofit;
    }
    public interface AppInfoStore{
//        @GET("index.php?route=app/index/init")
//        Call<AppInfo> init(@Query("version_code")String version_code);
        @GET("index.php?route=app/index/init")
        Observable<AppInfo> initRx(@Query("version_code")String version_code);
    }
}
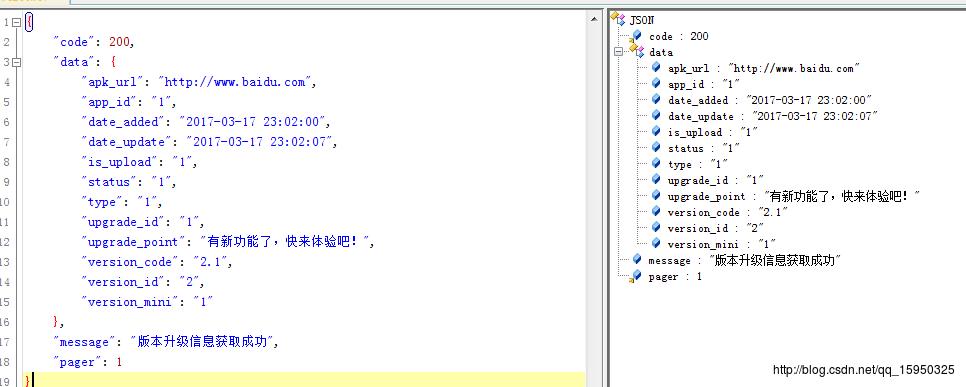
第二步进行bean的创建这里用的是hijson格式化json数据

GsonFormat生成对应Bean实体
package zm.visoport.com.retrofitproject.register;

/**
 * @author zm
 * bean序列化
 */

public class AppInfo implements Serializable {
    private AppInfo appInfo;

    public AppInfo getAppInfo() {
        return appInfo;
    }

    public void setAppInfo(AppInfo appInfo) {
        this.appInfo = appInfo;
    }
    /**
     * code : 200
     * data : {"apk_url":"http://www.baidu.com","app_id":"1","date_added":"2017-03-17 23:02:00","date_update":"2017-03-17 23:02:07","is_upload":"1","status":"1","type":"1","upgrade_id":"1","upgrade_point":"有新功能了,快来体验吧!","version_code":"2.1","version_id":"2","version_mini":"1"}
     * message : 版本升级信息获取成功
     * pager : 1
     */
     /**服务器状态码 例如200 响应成功**/
    private int code;
    /**服务器返回的数据 可以是对象 Object 或者数据 Array[]**/
    private DataBean data;
    /**服务器返回的Message 例如版本升级信息获取成功等**/
    private String message;
    /**默认只有一页数据 返回1**/
    private int pager;

    public int getCode() {
        return code;
    }

    public void setCode(int code) {
        this.code = code;
    }

    public DataBean getData() {
        return data;
    }

    public void setData(DataBean data) {
        this.data = data;
    }

    public String getMessage() {
        return message;
    }

    public void setMessage(String message) {
        this.message = message;
    }

    public int getPager() {
        return pager;
    }

    public void setPager(int pager) {
        this.pager = pager;
    }

    public static class DataBean {
        /**
         * apk_url : http://www.baidu.com
         * app_id : 1
         * date_added : 2017-03-17 23:02:00
         * date_update : 2017-03-17 23:02:07
         * is_upload : 1
         * status : 1
         * type : 1
         * upgrade_id : 1
         * upgrade_point : 有新功能了,快来体验吧!
         * version_code : 2.1
         * version_id : 2
         * version_mini : 1
         */

        private String apk_url;
        private String app_id;
        private String date_added;
        private String date_update;
        private String is_upload;
        private String status;
        private String type;
        private String upgrade_id;
        private String upgrade_point;
        private String version_code;
        private String version_id;
        private String version_mini;

        public String getApk_url() {
            return apk_url;
        }

        public void setApk_url(String apk_url) {
            this.apk_url = apk_url;
        }

        public String getApp_id() {
            return app_id;
        }

        public void setApp_id(String app_id) {
            this.app_id = app_id;
        }

        public String getDate_added() {
            return date_added;
        }

        public void setDate_added(String date_added) {
            this.date_added = date_added;
        }

        public String getDate_update() {
            return date_update;
        }

        public void setDate_update(String date_update) {
            this.date_update = date_update;
        }

        public String getIs_upload() {
            return is_upload;
        }

        public void setIs_upload(String is_upload) {
            this.is_upload = is_upload;
        }

        public String getStatus() {
            return status;
        }

        public void setStatus(String status) {
            this.status = status;
        }

        public String getType() {
            return type;
        }

        public void setType(String type) {
            this.type = type;
        }

        public String getUpgrade_id() {
            return upgrade_id;
        }

        public void setUpgrade_id(String upgrade_id) {
            this.upgrade_id = upgrade_id;
        }

        public String getUpgrade_point() {
            return upgrade_point;
        }

        public void setUpgrade_point(String upgrade_point) {
            this.upgrade_point = upgrade_point;
        }

        public String getVersion_code() {
            return version_code;
        }

        public void setVersion_code(String version_code) {
            this.version_code = version_code;
        }

        public String getVersion_id() {
            return version_id;
        }

        public void setVersion_id(String version_id) {
            this.version_id = version_id;
        }

        public String getVersion_mini() {
            return version_mini;
        }

        public void setVersion_mini(String version_mini) {
            this.version_mini = version_mini;
        }
    }
}
第三步接口调用
根据一般请求跟rx请求方式
 @OnClick({R.id.btn_retrofit2,R.id.btn_retrofitrx})
    public void onViewClicked(View view) {
        switch (view.getId()) {
            case R.id.btn_retrofit2:
            /**获取App版本信息**/
                getAppInfo();
//                getWeather();
                break;
                /**RXJava请求方式**/
            case R.id.btn_retrofitrx:
                getRXAppInfo();
                break;
        }
    }
private void getAppInfo() {
AppInfoClient.AppInfoStore app = AppInfoClient.getAppInfo().create(AppInfoClient.AppInfoStore.class);
Call<AppInfo> call = app.init("2.1");
call.enqueue(new Callback<AppInfo>() {
@Override
public void onResponse(Call<AppInfo> call, Response<AppInfo> response) {
/**请求成功的回调**/
if (response.isSuccessful()) {
String appInfo = response.body().getData().getVersion_code() + "\\n" +
response.body().getData().getApk_url() + "\\n" +
response.body().getData().getVersion_id() + "\\n" +
response.body().getData().getDate_update() + "\\n";
tvResult.setText("版本信息如下:"+appInfo);
// tvRetrofit.setText(response.body().getAppInfo().getCode()+"\\n"
// +response.body().getMessage()+"\\n"+
// response.body().getAppInfo().getPager());
}
}
@Override
public void onFailure(Call<AppInfo> call, Throwable t) {
Log.i(TAG, "onFailure: " + call.request());
/**请求失败的回调**/
}
});
}
private void getRXAppInfo() {
AppInfoClient.AppInfoStore app = AppInfoClient.getAppInfo().create(AppInfoClient.AppInfoStore.class);
// Call<AppInfo> call=app.init("2.1");
final Observable<AppInfo> ob = app.initRx("2.1");
ob.subscribeOn(Schedulers.io())
.observeOn(androidSchedulers.mainThread())
.subscribe(new Subscriber<AppInfo>() {
/**请求完成**/
@Override
public void onCompleted() {
Log.i(TAG, "onCompleted: ");
}
/**请求失败**/
@Override
public void onError(Throwable e) {
Log.i(TAG, "onError: " + e.getMessage());
}
//获取网络数据并成功返回
@Override
public void onNext(AppInfo appInfo) {
tvRetrofit.setText("版本号:"+appInfo.getData().getVersion_code());
}
});
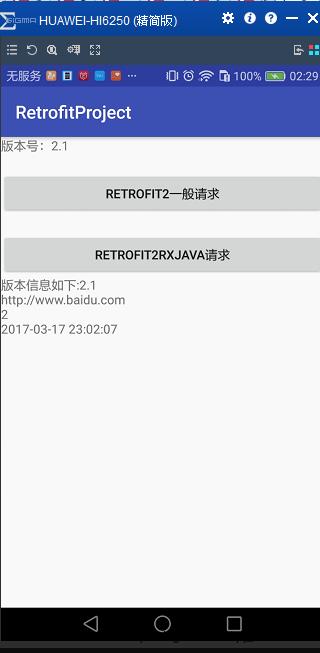
}成功返回数据如图所示

经典文章推荐
《入门篇》
Retrofit2 入门
Retrofit2.0起步篇
Android Retrofit 2.0使用
《进阶篇》
Retrofit2 源码解析
[Retrofit2 完全解析 探索与okhttp之间的关系]
写到最后:
到这里基本的印象已经完成,具体项目还是您自己根据自己的魔板进行分析,很久没写博客了这个点大家应该都睡了!我赶快睡!一直听着外面的雨声滴答滴答跟钟一样,声声入耳!睡觉去了!转载请注明出处http://blog.csdn.net/qq_15950325/article/details/72235028
以上是关于Retrofit2 初印象的主要内容,如果未能解决你的问题,请参考以下文章