文件查找工具locate与find
Posted
tags:
篇首语:本文由小常识网(cha138.com)小编为大家整理,主要介绍了文件查找工具locate与find相关的知识,希望对你有一定的参考价值。
写在前面:
博客书写牢记5W1H法则:What,Why,When,Where,Who,How。
本篇主要内容:
● locate用法
● 使用find基于文件属性进行查找
locate与find简介:
locate与find都是文件查找工具(区别与grep等文本查找工具),尤其是find,可根据文件的诸多属性(如文件大小、属主属组、权限信息、修改时间等),对文件进行实时查找
locate:
1、查找默认数据库文件/var/lib/mlocate/mlocate.db,所以查找速度快,非实时,每天自动更新数据库。手动更新用updatedb命令。
2、既然直接查找数据库文件,所以也不用指定查找路径。
3、自动更新遵循配置文件/etc/updatedb.conf。会排除一些目录及某些字符串结尾的文件。
4、默认情况下,PATTERN包含在整个路径中,不是精确匹配文件名。
find:
实时查找工具,通过遍历指定路径下的文件系统完成文件查找;
工作特点:
查找速度略慢;
精确查找;
实时查找;
locate
find files by name
locate [OPTION]... PATTERN...
-b, --basename:只匹配基名
-i, --ignore-case
-r, --regexp REGEXP
默认支持通配符(glob)
实例:
   #查找文件或路径名包含file的文件
[[email protected] ~]# locate ‘file‘
/usr/share/vim/vimfiles/after/lang
/var/db/Makefile
/var/lib/yum/rpmdb-indexes/file-requires
省略输出...
   #使用locate查找以".repo"结尾的文件或目录
locate -b -r ‘\.repo$‘
find
search for files in a directory hierarchy
find [-L] [-P] [path...] [expression]
GNU find会自左向右的查找以给定目录为根的目录树,知道查找到结果后,会继续匹配下一个文件。find默认支持使用glob(通配符),欲使用正则表达式,需要使用额外选项。
-P:不展开软链接,当搜索到软链接时,按链接本身对待,而不是查找原文件。默认选项。
-L:展开软链接,当搜索到指向目录的软链接时,查看的文件类型是目录内文件的,而不是软链接本身。除非链接损坏。
语法:
find [OPTION]... [查找路径] [查找条件] [处理动作]
OPTION:
-maxdepth levels:查找的最深路径,当前目录下是1
-mindepth levels:查找的最浅路径
查找条件:
根据文件名称:
-name pattern:匹配文件名,只匹配基名
-iname pattern:文件名忽略大小写,只匹配基名
-regex pattern:匹配整个路径,而不只是基名
实例:
   #查找/etc/目录,文件名为*.repo的文件
find /etc -name ‘*.repo‘
   #查找/etc/目录,文件名中包含忽略大小写"centos"的文件
find /etc -iname ‘*centos*‘
   #查找整个路径中以shell/1.sh结尾的文件,例如想查找文件名为1.sh的文件,但只记得其父目录为shell,不记得其他信息:
find / -regex ‘.*shell/1.sh‘
根据属主、属组查找:
-user uname
-uid n
-group gname
-gid n
-nouser
-nogroup
实例:
   #查找/var /home /etc /tmp目录中没有属主的文件
find /var /home /etc /tmp -nouser
根据文件类型查找:
-type c
文件类型字符表示:b(block) c(charecter) d(directory) p(pipe) f(regular file) l(symbolic link) s(socket) D(door)
实例:
   #查找/dev目录下,文件类型为块设备(block),名称以sd开头的文件
find /dev -type b -name ‘sd*‘
条件组合:
\( expr \):分组,注意两边都保留空格
! expr或-not expr:逻辑非
expr1 expr2或expr1 -a expr2或expr1 -and expr2:逻辑与
expr1 -o expr2或expr1 -or expr2:逻辑或
expr1 , expr2:只匹配expr2的结果,expr1不起作用
条件组合法则:
!A -a !B = !(A -o B)
!A -o !B = !(A -a B)
实例:
   #找出/tmp目录下,属主不是root,且文件名不是fstab的文件
find /tmp -not -user root -a -not -name ‘fstab‘
  或
find /tmp -not \( -user root -o -name ‘fstab‘  \)
   #找出/tmp目录下,属主不是root,或属组不是root的文件
find /tmp \( -not -user ‘root‘ \) -o \( -not -group ‘root‘ \)
  或
find /tmp -not \( -user ‘root‘ -a -group ‘root‘ \)
根据文件大小来查找:
-size [+|-]n[cwbkMG]
单位:c(bytes) w(two-byte words) b(512-byte blocks,默认) k(1024bytes) M(1048576 bytes) G(1073741824 bytes)
+n:表示大于n单位
-n:表示小于n单位
find的计算方式与ls -l不同,如查找2k的文件,find会找到1-2k的文件
   #查找/etc目录下,文件大小为1M的文件
[[email protected] ~]# find /etc -size 2M
/etc/selinux/targeted/contexts/files/file_contexts.bin
[[email protected] ~]# ls -lh /etc/selinux/targeted/contexts/files/file_contexts.bin
-rw-------. 1 root root 1.3M Mar  8 22:58 /etc/selinux/targeted/contexts/files/file_contexts.bin
  #可以看到文件大小只有1.3M,但却被find理解为2M的文件,请一定注意!

   #查找/etc目录下,文件大小大于2M的文件
[[email protected] ~]# find /etc -size +2M | xargs ls -ldh
-rw-r--r--. 1 root root 3.6M Mar  8 22:58 /etc/selinux/targeted/policy/policy.29
-r--r--r--. 1 root root 6.7M Mar  3 18:59 /etc/udev/hwdb.bin
   #查找/etc目录下,文件大小小于2M的文件
[[email protected] ~]# find /etc -size -2M | grep file_contexts.bin
[[email protected] ~]#
  #可以看到查找结果中并没有上面例子中出现的文件大小为1.3M的文件,因为find会认为小于2M是0-(2-1)M。
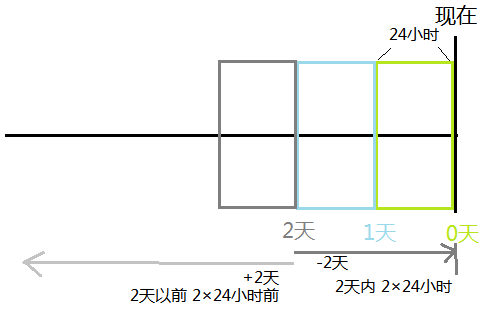
根据时间戳:
-atime [+|-]n:atime属性在第n天[前|内]
-ctime [+|-]n:ctime属性。。。
-mtime [+|-]n:mtime。。。
-amin [+|-]n:atime在第n分钟[前|内]
-cmin [+|-]n:ctime。。。
-mmin [+|-]n:mtime。。。
-anewer file:atime比file文件新(晚)
-cnewer file:ctime。。。
-newer file:mtime。。。
注意:以天为单位,从0开始计数,0表示过去24小时,如图:
实例:
   #查找/tmp目录下,访问时间在24小时内的文件并详细显示
[[email protected] ~]# date +"%F %T"
2016-03-10 10:37:26
[[email protected] ~]# find /tmp -atime 0 | xargs ls -ld --time atime -t --full-time
drwxrwxrwt. 16 root    root    4096 2016-03-10 10:35:34.037896700 +0800 /tmp
drwxr-x-w-.  2 root    root      18 2016-03-09 21:54:19.443113494 +0800 /tmp/xx
-rw-r--r--.  1 root    root      58 2016-03-09 18:30:40.551043611 +0800 /tmp/date.log
-rw-r--r--.  1 root    root     196 2016-03-09 18:30:40.551043611 +0800 /tmp/memory.txt
drwxr-xr-x.  2 root    root      38 2016-03-09 11:13:18.426879619 +0800 /tmp/vmware-config0
drwx------.  2 root    root    4096 2016-03-09 11:13:18.426879619 +0800 /tmp/vmware-root
drwxrwxr-x.  3 mageedu mageedu   18 2016-03-09 11:13:17.844872897 +0800 /tmp/mageedu
   #查找当前路径下,比functions.bak文件内容改动时间更新(晚)的文件
[[email protected] ~]# ls -l --full-time functions.bak
-rw-r--r--. 1 root root 14391 2016-03-09 16:46:30.772901402 +0800 functions.bak
[[email protected] ~]# find . -newer functions.bak | xargs ls -ld --full-time -t
drwxr-xr-x. 2 root root    29 2016-03-10 10:32:38.310467090 +0800 ./.cache/abrt
-rw-------. 1 root root    11 2016-03-10 10:32:38.309467082 +0800 ./.cache/abrt/lastnotification
dr-xr-x---. 7 root root  4096 2016-03-10 10:32:38.297466990 +0800 .
-rw-------. 1 root root   268 2016-03-10 10:32:38.297466990 +0800 ./.Xauthority
-rw-------. 1 root root 20626 2016-03-10 10:28:12.176531057 +0800 ./.bash_history
-rw-------. 1 root root  6877 2016-03-10 10:28:05.687488818 +0800 ./.viminfo
-rw-------. 1 root root    81 2016-03-09 23:47:30.380374947 +0800 ./.lesshst
drwxr-xr-x. 2 root root    54 2016-03-09 22:12:39.964026062 +0800 ./test
-rw-r--r--. 1 root root     0 2016-03-09 22:12:39.964026062 +0800 ./test/1.sh
-rw-r--r--. 1 root root   527 2016-03-09 17:27:20.207755863 +0800 ./.ssh/known_hosts
根据权限查找:
-perm mode:指定准确权限
-perm -mode:ugo三组都必须满足mode,实际权限可以大于mode
-perm /mode:ugo三组有一组满足mode即可
实例:
   #查找$PATH路径下下,所有用户都有执行权限,且其它用户有写权限的普通文件
[[email protected] ~]# find `echo $PATH | tr ‘:‘ ‘ ‘` -perm /113 -type f
省略输出....
/usr/bin/screen
/usr/bin/koi8rxterm
/usr/bin/resize
/usr/bin/stap-merge
/usr/bin/stap-report
/usr/bin/catman
   #查找/etc目录下至少有一类用户没有执行权限的文件;
[[email protected] ~]# find /etc/ -not -perm -111
省略输出....
-rw-r--r--. 1 root    root           6 Dec  9 17:59 /etc/yum/vars/infra
-rw-r--r--. 1 root    root         444 Dec  3 23:33 /etc/yum/version-groups.conf
-rw-r--r--. 1 root    root        2534 Dec  3 23:33 /etc/yum/yum-cron.conf
-rw-r--r--. 1 root    root        2496 Dec  3 23:33 /etc/yum/yum-cron-hourly.conf
   #查找/etc目录下所有用户都没有写权限的文件
[[email protected] ~]# find /etc/ -not  -perm /222 | xargs ls -ld
-r--r--r--. 1 root root     460 Nov 20 23:07 /etc/dbus-1/system.d/cups.conf
----------. 1 root root     742 Mar  9 11:03 /etc/gshadow
----------. 1 root root     731 Mar  8 10:45 /etc/gshadow-
省略输出....
处理动作:
-delete:直接删除查找到的内容,不会提示!!!
-exec command {} \; :其中{}代表前面查到的内容
-fls file:执行-ls动作,并且把结果保存至文件
-ls:相当于ls -dils,只显示目录,显示inode,长格式,以blocks显示文件大小
-ok command {} \; 与exec类似,但会每一步操作都提示用户
-print:输出到屏幕,默认动作
-prune:修剪。排除
实例:
   #查找当前目录,并排除dir1目录,名称以file开头的文件
[[email protected] test]# mkdir dir1 dir2
[[email protected] test]# touch dir1/file{1..3}
[[email protected] test]# touch dir2/file{1..3}
[[email protected] test]# find . -path ./dir1 -prune -o -name file* -print
./dir2/file1
./dir2/file2
./dir2/file3
   #查找/var/log目录,大于1M的文件,并提示是否删除
[[email protected] ~]# find /var/log -size +1M -ok rm {} \;
< rm ... /var/log/audit/audit.log > ? n
< rm ... /var/log/messages-20160308 > ? n
   #查找/etc目录下最近一周内其内容修改过,同时属主不为root,也不是hadoop的文件或目录,将结果保存至/tmp/weekmodify.result。
[[email protected] man1]# find /etc -mtime -7 -not -user ‘root‘ -not -user ‘hadoop‘ -fls /tmp/weekmodify.result
[[email protected] man1]# cat /tmp/weekmodify.result
201327388    0 drwx------   2 polkitd  root           63 Mar  4 02:44 /etc/polkit-1/rules.d
本文出自 “FredDream” 博客,请务必保留此出处http://1036416056.blog.51cto.com/5943987/1749532
以上是关于文件查找工具locate与find的主要内容,如果未能解决你的问题,请参考以下文章

