Gitlab用户权限管理
Posted
tags:
篇首语:本文由小常识网(cha138.com)小编为大家整理,主要介绍了Gitlab用户权限管理相关的知识,希望对你有一定的参考价值。
在安装完毕gitlab后,登录到页面后,我们可以看到是没有任何项目,而且只有一个用户。在使用的时候,需要创建项目,而且会有对应的用户在项目中。下面练习这个操作
- 新建用户组
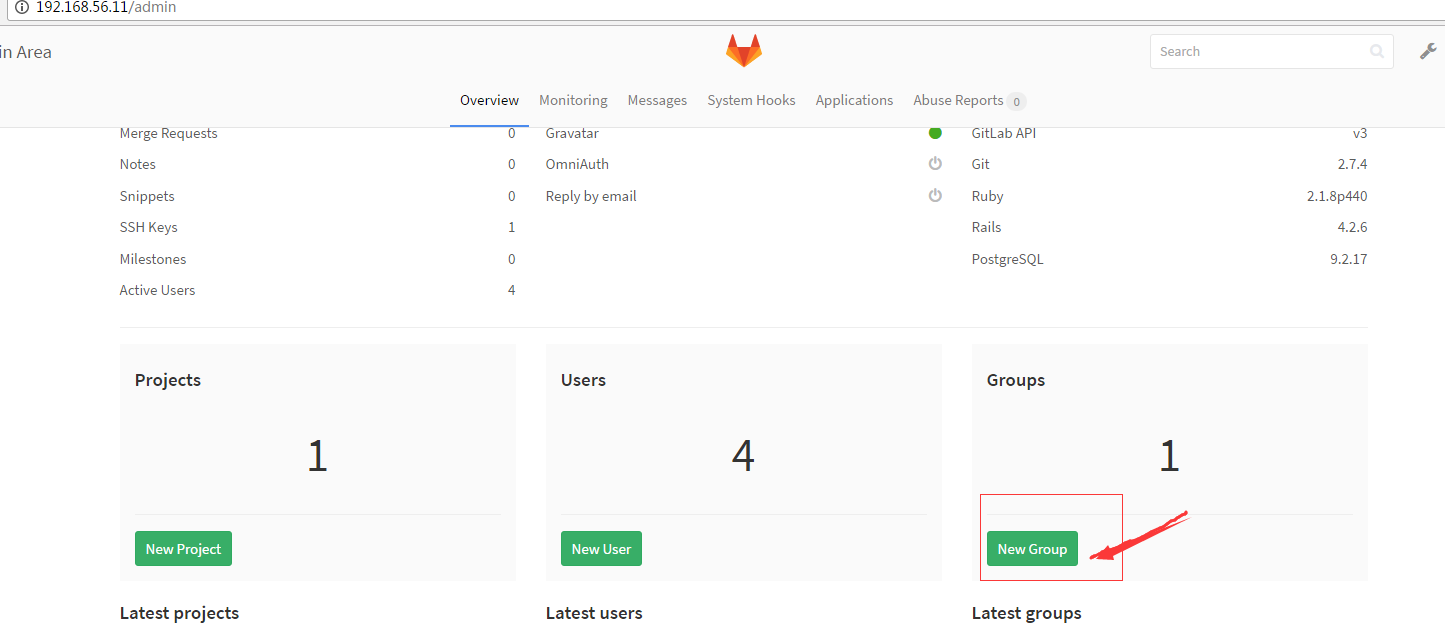
1、点击右上角的扳手按钮
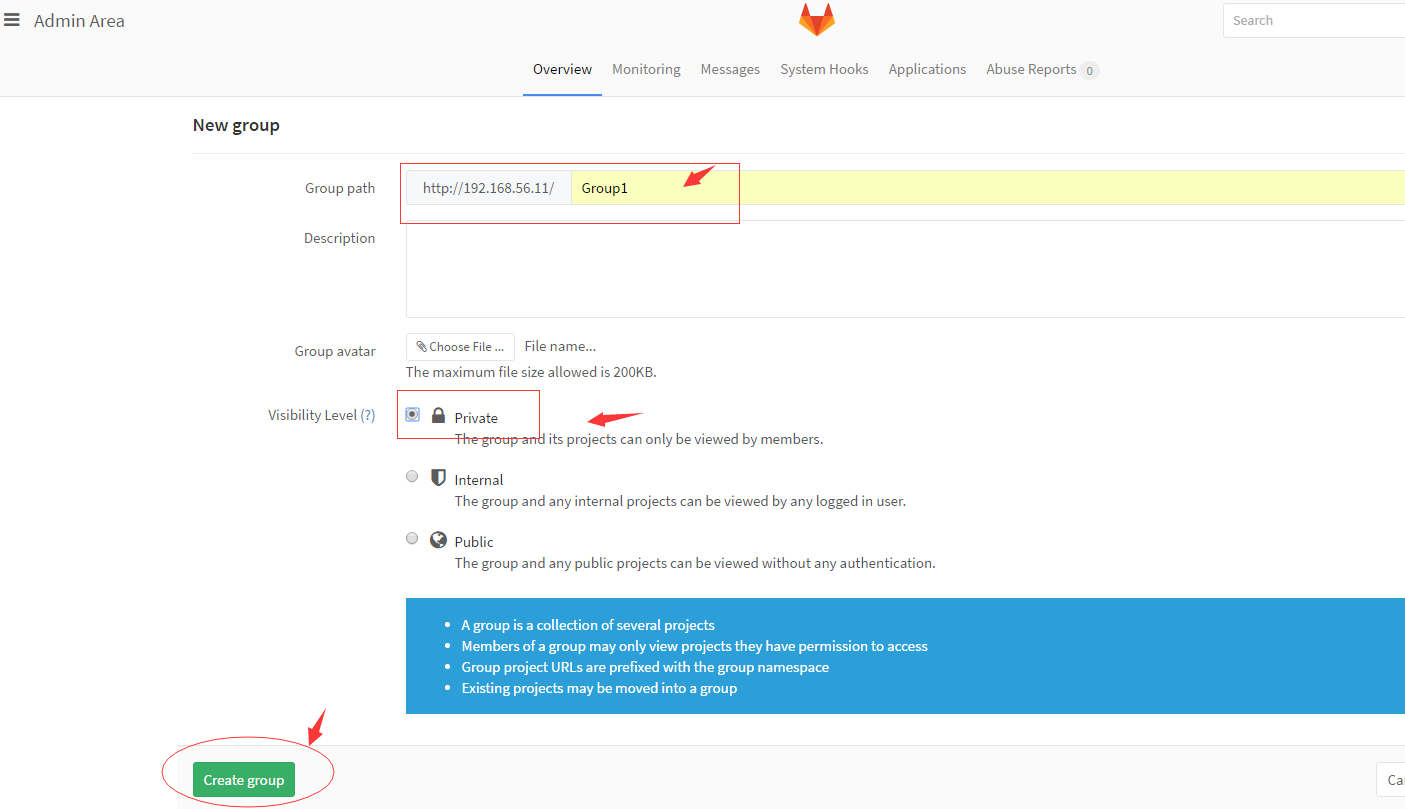
2、在弹出的对话框中选择 new group
3、Private:只有授权的用户才可以看到
Internal:只要是登录上来的用户就可以看到
Public:任何组和项目都可以看到
- 组授权
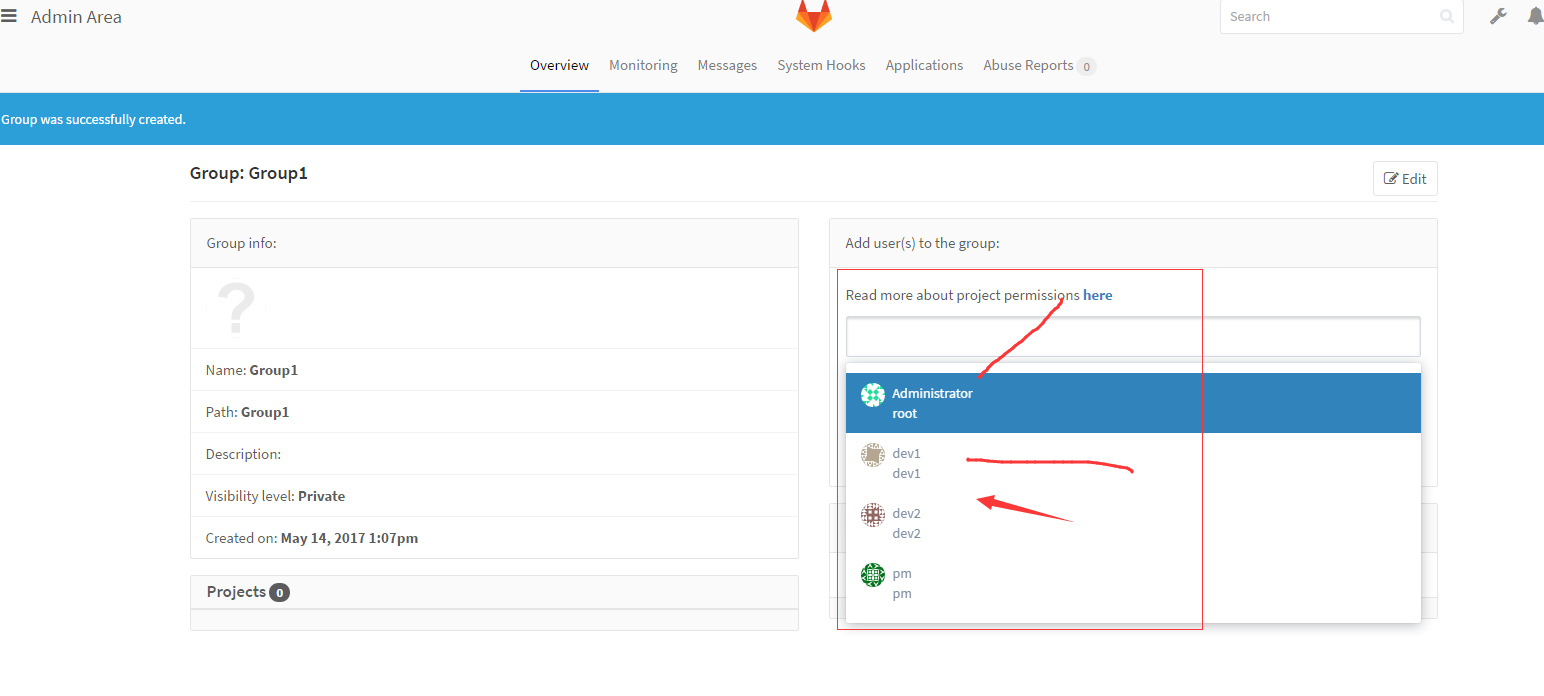
1、可以看到创建完组以后,可以给组内添加成员。下面创建几个用户
tips:一个组可以有多个项目
- 用户创建
1、点击右上角的扳手按钮
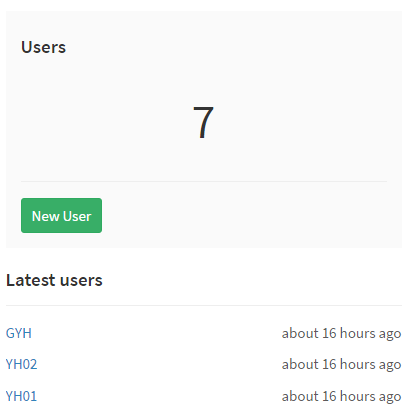
2、在弹出的对话框中选择 new user,下面创建了一个管理用户GYH,两个普通用户YH01和YH02
给用户添加到授权组中,并修改权限
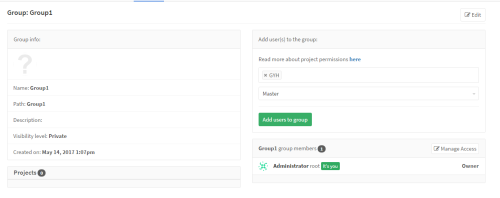
如图,这样我们就把GYH用户添加到Group1组中,并给予了master权限
- 创建项目
1、点击右上角的扳手按钮
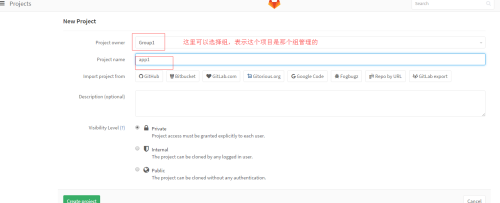
2、在弹出的对话框中选择 new project
3、选择项目拥有者
4、创建完项目,要授权项目
当我们创建完毕后,会有一个提示信息,如下,告知我们需要配置了ssh才能使用ssh协议来push或者pull这个项目
You won‘t be able to pull or push project code via SSH until you add an SSH key to your profile
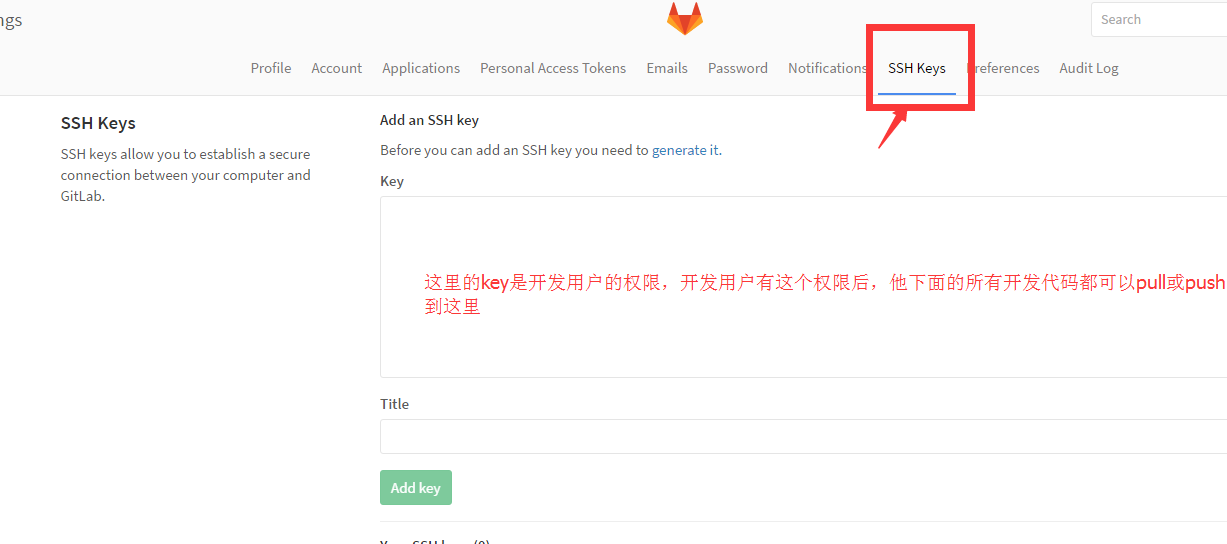
下面我们就要对这个项目做权限处理,让它可以通过ssh来pull或者push动作
点击到上面的位置后,我们需要登录到需要授权连接到gitlab的设备上面。来复制密钥到gitlab上面。
下面以Linux设备ip为56.11为例,登录到此设备上
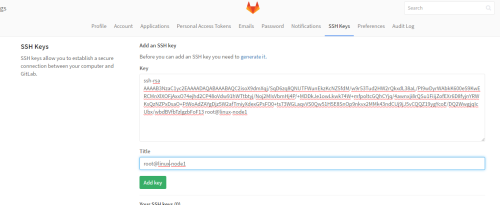
通过ssh-keygen 一路回车来生成密钥,然后拷贝pul公钥到gitlab上去
点击Addkey按钮后,就添加成功!!
这里需要注意到是,gitlab上面登录的账号是YH01 是在这个账号下添加到SSH key
如果不添加上面的ssh的话,你clone的时候会提示错误:错误提示如下图
给项目添加授权用户
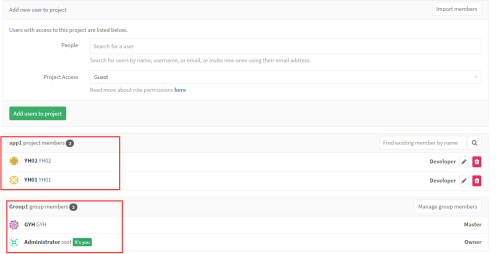
添加完毕后,这个项目拥有了4个用户,其中两个是组里面继承过来的,另外两个是这个项目的用户,如图
当完成上面的设置后,使用YH01账号登录后,在登录界面就能看到他所拥有的项目了
这个时候就可以从客户通过git glone来下载项目了
[[email protected] ~]# git clone [email protected]:Group1/app1.git
Cloning into ‘app1‘...
The authenticity of host ‘192.168.56.11 (192.168.56.11)‘ can‘t be established.
ECDSA key fingerprint is 28:3e:e9:97:c9:ff:33:16:41:23:0a:14:30:7c:5c:7f.
Are you sure you want to continue connecting (yes/no)? yes
Warning: Permanently added ‘192.168.56.11‘ (ECDSA) to the list of known hosts.
warning: You appear to have cloned an empty repository.
Checking connectivity... done.
[[email protected] ~]# ll
total 277436
-rw-------.  1 root root       990 Dec 26 18:21 anaconda-ks.cfg
drwxr-xr-x   3 root root        17 May 14 22:30 app1
这里由于app1项目是一个空的目录,下面我们在这个目录上面新建一个文件readme
然后使用git pull来测试拉取
[[email protected] app1]# git pull
remote: Counting objects: 3, done.
remote: Total 3 (delta 0), reused 0 (delta 0)
Unpacking objects: 100% (3/3), done.
From 192.168.56.11:Group1/app1
 * [new branch]      master     -> origin/master
[[email protected] app1]# ll
total 4
-rw-r--r-- 1 root root 47 May 14 22:37 readme
[[email protected] app1]# cat readme
readme创建一个床主主峰之
#这里可以看到,把master上面的readme文件拉取了下来了
二 windows客户端建立ssh免密钥登录
1、安装工具
Git-2.7.2-32-bit_setup.1457942412.exe
2、在一个目录里面选择右键,选择“Git Bash Here”,会弹出一个shell窗口,这个窗口里面执行和Linux一样的ssh密钥生成命令。结果也会生成一个密钥
[email protected] MINGW32 ~/.ssh
$ cat id_rsa.pub
ssh-rsa AAAAB3NzaC1yc2EAAAADAQABAAABAQCxfaZna8H+91hB4+GYPI2RcOzZhDleHx8sK8po5bq5wwk+tgRUSGQiLg8mA+HAxSIueylsKA0sfBCajP9k2hJ05vaOxr+UOqZ0yEytYqlQs0WIgX+VOAwkJDwGYgeZ7jZ3N0knem4GK8NRSWeoSwXseoZs9ddeFk3YVAaVykLDDngZ0YKsBkP7rjPn0JnFau8Me75cfIjuTnMVYPGY5YPJnN9MULjQvZB9mJ34E05a/4cAXZBSVKtumasBnIjTIbRFNVxcRjDohNdak1kZgdmOwMSyeCX+ADcV5vwgGZNxxWkRpOFV+W9vI/NqIpGktj7HD12XXtzxi8nnuozGe0SL [email protected]

[email protected] MINGW32 ~/.ssh
3、把windows上面这个加到YH02用户上面
4、在gitlab上用YH02登录上去,在profiles setting设置里面添加SSH Key添加上去,
5、从windows客户端上pull代码下来。
[email protected] MINGW32 ~/.ssh
$ git clone [email protected]:Group1/app1.git
Cloning into ‘app1‘...
The authenticity of host ‘192.168.56.11 (192.168.56.11)‘ can‘t be established.
ECDSA key fingerprint is SHA256:l8F7OnGgtB8t1VEWnooak1oCP6UsZ3GJx1MPhssMv04.
Are you sure you want to continue connecting (yes/no)? yes
Warning: Permanently added ‘192.168.56.11‘ (ECDSA) to the list of known hosts.
remote: Counting objects: 3, done.
remote: Total 3 (delta 0), reused 0 (delta 0)
Receiving objects: 100% (3/3), done.
Checking connectivity... done.

[email protected] MINGW32 ~/.ssh
$ ll
total 6
drwxr-xr-x 1 Tony 197121    0 五月 15 14:36 app1/
-rw-r--r-- 1 Tony 197121 1675 五月 14 11:34 id_rsa
-rw-r--r-- 1 Tony 197121  394 五月 14 11:34 id_rsa.pub
-rw-r--r-- 1 Tony 197121  175 五月 15 14:36 known_hosts

[email protected] MINGW32 ~/.ssh
$ cd app1/

[email protected] MINGW32 ~/.ssh/app1 (master)
$ ll
total 1
-rw-r--r-- 1 Tony 197121 49 五月 15 14:36 readme

[email protected] MINGW32 ~/.ssh/app1 (master)
$ cat readme
readme创建一个床主主峰之

master brach
[email protected] MINGW32 ~/.ssh/app1 (master)
$
Deploy Key
每个项目都有个deploy key,项目部署公钥(Deploy Key)允许通过SSH协议以只读的方式访问项目,不需要输入密码,而且数据是使用你上传的公钥加密传输的。与HTTPS协议相比,SSH协议的数据传输效率要更高和稳定些,支持超大项目数据的传输。使用depoly key 后发现只能pull 不能push
这个一般是给jenkins使用的。
三 gitlab开发计划实施
假设现在已经有了一个开发计划,怎么做gitlab上实施这个开发计划那????
这里我们使用管理账号GYH来当项目经理,登录到gitlab上面
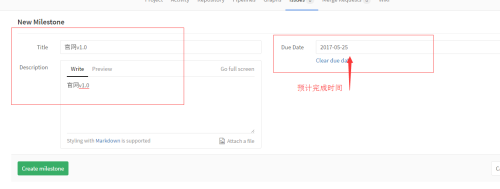
在左面的菜单中选择Milestones里程碑,--》new milestones
新建新的issue来分配任务
依次创建4个issue
当我们使用YH01或者YH02登录到gitlab时候就能看到分配给自己的任务
开发者开始开发的流程
1、首先要创建一个新的分支
(1)可以通过命令创建分支
[[email protected] app1]# git checkout -b shouye
Switched to a new branch ‘shouye‘
[[email protected] app1]# git status
On branch shouye
nothing to commit, working directory clean
(2)在页面直接创建分支,并且会以当前issue的ID来命名分支
2、在分支上开发程序,并推送到分支上
[[email protected] app1]# echo "shou ye wen jian" >index.html
[[email protected] app1]# git add .
[[email protected] app1]# git commit -m "shouye"
[shouye 1f9cf77] shouye
 1 file changed, 1 insertion(+)
 create mode 100644 index.html
[[email protected] app1]# git log
commit 1f9cf77118cc8c8ec704bc1458db128fc25f39d2
Author: kesungang <[email protected]>
Date:   Sun May 14 23:25:17 2017 +0800

    shouye

commit 34b7e533c414b0f27ab2d1e209e145bc5d0afd1b
Author: YH01 <[email protected]>
Date:   Sun May 14 22:35:42 2017 +0800

    first commit for master
[[email protected] app1]# git push origin shouye
Counting objects: 3, done.
Delta compression using up to 2 threads.
Compressing objects: 100% (2/2), done.
Writing objects: 100% (3/3), 284 bytes | 0 bytes/s, done.
Total 3 (delta 0), reused 0 (delta 0)
To [email protected]:Group1/app1.git
 * [new branch]      shouye -> shouye
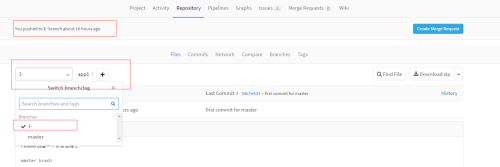
gitlab上在用户的项目里面可以查看到分支,并且点击分支,可以看到你的commit记录
3、开发完毕,分支请求合并到master分支上去
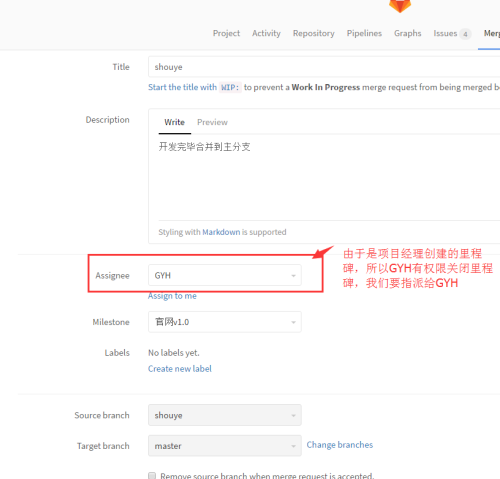
(1) 、可以从页面上的shouye分支,点击右边的Merge Request
(2)GYH项目经理登录到gitlab上,可以从有上面的小铃铛,提示有任务,如果检查没有问题,接受合并请求
(3)测试正常合并的,可以关闭分支了
(4)分支更新(其他人就可以从master上面拉下最新内容了)
[[email protected] app1]# git checkout master
Switched to branch ‘master‘
Your branch is up-to-date with ‘origin/master‘.
[[email protected] app1]# ll
total 4
-rw-r--r-- 1 root root 47 May 14 22:37 readme
[[email protected] app1]# git pull
remote: Counting objects: 1, done.
remote: Total 1 (delta 0), reused 0 (delta 0)
Unpacking objects: 100% (1/1), done.
From 192.168.56.11:Group1/app1
   34b7e53..1f84445  master     -> origin/master
 * [new branch]      1-         -> origin/1-
Updating 34b7e53..1f84445
Fast-forward
 index.html | 1 +
 1 file changed, 1 insertion(+)
 create mode 100644 index.html
[[email protected] app1]# ll
total 8
-rw-r--r-- 1 root root 17 May 15 00:13 index.html
-rw-r--r-- 1 root root 47 May 14 22:37 readme
另外一种commit 自动关闭分支任务
-rw-r--r-- 1 root root 47 May 14 22:37 readme
[[email protected] app1]#
[[email protected] app1]# git checkout -b news
Switched to a new branch ‘news‘
[[email protected] app1]# git status
On branch news
nothing to commit, working directory clean
[[email protected] app1]# echo "xinwen" >news.html
[[email protected] app1]# ll
total 12
-rw-r--r-- 1 root root 17 May 15 00:13 index.html
-rw-r--r-- 1 root root  7 May 15 00:16 news.html
-rw-r--r-- 1 root root 47 May 14 22:37 readme
[[email protected] app1]# git add .
[[email protected] app1]# git status
On branch news
Changes to be committed:
  (use "git reset HEAD <file>..." to unstage)

	new file:   news.html

[[email protected] app1]# git commit -m "close #2"#使用#2格式来提交
[news 9def595] close #2
 1 file changed, 1 insertion(+)
 create mode 100644 news.html
[[email protected] app1]# git status
On branch news
nothing to commit, working directory clean
[[email protected] app1]# git push origin news
Counting objects: 3, done.
Delta compression using up to 2 threads.
Compressing objects: 100% (2/2), done.
Writing objects: 100% (3/3), 303 bytes | 0 bytes/s, done.
Total 3 (delta 0), reused 0 (delta 0)
To [email protected]:Group1/app1.git
 * [new branch]      news -> news
本文出自 “圈中一鸟” 博客,谢绝转载!
以上是关于Gitlab用户权限管理的主要内容,如果未能解决你的问题,请参考以下文章
