基于VS2013 MFC的OPENCV3.1环境构建及测试
Posted
tags:
篇首语:本文由小常识网(cha138.com)小编为大家整理,主要介绍了基于VS2013 MFC的OPENCV3.1环境构建及测试相关的知识,希望对你有一定的参考价值。
1. 创建OPENCV工程
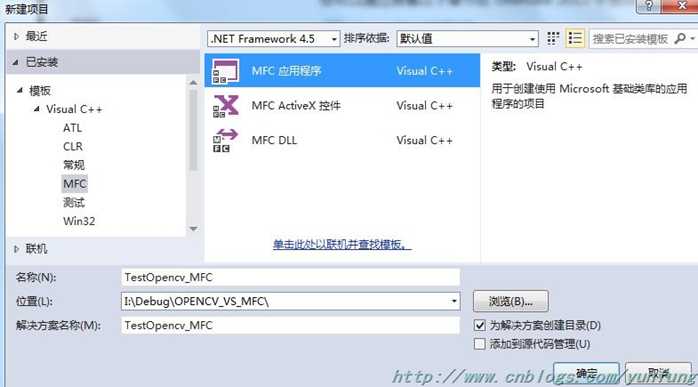
1)打开VS2013,点击新建项目->MFC应用程序,并选择保存名称及路径,如下图,
2) 点击确定进入MFC应用程序向导,设置如下,
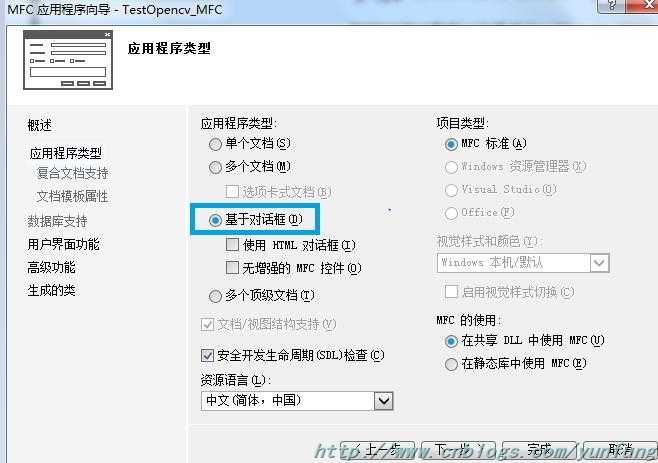
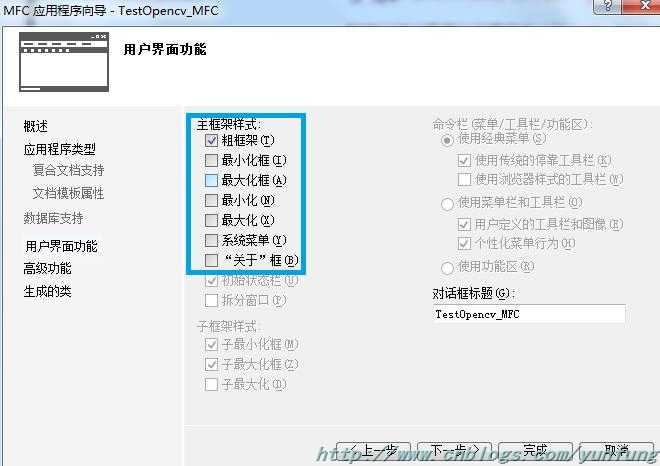
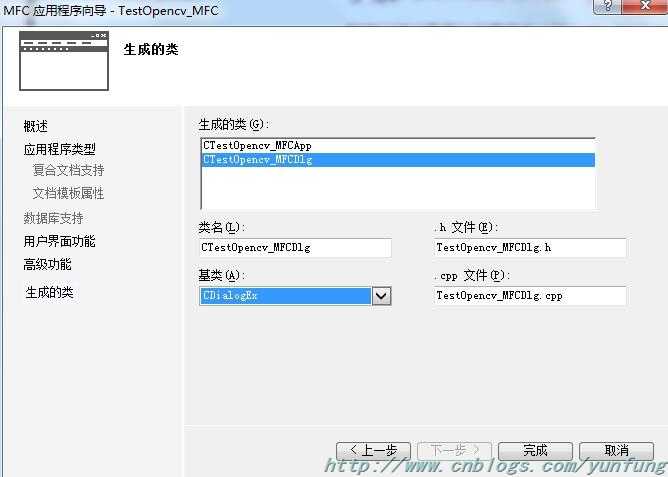
3) 配置OPENCV,具体可参考http://www.cnblogs.com/yunfung/p/6756367.html
2. MFC 界面设计
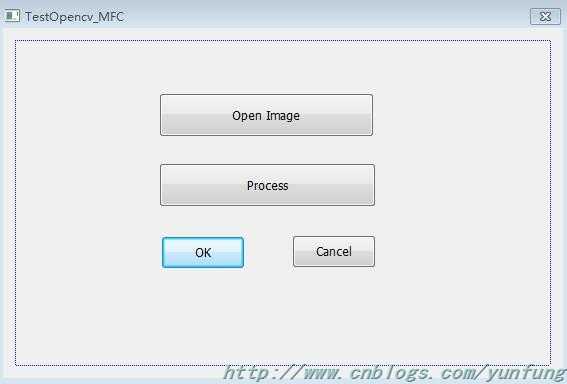
在资源视图中,双击IDD_TESTOPENCV_MFC_DIALOG,在显示的窗口中,添加两个按钮(通过工具箱中的对话框编辑器),并适当修改(单击相应对话框部件,在属性窗口中,调整Caption的显示值及ID值;如Open Image 的ID值为ID_OPEN,Process 的ID值为ID_PROCESS)及调整布局,如下图
3. 完善工程
1) 分别将相应工程文件colordetector.h、colordetector.cpp、colorDetectController.h添加到工程。注意在源文件首行添加#include "stdafx.h"定义
colordetector.h

 1 #if !defined COLORDETECT
 2 #define COLORDETECT
 3
 4 #include <opencv2/core/core.hpp>
 5 #include <opencv2/imgproc/imgproc.hpp>
 6
 7 class ColorDetector {
 8   private:
 9       int maxDist;        // minimum acceptable distance
10       cv::Vec3b target;   // target color
11       cv::Mat result;     // image containing resulting binary map
12   public:
13
14       ColorDetector() : maxDist(20), target(0,0,0){}
15
16
17       // Computes the distance from target color.
18       int getDistanceToTargetColor(const cv::Vec3b& color) const;      //  no{ }
19       int getColorDistance(const cv::Vec3b& color1, const cv::Vec3b& color2) const;
20
21       // Processes the image. Returns a 1-channel binary image.
22       cv::Mat process(const cv::Mat &image);
23
24
25       void setColorDistanceThreshold(int distance);
26       // Gets the color distance threshold
27       int getColorDistanceThreshold() const;
28
29       // Sets the color to be detected
30       void setTargetColor(uchar blue, uchar green, uchar red);
31       // Sets the color to be detected
32       void setTargetColor(cv::Vec3b color);
33
34       // Gets the color to be detected
35       cv::Vec3b getTargetColor() const;
36 };  // semicolons need
37
38 #endif
colordetector.cpp

 1 #include "stdafx.h"
 2 // Classes split .h & .cpp
 3 #include "colordetector.h"
 4 #include <vector>
 5
 6
 7 int ColorDetector::getDistanceToTargetColor(const cv::Vec3b& color) const{
 8     return getColorDistance(color, target);
 9 }
10
11 int ColorDetector::getColorDistance(const cv::Vec3b& color1, const cv::Vec3b& color2) const{
12     return abs(color1[0] - color2[0]) + abs(color1[1] - color2[1]) + abs(color1[2] - color2[2]);
13 }
14
15 void ColorDetector::setColorDistanceThreshold(int distance){
16     if (distance < 0)
17     distance = 0;
18     maxDist = distance;
19 }
20
21
22 int ColorDetector::getColorDistanceThreshold() const {
23     return maxDist;
24 }
25
26 void  ColorDetector::setTargetColor(uchar blue, uchar green, uchar red) {
27     target = cv::Vec3b(blue, green, red);
28 }
29
30 void  ColorDetector::setTargetColor(cv::Vec3b color) {
31     target = color;
32 }
33
34 cv::Vec3b ColorDetector::getTargetColor() const {
35     return target;
36 }
37
38 cv::Mat ColorDetector::process(const cv::Mat &image) {
39       // re-allocate binary map if necessary same size as input image, but 1-channel
40       result.create(image.size(),CV_8U);
41       // get the iterators
42       cv::Mat_<cv::Vec3b>::const_iterator it= image.begin<cv::Vec3b>();
43       cv::Mat_<cv::Vec3b>::const_iterator itend= image.end<cv::Vec3b>();
44       cv::Mat_<uchar>::iterator itout= result.begin<uchar>();
45       for ( ; it!= itend; ++it, ++itout)
46       {
47           // compute distance from target color
48           if (getDistanceToTargetColor(*it) < maxDist) {
49               *itout= 255;
50           }
51           else {
52               *itout= 0;
53           }
54       }
55       return result;
56 }
colorDetectController.h

 1 #if !defined CD_CNTRLLR
 2 #define CD_CNTRLLR
 3
 4 #include <opencv2/highgui/highgui.hpp>
 5 #include "colordetector.h"
 6
 7 class ColorDetectController {
 8
 9 private:
10     //create the classes required to execute the application
11     ColorDetector *cdetect;
12     //need two member variables in order to hold a reference to the input and output results
13     cv::Mat image;
14     cv::Mat result;
15 public:
16     ColorDetectController() {
17         //use a dynamic allocation for our class  setting up the application
18         cdetect = new ColorDetector();
19     }
20
21     void setColorDistanceThreshold(int distance) {
22         cdetect->setColorDistanceThreshold(distance);
23     }
24
25     int getColorDistanceThreshold() const {
26         return cdetect->getColorDistanceThreshold();
27     }
28
29     void setTargetColor(unsigned char red, unsigned char green, unsigned char blue) {
30         cdetect->setTargetColor(blue, green, red);
31     }
32
33     void getTargetColour(unsigned char &red, unsigned char &green, unsigned char &blue) const {
34         cv::Vec3b colour = cdetect->getTargetColor();
35         red = colour[2];
36         green = colour[1];
37         blue = colour[0];
38     }
39
40     bool setInputImage(std::string filename) {
41         image = cv::imread(filename);
42         return !image.empty();
43     }
44
45     const cv::Mat getInputImage() const {
46         return image;
47     }
48
49     void process() {
50         result = cdetect->process(image);
51     }
52
53     const cv::Mat getLastResult() const {
54         return result;
55     }
56
57     // Deletes all processor objects created by the controller.
58     ~ColorDetectController() {
59         delete cdetect;
60     }
61 };
62
63 #endif
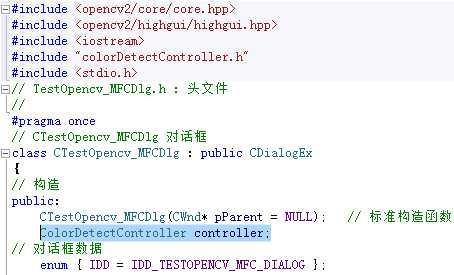
2) 在TestOpencv_MFCDlg.h中添加OPENCV相应的头文件,并创建一个ColorDetectController类对象,如下图
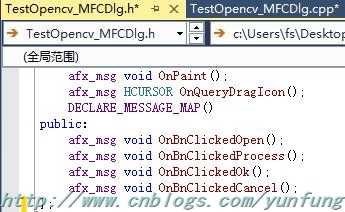
3) 在布局窗口中双击相应的部件,会将相应的代码自动添加到工程中(TestOpencv_MFCDlg.h、TestOpencv_MFCDlg.cpp),如下图
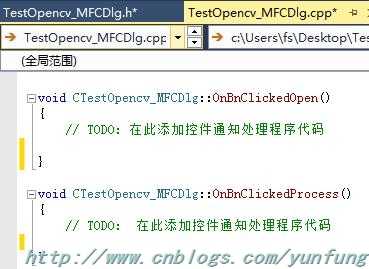
4) 填充相应CTestOpencv_MFCDlg::OnBnClickedOpen()、CTestOpencv_MFCDlg::OnBnClickedProcess()相应代码,即可完善工程
TestOpencv_MFCDlg.h

 1 #include <opencv2/core/core.hpp>
 2 #include <opencv2/highgui/highgui.hpp>
 3 #include <iostream>
 4 #include "colorDetectController.h"
 5 #include <stdio.h>
 6
 7
 8 // TestOpencv_MFCDlg.h : 头文件
 9 //
10
11 #pragma once
12
13
14 // CTestOpencv_MFCDlg 对话框
15 class CTestOpencv_MFCDlg : public CDialogEx
16 {
17 // 构造
18 public:
19     CTestOpencv_MFCDlg(CWnd* pParent = NULL);    // 标准构造函数
20
21     ColorDetectController controller;
22 // 对话框数据
23     enum { IDD = IDD_TESTOPENCV_MFC_DIALOG };
24
25     protected:
26     virtual void DoDataExchange(CDataExchange* pDX);    // DDX/DDV 支持
27 // 实现
28 protected:
29     HICON m_hIcon;
30
31     // 生成的消息映射函数
32     virtual BOOL OnInitDialog();
33     afx_msg void OnPaint();
34     afx_msg HCURSOR OnQueryDragIcon();
35     DECLARE_MESSAGE_MAP()
36 public:
37     afx_msg void OnBnClickedOpen();
38     afx_msg void OnBnClickedProcess();
39     afx_msg void OnBnClickedOk();
40     afx_msg void OnBnClickedCancel();
41 };
TestOpencv_MFCDlg.cpp

  1 // TestOpencv_MFCDlg.cpp : 实现文件
  2 //
  3
  4 #include "stdafx.h"
  5 #include "TestOpencv_MFC.h"
  6 #include "TestOpencv_MFCDlg.h"
  7 #include "afxdialogex.h"
  8
  9 #ifdef _DEBUG
 10 #define new DEBUG_NEW
 11 #endif
 12
 13
 14 // CTestOpencv_MFCDlg 对话框
 15
 16
 17
 18 CTestOpencv_MFCDlg::CTestOpencv_MFCDlg(CWnd* pParent /*=NULL*/)
 19     : CDialogEx(CTestOpencv_MFCDlg::IDD, pParent)
 20 {
 21     m_hIcon = AfxGetApp()->LoadIcon(IDR_MAINFRAME);
 22 }
 23
 24 void CTestOpencv_MFCDlg::DoDataExchange(CDataExchange* pDX)
 25 {
 26     CDialogEx::DoDataExchange(pDX);
 27 }
 28
 29 BEGIN_MESSAGE_MAP(CTestOpencv_MFCDlg, CDialogEx)
 30     ON_WM_PAINT()
 31     ON_WM_QUERYDRAGICON()
 32
 33     ON_BN_CLICKED(ID_OPEN, &CTestOpencv_MFCDlg::OnBnClickedOpen)
 34     ON_BN_CLICKED(ID_PROCESS, &CTestOpencv_MFCDlg::OnBnClickedProcess)
 35     ON_BN_CLICKED(IDOK, &CTestOpencv_MFCDlg::OnBnClickedOk)
 36     ON_BN_CLICKED(IDCANCEL, &CTestOpencv_MFCDlg::OnBnClickedCancel)
 37 END_MESSAGE_MAP()
 38
 39
 40 // CTestOpencv_MFCDlg 消息处理程序
 41
 42 BOOL CTestOpencv_MFCDlg::OnInitDialog()
 43 {
 44     CDialogEx::OnInitDialog();
 45
 46     // 设置此对话框的图标。  当应用程序主窗口不是对话框时,框架将自动
 47     //  执行此操作
 48     SetIcon(m_hIcon, TRUE);            // 设置大图标
 49     SetIcon(m_hIcon, FALSE);        // 设置小图标
 50
 51     // TODO:  在此添加额外的初始化代码
 52
 53     return TRUE;  // 除非将焦点设置到控件,否则返回 TRUE
 54 }
 55
 56 // 如果向对话框添加最小化按钮,则需要下面的代码
 57 //  来绘制该图标。  对于使用文档/视图模型的 MFC 应用程序,
 58 //  这将由框架自动完成。
 59
 60 void CTestOpencv_MFCDlg::OnPaint()
 61 {
 62     if (IsIconic())
 63     {
 64         CPaintDC dc(this); // 用于绘制的设备上下文
 65
 66         SendMessage(WM_ICONERASEBKGND, reinterpret_cast<WPARAM>(dc.GetSafeHdc()), 0);
 67
 68         // 使图标在工作区矩形中居中
 69         int cxIcon = GetSystemMetrics(SM_CXICON);
 70         int cyIcon = GetSystemMetrics(SM_CYICON);
 71         CRect rect;
 72         GetClientRect(&rect);
 73         int x = (rect.Width() - cxIcon + 1) / 2;
 74         int y = (rect.Height() - cyIcon + 1) / 2;
 75
 76         // 绘制图标
 77         dc.DrawIcon(x, y, m_hIcon);
 78     }
 79     else
 80     {
 81         CDialogEx::OnPaint();
 82     }
 83 }
 84
 85 //当用户拖动最小化窗口时系统调用此函数取得光标
 86 //显示。
 87 HCURSOR CTestOpencv_MFCDlg::OnQueryDragIcon()
 88 {
 89     return static_cast<HCURSOR>(m_hIcon);
 90 }
 91
 92
 93
 94 void CTestOpencv_MFCDlg::OnBnClickedOpen()
 95 {
 96     // TODO: 在此添加控件通知处理程序代码
 97     CFileDialog dlg(TRUE, _T("*.bmp"), NULL, OFN_FILEMUSTEXIST | OFN_PATHMUSTEXIST | OFN_HIDEREADONLY,
 98                                 _T("imagefile(*.bmp; *.jpg)|*.bmp; *.jpg|All Files(*.*)|*.*||"), NULL);
 99     dlg.m_ofn.lpstrTitle = _T("Open Image");
100     // if  a filename has been selected
101     if (IDOK == dlg.DoModal())
102     {
103
104         //std::string filename = dlg.GetPathName();
105         // Note CString  string
106
107         CString strMfc = dlg.GetPathName();
108         std::string filename = CT2CA(strMfc.GetBuffer(0));
109         // set and display the input image
110         controller.setInputImage(filename);
111         cv::imshow("Input Image", controller.getInputImage());
112     }
113
114 }
115
116
117 void CTestOpencv_MFCDlg::OnBnClickedProcess()
118 {
119     // TODO:  在此添加控件通知处理程序代码
120     // target color is hard-coded here
121     controller.setTargetColor(240, 0, 0);
122     // process the input image and display result
123     controller.process();
124     cv::imshow("Output Result", controller.getLastResult());
125 }
126
127
128 void CTestOpencv_MFCDlg::OnBnClickedOk()
129 {
130     // TODO:  在此添加控件通知处理程序代码
131     CDialogEx::OnOK();
132 }
133
134
135 void CTestOpencv_MFCDlg::OnBnClickedCancel()
136 {
137     // TODO:  在此添加控件通知处理程序代码
138     CDialogEx::OnCancel();
139 }
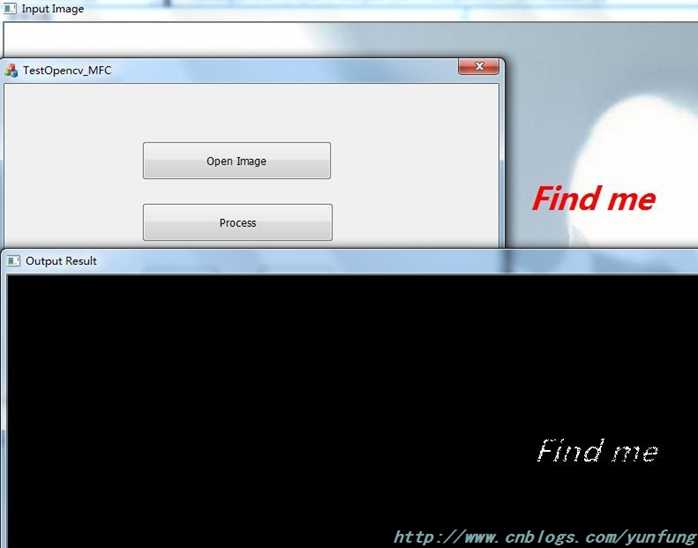
4. 运行结果
以上是关于基于VS2013 MFC的OPENCV3.1环境构建及测试的主要内容,如果未能解决你的问题,请参考以下文章
