数据可视化中数据展示效果,基于highcharts的图表数据展示
Posted
tags:
篇首语:本文由小常识网(cha138.com)小编为大家整理,主要介绍了数据可视化中数据展示效果,基于highcharts的图表数据展示相关的知识,希望对你有一定的参考价值。
最近在公司里搞对外的大屏展示,效果需要比较酷炫。
因为只是单纯的数据展示+效果,而且时间比较紧(2天时间基于一个原先的3D地球模型,制作配套十来个页面),采用jquery+highcharts
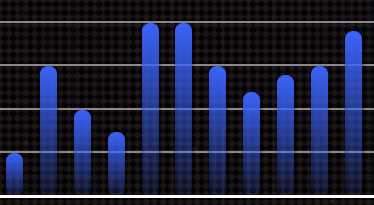
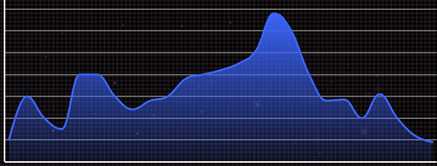
 (效果1)
(效果1)
 (效果2)
(效果2)
上面就是效果图,直接上代码,文件引入这样的问题就不说了
 1 render_chart: function (chartid, type) {
 2             let chartOption = {};
 3             switch (type) {
 4                 case "areaspline" :
 5                     chartOption.name = "效果1";
 6                     chartOption.color = "#3a63f9";
 7                     chartOption.fillColors = {                          //对渐变方向和渐变颜色的设置...
 8                         linearGradient: { x1: 0, y1: 0, x2: 0, y2: 1 },
 9                         stops: [ [0, "#3a63f9"],[1,"rgba(58,99,249,0.1)"] ]
10                     };
11                     break;
12                 case "column" :
13                     chartOption.name = "效果2";
14                     chartOption.color = {
15                         linearGradient: { x1: 0, y1: 0, x2: 0, y2: 1 },
16                         stops: [ [0, "#3a63f9"], [1, "rgba(58,99,249,0.1)"] ]
17                     };
18                     chartOption.fillColors = ‘‘;
19                     break;
20             }
21
22             $("#"+chartid).highcharts({
23                 chart: {
24                     type: type,
25                     backgroundColor: "rgba(0,0,0,0)"
26                 },
27                 exporting: {
28                     enabled:false
29                 },
30                 credits:{
31                     enabled:false
32                 },
33                 title: "",
34                 xAxis: {
35                     lineWidth: 3,
36                     lineColor: ‘#fff‘,
37                     allowDecimals: false,
38                     tickInterval: 3,
39                     tickLength: 0,
40                     labels: {
41                         style: {
42                             color: "#ffffff",
43                             fontSize: "14px"
44                         },
45                         formatter: function () {
46                             return this.value;
47                         }
48                     }
49                 },
50                 yAxis: {
51                     endOnTick: true,
52                     lineWidth: 3,
53                     lineColor: ‘#fff‘,
54                     gridLineColor: ‘#8a888a‘,
55                     tickInterval: 1000,
56                     gridLineWidth: 2,
57                     tickLength: 0,
58                     title: {
59                         text: ‘‘
60                     },
61                     labels: {
62                         style:{
63                             color: "#ffffff",
64                             fontSize: "14px"
65                         },
66                         formatter: function () {
67                             return this.value;
68                         }
69                     }
70                 },
71                 legend: {
72                     enabled: false
73                 },
74                 plotOptions: {
75                    series: {                       //效果2对数据圆角的设置
76                         borderRadius: 8,
77                         shadow: true
78                    },
79                    areaspline: {
80                         lineWidth: 4,
81                         marker: {
82                             enabled: false
83                         }
84                    }
85                 },
86                 series: [{
87                     name: type == chartOption.name,
88                     data: [1000,3000,2000,1500,4000,4000,3000,2400,2800,3000,3800,4000,4200,4500,5100,6800,6000,4000,2800,2850,2000,3100,2000,1200,900],
89                     borderWidth: 0,
90                     color: chartOption.color,
91                     fillColor: chartOption.fillColors,
92                 }]
注意对参数fillColors的设置,然后传进series里渲染
chartOption.fillColors = {linearGradient: { x1: 0, y1: 0, x2: 0, y2: 1 }, stops: [ [0, "#3a63f9"],[1,"rgba(58,99,249,0.1)"] ] };

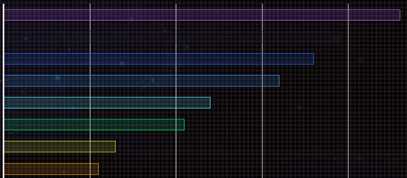
同样,如果需要设置多组数据同上一样展示(上面是两组数据的显示),在外面设置需要的效果参数,把所有的参数push进series里
_chartColumn_generation:function(){ var colors=["#2a62f7","transparent"]; var fillColors=["transparent","rgba(42,98,247,0.45)"]; var data=[[387, 682, 1057, 852, 1047, 642,777,900],[160,500,888,500,1000,300,500,400]]; var series=[]; var names=[‘name1‘,‘name2‘]; var chart_unit="Mv"; var point=[0,0.2]; $.each(data,function(i,idata){ //定义好空的数据配置,然后把需要的效果设置参数push进来,对图表进行渲染 series.push({name:names[i],data:idata,borderColor:colors[i%6],borderWidth:2,pointPadding:point[i],color:fillColors[i%6]}); //当需要不同的数据有一定的间隔时,设置pointPadding参数 }); Highcharts.chart(‘container-column-generation‘, { colors:["#000000"], chart: { type: ‘column‘, backgroundColor:‘rgba(0,0,0,0)‘ }, exporting: { enabled:false }, credits:{ enabled:false }, title: { align:‘left‘, text: ‘‘, style:{ color:‘#fff‘, fontSize:‘1em‘, } }, legend:{ enabled:false }, xAxis: { lineWidth:0, lineColor:‘#fff‘, gridLineColor:‘#8a888a‘, endOnTick:false, allowDecimals: false, tickLength:0, tickmarkPlacement: ‘between‘, categories: [‘#‘, ‘#2‘, ‘#3‘, ‘#4‘, ‘#5‘, ‘#6‘,‘#7‘,‘#8‘], labels: { style:{ color:"#ffffff", fontSize:"0.9em" } } }, yAxis: [{ lineWidth:1, lineColor:‘#fff‘, gridLineColor:‘#8a888a‘, tickLength:0, showLastLabel:false, title: { text: ‘y1‘, align:"high", rotation:0, offset:0, x:0, y:20, style:{ color:"#ffffff", fontSize:"1em" } }, labels: { style:{ color:"#ffffff", fontSize:"1em" } } },{ lineWidth:1, lineColor:‘#fff‘, opposite: true, title: { text: ‘y2‘, align:"high", rotation:0, offset:0, x:0, y:20, style:{ color:"#ffffff", fontSize:"1em" } }, }], tooltip: { shared:true, backgroundColor:"#000000", headerFormat: ‘<span style="font-size:2em;color:#ed1544"><b>{point.key}</b></span><table>‘, pointFormat: ‘<tr><td style="color:#ffffff;font-size:1.5em;padding:0">{series.name}: </td>‘ + ‘<td style="color:#ffffff;font-size:1.5em;">{point.y} ‘+chart_unit+‘</td></tr>‘, usehtml: true }, plotOptions: { column:{ enableMouseTracking:false, grouping:false //要想pointPadding参数设置有效,需要设置grouping为false } }, series: series //对数据配置项进行渲染 }); $(".highcharts-series-0 rect").slice(4,8).attr("stroke","#735bfe"); $(".highcharts-series-0 rect").slice(8,12).attr("stroke","#b95aff"); $(".highcharts-series-1 rect").slice(4,8).attr("fill","rgba(115,91,254,0.45)"); //可以设置每组数据的颜色 $(".highcharts-series-1 rect").slice(8,12).attr("fill","rgba(185,90,255,0.45)"); },

当需要颜色都不相同时,设置colors,把colors传进series即可
var colors=["#59ecf5","#2a62f7","#0bd872","#ed9915","#6523c7","#9431d2"];
或者在数据data里传入颜色参数,在从后台取数据时,把颜色数组里的色值作为一个参数传入数据中
var data = [{y:6200,borderColor:"#bb5aff",color:"rgba(187, 90, 255,0.15)"},{y:5200,borderColor:"#201a3f",color:"rgba(32, 26, 63,0.15)"},{y:5000,borderColor:"#2a62f7",color:"rgba(42, 98, 247,0.15)"}]
以上是关于数据可视化中数据展示效果,基于highcharts的图表数据展示的主要内容,如果未能解决你的问题,请参考以下文章