Rabbitmq集群部署手册
Posted
tags:
篇首语:本文由小常识网(cha138.com)小编为大家整理,主要介绍了Rabbitmq集群部署手册相关的知识,希望对你有一定的参考价值。
一、Rabbitmq集群部署手册
1、环境介绍
系统环境:Red HatEnterprise Linux Server release 6.2 (Santiago)
内核版本:Linux zxt-02.com2.6.32-220.el6.x86_64 #1 SMP Wed Nov 9 08:03:13 EST 2011 x86_64 x86_64 x86_64GNU/Linux
软件版本:otp_src_17.3;rabbitmq-server-3.2.4;Python 2.6.6;simplejson-3.3.2; haproxy-1.4.22-3.el6.x86_64.rpm
机器环境:
rabbit1 192.168.1.191
rabbit2 192.168.1.178
rabbit3 192.168.1.88
2、rabbitmq集群简介:
因为公司架构需要,最近在学习研究mq集群但是网上的各种文档,都似是而非的感觉,最后无意间点击到官网的安装文档然后就么有然后了。。。。。如果英文水平较好的读者本强烈建议略过本文档直接点击一下链接参考官方文档。
http://www.rabbitmq.com/clustering.html#issues-hostname
http://www.rabbitmq.com/man/rabbitmqctl.1.man.html
http://www.rabbitmq.com/ha.html
RabbitMQ是用erlang开发的,集群非常方便,因为erlang天生就是一门分布式语言,但其本身并不支持负载均衡。
Rabbit模式大概分为以下三种:
单一模式、普通模式、镜像模式
单一模式:最简单的情况,非集群模式。
没什么好说的。
普通模式:默认的集群模式。
对于Queue来说,消息实体只存在于其中一个节点,A、B两个节点仅有相同的元数据,即队列结构。当消息进入A节点的Queue中后,consumer从B节点拉取时,RabbitMQ会临时在A、B间进行消息传输,把A中的消息实体取出并经过B发送给consumer。所以consumer应尽量连接每一个节点,从中取消息。即对于同一个逻辑队列,要在多个节点建立物理Queue。否则无论consumer连A或B,出口总在A,会产生瓶颈。该模式存在一个问题就是当A节点故障后,B节点无法取到A节点中还未消费的消息实体。
如果做了消息持久化,那么得等A节点恢复,然后才可被消费;如果没有持久化的话,然后就没有然后了……
镜像模式:
把需要的队列做成镜像队列,存在于多个节点,属于RabbitMQ的HA方案。该模式解决了上述问题,其实质和普通模式不同之处在于,消息实体会主动在镜像节点间同步,而不是在consumer取数据时临时拉取。
该模式带来的副作用也很明显,除了降低系统性能外,如果镜像队列数量过多,加之大量的消息进入,集群内部的网络带宽将会被这种同步通讯大大消耗掉。所以在对可靠性要求较高的场合中适用
了解集群中的基本概念:
RabbitMQ的集群节点包括内存节点、磁盘节点。顾名思义内存节点就是将所有数据放在内存,磁盘节点将数据放在磁盘。不过,如前文所述,如果在投递消息时,打开了消息的持久化,那么即使是内存节点,数据还是安全的放在磁盘。一个rabbitmq集群中可以共享 user,vhost,queue,exchange等,所有的数据和状态都是必须在所有节点上复制的,一个例外是,那些当前只属于创建它的节点的消息队列,尽管它们可见且可被所有节点读取。rabbitmq节点可以动态的加入到集群中,一个节点它可以加入到集群中,也可以从集群环集群会进行一个基本的负载均衡。
集群中有两种节点:
1 内存节点:只保存状态到内存(一个例外的情况是:持久的queue的持久内容将被保存到disk)
2 磁盘节点:保存状态到内存和磁盘。
内存节点虽然不写入磁盘,但是它执行比磁盘节点要好。集群中,只需要一个磁盘节点来保存状态就足够了
如果集群中只有内存节点,那么不能停止它们,否则所有的状态,消息等都会丢失。
高可用解决思路:
那么具体如何实现RabbitMQ高可用,我们先搭建一个普通集群模式,在这个模式基础上再配置镜像模式实现高可用,Rabbit集群前增加一个反向代理,消息的生产者、消费者都通过反向代理访问RabbitMQ集群。
此次因有配图
3、RabbitMQ集群配置
1) 安装MQ
在本文档案例中 rabbit1、rabbit2、rabbit3作为rabbitmq的三个群集节点分别用安装RabbitMq-Server关于mq的安装请参考:
请参考本人之前的博客安装
(ps:据说配置外部yum源之后可以yum安装erlang和mq等软件)。
2) 配置服务器hosts文件
在安装好的三台节点服务器中分别修改/etc/hosts文件,确保三个节点能够互相解析机器名。请确保hostname文件的机器名没有错误。((注意:建议安装rabbitmq之前配置hostane和hosts文件)。
[[email protected] ~]# cat /etc/hosts
127.0.0.1   localhostlocalhost.localdomain localhost4 localhost4.localdomain4
::1         localhostlocalhost.localdomain localhost6 localhost6.localdomain6
192.168.1.195 rabbit1
192.168.1.178 rabbit2
192.168.1.9   rabbit3
3) 配置erlang群集
Rabbitmq的集群是依赖于erlang的集群来工作的,所以必须先构建起erlang的集群环境。Erlang的集群中各节点是通过一个magic cookie来实现的,这个cookie一般位于 /var/lib/rabbitmq/.erlang.cookie 或 $HOME /.erlang.cookie。文件是400的权限。所以必须保证各节点cookie保持一致,否则节点之间就无法通信。
注意:cookie所在的家目录一般是启动mq的目录,如初次安装启动mq则不会生成该文件。
将其中一台节点上的.erlang.cookie值复制下来保存到其他节点上。或者使用scp的方法也可,但是要注意文件的权限和属主属组。我们这里将rabbit1中的cookie 复制到rabbit2、rabbit3中,
[[email protected] ~]$ pwd
/home/tianyi
[[email protected] ~]$ ll .erlang.cookie
-r-------- 1 tianyi tianyi 20 Jan  8 00:00 .erlang.cookie
将rabbit1的/home/tianyi/.erlang.cookie这个文件,拷贝到rabbit2、rabbit3的同一位置(反过来亦可),该文件是集群节点进行通信的验证密钥,所有节点必须一致。拷完后启动RabbitMQ
[[email protected] ~]$ chmod 766 .erlang.cookie
[[email protected] ~]$ scp .erlang.cookie  192.168.1.178:~
[[email protected] ~]$ scp .erlang.cookie  192.168.1.88:~
[[email protected] ~]$ chmod 400 .erlang.cookie
[[email protected] ~]$ chmod 400 .erlang.cookie
[[email protected] ~]$ chmod 400 .erlang.cookie
注意:
A、复制好后别忘记还原.erlang.cookie的权限,否则可能会遇到错误.
B、尽量不要在RabbitMQ的状态下更改.erlang.cookie文件,否则执行”./rabbitmqctl sotp”关闭MQ时我出现错误。解决办法是直接kill掉RabbitMQ进程重新启动即可。
4) 启动独立节点
设置好cookie后先将三个节点的rabbitmq重启
cd  /opt/app/rabbitmq/sbin
 ##rabbitmq的安装目录
[[email protected] sbin]$ ./rabbitmq-server -detached
[[email protected] sbin]$  ./rabbitmq-server-detached
[[email protected] sbin]$  ./rabbitmq-server–detached
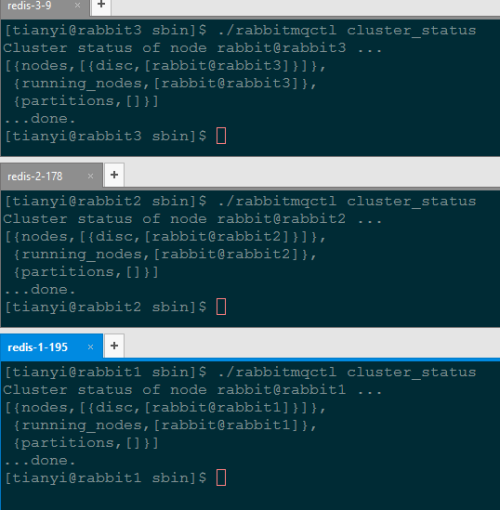
5) 查看单节点的集群状态
cd  /opt/app/rabbitmq/sbin
[[email protected] sbin]$ ./rabbitmqctlcluster_status
Cluster status of node [email protected] ...
[{nodes,[{disc,[[email protected]]}]},{running_nodes,[[email protected]]}]
...done.
[[email protected] sbin]$ ./rabbitmqctlcluster_status
Cluster status of node [email protected] ...
[{nodes,[{disc,[[email protected]]}]},{running_nodes,[[email protected]]}]
...done.
[[email protected] sbin]$ ./rabbitmqctlcluster_status
Cluster status of node [email protected] ...
[{nodes,[{disc,[[email protected]]}]},{running_nodes,[[email protected]]}]
...done.
6) 创建集群
我们将 rabbit2 和rabbit3 与rabbit1组成一个集群,我们第一次将rabbit2 与rabbit1连接。
注意:
要加入集群必须先停止rabbit2的 RabbitMQ 应用程序,加入集群后重启RabbitMQ的应用程序。
[[email protected] sbin]$ ./rabbitmqctlstop_app
Stopping node [email protected] ...done.
[[email protected] sbin]$ ./rabbitmqctljoin_cluster [email protected]
Clustering node [email protected] with [[email protected]] ...done.
[[email protected] sbin]$ ./rabbitmqctlstart_app
Starting node [email protected] ...done.
我们可以看到,两个节点连接在一个集群中运行 cluster_status 命令查看节点集群状态:
[[email protected] sbin]$ ./rabbitmqctlcluster_status
Cluster status of node [email protected] ...
[{nodes,[{disc,[[email protected],[email protected]]}]},
 {running_nodes,[[email protected],[email protected]]}]
...done.
[[email protected] sbin]$ ./rabbitmqctlcluster_status
Cluster status of node [email protected] ...
[{nodes,[{disc,[[email protected],[email protected]]}]},
 {running_nodes,[[email protected],[email protected]]}]
...done.
将rabbit3加入集群上方已经将rabbit2与rabbit1连接,也可以直接将rabbit3与rabbit1连接,同样可以加入集群中。
[[email protected] sbin]$ ./rabbitmqctlstop_app
Stopping node [email protected] ...done.
[[email protected] sbin]$ ./rabbitmqctljoin_cluster [email protected]
Clustering node [email protected] with [email protected] ...done.
[[email protected] sbin]$ ./rabbitmqctlstart_app
Starting node [email protected] ...done.
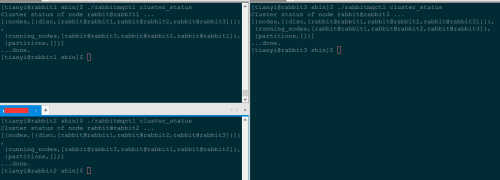
运行 cluster_status 命令,我们可以看到三个节点连接在一个集群中:
[[email protected] sbin]$ ./rabbitmqctlcluster_status
Cluster status of node [email protected] ...
[{nodes,[{disc,[[email protected],[email protected],[email protected]]}]},
 {running_nodes,[[email protected],[email protected],[email protected]]}]
...done.
[[email protected] sbin]$ ./rabbitmqctlcluster_status
Cluster status of node [email protected] ...
[{nodes,[{disc,[[email protected],[email protected],[email protected]]}]},
 {running_nodes,[[email protected],[email protected],[email protected]]}]
...done.
[[email protected] sbin]$./rabbitmqctlcluster_status
Cluster status of node [email protected] ...
[{nodes,[{disc,[[email protected],[email protected],[email protected]]}]},
 {running_nodes,[[email protected],[email protected],[email protected]]}]
...done.
如果要为集群增加新节点时,我们可以按照上面的步骤将新节点添加到集群。
7) 停止一个节点
在集群中如果要停止一个节点执行命令“rabbitmqctl stop_app”或“rabbitmqctl stop”或者可以kill掉节点的进程不影响其他节点运行(注意:如果只有一个磁盘节点,如果干掉磁盘节点后消息数据会丢失)。
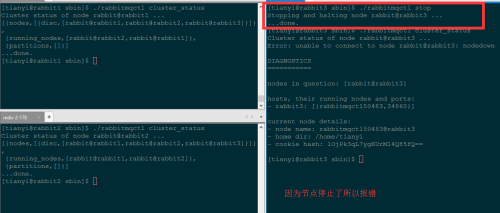
停止节点3
[[email protected] sbin]$ ./rabbitmqctlstop
Stopping and halting node [email protected] ...
...done.
查看其他节点状态:
[[email protected] sbin]$ ./rabbitmqctlcluster_status
Cluster status of node [email protected] ...
[{nodes,[{disc,[[email protected],[email protected],[email protected]]}]},
 {running_nodes,[[email protected],[email protected]]},
 {partitions,[]}]
...done.
[[email protected] sbin]$ ./rabbitmqctlcluster_status
Cluster status of node [email protected] ...
[{nodes,[{disc,[[email protected],[email protected],[email protected]]}]},
 {running_nodes,[[email protected],[email protected]]},
 {partitions,[]}]
...done.
8) 分离一个节点
上面我没已经操作过停止节点,为啥还要讲节点分离,集群节点无论任何原因停止之后只要再次启动rabbitmq此节点依然可以自动加集群。
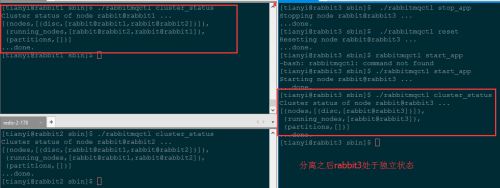
分离节点:将节点与集群完全分离,即时再启动rabbitmq进程依然无法加入集群。
[[email protected] sbin]$ ./rabbitmqctlstop_app
Stopping node [email protected] ...done.
[[email protected] sbin]$ ./rabbitmqctlreset    //重置节点
Resetting node [email protected] ...done.
[[email protected] sbin]$ ./rabbitmqctlstart_app
Starting node [email protected] ...done.
查看分离后的集群状态:
[[email protected] sbin]$ ./rabbitmqctlcluster_status    //rabbit3处于独立状态
Cluster status of node [email protected] ...
[{nodes,[{disc,[[email protected]]}]},
 {running_nodes,[[email protected]]},
 {partitions,[]}]
...done.
//rabbit1和rabbit2依然是集群。
[[email protected] sbin]$./rabbitmqctl cluster_status
Cluster status of node [email protected] ...
[{nodes,[{disc,[[email protected],[email protected]]}]},
 {running_nodes,[[email protected],[email protected]]},
 {partitions,[]}]
...done.
[[email protected] sbin]$ ./rabbitmqctlcluster_status
Cluster status of node [email protected] ...
[{nodes,[{disc,[[email protected],[email protected]]}]},
 {running_nodes,[[email protected],[email protected]]},
 {partitions,[]}]
...done.
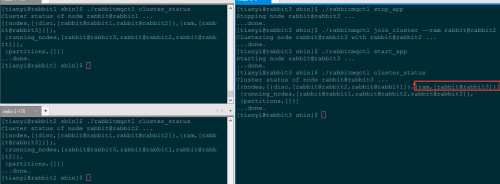
9) 创建内存节点集群
创建内存节点与创建磁盘节点的命令只多了一条“--ram”参数而已,如果需要创建内存节点方法如下。
(如果集群机器较多条件允许的话建议使用内存节点和磁盘节点混搭的架构速度和安全性都会有一定的提升)
[[email protected] sbin]$./rabbitmqctlstop_app
Stopping node [email protected] ...done.
[[email protected] sbin]$./rabbitmqctljoin_cluster --ram [email protected]
Clustering node [email protected] with [email protected] ...done.
[[email protected] sbin]$ ./rabbitmqctlstart_app
Starting node [email protected] ...done.
RAM节点集群中显示为这样的状态:
[[email protected] sbin]$ ./rabbitmqctlcluster_status
Cluster status of node [email protected] ...
[{nodes,[{disc,[[email protected]]},{ram,[[email protected]]}]},
 {running_nodes,[[email protected],[email protected]]}]
...done.
[[email protected] sbin]$ ./rabbitmqctlcluster_status
Cluster status of node [email protected] ...
[{nodes,[{disc,[[email protected]]},{ram,[[email protected]]}]},
 {running_nodes,[[email protected],[email protected]]}]
...done.
10) 改变节点类型
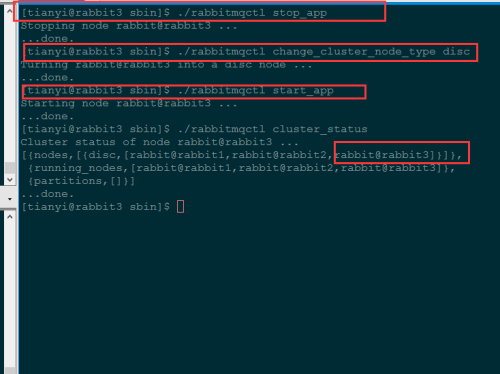
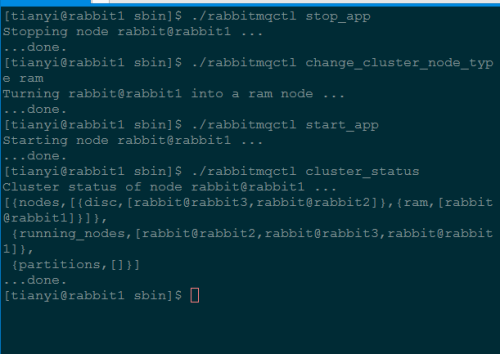
我们可以改变节点的类型从ram盘和副。 说我们想要扭转的类型[email protected] 和 [email protected] ,把前者从ram节点到盘节点,后者从盘节点到ram节点。要做到这一点,我们可以使用 change_cluster_node_type 命令。 节点必须 先停止
将Rabbit3改为磁盘节点:
[[email protected] sbin]$./rabbitmqctl stop_app
Stopping node [email protected] ...
...done.
[[email protected] sbin]$ ./rabbitmqctlchange_cluster_node_type disc
Turning [email protected] into a disc node ...
...done.
[[email protected] sbin]$ ./rabbitmqctlstart_app
Starting node [email protected] ...
...done.
将Rabbit3改为内存节点:
[[email protected] sbin]$ ./rabbitmqctlstop_app
Stopping node [email protected] ...
...done.
[[email protected] sbin]$ ./rabbitmqctlchange_cluster_node_type ram
Turning [email protected] into a ram node ...
...done.
[[email protected] sbin]$./rabbitmqctl start_app
Starting node [email protected] ...
...done.
4、配置rabbitmq镜像模式
http://www.rabbitmq.com/man/rabbitmqctl.1.man.html
http://www.rabbitmq.com/ha.html
上面配置的是RabbitMQ的默认集群模式,并不保证队列的高可用性,尽管交换机、绑定这些可以复制到集群里的任何一个节点,但是队列内容不会复制,虽然该模式解决一部分节点压力,但队列节点宕机直接导致该队列无法使用,只能等待重启,所以要想在队列节点宕机或故障也能正常使用,就要复制队列内容到集群里的每个节点,需要创建镜像队列。
使用Rabbit镜像功能,需要基于rabbitmq策略来实现,政策是用来控制和修改群集范围的某个vhost队列行为和Exchange行为 在集群中的任意节点启用策略,策略会自动同步到集群节点
[[email protected] sbin]$rabbitmqctl set_policy ha-all"^" ‘{"ha-mode":"all"}‘
//在任意节点执行上面的这条命令即可将普通集群设置为镜象集群。
这行命令策略模式为 all 即复制到所有节点,包含新增节点,策略正则表达式为 “^” 表示所有匹配所有队列名称。
例如rabbitmqctl set_policy -p hrsystem ha-allqueue "^message" ‘{"ha-mode":"all"}‘注意:"^message" 这个规则要根据自己修改,这个是指同步"message"开头的队列名称,我们配置时使用的应用于所有队列,所以表达式为"^"
官方set_policy说明参见
set_policy [-p vhostpath] {name} {pattern}{definition} [priority]
(http://www.rabbitmq.com/man/rabbitmqctl.1.man.html)
5、配置ha代理:
将RabbitMQ集群设置为镜像模式之后,需要用负载均衡服务将访问压力分散于集群中的每个节点,在此我们选择了HAProxy,(当然根据实际需求也可以选择lvs、nginx等)它的特点在于配置简单,并且功能十分强大,配置过程归纳起来也就是安装、设置配置文件、启动服务这三步这么简单。在生产环境应该有单独一台服务器来运行负载均衡服务,我们这里因测试条件有限本例中我们使用rabbit3运行负载均衡服务
5.1、安装HAProxy
[[email protected] soft]# rpm -ivh haproxy-1.4.22-3.el6.x86_64.rpm
warning: haproxy-1.4.22-3.el6.x86_64.rpm: Header V3 RSA/SHA1Signature, key ID c105b9de: NOKEY
Preparing...               ########################################### [100%]
   1:haproxy               ########################################### [100%]
5.2、配置HAProxy
关于HAProxy的配置因为本文主要内容不是介绍HAProxy因此此次只贴出配置文件供参考
global
log 127.0.0.1 local0
#使用tcp监听模式
mode tcp
listen admin_stat
#haproxy的web管理端口 8888,自行设置
bind 0.0.0.0:8888
mode http
stats refresh 30s
#haproxy web管理url,自行设置
listen rabbitmq 0.0.0.0:5670
#监听5670端口,并转发给三个节点的5672端口,采用轮询策略
mode tcp
balance roundrobin
server rabbitmq-1 192.168.64.87:5672 check inter 2000 rise 2fall 3
server rabbitmq-2 192.168.64.88:5672 check inter 2000 rise 2fall 3
server rabbitmq-3 192.168.64.89:5672 check inter 2000 rise 2fall 3
5.3、启用HAProxy
[[email protected] haproxy]# /etc/init.d/haproxy start
Or
/usr/sbin/haproxy -f /etc/haproxy/haproxy.cfg –D
附件:参考文献:
http://www.cnblogs.com/flat_peach/archive/2013/04/07/3004008.html
http://blog.csdn.net/tantexian/article/details/44806313
http://www.rabbitmq.com/ha.html
本文出自 “无名之辈” 博客,请务必保留此出处http://server110.blog.51cto.com/3432391/1920371
以上是关于Rabbitmq集群部署手册的主要内容,如果未能解决你的问题,请参考以下文章
