angularjs系列之双向绑定
Posted
tags:
篇首语:本文由小常识网(cha138.com)小编为大家整理,主要介绍了angularjs系列之双向绑定相关的知识,希望对你有一定的参考价值。
把之前学到ng的一些东西和大家分享一下。首先要讲的就是ng最重要的一个特性,双向绑定。(angular源码全部是1.5.0版本)
那么一个双向绑定的代码是什么样子。来看ng官网上的例子,代码就是这么简单。
<script>
  angular.module(‘bindExample‘, [])
    .controller(‘ExampleController‘, [‘$scope‘, function($scope) {
      $scope.test = ‘Whirled‘;
      $scope.testFn = function(){
         console.log($scope.test);
      };
    }]);
</script>
<div ng-controller="ExampleController">
  Enter name: <input type="text" ng-model="test"><br>
  Hello <span ng-bind="test"></span>!
  <span>{{test}}</span>
  <button class="btn btn-default" ng-click="testFn()">点击</button>
</div>
但是ng是如何实现双向绑定?我们可以看到双向绑定的都是在$scope的属性。而$scope是$rootScopeProvider生成的一个实例。在ng代码中中,Scope原型链上主要有以下几个方法:
$new,$digest,$watch,$watchGroup,$watchCollection,$apply,$destroy,$eval,$on,$emit,$broadcast。
具体就不一 一介绍了。和数据绑定相关的主要有三个(类)。
- $digest
- $watch,$watchGroup,$watchCollection
- $apply
从Scope构造函数开始,看看它的几个实例属性
    function Scope() {
      this.$id = nextUid();
      this.$$phase = this.$parent = this.$$watchers =
                     this.$$nextSibling = this.$$prevSibling =
                     this.$$childHead = this.$$childTail = null;
      this.$root = this;
      this.$$destroyed = false;
      this.$$listeners = {};
      this.$$listenerCount = {};
      this.$$watchersCount = 0;
      this.$$isolateBindings = null;
    }
然后我们从最重要的$digest 入手,$digest是scope进行脏检查的核心部分,主要功能就是对scope.wathers数组的元素进行检查,更新watch。
核心代码如下:
$digest: function() {
        var watch, value, last, fn, get,
            watchers,   //脏检查的对象数组
            length,
            //TTL 默认的脏检查循环上线,var TTL = 10; 可以修改digestTtl(15);
            dirty, ttl = TTL,
            next, current, target = this, //this scope的实例
            watchLog = [],
            logIdx, logMsg, asyncTask;

        beginPhase(‘$digest‘);  //设置脏检查的状态
        // Check for changes to browser url that happened in sync before the call to $digest
        $browser.$$checkUrlChange();

        if (this === $rootScope && applyAsyncId !== null) {
          // If this is the root scope, and $applyAsync has scheduled a deferred $apply(), then
          // cancel the scheduled $apply and flush the queue of expressions to be evaluated.
          $browser.defer.cancel(applyAsyncId);
          flushApplyAsync();
        }

        lastDirtyWatch = null;
        __i = __i + 1;
        console.info(‘digest: ‘+__i);
        do { // "while dirty" loop
          dirty = false;
          current = target;

          while (asyncQueue.length) {
            try {
              asyncTask = asyncQueue.shift();
              asyncTask.scope.$eval(asyncTask.expression, asyncTask.locals);
            } catch (e) {
              $exceptionHandler(e);
            }
            lastDirtyWatch = null;
          }
          traverseScopesLoop:
          do { // 整个脏检查从这里开始
            if ((watchers = current.$$watchers)) {
              // console.log(watchers);
              // process our watches
              length = watchers.length;
              while (length--) {
                try {
                  watch = watchers[length];
                  // Most common watches are on primitives, in which case we can short
                  // circuit it with === operator, only when === fails do we use .equals

                  if (watch) {
                    get = watch.get;
                   // console.log(‘value:  ‘+get(current));
                    //console.log(‘last:  ‘+watch.last)
                   //value watch中当前的数据值,last watch中存储的上一次的数据值  watch.eq 是否开启对象的监听
                    if ((value = get(current)) !== (last = watch.last) &&
                        !(watch.eq
                            ? equals(value, last)
                            : (typeof value === ‘number‘ && typeof last === ‘number‘
                               && isNaN(value) && isNaN(last)))) {
                      dirty = true;
                      lastDirtyWatch = watch;     // $digest触发的最后一个watch。为何呢?看下边
                      watch.last = watch.eq ? copy(value, null) : value;
                      fn = watch.fn;
                      fn(value, ((last === initWatchVal) ? value : last), current);  //调用监听函数
                      if (ttl < 5) {
                        logIdx = 4 - ttl;
                        if (!watchLog[logIdx]) watchLog[logIdx] = [];
                        watchLog[logIdx].push({
                          msg: isFunction(watch.exp) ? ‘fn: ‘ + (watch.exp.name || watch.exp.toString()) : watch.exp,
                          newVal: value,
                          oldVal: last
                        });
                      }
                    } else if (watch === lastDirtyWatch) {

                     //因为digest至少会触发两次,找到有watch等于之前标记的最后一个脏检查的watch就停止脏检查
                     //这样做还有一个附带的好处就是当找到最后标记的那个watch,就跳出循环,不会对之后没有改变的watch进行处理
                      dirty = false;
                      break traverseScopesLoop;
                     }
                  }
                } catch (e) {
                  $exceptionHandler(e);
                }
              }
            }

           // 这段代码作用是深度遍历,
            if (!(next = ((current.$$watchersCount && current.$$childHead) ||
                (current !== target && current.$$nextSibling)))) {
              while (current !== target && !(next = current.$$nextSibling)) {
                current = current.$parent;
              }
            }
          } while ((current = next));

          // `break traverseScopesLoop;` takes us to here

          if ((dirty || asyncQueue.length) && !(ttl--)) {
            clearPhase();
            throw $rootScopeMinErr(‘infdig‘,
                ‘{0} $digest() iterations reached. Aborting!\n‘ +
                ‘Watchers fired in the last 5 iterations: {1}‘,
                TTL, watchLog);
          }

        } while (dirty || asyncQueue.length);

        clearPhase();

        while (postDigestQueue.length) {
          try {
            postDigestQueue.shift()();
          } catch (e) {
            $exceptionHandler(e);
          }
        }
      }
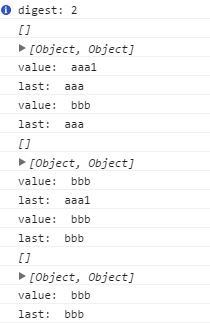
以上代码,我们需要着重关注,do {...} while (dirty || asyncQueue.length);这是整个digest循环,细节请看代码里边都有注释。大家可能会疑惑,为何需要两次digest。原因很简单,就是保证digest后边的watcher的改变没有影响到前边的watcher,起一个验证的作用。下边就是一个例子:
//html
<input type="text" ng-model="test"/>

//js
    $scope.test ="aaa";
    $scope.$watch(‘test‘,function(value,last){
        //对model的数据进行filter处理,尽量不要这样做,因为ngModelController有相应的方法。这里只是一个例子
    	if(value !== last){
    		$scope.test ="bbb";
    	}
    });
以上例子,当我们改变input时,digest就会触发,三次。

当然,代码稍作修改 $scope.test = $scope.test + ‘1‘; 这样digest会超过十次,error。
了解了如何做脏检查,那么我们就继续了解一下,如何向脏检查的watchers中注册被观察对象,主要有两类:
- {{}},ngBind,ngHide.....
- $watch()
第一种注册的过程:
- compile时,搜集directive
- link阶段,使用$watch()绑定
以{{}}为例
    //收集directive的代码。根据nodeType来进行添加directive
    function collectDirectives(node, directives, attrs, maxPriority, ignoreDirective) {
      var nodeType = node.nodeType,
          attrsMap = attrs.$attr,
          match,
          className;

      switch (nodeType) {
          case NODE_TYPE_TEXT: //对text进行处理
          if (msie === 11) {
            // Workaround for #11781
            while (node.parentNode && node.nextSibling && node.nextSibling.nodeType === NODE_TYPE_TEXT) {
              node.nodeValue = node.nodeValue + node.nextSibling.nodeValue;
              node.parentNode.removeChild(node.nextSibling);
            }
          }
          addTextInterpolateDirective(directives, node.nodeValue);
      }
}
    // {{}}指令
    function addTextInterpolateDirective(directives, text) {
      var interpolateFn = $interpolate(text, true);
      if (interpolateFn) {
        directives.push({
          priority: 0,
          compile: function textInterpolateCompileFn(templateNode) {
            var templateNodeParent = templateNode.parent(),
                hasCompileParent = !!templateNodeParent.length;

            // When transcluding a template that has bindings in the root
            // we don‘t have a parent and thus need to add the class during linking fn.
            if (hasCompileParent) compile.$$addBindingClass(templateNodeParent);

            return function textInterpolateLinkFn(scope, node) {
              var parent = node.parent();
              if (!hasCompileParent) compile.$$addBindingClass(parent);
              compile.$$addBindingInfo(parent, interpolateFn.expressions);
              //通过$watch添加监听
              scope.$watch(interpolateFn, function interpolateFnWatchAction(value) {
                node[0].nodeValue = value;
              });
            };
          }
        });
      }
    }
接下来就需要聊一聊$watch了。毕竟部分指令和手动注册watch都是通过这个方法。还是看源码
      $watch: function(watchExp, listener, objectEquality, prettyPrintExpression) {
        var get = $parse(watchExp);   //$parse转换

        if (get.$$watchDelegate) {    //如果已经注册watch了,进行移除watch操作
          return get.$$watchDelegate(this, listener, objectEquality, get, watchExp);
        }
        var scope = this,
            array = scope.$$watchers,
            watcher = {
              fn: listener,
              last: initWatchVal,
              get: get,
              exp: prettyPrintExpression || watchExp,
              eq: !!objectEquality
            };

        lastDirtyWatch = null;

        if (!isFunction(listener)) {
          watcher.fn = noop;
        }

        if (!array) {
          array = scope.$$watchers = [];
        }
        //unshift 是因为,digest的时候是length--,所以注册到watchers数组前
        array.unshift(watcher);
        incrementWatchersCount(this, 1); //修改watchersCount数量

        return function deregisterWatch() {
          if (arrayRemove(array, watcher) >= 0) {
            incrementWatchersCount(scope, -1);
          }
          lastDirtyWatch = null;    //删除脏检查watch,防止死循环
        };
      },
$watchGroup,$watchCollection则是$watch的扩展,主要是对数组和对象的属性发生变化的监听。具体怎么用,大家可以去尝试,就不做介绍了。
当然,常常我们还会遇到$apply(),手动触发$digest循环。代码很简单。就不介绍了。
在angular中,脏检查占用了js运算的很大一部分,尤其是做下拉无线列表时,往往会绑定大量元素。这时候就需要考虑减少$watch,减少digest循环。比如bindonce就是将元素绑定到页面后注销watch。
以上是关于angularjs系列之双向绑定的主要内容,如果未能解决你的问题,请参考以下文章