CentOS 6.5 安装redmine项目管理系统
Posted
tags:
篇首语:本文由小常识网(cha138.com)小编为大家整理,主要介绍了CentOS 6.5 安装redmine项目管理系统相关的知识,希望对你有一定的参考价值。
前提:先关闭防火墙和selinux
主机操作系统是CentOS 6.5
软件:
rubygems-2.4.1.tgz
ruby-2.2.6.tar.gz
redmine-3.2.0.tar.gz
1. 安装依赖关系
yum install zlib* openssl* ImageMagick-devel gcc -y
2、安装ruby
tar -zxvf ruby-2.2.6.tar.gz
cd ruby-2.2.6
./configure --prefix=/usr/local/ruby
make
make install
验证:
Vim /etc/profile -> exportPATH=/usr/local/ruby/bin:$PATH ->source /etc/profile
[[email protected] ~]# ruby -v
ruby 2.2.6p396 (2016-11-15 revision 56800) [x86_64-linux]
3、安装rubygem
tar -zxvf rubygems-2.4.1.tgz
ruby setup.rb
验证:
[[email protected] ~]# gem -v
2.4.1
4、更换ruby源
去除美国的ruby源
[[email protected] ~]# gem sources -r https://rubygems.org/
https://rubygems.org/ removed from sources
添加淘宝的ruby源
[[email protected] ~]# gem sources -a https://ruby.taobao.org/
https://ruby.taobao.org/ added to sources
5、安装rails 4.2.5 mongrel
[[email protected] ~]# gem install rails -v=4.2.5
[[email protected] ~]# rails -v
Expected string default value for ‘--rc‘; got false (boolean)
Rails 4.2.5
[[email protected] ~]# gem install mongrel -v=1.2.0.pre2
6、安装mysql mysql-server mysql-devel几个包并启动数据库
[[email protected] ~]# yum install mysql mysql-server mysql-devel
[[email protected] ~]# service mysqld start
7、创建redmine数据库和用户并授权
mysql> create database redmine character set utf8;
Query OK, 1 row affected (0.00 sec)
mysql> create user [email protected] identified by ‘redmine‘;
Query OK, 0 rows affected (0.01 sec)
mysql> grant all privileges on redmine.* to [email protected];
Query OK, 0 rows affected (0.00 sec)
mysql> flush privileges;
Query OK, 0 rows affected (0.00 sec)
mysql> \q
Bye
8、安装httpd
yum install httpd httpd-devel
9、下载、解压reedmine并配置
wget http://www.redmine.org/releases/redmine-3.2.0.tar.gz
tar -zxvf redmine-3.2.0.tar.gz
mv redmine-3.2.0 /var/www/html/redmine
cd /var/www/html/redmine/config
mv database.yml.example database.yml
vim database.yml
production:
adapter: mysql2
database: redmine
host: localhost
username: redmine
password: "redmine"
encoding: utf8
10、安装一些依赖包
cd /var/www/html/redmine
vim Gemfile
source ‘http://rubygems.org’ #删除官方的gem源
source‘ https://ruby.taobao.org‘ #使用淘宝的gem源
执行 bundle install 安装依赖包,注意在redmine的主目录文件里执行,其中报错说是不能使用root用户执行该命令,可以不用管
使用bundle show可以查看已经安装了那些包的
11、开始配置会话
注意:该命令只能执行一遍
[[email protected] redmine]# rake generate_secret_token
/usr/local/ruby/lib/ruby/gems/2.2.0/gems/htmlentities-4.3.1/lib/htmlentities/mappings/expanded.rb:465: warning: duplicated key at line 466 ignored: "inodot"
vim /usr/local/ruby/lib/ruby/gems/2.2.0/gems/htmlentities-4.3.1/lib/htmlentities/mappings/expanded.rb
编辑465行,把该行注释即可
12、导入生成数据
rake db:migrate RAILS_ENV=‘production‘
13、启动redmine,可以看到redmine已经在运行了
[[email protected] redmine]# ruby /usr/local/ruby/bin/rails server webrick -e production
=> Booting WEBrick
=> Rails 4.2.5 application starting in production on http://localhost:3000
=> Run `rails server -h` for more startup options
=> Ctrl-C to shutdown server
[2017-03-17 04:38:06] INFO WEBrick 1.3.1
[2017-03-17 04:38:06] INFO ruby 2.2.6 (2016-11-15) [x86_64-linux]
[2017-03-17 04:38:06] INFO WEBrick::HTTPServer#start: pid=45508 port=3000
14、查看redmine进程监听的端口
[[email protected] ~]# ss -tnlp|grep 3000
LISTEN 0 128 127.0.0.1:3000 *:* users:(("ruby",45508,10))
LISTEN 0 128 ::1:3000 :::* users:(("ruby",45508,9))
15、修改文件系统权限
cd /var/www/html/redmine
mkdir tmp tmp/pdf public/plugin_assets #主要是修改文件夹权限,如果有了可以不创建,只修改权限和属主
chown -R apache:apache /var/www/html/redmine
chown -R apache:apache files/ log/ tmp/ public/plugin_assets/
chmod -R 755 files log tmp public/plugin_assets
16、配置redmine和apache结合
需先安装httpd httpd-devel两个包
gem install passenger
passenger-install-apache2-module
执行该命令并选择了一些选项后,会出现下面的报错!
* Checking for C++ compiler...
Found: no
* Checking for Curl development headers with SSL support...
Found: no
Error: Cannot find the `curl-config` command.
Installation instructions for required software
* To install C++ compiler:
Please install it with yum install gcc-c++
* To install Curl development headers with SSL support:
Please install it with yum install libcurl-devel
上面提示我们需要安装c++,libcurl-devel
yum install gcc-c++ libcurl-devel
Vim /etc/httpd/conf.d/redmine.conf
实际情况可以根据 passenger-install-apache2-module的执行结果修改
LoadModule passenger_module /usr/local/ruby/lib/ruby/gems/2.2.0/gems/passenger-5.1.2/buildout/apache2/mod_passenger.so
<IfModule mod_passenger.c>
PassengerRoot /usr/local/ruby/lib/ruby/gems/2.2.0/gems/passenger-5.1.2
PassengerDefaultRuby /usr/local/ruby/bin/ruby
</IfModule>
Listen 3000
<VirtualHost *:3000>
ServerName www.shamereedwine.com #自己的主机名
# !!! Be sure to point DocumentRoot to ‘public‘!
DocumentRoot /var/www/html/redmine/public
<Directory /var/www/html/redmine/public >
# This relaxes Apache security settings.
AllowOverride all
# MultiViews must be turned off.
Options -MultiViews
</Directory>
</VirtualHost>
17、启动apache
service httpd start
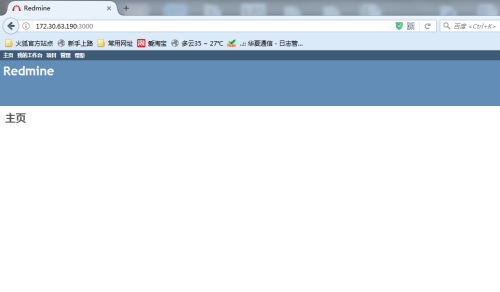
18、打开主页面http://172.30.63.190:3000/
使用用户名admin和密码admin登入,如下图所示界面:
19、安装成功!
本文出自 “服务器运维” 博客,请务必保留此出处http://shamereedwine.blog.51cto.com/5476890/1908903
以上是关于CentOS 6.5 安装redmine项目管理系统的主要内容,如果未能解决你的问题,请参考以下文章
