Angular2快速起步——构建一个简单的应用
Posted freeah
tags:
篇首语:本文由小常识网(cha138.com)小编为大家整理,主要介绍了Angular2快速起步——构建一个简单的应用相关的知识,希望对你有一定的参考价值。
构建此应用,分为如下几步:
1、环境准备:安装Node.js和npm;
2、创建并配置此项目;
3、创建应用;
5、启动应用程序;
6、定义作为该应用的宿主页面;
7、构建并运行此应用;
环境准备:安装Node.js和npm;
下载node.js.msi文件来进行安装,可以参考这个文档来安装 http://www.runoob.com/nodejs/nodejs-install-setup.html
我们的例子需要node v5.x.x或更高版本以及npm 3.x.x或更高版本。 要检查你正在使用的版本,请在终端窗口中运行node -v和npm -v命令。
创建并配置本项目
1、创建项目目录
可以通过终端创建项目目录,在终端进入你想要创建文件夹的位置,之后 mkdir angular2 创建angular2文件夹 ,同理创建quickstart文件夹,也可以新建文件夹创建。
2、创建配置文件,在上面的文件夹下
package.json用来标记出本项目所需的npm依赖包;
tsconfig.json定义了TypeScript编译器如何从项目原文件生成javascript代码;
typings.json为那些TypeScript编译器无法识别的库提供了别的定义文件;
systemjs.config.js为模块加载器提供了该到哪里去查找应用模块的信息,并注册了所有必备的依赖包。
package.json内容如下
{  "name": "angular2-quickstart",
   "version": "1.0.0",
   "scripts": {
       "start": "tsc && concurrently \\"npm run tsc:w\\" \\"npm run lite\\" ",
       "lite": "lite-server",
       "postinstall": "typings install",
       "tsc": "tsc",    "tsc:w": "tsc -w",
       "typings": "typings"  },
   "license": "ISC",
  "dependencies": {
       "@angular/common": "2.0.0",
       "@angular/compiler": "2.0.0",
       "@angular/core": "2.0.0",
       "@angular/forms": "2.0.0",
       "@angular/http": "2.0.0",
       "@angular/platform-browser": "2.0.0",
       "@angular/platform-browser-dynamic": "2.0.0",
       "@angular/router": "3.0.0",
       "@angular/upgrade": "2.0.0",
       "core-js": "^2.4.1",
       "reflect-metadata": "^0.1.3",
       "rxjs": "5.0.0-beta.12",
       "systemjs": "0.19.27",
       "zone.js": "^0.6.23",
       "angular2-in-memory-web-api": "0.0.20",
       "bootstrap": "^3.3.6"  },
   "devDependencies": {
         "concurrently": "^2.2.0",
         "lite-server": "^2.2.2",
         "typescript": "^2.0.2",    "typings":"^1.3.2"
        }
}
tsconfig.json
{
    "compilerOptions": {
              "target": "es5",
              "module": "commonjs",
              "moduleResolution": "node",
              "sourceMap": true,
              "emitDecoratorMetadata": true,
              "experimentalDecorators": true,
              "removeComments": false,
              "noImplicitAny": false
           }
}
typings.json
{
  "globalDependencies": {
    "core-js": "registry:dt/core-js#0.0.0+20160725163759",
    "jasmine": "registry:dt/jasmine#2.2.0+20160621224255",
    "node": "registry:dt/node#6.0.0+20160909174046"
  }
}
systemjs.config.js
/**
 * System configuration for Angular 2 samples
 * Adjust as necessary for your application needs.
 */
(function (global) {
  System.config({
    paths: {
      // paths serve as alias
      \'npm:\': \'node_modules/\'
    },
    // map tells the System loader where to look for things
    map: {
      // our app is within the app folder
      app: \'app\',
      // angular bundles
      \'@angular/core\': \'npm:@angular/core/bundles/core.umd.js\',
      \'@angular/common\': \'npm:@angular/common/bundles/common.umd.js\',
      \'@angular/compiler\': \'npm:@angular/compiler/bundles/compiler.umd.js\',
      \'@angular/platform-browser\': \'npm:@angular/platform-browser/bundles/platform-browser.umd.js\',
      \'@angular/platform-browser-dynamic\': \'npm:@angular/platform-browser-dynamic/bundles/platform-browser-dynamic.umd.js\',
      \'@angular/http\': \'npm:@angular/http/bundles/http.umd.js\',
      \'@angular/router\': \'npm:@angular/router/bundles/router.umd.js\',
      \'@angular/forms\': \'npm:@angular/forms/bundles/forms.umd.js\',
      // other libraries
      \'rxjs\':                       \'npm:rxjs\',
      \'angular2-in-memory-web-api\': \'npm:angular2-in-memory-web-api\',
    },
    // packages tells the System loader how to load when no filename and/or no extension
    packages: {
      app: {
        main: \'./main.js\',
        defaultExtension: \'js\'
      },
      rxjs: {
        defaultExtension: \'js\'
      },
      \'angular2-in-memory-web-api\': {
        main: \'./index.js\',
        defaultExtension: \'js\'
      }
    }
  });
})(this);
3、安装依赖包
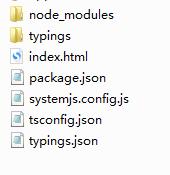
在终端定位到package.json的位置,直接npm install
在安装期间可能出现红色的错误信息,你还会看到npm WARN信息。不过不用担心,只要末尾处没有npm ERR!信息就算成功了。
你应该得到如下结构:

如果在运行npm install之后没有出现typings目录,我们可以手动安装它
npm run typings install
创建应用
在应用的根目录下创建app子目录,在app子目录下创建app.module.ts文件
app.module.ts
import { NgModule } from \'@angular/core\';
import { BrowserModule } from \'@angular/platform-browser\';
@NgModule({
imports: [ BrowserModule ]
})
export class AppModule { }
这里是应用的入口点,由于应用是运行在浏览器中的,所以根模块需要从@angular/platform-browser中导入BrowserModule并添加到imports数组中,这是要让最小的应用在浏览器中运行时,对Angular的最低需求。
创建组件并添加到应用中
每个Angular应用都至少有一个组件:根组件,这里叫AppComponent,组件是Angular应用的基本构造块,每个组件都会通过与它相关的模块来控制屏幕上的一小块,在app文件夹下创建app.component.ts
app.component.ts
import { Component } from \'@angular/core\';
@Component({
selector: \'my-app\',
template: \'<h1>My First Angular App</h1>\'
})
export class AppComponent { }
import语句。它让你能访问Angular核心库中的@Component装饰器函数。
@Component装饰器,它会把一份元数据关联到AppComponent组件类上:
selector为用来代表该组件的html元素指定简单的CSS选择器。
template用来告诉Angular如何渲染该组件的视图。
我们还要导出AppComponent类,以便让刚刚创建的这个应用导入它
编辑app/app.module.ts文件,导入这个新的AppComponent,并把它添加到NgModule装饰器中的declarations和bootstrap字段:
app.module.ts
import { NgModule } from \'@angular/core\';
import { BrowserModule } from \'@angular/platform-browser\';
import { AppComponent } from \'./app.component\';
@NgModule({
imports: [ BrowserModule ],
declarations: [ AppComponent ],
bootstrap: [ AppComponent ]
})
export class AppModule { }
启动应用
在app文件夹下创建新文件main.ts
main.ts
import { platformBrowserDynamic } from \'@angular/platform-browser-dynamic\';
import { AppModule } from \'./app.module\';
const platform = platformBrowserDynamic();
platform.bootstrapModule(AppModule);
定义该应用的宿主页面
在quickstart文件夹下创建index.html文件
index.html
<!DOCTYPE html>
<html lang="en">
<head>
    <meta charset="UTF-8">
    <title>Angular Quickstart</title>
    <meta name="viewport" content="width=device-width, initial-scale=1">
    <!-- 1. Load libraries -->
    <!-- Polyfill(s) for older browsers -->
    <script src="node_modules/core-js/client/shim.min.js"></script>
    <script src="node_modules/zone.js/dist/zone.js"></script>
    <script src="node_modules/reflect-metadata/Reflect.js"></script>
    <script src="node_modules/systemjs/dist/system.src.js"></script>
    <!-- 2. Configure SystemJS -->
    <script src="systemjs.config.js"></script>
    <script>
        System.import(\'app\').catch(function(err){ console.error(err); });
    </script>
</head>
<body>
<my-app>Loading...</my-app>
</body>
</html>
编译并运行应用程序
打开终端,定位到该目录,npm start
稍后,一个浏览器页标签就会打开并显示出来。

以上是关于Angular2快速起步——构建一个简单的应用的主要内容,如果未能解决你的问题,请参考以下文章