LinearLayout的横向和纵向布局问题
Posted
tags:
篇首语:本文由小常识网(cha138.com)小编为大家整理,主要介绍了LinearLayout的横向和纵向布局问题相关的知识,希望对你有一定的参考价值。
参考技术A LinearLayout的布局方式有两种,即由orientation属性控制,默认orientation=horizontal。在使用as作为开发工具的时候,如果在LinearLayout中出现多于两个的同级子布局时,as会强制要求设置显示设置orientation属性。orientation属性的值有两个:horizontal和vertical
分别表示横向和纵向排列。
layout_gravity属性只有根布局是LinearLayout的情况下才能使用。表示子布局在父布局中的显示方式。
layout_gravity有以下几种值:
center:居中(横向和纵向均居中)
center_horizontal:水平居中
center_vertical:垂直居中
以上都是常用的属性,还有一些其他不常用的属性,就不再赘述(clip_horizontal、clip_vertical、end、start、left、right…)。
两种情况:
1、orientation=horizontal
子布局只能垂直方向的设置有效,不会水平方向的设置有效。
如果设置layout_gravity=center时,只有垂直方向的设置有效,水平方向的设置无效。
2、orientation=vertical
子布局只能水平方向的设置有效,不会垂直方向的设置有效。
如果设置layout_gravity=center时,只有水平方向的设置有效,垂直方向的设置无效。
在查看LinearLayout的源码的时候会发现,LinearLayout在测量横向和纵向的布局时,有两个方法分别为layoutVertical()和layoutHorizontal()分别用于测量横向和纵向的布局位置。
我们就其中的一个方法进行解释:
layoutVertical():
在for循环中仅仅是判断了CENTER_HORIZONTAL、RIGHT、LEFT三中情况,即在orientation=vertical时,只有水平居中和居左和居右有效,因此这就是为什么我们在设置layout_gravity=center时,只有水平方向的设置有效果了。
同理layoutHorizontal()方法也是同样的设置。
LinearLayout(线性布局)
分类:C#、Android、VS2015;
创建日期:2016-02-10
一、简介
LinearLayout将容器内的组件一个挨着一个地横向或纵向依次堆叠起来(不重叠)。该布局和WPF的StackPanel控件的功能非常相似,也是通过orientation属性设置排列的方向是纵向(vertical)还是纵向(horizontal)。
常用属性有:
android:layout_gravity:子元素在容器中的对齐方式。即:往哪一端偏沉(gravity:重力)。
android:orientation:控制子元素的排列方式(横向排列、纵向排列)
android:layout_weight:表示其子元素占用空间的分配权重,值越小权重越大。
例如:
<LinearLayout
android:orientation="horizontal"
android:layout_width="fill_parent"
android:layout_height="fill_parent"
android:layout_weight="1"
注意:子元素的宽和高必须至少有一个设置为“fill_parent”线性布局才会起作用。
二、示例—Demo01LinearLayout
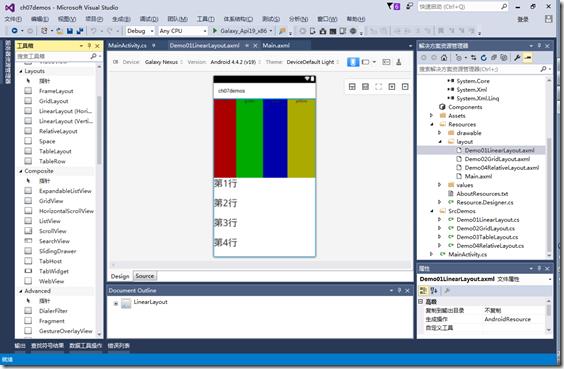
1、设计界面
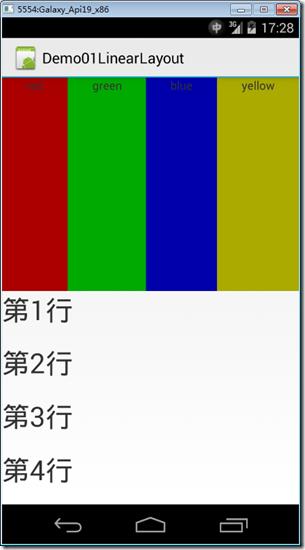
2、运行效果

3、添加Demo01LinearLayout.axml文件
在layout文件夹下添加该文件。
<?xml version="1.0" encoding="utf-8"?>
<LinearLayout xmlns:android="http://schemas.android.com/apk/res/android"
    android:orientation="vertical"
    android:layout_width="match_parent"
    android:layout_height="match_parent">
  <LinearLayout
      android:orientation="horizontal"
      android:layout_width="fill_parent"
      android:layout_height="fill_parent"
      android:layout_weight="1">
    <TextView
        android:text="red"
        android:gravity="center_horizontal"
        android:background="#aa0000"
        android:layout_width="wrap_content"
        android:layout_height="fill_parent"
        android:layout_weight="1" />
    <TextView
        android:text="green"
        android:gravity="center_horizontal"
        android:background="#00aa00"
        android:layout_width="wrap_content"
        android:layout_height="fill_parent"
        android:layout_weight="1" />
    <TextView
        android:text="blue"
        android:gravity="center_horizontal"
        android:background="#0000aa"
        android:layout_width="wrap_content"
        android:layout_height="fill_parent"
        android:layout_weight="1" />
    <TextView
        android:text="yellow"
        android:gravity="center_horizontal"
        android:background="#aaaa00"
        android:layout_width="wrap_content"
        android:layout_height="fill_parent"
        android:layout_weight="1" />
  </LinearLayout>
  <LinearLayout
      android:orientation="vertical"
      android:layout_width="fill_parent"
      android:layout_height="fill_parent"
      android:layout_weight="1">
    <TextView
        android:text="第1行"
        android:textSize="15pt"
        android:layout_width="fill_parent"
        android:layout_height="wrap_content"
        android:layout_weight="1" />
    <TextView
        android:text="第2行"
        android:textSize="15pt"
        android:layout_width="fill_parent"
        android:layout_height="wrap_content"
        android:layout_weight="1" />
    <TextView
        android:text="第3行"
        android:textSize="15pt"
        android:layout_width="fill_parent"
        android:layout_height="wrap_content"
        android:layout_weight="1" />
    <TextView
        android:text="第4行"
        android:textSize="15pt"
        android:layout_width="fill_parent"
        android:layout_height="wrap_content"
        android:layout_weight="1" />
  </LinearLayout>
</LinearLayout>
4、添加Demo01LinearLayout.cs文件
在SrcDemos文件夹下添加该文件。
using Android.App;
using Android.OS;
namespace ch07demos.SrcDemos
{
    [Activity(Label = "Demo01LinearLayout")]
    public class Demo01LinearLayout : Activity
    {
        protected override void OnCreate(Bundle savedInstanceState)
        {
            base.OnCreate(savedInstanceState);
            SetContentView(Resource.Layout.Demo01LinearLayout);
        }
    }
}
运行观察效果。
以上是关于LinearLayout的横向和纵向布局问题的主要内容,如果未能解决你的问题,请参考以下文章
