Unity3D Asset文件导出3DMax 可编辑格式
Posted cartzhang
tags:
篇首语:本文由小常识网(cha138.com)小编为大家整理,主要介绍了Unity3D Asset文件导出3DMax 可编辑格式相关的知识,希望对你有一定的参考价值。
本文章由cartzhang编写,转载请注明出处。 所有权利保留。
文章链接:http://blog.csdn.net/cartzhang/article/details/60878354
作者:cartzhang
一、前言
美术想要一个把unity中*.asset的模型导出来,导成3D Max可以打开的模式,fbx或obj.
需要导出的格式:
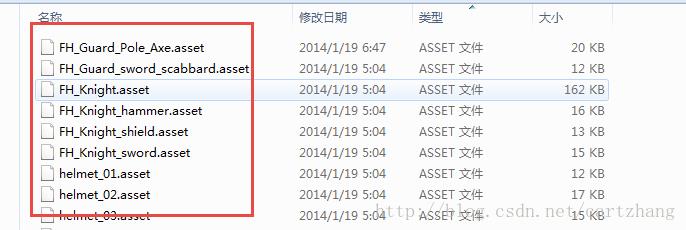
图1
也就是需要一个工具,个人觉得这个问题,肯定之前Unity的前辈就有解决方法了。于是乎网上一通下载和测试。
二、解包工具集合
网络上找来了各种测试,但是没有一个适合我的,很多都是失败,打不开。
参考宣雨松的博客,找了还是没有结果。
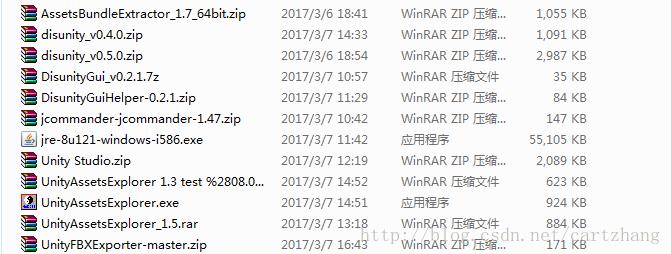
图3
解包工具有很多种类,
disunity github地址: https://github.com/ata4/disunity
还有就是AssetAssetsExport,还有Unity Studio.
别人的博客里面都有比较多的介绍和说明,这里就详细说了。
最后还网上wiki里,找到了一个合适的我自己的解包。
http://wiki.unity3d.com/index.php?title=ObjExporter
三、初步成果
找到了一个网站:http://wiki.unity3d.com/index.php?title=ObjExporter
可以导出部分对象。
如下图:
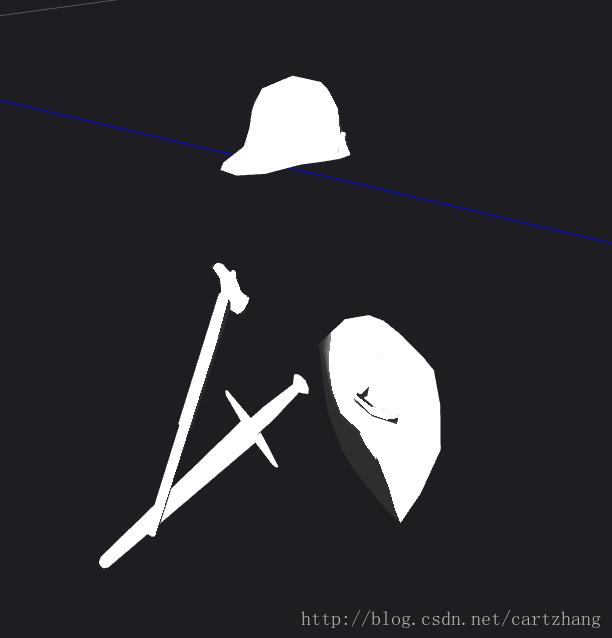
图0
而原来unity中模型是这个样子的。
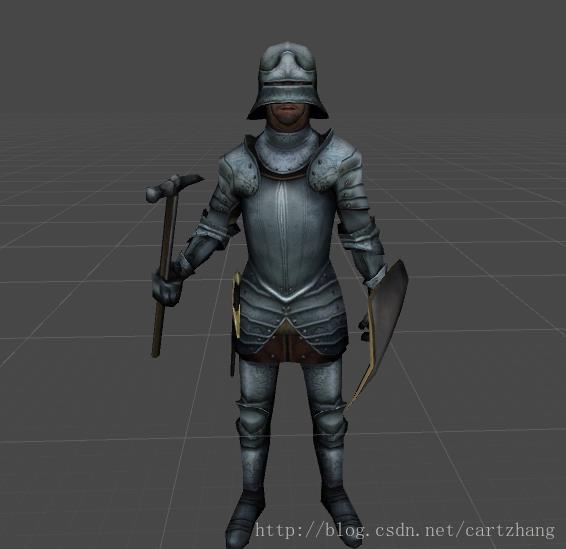
图4
导出的只有武器和头盔,没有人物主体body.
四、bug修改
其实也不能算bug,也许人家没有这样的需要呢。
 Component[] meshfilter = selection[i].GetComponentsInChildren<MeshFilter>();
            MeshFilter[] mf = new MeshFilter[meshfilter.Length];
            int m = 0;
            for (; m < meshfilter.Length; m++)
            {
                exportedObjects++;
                mf[m] = (MeshFilter)meshfilter[m];
            }
代码中是要查找所有组件中的MeshFilter,发现SkinnedMeshRender组件居然没有这个MeshFilter这个组件,所以总会导出少一个,而这个居然是人的主体。
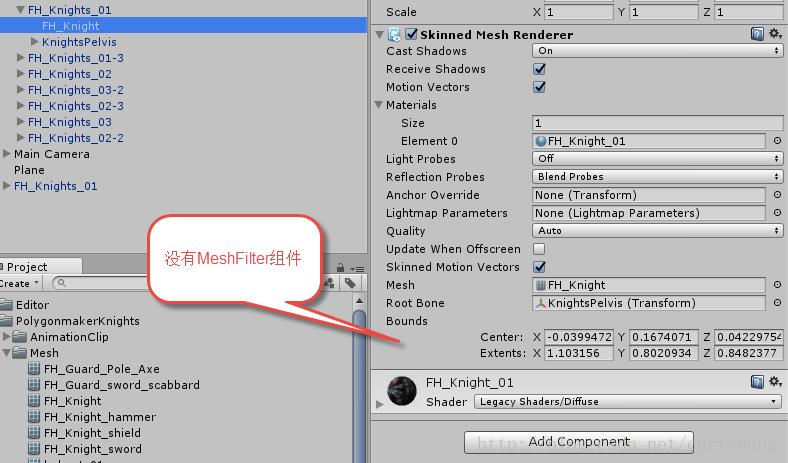
图5
本来说让美术自己添加一个MeshFilter组件,然后根据mesh render中的mesh自己来添加一个对应的mesh.
既然是程序,那就想办法,思路很明显,既然是有meshrender,就从这入手呗。
代码还是不难度。
// 没有meshFilter,添加一个meshFilter.
            SkinnedMeshRenderer[] meshfilterRender = selection[i].GetComponentsInChildren<SkinnedMeshRenderer>();
            for (int j = 0; j < meshfilterRender.Length; j++)
            {
                if (meshfilterRender[j].GetComponent<MeshFilter>() == null)
                {
                    meshfilterRender[j].gameObject.AddComponent<MeshFilter>();
                    meshfilterRender[j].GetComponent<MeshFilter>().sharedMesh = Instantiate(meshfilterRender[j].sharedMesh);
                }
            }
这样修改过,就会自动在没有MeshFilter,但是有skinnedMeshRender组件的节点下,添加一个MeshFilter,然后就可以正常导出成.obj文件,与.FBX是类似的,都可以被3D max编辑使用。
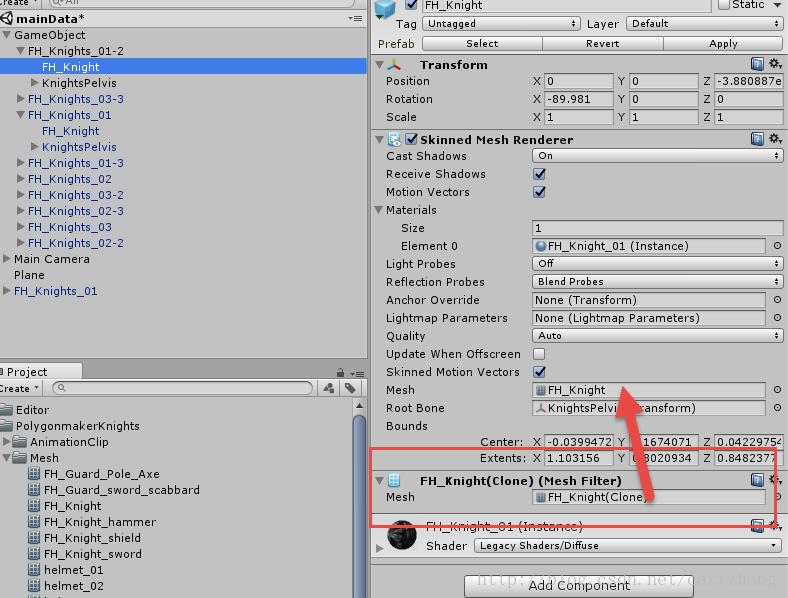
图7
最后的在VS中看的模型,因为没有安装3Dmax.
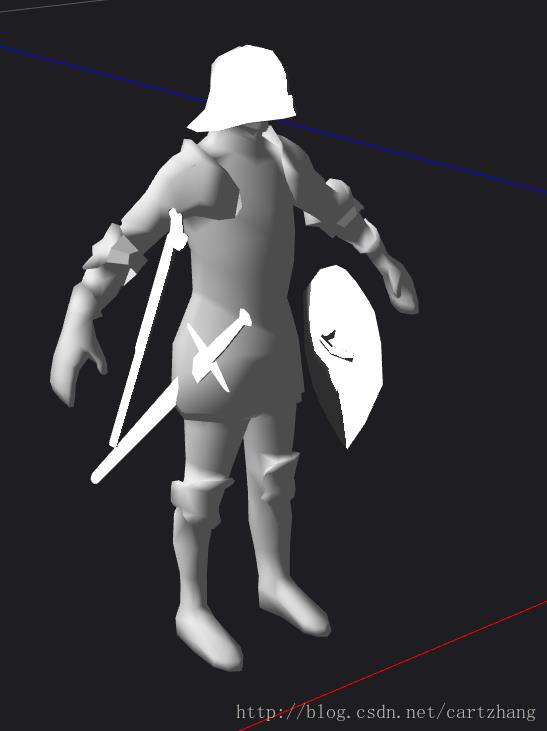
图6
虽然看起来简陋,但是满足他们小需要,就好了。
贴出主要的代码:
/*
Based on ObjExporter.cs, this "wrapper" lets you export to .OBJ directly from the editor menu.

This should be put in your "Editor"-folder. Use by selecting the objects you want to export, and select
the appropriate menu item from "Custom->Export". Exported models are put in a folder called
"ExportedObj" in the root of your Unity-project. Textures should also be copied and placed in the
same folder.
N.B. there may be a bug so if the custom option doesn't come up refer to this thread http://answers.unity3d.com/questions/317951/how-to-use-editorobjexporter-obj-saving-script-fro.html

Updated for Unity 5.3

2017-03-07
@cartzhang
fixed can not create obj file in folder.
*/

using UnityEngine;
using UnityEditor;
using UnityEditor.SceneManagement;
using System.Collections;
using System.Collections.Generic;
using System.IO;
using System.Text;
using System;

struct ObjMaterial
{
    public string name;
    public string textureName;
}

public class EditorObjExporter : ScriptableObject
{
    private static int vertexOffset = 0;
    private static int normalOffset = 0;
    private static int uvOffset = 0;


    //User should probably be able to change this. It is currently left as an excercise for
    //the reader.
    private static string targetFolder = "ExportedObj";


    private static string MeshToString(MeshFilter mf, Dictionary<string, ObjMaterial> materialList)
    {
        Debug.Assert(null != mf);
        Mesh m = mf.sharedMesh;
        Material[] mats = mf.GetComponent<Renderer>().sharedMaterials;

        StringBuilder sb = new StringBuilder();
        if (null == m)
            return sb.ToString();

        sb.Append("g ").Append(mf.name).Append("\\n");
        foreach (Vector3 lv in m.vertices)
        {
            Vector3 wv = mf.transform.TransformPoint(lv);

            //This is sort of ugly - inverting x-component since we're in
            //a different coordinate system than "everyone" is "used to".
            sb.Append(string.Format("v {0} {1} {2}\\n", -wv.x, wv.y, wv.z));
        }
        sb.Append("\\n");

        foreach (Vector3 lv in m.normals)
        {
            Vector3 wv = mf.transform.TransformDirection(lv);

            sb.Append(string.Format("vn {0} {1} {2}\\n", -wv.x, wv.y, wv.z));
        }
        sb.Append("\\n");

        foreach (Vector3 v in m.uv)
        {
            sb.Append(string.Format("vt {0} {1}\\n", v.x, v.y));
        }

        for (int material = 0; material < m.subMeshCount; material++)
        {
            sb.Append("\\n");
            sb.Append("usemtl ").Append(mats[material].name).Append("\\n");
            sb.Append("usemap ").Append(mats[material].name).Append("\\n");

            //See if this material is already in the materiallist.
            try
            {
                ObjMaterial objMaterial = new ObjMaterial();

                objMaterial.name = mats[material].name;

                if (mats[material].mainTexture)
                    objMaterial.textureName = AssetDatabase.GetAssetPath(mats[material].mainTexture);
                else
                    objMaterial.textureName = null;

                materialList.Add(objMaterial.name, objMaterial);
            }
            catch (ArgumentException)
            {
                //Already in the dictionary
            }


            int[] triangles = m.GetTriangles(material);
            for (int i = 0; i < triangles.Length; i += 3)
            {
                //Because we inverted the x-component, we also needed to alter the triangle winding.
                sb.Append(string.Format("f {1}/{1}/{1} {0}/{0}/{0} {2}/{2}/{2}\\n",
                    triangles[i] + 1 + vertexOffset, triangles[i + 1] + 1 + normalOffset, triangles[i + 2] + 1 + uvOffset));
            }
        }

        vertexOffset += m.vertices.Length;
        normalOffset += m.normals.Length;
        uvOffset += m.uv.Length;

        return sb.ToString();
    }

    private static void Clear()
    {
        vertexOffset = 0;
        normalOffset = 0;
        uvOffset = 0;
    }

    private static Dictionary<string, ObjMaterial> PrepareFileWrite()
    {
        Clear();

        return new Dictionary<string, ObjMaterial>();
    }

    private static void MaterialsToFile(Dictionary<string, ObjMaterial> materialList, string folder, string filename)
    {
        using (StreamWriter sw = new StreamWriter(folder + Path.DirectorySeparatorChar + filename + ".mtl"))
        {
            foreach (KeyValuePair<string, ObjMaterial> kvp in materialList)
            {
                sw.Write("\\n");
                sw.Write("newmtl {0}\\n", kvp.Key);
                sw.Write("Ka  0.6 0.6 0.6\\n");
                sw.Write("Kd  0.6 0.6 0.6\\n");
                sw.Write("Ks  0.9 0.9 0.9\\n");
                sw.Write("d  1.0\\n");
                sw.Write("Ns  0.0\\n");
                sw.Write("illum 2\\n");

                if (kvp.Value.textureName != null)
                {
                    string destinationFile = kvp.Value.textureName;


                    int stripIndex = destinationFile.LastIndexOf(Path.DirectorySeparatorChar);

                    if (stripIndex >= 0)
                        destinationFile = destinationFile.Substring(stripIndex + 1).Trim();


                    string relativeFile = destinationFile;

                    destinationFile = folder + Path.DirectorySeparatorChar + destinationFile;

                    Debug.Log("Copying texture from " + kvp.Value.textureName + " to " + destinationFile);

                    try
                    {
                        //Copy the source file
                        File.Copy(kvp.Value.textureName, destinationFile);
                    }
                    catch
                    {

                    }


                    sw.Write("map_Kd {0}", relativeFile);
                }

                sw.Write("\\n\\n\\n");
            }
        }
    }

    private static void MeshToFile(MeshFilter mf, string folder, string filename)
    {
        Dictionary<string, ObjMaterial> materialList = PrepareFileWrite();

        using (StreamWriter sw = new StreamWriter(folder + Path.DirectorySeparatorChar + filename + ".obj"))
        {
            sw.Write("mtllib ./" + filename + ".mtl\\n");

            sw.Write(MeshToString(mf, materialList));
        }

        MaterialsToFile(materialList, folder, filename);
    }

    private static void MeshesToFile(MeshFilter[] mf, string folder, string filename)
    {
        Dictionary<string, ObjMaterial> materialList = PrepareFileWrite();

        using (StreamWriter sw = new StreamWriter(folder + Path.DirectorySeparatorChar + filename + ".obj"))
        {
            sw.Write("mtllib ./" + filename + ".mtl\\n");

            for (int i = 0; i < mf.Length; i++)
            {
                sw.Write(MeshToString(mf[i], materialList));
            }
        }

        MaterialsToFile(materialList, folder, filename);
    }

    private static bool CreateTargetFolder()
    {
        try
        {
            System.IO.Directory.CreateDirectory(targetFolder);
        }
        catch
        {
            EditorUtility.DisplayDialog("Error!", "Failed to create target folder!", "");
            return false;
        }

        return true;
    }

    [MenuItem("Custom/Export/Export whole selection to single OBJ")]
    static void ExportWholeSelectionToSingle()
    {
        if (!CreateTargetFolder())
            return;


        Transform[] selection = Selection.GetTransforms(SelectionMode.Editable | SelectionMode.ExcludePrefab);

        if (selection.Length == 0)
        {
            EditorUtility.DisplayDialog("No source object selected!", "Please select one or more target objects", "");
            return;
        }

        int exportedObjects = 0;

        ArrayList mfList = new ArrayList();

        for (int i = 0; i < selection.Length; i++)
        {
            Component[] meshfilter = selection[i].GetComponentsInChildren(typeof(MeshFilter));

            for (int m = 0; m < meshfilter.Length; m++)
            {
                exportedObjects++;
                mfList.Add(meshfilter[m]);
            }
        }

        if (exportedObjects > 0)
        {
            MeshFilter[] mf = new MeshFilter[mfList.Count];

            for (int i = 0; i < mfList.Count; i++)
            {
                mf[i] = (MeshFilter)mfList[i];
            }

            string filename = EditorSceneManager.GetActiveScene().name + "_" + exportedObjects;

            int stripIndex = filename.LastIndexOf(Path.DirectorySeparatorChar);

            if (stripIndex >= 0)
                filename = filename.Substring(stripIndex + 1).Trim();

            MeshesToFile(mf, targetFolder, filename);


            EditorUtility.DisplayDialog("Objects exported", "Exported " + exportedObjects + " objects to " + filename, "");
        }
        else
            EditorUtility.DisplayDialog("Objects not exported", "Make sure at least some of your selected objects have mesh filters!", "");
    }


    [MenuItem("Custom/Export/Export each selected to single OBJ")]
    static void ExportEachSelectionToSingle()
    {
        if (!CreateTargetFolder())
            return;

        Transform[] selection = Selection.GetTransforms(SelectionMode.Editable | SelectionMode.ExcludePrefab);

        if (selection.Length == 0)
        {
            EditorUtility.DisplayDialog("No source object selected!", "Please select one or more target objects", "");
            return;
        }

        int exportedObjects = 0;


        for (int i = 0; i < selection.Length; i++)
        {
            // 没有meshFilter,添加一个meshFilter.
            SkinnedMeshRenderer[] meshfilterRender = selection[i].GetComponentsInChildren<SkinnedMeshRenderer>();
            for (int j = 0; j < meshfilterRender.Length; j++)
            {
                if (meshfilterRender[j].GetComponent<MeshFilter>() == null)
                {
                    meshfilterRender[j].gameObject.AddComponent<MeshFilter>();
                    meshfilterRender[j].GetComponent<MeshFilter>().sharedMesh = Instantiate(meshfilterRender[j].sharedMesh);
                }
            }

            Component[] meshfilter = selection[i].GetComponentsInChildren<MeshFilter>();
            MeshFilter[] mf = new MeshFilter[meshfilter.Length];
            int m = 0;
            for (; m < meshfilter.Length; m++)
            {
                exportedObjects++;
                mf[m] = (MeshFilter)meshfilter[m];
            }

            MeshesToFile(mf, targetFolder, selection[i].name + "_" + i);
        }

        if (exportedObjects > 0)
        {
            EditorUtility.DisplayDialog("Objects exported", "Exported " + exportedObjects + " objects", "");
        }
        else
            EditorUtility.DisplayDialog("Objects not exported", "Make sure at least some of your selected objects have mesh filters!", "");
    }

}
可以直接复制到直接的项目中使用。
五、怎么使用呢?
首先把代码拷贝到项目中,直接下载工程也行。
步骤一
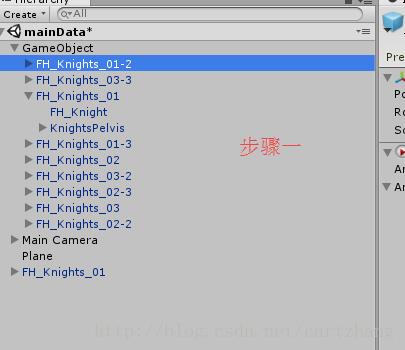
图8
步骤二
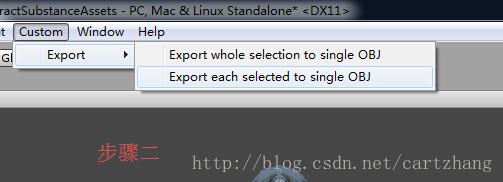
图10
步骤三
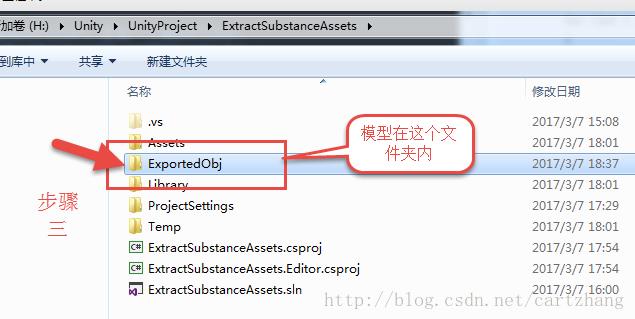
图11
就可以使用你的模型编辑工具来查看了。
五、源码和示例工程
源码地址:
https://github.com/cartzhang/unity_lab/blob/master/ExportFbx/UnityAssetExportFBX/Assets/Editor/OBJExport/EditorObjExporter.cs
示例工程地址:
https://github.com/cartzhang/unity_lab/tree/master/ExportFbx/UnityAssetExportFBX
博客图片地址:
https://github.com/cartzhang/unity_lab/tree/master/ExportFbx/Img
Github readme:
https://github.com/cartzhang/unity_lab/blob/master/ExportFbx/Unity%20asset%E6%96%87%E4%BB%B6%20%E5%AF%BC%E5%87%BAOBJ.md
六、参考
【1】http://www.xuanyusong.com/archives/3618
【2】https://forums.inxile-entertainment.com/viewtopic.php?t=13724
【3】http://www.cnblogs.com/Niger123/p/4261763.html
【4】http://prog3.com/sbdm/download/download/akof1314/9097153
【5】http://wiki.unity3d.com/index.php?title=ObjExporter
【6】https://github.com/KellanHiggins/UnityFBXExporter/tree/master/Assets/Packages/UnityFBXExporter
七,最后但不是不重要
Asset导出成FBX的格式:https://github.com/cartzhang/UnityFBXExporter
与上面介绍的不是一个方法,但是思路都一样。这个源码可以把纹理和材质都匹配上去,当然我也做了稍微的修改,修复了之前的小bug。
非常感谢,欢迎留言!!
以上是关于Unity3D Asset文件导出3DMax 可编辑格式的主要内容,如果未能解决你的问题,请参考以下文章