IOS开发基础知识--碎片35
Posted
tags:
篇首语:本文由小常识网(cha138.com)小编为大家整理,主要介绍了IOS开发基础知识--碎片35相关的知识,希望对你有一定的参考价值。
1:ios视图控制对象生命周期
init-初始化程序
viewDidLoad-加载视图
viewWillAppear-UIViewController对象的视图即将加入窗口时调用;
viewDidApper-UIViewController对象的视图已经加入到窗口时调用;
viewWillDisappear-UIViewController对象的视图即将消失、被覆盖或是隐藏时调用;
viewDidDisappear-UIViewController对象的视图已经消失、被覆盖或是隐藏时调用;
执行时间顺序
15:51:44.811inHyron[483:b903] init
15:51:54.081inHyron[483:b903] viewDidLoad
15:51:54.082inHyron[483:b903] viewVillAppear
15:51:54.084 inHyron[483:b903] viewDidAppear
很明显,先执行init、然后执行viewDidLoad,然后是viewWillAppear最后是viewDidAppear,这样视图就创建好了,当视图消失或者被覆盖的时候:
15:54:14.557inHyron[483:b903] viewWillDisappear
15:54:14.558inHyron[483:b903] viewDidDisappear
这样一来视图就消失了
2:初始化一个有默认值实例类
userManager.h文件内容:

#import <Foundation/Foundation.h>

@interface userManager : NSObject

@property(nonatomic,copy)NSString *userName;
@property(nonatomic,copy)NSString *passWord;
@property (assign, nonatomic) NSInteger type;

+(userManager *)userManagerWithType:(NSInteger)type;

-(NSString *)toGetParams;

-(void)configWithObj:(userManager *)userManagerInfo;

@end

userManager.m文件内容:

#import "userManager.h"

@implementation userManager


- (instancetype)init
{
    self = [super init];
    if (self) {
        _userName=@"root";
        _passWord=@"123456";
        _type = 0;
    }
    return self;
}

+(userManager *)userManagerWithType:(NSInteger)type
{
    userManager *myManager=[[userManager alloc]init];
    myManager.type=type;
    return myManager;
}

-(void)configWithObj:(userManager *)userManagerInfo
{
    self.userName=userManagerInfo.userName;
    self.passWord=userManagerInfo.passWord;
    self.type=userManagerInfo.type;
}

-(NSString *)toGetParams
{
    return [NSString stringWithFormat:@"当前用户:%@ 密码:%@",self.userName,self.passWord];
}

@end

调用代码:

userManager *myManager=[userManager userManagerWithType:4];
NSLog(@"用户信息:%@",myManager.toGetParams);
3:NSHTTPCookieStorage(获取和删除cookie)
取出cookie

NSArray *cookiesArray = [[NSHTTPCookieStorage sharedHTTPCookieStorage] cookies];
NSDictionary *cookieDict = [NSHTTPCookie requestHeaderFieldsWithCookies:cookiesArray];
NSString *cookie = [cookieDict objectForKey:@"Cookie"];
//设置http的header的cookie
[urlRequest setValue:cookie forHTTPHeaderField:@"Cookie”];

删除cookie

NSArray *cookiesArray = [[NSHTTPCookieStorage sharedHTTPCookieStorage] cookies];
for (NSHTTPCookie *cookie in cookiesArray) {
    [[NSHTTPCookieStorage sharedHTTPCookieStorage] deleteCookie:cookie];
}
4:iOS关于在UITableView中,实现多个cell中不同的倒计时实现
//所有剩余时间数组
NSMutableArray *totalLastTime;
在网络请求到的所有数据中,根据需要将其中要进行倒计时显示的数据中的剩余时间单独保存出来,如果这里是所有的数据都需要倒计时,则只需要保存时间即可,如果是有部分数据才需要倒计时,则可以保存字典,两个键值对分别为其在UITableView的indexPath和剩余时间:num默认从0开始
NSDictionary *dic = @{@"indexPath":[NSStrin stringWithFormat:@"%i",num],@"lastTime": order.payLastTime};
 [totalLastTime addObject:dic];
开启定时器方法:
- (void)startTimer
{
    timer = [NSTimer scheduledTimerWithTimeInterval:1 target:selfselector:@selector(refreshLessTime) userInfo:@"" repeats:YES];

如果不添加下面这条语句,在UITableView拖动的时候,会阻塞定时器的调用
    [[NSRunLoop currentRunLoop] addTimer:timer forMode:UITrackingRunLoopMode];

}

主要的定时器中的方法,在该方法中,遍历totalLastTime,取出其中保存的lasttime和indexpath,time用来显示,在显示完后自减,indexpath代表对应显示的位置,在一次循环后,将新的time和没有改变的indexpath从新替换totalLastTime 中对应位置的元素,以此保证每一秒执行时,显示time都是最新的。
- (void)refreshLessTime
{
    NSUInteger time;
    for (int i = 0; i < totalLastTime.count; i++) {
        time = [[[totalLastTime objectAtIndex:i] objectForKey:@"lastTime"]integerValue];
        NSIndexPath *indexPath = [NSIndexPath indexPathForItem:0 inSection:[[[totalLastTime objectAtIndex:i] objectForKey:@"indexPath"] integerValue]];
        WLServiceOrderTableViewCell *cell = (WLServiceOrderTableViewCell *)[_tableView cellForRowAtIndexPath:indexPath];
        cell.remainingTimeLabel.text = [NSString stringWithFormat:@"剩余支付时间:%@",[self lessSecondToDay:--time]];
        NSDictionary *dic = @{@"indexPath": [NSStringstringWithFormat:@"%i",indexPath.section],@"lastTime": [NSStringstringWithFormat:@"%i",time]};
        [totalLastTime replaceObjectAtIndex:i withObject:dic];
    }
}

- (NSString *)lessSecondToDay:(NSUInteger)seconds
{
    NSUInteger day  = (NSUInteger)seconds/(24*3600);
    NSUInteger hour = (NSUInteger)(seconds%(24*3600))/3600;
    NSUInteger min  = (NSUInteger)(seconds%(3600))/60;
    NSUInteger second = (NSUInteger)(seconds%60);

    NSString *time = [NSString stringWithFormat:@"%lu日%lu小时%lu分钟%lu秒",(unsigned long)day,(unsigned long)hour,(unsigned long)min,(unsigned long)second];
    return time;

}
5:如何运用Method Swizzling动态插入一些操作
假设工程中有很多ViewController,但有个操作每个页面都有,以前都是每个页面都去编写相同的代码,其实用Method Swizzling就可以解决这个问题,比如RDVTabBarController这个只在四个首页才显示出来,其它页面都进行隐藏;
a:创建一个扩展类:UIViewController+Swizzle
.h文件的内容:
#import <UIKit/UIKit.h>
#import <objc/runtime.h>
#import "RDVTabBarController.h"

@interface UIViewController (Swizzle)

@end
.m文件的内容:
#import "UIViewController+Swizzle.h"

@implementation UIViewController (Swizzle)

+ (void)load
{
    SEL origSel = @selector(viewDidAppear:);
    SEL swizSel = @selector(swiz_viewDidAppear:);
    [UIViewController swizzleMethods:[self class] originalSelector:origSel swizzledSelector:swizSel];

    SEL vcWillAppearSel=@selector(viewWillAppear:);
    SEL swizWillAppearSel=@selector(swiz_viewWillAppear:);
    [UIViewController swizzleMethods:[self class] originalSelector:vcWillAppearSel swizzledSelector:swizWillAppearSel];
}

+ (void)swizzleMethods:(Class)class originalSelector:(SEL)origSel swizzledSelector:(SEL)swizSel
{
    Method origMethod = class_getInstanceMethod(class, origSel);
    Method swizMethod = class_getInstanceMethod(class, swizSel);

    //class_addMethod will fail if original method already exists
    BOOL didAddMethod = class_addMethod(class, origSel, method_getImplementation(swizMethod), method_getTypeEncoding(swizMethod));
    if (didAddMethod) {
        class_replaceMethod(class, swizSel, method_getImplementation(origMethod), method_getTypeEncoding(origMethod));
    } else {
        //origMethod and swizMethod already exist
        method_exchangeImplementations(origMethod, swizMethod);
    }
}

- (void)swiz_viewDidAppear:(BOOL)animated
{
    //可以对控制器名称做过滤 达到过滤哪些是不操作
    NSString *curClassName=NSStringFromClass([self class]);
    if (curClassName.length>0&&([curClassName isEqualToString:@"BDCustomerListViewController"]||[curClassName isEqualToString:@"BDOrdersViewController"]||[curClassName isEqualToString:@"BDDiscoverViewController"]||[curClassName isEqualToString:@"BDMineInfoViewController"])) {
        [self.rdv_tabBarController setTabBarHidden:NO animated:YES];
    }
    //需要注入的代码写在此处
    [self swiz_viewDidAppear:animated];
}

-(void)swiz_viewWillAppear:(BOOL)animated
{
    if ([[self.navigationController childViewControllers] count] > 1) {
        [self.rdv_tabBarController setTabBarHidden:YES animated:YES];
    }
    [self swiz_viewWillAppear:animated];
}

@end
说明:+ (void)load 方法是一个类方法,当某个类的代码被读到内存后,runtime会给每个类发送 + (void)load 消息。因此 + (void)load 方法是一个调用时机相当早的方法,而且不管父类还是子类,其 + (void)load 方法都会被调用到,很适合用来插入swizzling方法
b:调用在main.m引入这个扩展类
#import <UIKit/UIKit.h>

#import "AppDelegate.h"

#import "UIViewController+Swizzle.h"

int main(int argc, char * argv[]) {

    @autoreleasepool {

        return UIApplicationMain(argc, argv, nil, NSStringFromClass([AppDelegate class]));

    }

 }
6:IOS关于UIImageView的拉伸问题
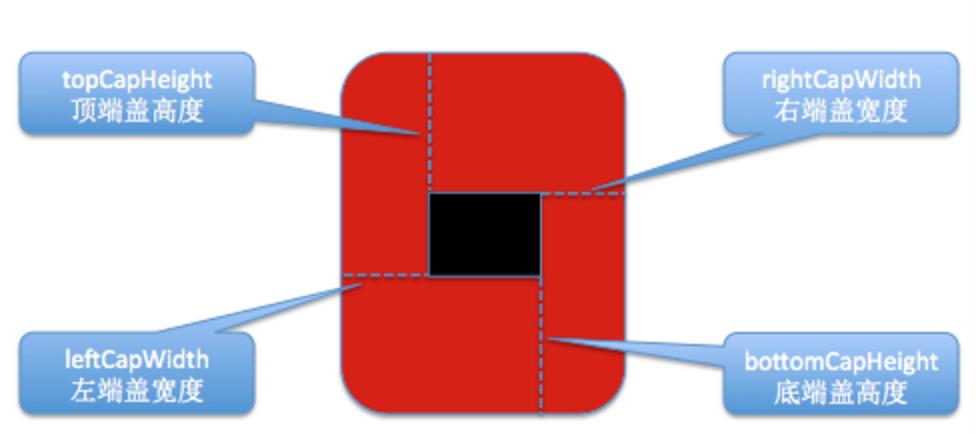
指定这4个宽度后 会形成黑色模块 直白点就是 这块内容就是拉伸后中间那块不断填充的部分
UIImage* img=[UIImage imageNamed:@"2.png"];//原图
UIEdgeInsets edge=UIEdgeInsetsMake(0, 10, 0,10);
     //UIImageResizingModeStretch:拉伸模式,通过拉伸UIEdgeInsets指定的矩形区域来填充图片 上下左右都会
     //UIImageResizingModeTile:平铺模式,通过重复显示UIEdgeInsets指定的矩形区域来填充图
img= [img resizableImageWithCapInsets:edge resizingMode:UIImageResizingModeStretch];
self.imageView.image=img;

项目中的运用:
        self.myImageView=[[UIImageView alloc]initWithFrame:CGRectMake(0, 100, 184, 25)];

        UIImage *curImage=[UIImage imageNamed:@"form_no_selected_icon"];

        UIEdgeInsets edge=UIEdgeInsetsMake(0, 40, 0,25);

        curImage= [curImage resizableImageWithCapInsets:edge resizingMode:UIImageResizingModeStretch];

        self.myImageView.image=curImage;

        [self.view addSubview:self.myImageView];
如果只是左右拉伸就用UIImageResizingModeStretch,关于edge的值左右自个根据实际的大小进行确定,把以这块进行拉伸,特别要注意2X跟3X的图片;