Django框架
一、什么是web框架
框架,即framework,特指为解决一个开放性问题而设计的具有一定约束性的支撑结构,使用框架可以帮你快速开发特定的系统,简单地说,就是你用别人搭建好的舞台来做表演。 对于所有的Web应用,本质上其实就是一个socket服务端,用户的浏览器其实就是一个socket客户端。
示例:自己写一个框架
myWeb.py

from wsgiref.simple_server import make_server


import time

def foo1(req):
    f=open("index2.html","rb")
    data=f.read()
    return data

def foo2(req):
    f=open("index1.html","rb")
    data=f.read()
    return data

def login(req):
    print(req["QUERY_STRING"])

    return b"welcome!"

def signup(req):
    pass

def show_time(req):
   times=time.ctime()

   #return ("<h1>time:%s</h1>"%str(times)).encode("utf8")
   f=open("show_time.html","rb")

   data=f.read()
   data=data.decode("utf8")
   data=data.replace("{{time}}",str(times))

   return data.encode("utf8")

def router():
    url_patterns=[
        ("/login",login),
        ("/signup",signup),
        ("/yuan",foo2),
        ("/alex",foo1),
        ("/show_time",show_time),

    ]

    return url_patterns

def application(environ, start_response):

    print("path",environ["PATH_INFO"])
    path=environ["PATH_INFO"]

    start_response(\'200 OK\', [(\'Content-Type\', \'text/html\')])

    url_patterns=router()

    func=None
    for item in url_patterns:
        if item[0]==path:
            func=item[1]
            break
    if func:
          return [func(environ)]
    else:
        return [b"404"]


httpd = make_server(\'\', 8080, application)

print(\'Serving HTTP on port 8080...\')
# 开始监听HTTP请求:
httpd.serve_forever()
show_time.html

<!DOCTYPE html>
<html lang="en">
<head>
    <meta charset="UTF-8">
    <script src="jquery-3.1.1.js"></script>
    <title>Title</title>

</head>
<body>

<h1>时间:{{time}}</h1>

</body>
</html>
login.html

<!DOCTYPE html>
<html lang="en">
<head>
    <meta charset="UTF-8">
    <script src="jquery-3.1.1.js"></script>
    <title>Title</title>

</head>
<body>


<form action="http://127.0.0.1:8080/login" method="get">
    <p>用户名<input type="text" name="user"></p>
    <p>密码<input type="password" name="pwd"></p>
    <p><input type="submit">提交</p>
</form>

</body>
</html>
index1.html

<!DOCTYPE html>
<html lang="en">
<head>
    <meta charset="UTF-8">
    <script src="jquery-3.1.1.js"></script>
    <title>Title</title>

</head>
<body>

<h1>hello nulige</h1>

</body>
</html>
index2.html

<!DOCTYPE html>
<html lang="en">
<head>
    <meta charset="UTF-8">
    <script src="jquery-3.1.1.js"></script>
    <title>Title</title>

</head>
<body>

<h1>hello alex</h1>

</body>
</html>
最简单的Web应用就是先把HTML用文件保存好,用一个现成的HTTP服务器软件,接收用户请求,从文件中读取HTML,返回。 如果要动态生成HTML,就需要把上述步骤自己来实现。不过,接受HTTP请求、解析HTTP请求、发送HTTP响应都是苦力活,如果我们自己来写这些底层代码,还没开始写动态HTML呢,就得花个把月去读HTTP规范。 正确的做法是底层代码由专门的服务器软件实现,我们用Python专注于生成HTML文档。因为我们不希望接触到TCP连接、HTTP原始请求和响应格式,所以,需要一个统一的接口,让我们专心用Python编写Web业务。 这个接口就是WSGI:Web Server Gateway Interface。
二、MVC和MTV模式
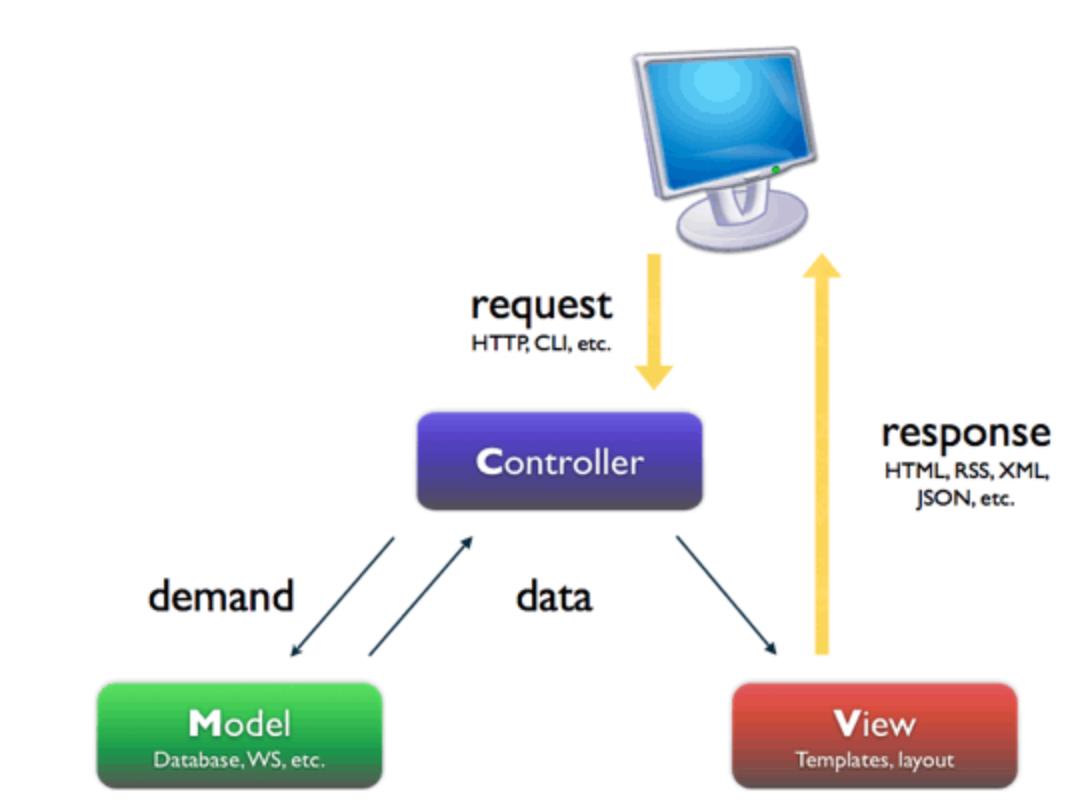
著名的MVC模式:所谓MVC就是把web应用分为模型(M),控制器(C),视图(V)三层;他们之间以一种插件似的,松耦合的方式连接在一起。
模型负责业务对象与数据库的对象(ORM),视图负责与用户的交互(页面),控制器(C)接受用户的输入调用模型和视图完成用户的请求。

Django的MTV模式本质上与MVC模式没有什么差别,也是各组件之间为了保持松耦合关系,只是定义上有些许不同,Django的MTV分别代表:
Model(模型):负责业务对象与数据库的对象(ORM)
Template(模版):负责如何把页面展示给用户
View(视图):负责业务逻辑,并在适当的时候调用Model和Template
此外,Django还有一个url分发器,它的作用是将一个个URL的页面请求分发给不同的view处理,view再调用相应的Model和Template。

三、django的流程和命令行工具
django实现流程
django
    #安装: pip3 install django

          添加环境变量

    #1  创建project
       django-admin startproject mysite

       ---mysite

          ---settings.py
          ---url.py
          ---wsgi.py

       ---- manage.py(启动文件)

    #2  创建APP
       python mannage.py startapp  app01

    #3  settings配置

       TEMPLATES

       STATICFILES_DIRS=(
            os.path.join(BASE_DIR,"statics"),
        )

       STATIC_URL = \'/static/\'
       #  我们只能用 STATIC_URL,但STATIC_URL会按着你的STATICFILES_DIRS去找#4  根据需求设计代码
           url.py
           view.py

    #5  使用模版
       render(req,"index.html")

    #6  启动项目
       python manage.py runserver  127.0.0.1:8090

    #7  连接数据库,操作数据
       model.py
django的命令行工具
django-admin.py 是Django的一个用于管理任务的命令行工具,manage.py是对django-admin.py的简单包装,每一个Django Project里都会有一个mannage.py。
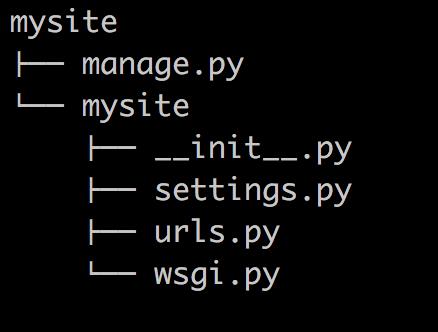
<1> 创建一个django工程 : django-admin.py startproject mysite
当前目录下会生成mysite的工程,目录结构如下:

- manage.py ----- Django项目里面的工具,通过它可以调用django shell和数据库等。
- settings.py ---- 包含了项目的默认设置,包括数据库信息,调试标志以及其他一些工作的变量。
- urls.py ----- 负责把URL模式映射到应用程序。
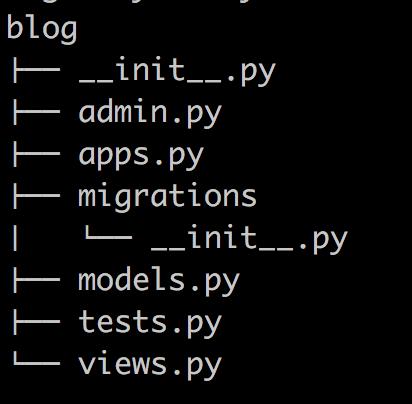
<2>在mysite目录下创建blog应用: python manage.py startapp blog

<3>启动django项目:python manage.py runserver 8080
这样我们的django就启动起来了!当我们访问:http://127.0.0.1:8080/时就可以看到:

<4>生成同步数据库的脚本:python manage.py makemigrations
同步数据库: python manage.py migrate
注意:在开发过程中,数据库同步误操作之后,难免会遇到后面不能同步成功的情况,解决这个问题的一个简单粗暴方法是把migrations目录下
的脚本(除__init__.py之外)全部删掉,再把数据库删掉之后创建一个新的数据库,数据库同步操作再重新做一遍。
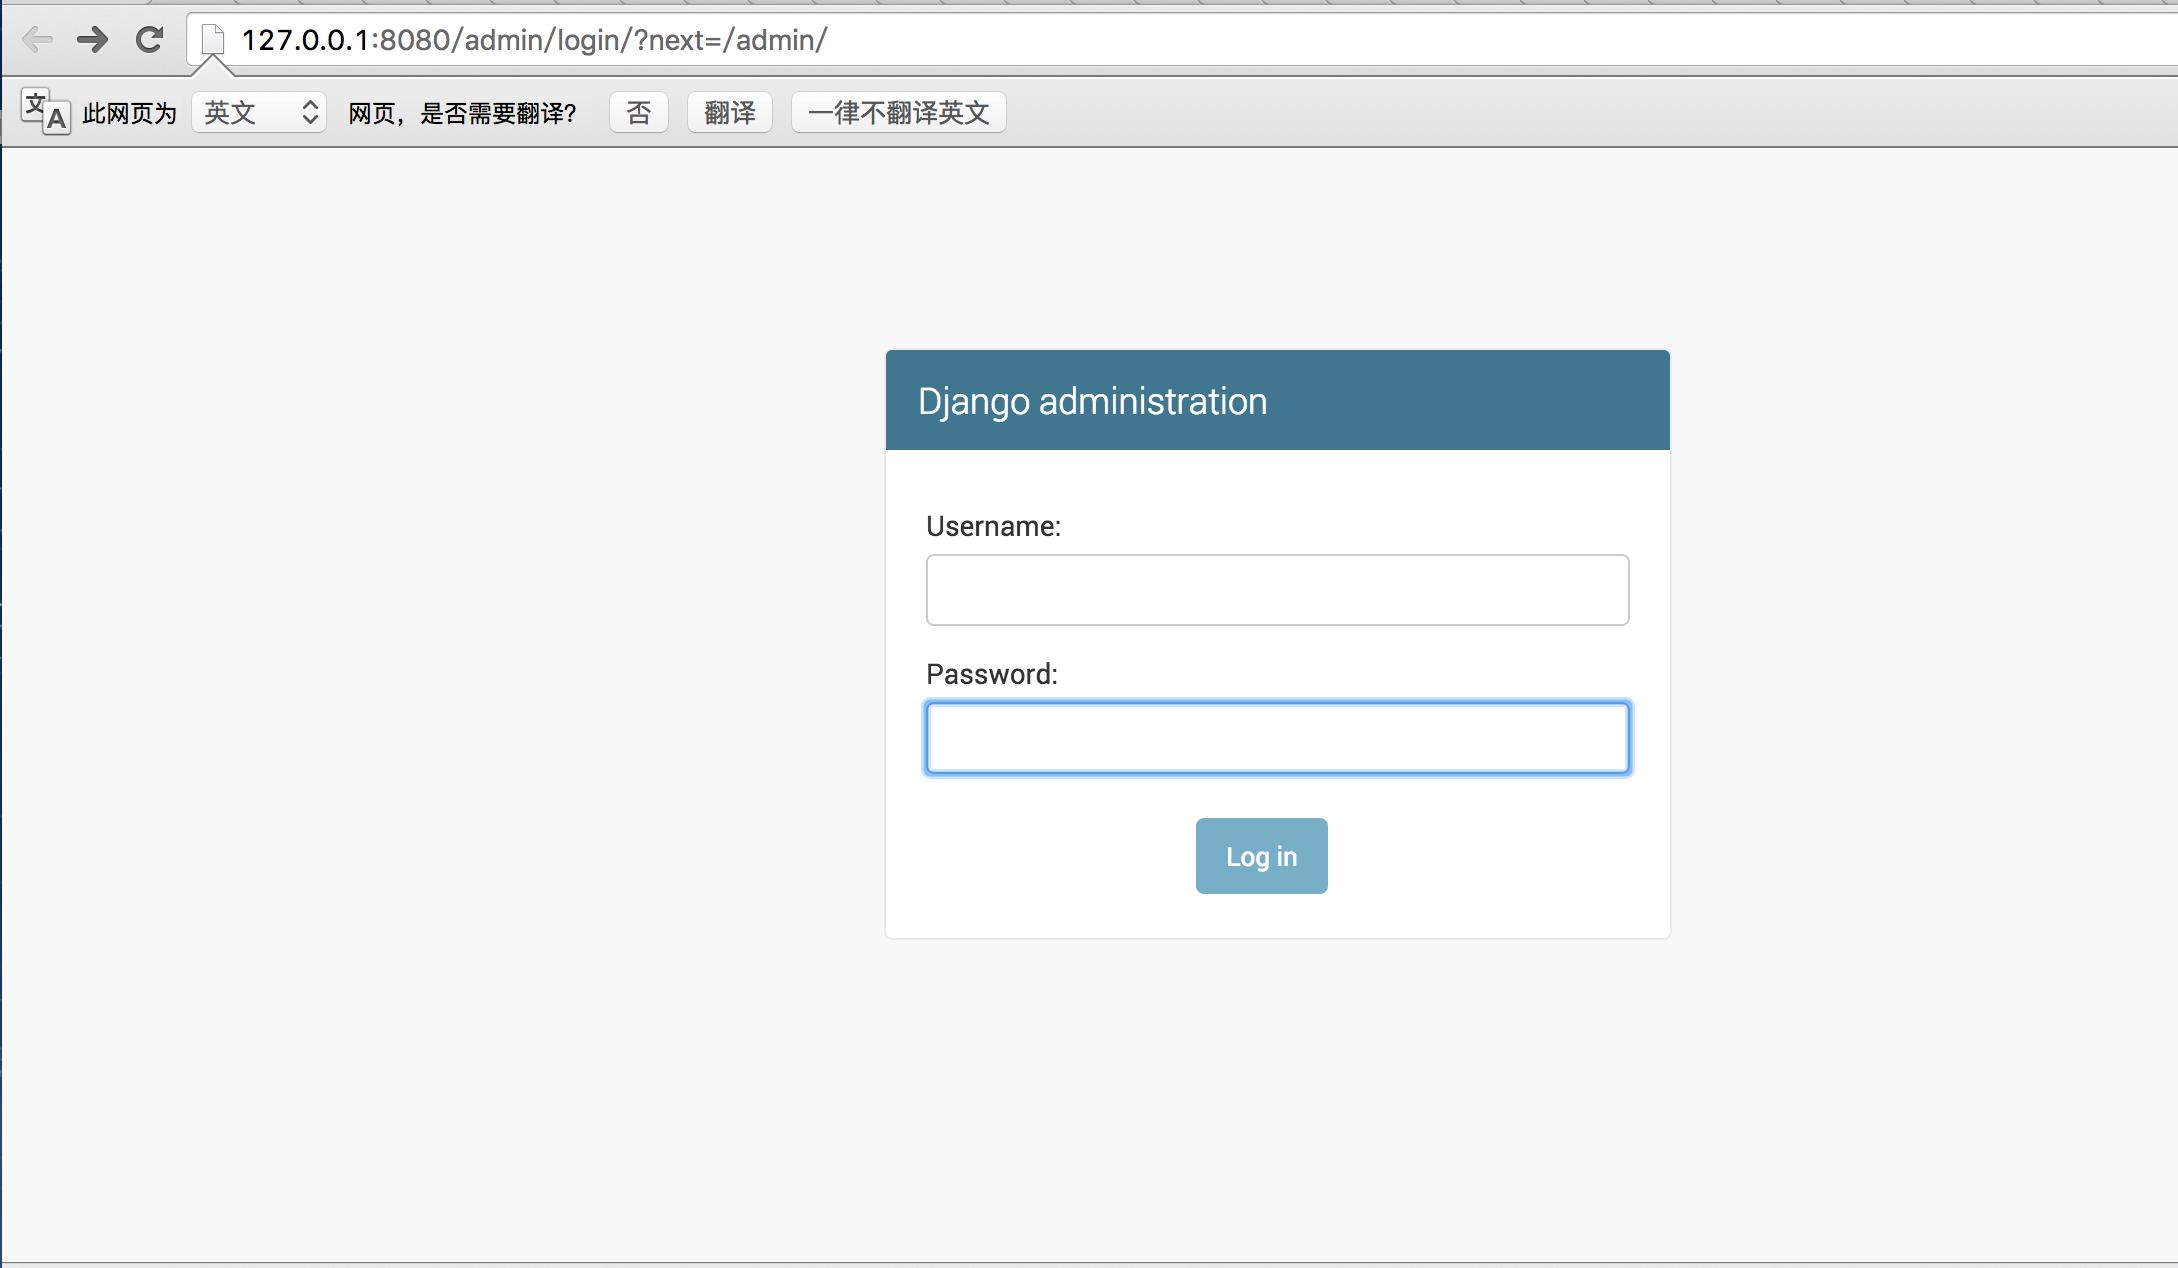
<5>当我们访问http://127.0.0.1:8080/admin/时,会出现:

所以我们需要为进入这个项目的后台创建超级管理员:python manage.py createsuperuser,设置好用户名和密码后便可登录啦!
<6>清空数据库:python manage.py flush
<7>查询某个命令的详细信息: django-admin.py help startapp
admin 是Django 自带的一个后台数据库管理系统。
<8>启动交互界面 :python manage.py shell
这个命令和直接运行 python 进入 shell 的区别是:你可以在这个 shell 里面调用当前项目的 models.py 中的 API,对于操作数据,还有一些小测试非常方便。
<9> 终端上输入python manage.py 可以看到详细的列表,在忘记子名称的时候特别有用。
实例练习1-提交数据并展示
<!DOCTYPE html>
<html lang="en">
<head>
    <meta charset="UTF-8">
    <title>Title</title>
</head>
<body>
<h1>创建个人信息</h1>

<form action="/userInfor/" method="post">

    <p>姓名<input type="text" name="username"></p>
    <p>性别<input type="text" name="sex"></p>
    <p>邮箱<input type="text" name="email"></p>
    <p><input type="submit" value="submit"></p>

</form>

<hr>

<h1>信息展示</h1>

<table border="1">

    <tr>
        <td>姓名</td>
        <td>性别</td>
        <td>邮箱</td>
    </tr>
    {% for i in info_list %}

        <tr>
            <td>{{ i.username }}</td>
            <td>{{ i.sex }}</td>
            <td>{{ i.email }}</td>
        </tr>

    {% endfor %}

</table>

</body>
</html>


-----------------------url.py---------------------------------------
url(r\'^userInfor/\', views.userInfor)

-----------------------views.py--------------------------------------

info_list=[]

def userInfor(req):

    if req.method=="POST":
        username=req.POST.get("username",None)
        sex=req.POST.get("sex",None)
        email=req.POST.get("email",None)

        info={"username":username,"sex":sex,"email":email}
        info_list.append(info)

    return render(req,"userInfor.html",{"info_list":info_list})
实例练习2-提交数据并展示(数据库)
<!DOCTYPE html>
<html lang="en">
<head>
    <meta charset="UTF-8">
    <title>Title</title>
</head>
<body>
<h1>创建个人信息</h1>

<form action="/userInfor/" method="post">

    <p>姓名<input type="text" name="username"></p>
    <p>性别<input type="text" name="sex"></p>
    <p>邮箱<input type="text" name="email"></p>
    <p><input type="submit" value="submit"></p>

</form>

<hr>

<h1>信息展示</h1>

<table border="1">

    <tr>
        <td>姓名</td>
        <td>性别</td>
        <td>邮箱</td>
    </tr>
    {% for i in info_list %}

        <tr>
            <td>{{ i.username }}</td>
            <td>{{ i.sex }}</td>
            <td>{{ i.email }}</td>
        </tr>

    {% endfor %}

</table>

</body>
</html>


----------------------------------------------models.py
from django.db import models

# Create your models here.


class UserInfor(models.Model):

    username=models.CharField(max_length=64)
    sex=models.CharField(max_length=64)
    email=models.CharField(max_length=64)

----------------------------------------------views.py

from django.shortcuts import render

from app01 import models
# Create your views here.


def userInfor(req):

    if req.method=="POST":
        u=req.POST.get("username",None)
        s=req.POST.get("sex",None)
        e=req.POST.get("email",None)


       #---------表中插入数据方式一
            # info={"username":u,"sex":e,"email":e}
            # models.UserInfor.objects.create(**info)

       #---------表中插入数据方式二
        models.UserInfor.objects.create(
            username=u,
            sex=s,
            email=e
        )

        info_list=models.UserInfor.objects.all()

        return render(req,"userInfor.html",{"info_list":info_list})

    return render(req,"userInfor.html")
四 Django的配置文件(settings)
静态文件设置:
一、概述:

     #静态文件交由Web服务器处理,Django本身不处理静态文件。简单的处理逻辑如下(以nginx为例):

     #          URI请求-----> 按照Web服务器里面的配置规则先处理,以nginx为例,主要求配置在nginx.
                             #conf里的location

                         |---------->如果是静态文件,则由nginx直接处理

                         |---------->如果不是则交由Django处理,Django根据urls.py里面的规则进行匹配

    # 以上是部署到Web服务器后的处理方式,为了便于开发,Django提供了在开发环境的对静态文件的处理机制,方法是这样:

    #1、在INSTALLED_APPS里面加入\'django.contrib.staticfiles\',

    #2、在urls.py里面加入
       if settings.DEBUG:
           urlpatterns += patterns(\'\', url(r\'^media/(?P<path>.*)$\',
           \'django.views.static.serve\', {\'document_root\': settings.MEDIA_ROOT }),
            url(r\'^static/(?P<path>.*)$\',
          \'django.views.static.serve\',{\'document_root\':settings.STATIC_ROOT}), )

    # 3、这样就可以在开发阶段直接使用静态文件了。

二、MEDIA_ROOT和MEDIA_URL

        #而静态文件的处理又包括STATIC和MEDIA两类,这往往容易混淆,在Django里面是这样定义的:

        #MEDIA:指用户上传的文件,比如在Model里面的FileFIeld,ImageField上传的文件。如果你定义

        #MEDIA_ROOT=c:\\temp\\media,那么File=models.FileField(upload_to="abc/")#,上传的文件就会被保存到c:\\temp\\media\\abc
        #eg:
            class blog(models.Model):
                   Title=models.charField(max_length=64)
                   Photo=models.ImageField(upload_to="photo")
        #     上传的图片就上传到c:\\temp\\media\\photo,而在模板中要显示该文件,则在这样写
        #在settings里面设置的MEDIA_ROOT必须是本地路径的绝对路径,一般是这样写:
                 BASE_DIR= os.path.abspath(os.path.dirname(__file__))
                 MEDIA_ROOT=os.path.join(BASE_DIR,\'media/\').replace(\'\\\\\',\'/\')

        #MEDIA_URL是指从浏览器访问时的地址前缀,举个例子:
            MEDIA_ROOT=c:\\temp\\media\\photo
            MEDIA_URL="/data/"
        #在开发阶段,media的处理由django处理:

        #    访问http://localhost/data/abc/a.png就是访问c:\\temp\\media\\photo\\abc\\a.png

        #    在模板里面这样写<img src="{{MEDIA_URL}}abc/a.png">

        #    在部署阶段最大的不同在于你必须让web服务器来处理media文件,因此你必须在web服务器中配置,
        #  以便能让web服务器能访问media文件
        #    以nginx为例,可以在nginx.conf里面这样:

                 location ~/media/{
                       root/temp/
                       break;
                    }

        #    具体可以参考如何在nginx部署django的资料。

三、STATIC_ROOT和STATIC_URL、
    STATIC主要指的是如css,js,images这样文件,在settings里面可以配置STATIC_ROOT和STATIC_URL,
    配置方式与MEDIA_ROOT是一样的,但是要注意

    #STATIC文件一般保存在以下位置:

    #1、STATIC_ROOT:在settings里面设置,一般用来放一些公共的js,css,images等。

    #2、app的static文件夹,在每个app所在文夹均可以建立一个static文件夹,然后当运行collectstatic时,
    #    Django会遍历INSTALL_APPS里面所有app的static文件夹,将里面所有的文件复制到STATIC_ROOT。因此,
    #   如果你要建立可复用的app,那么你要将该app所需要的静态文件放在static文件夹中。

    # 也就是说一个项目引用了很多app,那么这个项目所需要的css,images等静态文件是分散在各个app的static文件的,比
    #  较典型的是admin应用。当你要发布时,需要将这些分散的static文件收集到一个地方就是STATIC_ROOT。

    #3、STATIC文件还可以配置STATICFILES_DIRS,指定额外的静态文件存储位置。
    #  STATIC_URL的含义与MEDIA_URL类似。

    # ----------------------------------------------------------------------------
    #注意1:
        #为了后端的更改不会影响前端的引入,避免造成前端大量修改

        STATIC_URL = \'/static/\'               #引用名
        STATICFILES_DIRS = (
            os.path.join(BASE_DIR,"statics")  #实际名 ,即实际文件夹的名字
        )

        #django对引用名和实际名进行映射,引用时,只能按照引用名来,不能按实际名去找
        #<script src="/statics/jquery-3.1.1.js"></script>
        #------error-----不能直接用,必须用STATIC_URL = \'/static/\':
        #<script src="/static/jquery-3.1.1.js"></script>

    #注意2(statics文件夹写在不同的app下,静态文件的调用):

        STATIC_URL = \'/static/\'

        STATICFILES_DIRS=(
            (\'hello\',os.path.join(BASE_DIR,"app01","statics")) ,
        )

        #<script src="/static/hello/jquery-1.8.2.min.js"></script>

    #注意3:
        STATIC_URL = \'/static/\'
        {% load staticfiles %}
       # <script src={% static "jquery-1.8.2.min.js" %}></script>
其它重要参数设置:
APPEND_SLASH
       Default: True
       When set to True, if the request URL does not match any of the patterns in the URLconf and it
       doesn’t end in a slash, an HTTP redirect is issued to the same URL with a slash appended. Note
       that the redirect may cause any data submitted in a POST request to be lost.
五 Django URL (路由系统)
URL配置(URLconf)就像Django 所支撑网站的目录。它的本质是URL模式以及要为该URL模式调用的视图函数之间的映射表;你就是以这种方式告诉Django,对于这个URL调用这段代码,对于那个URL调用那段代码。
urlpatterns = [
    url(正则表达式, views视图函数,参数,别名),
]
参数说明:
- 一个正则表达式字符串
- 一个可调用对象,通常为一个视图函数或一个指定视图函数路径的字符串
- 可选的要传递给视图函数的默认参数(字典形式)
- 一个可选的name参数
5.1 Here’s a sample URLconf:
from django.conf.urls import url
from django.contrib import admin

from app01 import views

urlpatterns = [

    url(r\'^articles/2003/$\', views.special_case_2003),

    #url(r\'^articles/[0-9]{4}/$\', views.year_archive),

    url(r\'^articles/([0-9]{4})/$\', views.year_archive),  #no_named group

    url(r\'^articles/([0-9]{4})/([0-9]{2})/$\', views.month_archive),

    url(r\'^articles/([0-9]{4})/([0-9]{2})/([0-9]+)/$\', views.article_detail),

]
Note:
#1   There’s no need to add a leading slash, because every URL has that. For
#    example, it’s ^articles, not ^/articles.

#2   A request to /articles/2005/03/ would match the third entry in the list.
#    Django would call the function views.month_archive(request, \'2005\', \'03\').

#3   /articles/2005/3/ would not match any URL patterns

#4   /articles/2003/ would match the first pattern in the list, not the second one

#5   /articles/2003/03/03/ would match the final pattern. Django would call the
#    functionviews.article_detail(request, \'2003\', \'03\', \'03\').
5.2 Named groups
The above example used simple, non-named regular-expression groups (via parenthesis) to capture bits of the URL and pass them as positional arguments to a view. In more advanced usage, it’s possible to use named regular-expression groups to capture URL bits and pass them as keyword arguments to a view.
In Python regular expressions, the syntax for named regular-expression groups is (?P<name>pattern), where name is the name of the group and pattern is some pattern to match.
Here’s the above example URLconf, rewritten to use named groups:
import re

ret=re.search(\'(?P<id>\\d{3})/(?P<name>\\w{3})\',\'weeew34ttt123/ooo\')

print(ret.group())
print(ret.group(\'id\'))
print(ret.group(\'name\'))

ready
from django.conf.urls import url

from . import views

urlpatterns = [
    url(r\'^articles/2003/$\', views.special_case_2003),
    url(r\'^articles/(?P<year>[0-9]{4})/$\', views.year_archive),
    url(r\'^articles/(?P<year>[0-9]{4})/(?P<month>[0-9]{2})/$\', views.month_archive),
    url(r\'^articles/(?P<year>[0-9]{4})/(?P<month>[0-9]{2})/(?P<day>[0-9]{2})/$\', views.article_detail),
]
This accomplishes exactly the same thing as the previous example, with one subtle difference: The captured values are passed to view functions as keyword arguments rather than positional arguments.
5.3 Passing extra options to view functions
URLconfs have a hook that lets you pass extra arguments to your view functions, as a Python dictionary.
The django.conf.urls.url() function can take an optional third argument which should be a dictionary of extra keyword arguments to pass to the view function.
For example:
from django.conf.urls import url
from . import views

urlpatterns = [
    url(r\'^blog/(?P<year>[0-9]{4})/$\', views.year_archive, {\'foo以上是关于Django框架的主要内容,如果未能解决你的问题,请参考以下文章
