CSS3 流动边框(仿王者荣耀等待效果)的三种实现方式
Posted
tags:
篇首语:本文由小常识网(cha138.com)小编为大家整理,主要介绍了CSS3 流动边框(仿王者荣耀等待效果)的三种实现方式相关的知识,希望对你有一定的参考价值。
参考技术A <!DOCTYPE html><html>
<head>
<meta charset="utf8">
<style>
:root
--border-anim-size: 10em;
--border-anim-width: calc(var(--border-anim-size) / 20);
--border-anim-width-double: calc(var(--border-anim-width)*2);
--border-anim-duration: 5s;
--border-anim-border-color: gray;
--border-anim-hover-color: LightCoral;
body
display: flex;
.border-anim
width: var(--border-anim-size);
height: var(--border-anim-size);
position: relative;
border: 1px solid var(--border-anim-border-color);
.border-anim::before, .border-anim::after
content: '';
position: absolute;
border: var(--border-anim-width) solid var(--border-anim-border-color);
/* 让边框在内容区域内绘制 */
box-sizing: border-box;
transition: background-color 1s;
.border-anim::before
animation: anim-border-run calc(var(--border-anim-duration) * 2) linear infinite;
.border-anim::after
animation: anim-border-run calc(var(--border-anim-duration) * 2) calc(var(--border-anim-duration) / -1) linear infinite;
.border-anim:hover::before, .border-anim:hover::after
background-color: var(--border-anim-hover-color);
.border-anim-content
width: calc(100% - var(--border-anim-width-double));
height: calc(100% - var(--border-anim-width-double));
margin: var(--border-anim-width);
border: 1px solid var(--border-anim-border-color);
@keyframes anim-border-run
/* 这里将动画分成了4步;也可以改为2步,这时before和after用的就要是两套keyframes了 */
from, to
width: var(--border-anim-width-double);
height: 100%;
top: 0;
left: 0;
25%
width: 100%;
height: var(--border-anim-width-double);
top: calc(100% - var(--border-anim-width-double));
left: 0;
50%
width: var(--border-anim-width-double);
height: 100%;
top: 0;
left: calc(100% - var(--border-anim-width-double));
75%
width: 100%;
height: var(--border-anim-width-double);
top: 0%;
left: 0%;
/* 需要设置临界效果,否则会渐变 */
from, to, 24.9%
border-left-color: var(--border-anim-border-color);
border-top-color: transparent;
border-right-color: transparent;
border-bottom-color: var(--border-anim-border-color);
25%, 49.9%
border-left-color: transparent;
border-top-color: transparent;
border-right-color: var(--border-anim-border-color);
border-bottom-color: var(--border-anim-border-color);
50%, 74.9%
border-left-color: transparent;
border-top-color: var(--border-anim-border-color);
border-right-color: var(--border-anim-border-color);
border-bottom-color: transparent;
75%, 99.9%
border-left-color: var(--border-anim-border-color);
border-top-color: var(--border-anim-border-color);
border-right-color: transparent;
border-bottom-color: transparent;
</style>
<style>
.border-anim2
width: var(--border-anim-size);
height: var(--border-anim-size);
position: relative;
border: 1px solid var(--border-anim-border-color);
.border-anim2-edge
position: absolute;
/* 必须把其他边框置0,否则有默认值存在 */
border: 0px solid var(--border-anim-border-color);
box-sizing: border-box;
/*
注意:CSS中不能前向选择,而只能后向选择!
因为如果CSS支持了父选择器,那就必须要页面所有子元素加载完毕才能渲染HTML文档,
因为所谓“父选择器”,就是后代元素影响祖先元素,如果后代元素还没加载处理,如何影响祖先元素的样式?
于是,网页渲染呈现速度就会大大减慢,浏览器会出现长时间的白板。
*/
/* 波浪号和加号都是选择其后的元素,区别是加号只取一个,波浪取所有
.border-anim-content:hover ~ .border-anim2-edge */
.border-anim2:hover > .border-anim2-edge
background-color: var(--border-anim-hover-color);
.border-anim2-left
width: var(--border-anim-width-double);
height: 100%;
left: 0;
border-left-width: var(--border-anim-width);
animation: anim2-border-run-left var(--border-anim-duration) calc(var(--border-anim-duration) / -2) linear infinite;
.border-anim2-top
height: var(--border-anim-width-double);
width: 100%;
top: 0;
border-top-width: var(--border-anim-width);
animation: anim2-border-run-top var(--border-anim-duration) linear infinite;
.border-anim2-right
width: var(--border-anim-width-double);
height: 100%;
right: 0;
border-right-width: var(--border-anim-width);
animation: anim2-border-run-right var(--border-anim-duration) calc(var(--border-anim-duration) / -2) linear infinite;
.border-anim2-bottom
height: var(--border-anim-width-double);
width: 100%;
bottom: 0;
border-bottom-width: var(--border-anim-width);
animation: anim2-border-run-bottom var(--border-anim-duration) linear infinite;
@keyframes anim2-border-run-left
from, to
height: 0;
50%
height: 100%;
from, to, 49.9%
top: 0;
bottom: auto;
50%, 99.9%
top: auto;
bottom: 0;
@keyframes anim2-border-run-top
from, to
width: 0;
50%
width: 100%;
from, to, 49.9%
left: auto;
right: 0;
50%, 99.9%
left: 0;
right: auto;
@keyframes anim2-border-run-right
from, to
height: 0;
50%
height: 100%;
from, to, 49.9%
top: auto;
bottom: 0;
50%, 99.9%
top: 0;
bottom: auto;
@keyframes anim2-border-run-bottom
from, to
width: 0;
50%
width: 100%;
from, to, 49.9%
left: 0;
right: auto;
50%, 99.9%
left: auto;
right: 0;
</style>
<style>
.border-anim3
width: var(--border-anim-size);
height: var(--border-anim-size);
position: relative;
border: 1px solid var(--border-anim-border-color);
box-sizing: border-box;
.border-anim3::before, .border-anim3::after
content: '';
position: absolute;
width: 100%;
height: 100%;
top: 0;
left: 0;
.border-anim3::before
box-shadow: 0 0 0 var(--border-anim-width) var(--border-anim-border-color) inset;
animation: anim3-border-run calc(var(--border-anim-duration) * 2) calc(var(--border-anim-duration) / -1) linear infinite;
.border-anim3::after
box-shadow: 0 0 0 var(--border-anim-width) var(--border-anim-border-color) inset;
animation: anim3-border-run calc(var(--border-anim-duration) * 2) linear infinite;
.border-anim3:hover::before, .border-anim3:hover::after
/* 如果只在hover的时候设置transition,那么进入有效,但是退出无效(即退出时不会有缓动) */
transition: background-color 1s;
background-color: var(--border-anim-hover-color);
@keyframes anim3-border-run
/*
clip通过对元素进行剪切来控制元素的可显示区域(clip的区域显示,其他隐藏)
clip属性只能在元素设置了“position:absolute”或者“position:fixed”属性起作用
shape函数声明:rect(top right bottom left)
rect()和<top>和<bottom>指定偏移量是从元素盒子顶部边缘算起;<left>和<right>指定的偏移量是从元素盒子左边边缘算起(包括边框)。
如果<right>和<bottom>设置为auto时,他们就相当于元素的宽度(这个宽度包括元素的border、padding和width),或者简单的理解为100%
注意:1.值不能设置为百分比。 2.在动画设置过程里不能使用auto,使用auto没有动画效果(因此建议使用SCSS或者LESS之类的预处理器)
*/
/*
clip动画有3种方案,但是都有点小瑕疵(在线条粗的时候明显,线条细的情况下完全看不出来)
(1)使用如下的1和9作为边界,当拐弯的时候,尾部多余的边界会跟着动
(2)将下面的1和9替换为0和10,当拐弯的时候,线条宽度会变为0
(3)在每个状态后面一步立即重置它,但是会出现抖动
*/
from, to
clip: rect(0, 1em, 10em, 0);
1%
clip: rect(1em, 1em, 10em, 0);
25%
clip: rect(9em, 10em, 10em, 0);
25.1%
clip: rect(9em, 10em, 10em, 1em);
50%
clip: rect(0, 10em, 10em, 9em);
50.1%
clip: rect(0, 10em, 9em, 9em);
75%
clip: rect(0, 10em, 1em, 0);
75.1%
clip: rect(0, 9em, 1em, 0);
</style>
</head>
<body>
<section>
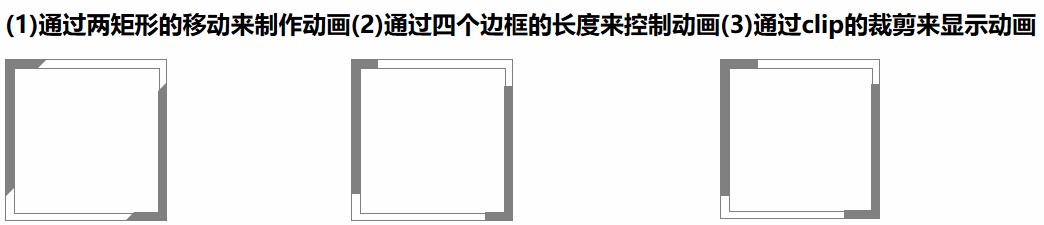
<h1>(1)通过两矩形的移动来制作动画</h1>
<div class="border-anim">
<div class="border-anim-content"></div>
</div>
</section>
<section>
<h1>(2)通过四个边框的长度来控制动画</h1>
<div class="border-anim2">
<div class="border-anim-content"></div>
<div class="border-anim2-edge border-anim2-left"></div>
<div class="border-anim2-edge border-anim2-top"></div>
<div class="border-anim2-edge border-anim2-right"></div>
<div class="border-anim2-edge border-anim2-bottom"></div>
</div>
</section>
<section>
<h1>(3)通过clip的裁剪来显示动画</h1>
<div class="border-anim3">
<div class="border-anim-content"></div>
</div>
<section>
</body>
</html>
对web开发技术感兴趣的同学,欢迎私信我加群,不管你是小白还是大牛我都欢迎,还有大牛整理的一套高效率学习路线和教程与您免费分享,同时每天更新视频资料。
最后,祝大家早日学有所成,拿到满意offer,快速升职加薪,走上人生巅峰
CSS3 流动边框(仿王者荣耀等待效果)的三种实现方式
<!DOCTYPE html>
<html>
<head>
<meta charset="utf8">
<style>
:root
	--border-anim-size: 10em;
	--border-anim-width: calc(var(--border-anim-size) / 20);
	--border-anim-width-double: calc(var(--border-anim-width)*2);
	--border-anim-duration: 5s;
	--border-anim-border-color: gray;
	--border-anim-hover-color: LightCoral;

body
	display: flex;

.border-anim
	width: var(--border-anim-size);
	height: var(--border-anim-size);
	position: relative;
	border: 1px solid  var(--border-anim-border-color);

.border-anim::before, .border-anim::after
	content: '';
	position: absolute;
	border: var(--border-anim-width) solid var(--border-anim-border-color);
	/* 让边框在内容区域内绘制 */
	box-sizing: border-box;
	transition: background-color 1s;

.border-anim::before
	animation: anim-border-run calc(var(--border-anim-duration) * 2) linear infinite;

.border-anim::after
	animation: anim-border-run calc(var(--border-anim-duration) * 2) calc(var(--border-anim-duration) / -1) linear infinite;

.border-anim:hover::before, .border-anim:hover::after
	background-color: var(--border-anim-hover-color);

.border-anim-content
	width: calc(100% - var(--border-anim-width-double));
	height: calc(100% - var(--border-anim-width-double));
	margin: var(--border-anim-width);
	border: 1px solid var(--border-anim-border-color);

@keyframes anim-border-run
	/* 这里将动画分成了4步;也可以改为2步,这时before和after用的就要是两套keyframes了 */
	from, to
		width: var(--border-anim-width-double);
		height: 100%;
		top: 0;
		left: 0;

	25%
		width: 100%;
		height: var(--border-anim-width-double);
		top: calc(100% - var(--border-anim-width-double));
		left: 0;

	50%
		width: var(--border-anim-width-double);
		height: 100%;
		top: 0;
		left: calc(100% - var(--border-anim-width-double));

	75%
		width: 100%;
		height: var(--border-anim-width-double);
		top: 0%;
		left: 0%;

	/* 需要设置临界效果,否则会渐变 */
	from, to, 24.9%
		border-left-color: var(--border-anim-border-color);
		border-top-color: transparent;
		border-right-color: transparent;
		border-bottom-color: var(--border-anim-border-color);

	25%, 49.9%
		border-left-color: transparent;
		border-top-color: transparent;
		border-right-color: var(--border-anim-border-color);
		border-bottom-color: var(--border-anim-border-color);

	50%, 74.9%
		border-left-color: transparent;
		border-top-color: var(--border-anim-border-color);
		border-right-color: var(--border-anim-border-color);
		border-bottom-color: transparent;

	75%, 99.9%
		border-left-color: var(--border-anim-border-color);
		border-top-color: var(--border-anim-border-color);
		border-right-color: transparent;
		border-bottom-color: transparent;


</style>
<style>
.border-anim2
	width: var(--border-anim-size);
	height: var(--border-anim-size);
	position: relative;
	border: 1px solid var(--border-anim-border-color);

.border-anim2-edge
	position: absolute;
	/* 必须把其他边框置0,否则有默认值存在 */
	border: 0px solid var(--border-anim-border-color);
	box-sizing: border-box;

/*
注意:CSS中不能前向选择,而只能后向选择!
因为如果CSS支持了父选择器,那就必须要页面所有子元素加载完毕才能渲染HTML文档,
因为所谓“父选择器”,就是后代元素影响祖先元素,如果后代元素还没加载处理,如何影响祖先元素的样式?
于是,网页渲染呈现速度就会大大减慢,浏览器会出现长时间的白板。
*/
/* 波浪号和加号都是选择其后的元素,区别是加号只取一个,波浪取所有
.border-anim-content:hover ~ .border-anim2-edge  */
.border-anim2:hover > .border-anim2-edge
	background-color: var(--border-anim-hover-color);

.border-anim2-left
	width: var(--border-anim-width-double);
	height: 100%;
	left: 0;
	border-left-width: var(--border-anim-width);
	animation: anim2-border-run-left var(--border-anim-duration) calc(var(--border-anim-duration) / -2) linear infinite;

.border-anim2-top
	height: var(--border-anim-width-double);
	width: 100%;
	top: 0;
	border-top-width: var(--border-anim-width);
	animation: anim2-border-run-top var(--border-anim-duration) linear infinite;

.border-anim2-right
	width: var(--border-anim-width-double);
	height: 100%;
	right: 0;
	border-right-width: var(--border-anim-width);
	animation: anim2-border-run-right var(--border-anim-duration) calc(var(--border-anim-duration) / -2) linear infinite;

.border-anim2-bottom
	height: var(--border-anim-width-double);
	width: 100%;
	bottom: 0;
	border-bottom-width: var(--border-anim-width);
	animation: anim2-border-run-bottom var(--border-anim-duration) linear infinite;

@keyframes anim2-border-run-left
	from, to
		height: 0;

	50%
		height: 100%;

	from, to, 49.9%
		top: 0;
		bottom: auto;

	50%, 99.9%
		top: auto;
		bottom: 0;


@keyframes anim2-border-run-top
	from, to
		width: 0;

	50%
		width: 100%;

	from, to, 49.9%
		left: auto;
		right: 0;

	50%, 99.9%
		left: 0;
		right: auto;


@keyframes anim2-border-run-right
	from, to
		height: 0;

	50%
		height: 100%;

	from, to, 49.9%
		top: auto;
		bottom: 0;

	50%, 99.9%
		top: 0;
		bottom: auto;


@keyframes anim2-border-run-bottom
	from, to
		width: 0;

	50%
		width: 100%;

	from, to, 49.9%
		left: 0;
		right: auto;

	50%, 99.9%
		left: auto;
		right: 0;


</style>
<style>
.border-anim3
	width: var(--border-anim-size);
	height: var(--border-anim-size);
	position: relative;
	border: 1px solid var(--border-anim-border-color);
	box-sizing: border-box;

.border-anim3::before, .border-anim3::after
	content: '';
	position: absolute;
	width: 100%;
	height: 100%;
	top: 0;
	left: 0;

.border-anim3::before
	box-shadow: 0 0 0 var(--border-anim-width) var(--border-anim-border-color) inset;
	animation: anim3-border-run calc(var(--border-anim-duration) * 2) calc(var(--border-anim-duration) / -1) linear infinite;

.border-anim3::after
	box-shadow: 0 0 0 var(--border-anim-width) var(--border-anim-border-color) inset;
	animation: anim3-border-run calc(var(--border-anim-duration) * 2) linear infinite;

.border-anim3:hover::before, .border-anim3:hover::after
	/* 如果只在hover的时候设置transition,那么进入有效,但是退出无效(即退出时不会有缓动) */
	transition: background-color 1s;
	background-color: var(--border-anim-hover-color);

@keyframes anim3-border-run
	/*
	clip通过对元素进行剪切来控制元素的可显示区域(clip的区域显示,其他隐藏)
	clip属性只能在元素设置了“position:absolute”或者“position:fixed”属性起作用
	shape函数声明:rect(top right bottom left)
	rect()和<top>和<bottom>指定偏移量是从元素盒子顶部边缘算起;<left>和<right>指定的偏移量是从元素盒子左边边缘算起(包括边框)。
	如果<right>和<bottom>设置为auto时,他们就相当于元素的宽度(这个宽度包括元素的border、padding和width),或者简单的理解为100%
	注意:1.值不能设置为百分比。 2.在动画设置过程里不能使用auto,使用auto没有动画效果(因此建议使用SCSS或者LESS之类的预处理器)
	*/
	/*
	clip动画有3种方案,但是都有点小瑕疵(在线条粗的时候明显,线条细的情况下完全看不出来)
	(1)使用如下的1和9作为边界,当拐弯的时候,尾部多余的边界会跟着动
	(2)将下面的1和9替换为0和10,当拐弯的时候,线条宽度会变为0
	(3)在每个状态后面一步立即重置它,但是会出现抖动
	*/
	from, to
		clip: rect(0, 1em, 10em, 0);

	1%
		clip: rect(1em, 1em, 10em, 0);

	25%
		clip: rect(9em, 10em, 10em, 0);

	25.1%
		clip: rect(9em, 10em, 10em, 1em);

	50%
		clip: rect(0, 10em, 10em, 9em);

	50.1%
		clip: rect(0, 10em, 9em, 9em);

	75%
		clip: rect(0, 10em, 1em, 0);

	75.1%
		clip: rect(0, 9em, 1em, 0);


</style>
</head>
<body>
<section>
<h1>(1)通过两矩形的移动来制作动画</h1>
<div class="border-anim">
	<div class="border-anim-content"></div>
</div>
</section>
<section>
<h1>(2)通过四个边框的长度来控制动画</h1>
<div class="border-anim2">
	<div class="border-anim-content"></div>
	<div class="border-anim2-edge border-anim2-left"></div>
	<div class="border-anim2-edge border-anim2-top"></div>
	<div class="border-anim2-edge border-anim2-right"></div>
	<div class="border-anim2-edge border-anim2-bottom"></div>
</div>
</section>
<section>
<h1>(3)通过clip的裁剪来显示动画</h1>
<div class="border-anim3">
	<div class="border-anim-content"></div>
</div>
<section>
</body>
</html>
以上是关于CSS3 流动边框(仿王者荣耀等待效果)的三种实现方式的主要内容,如果未能解决你的问题,请参考以下文章
HTML5期末考核大作业 基于HTML+CSS+JavaScript仿王者荣耀首页 游戏网站开发 游戏官网设计与实现...