第三次课:使用注解的方式配置springMVC
Posted
tags:
篇首语:本文由小常识网(cha138.com)小编为大家整理,主要介绍了第三次课:使用注解的方式配置springMVC相关的知识,希望对你有一定的参考价值。
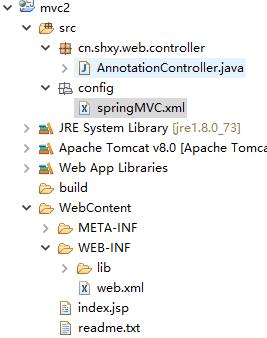
第一部分:程序结构

第二部分:配置与测试
1、配置扫描包
      <!-- 配置扫描包 -->
      <context:component-scan base-package="cn.shxy.web.controller" />
2、启用注解
      <!-- 启用注解 -->
      <bean class="org.springframework.web.servlet.mvc.annotation.AnnotationMethodHandlerAdapter"/>
      <bean class="org.springframework.web.servlet.mvc.annotation.DefaultAnnotationHandlerMapping"/>
3、编写请求代码
package cn.shxy.web.controller;

import org.springframework.stereotype.Controller;
import org.springframework.web.bind.annotation.RequestMapping;
import org.springframework.web.bind.annotation.RequestMethod;
import org.springframework.web.servlet.ModelAndView;

/**
 * Controller类
 * @author John
 *
 */
@Controller
public class AnnotationController {

    /**
     * 请求路径配置
     * @return
     */
    @RequestMapping(value = "/user/hello", method = RequestMethod.GET)
    public ModelAndView hello() {
        return new ModelAndView("/index", "msg", "张三");
    }

    @RequestMapping(value = "/test/index", method = RequestMethod.GET)
    public ModelAndView index() {
        return new ModelAndView("/index", "msg", "李四");
    }
}
4、测试
打开浏览器,浏览路径:http://localhost:8080/mvc1/test/index

第三部分:注解优化
1、启用注解优化
      <!-- 启用注解 -->
      <mvc:annotation-driven />
2、@RequestMapping优化
@RequestMapping("/test/hello")
    public String hello(HttpServletRequest request) {
        request.setAttribute("msg", "张三");
        return "/index";
    }
3、请求路径优化
package cn.shxy.web.controller;

import javax.servlet.http.HttpServletRequest;

import org.springframework.stereotype.Controller;
import org.springframework.web.bind.annotation.RequestMapping;

/**
 * Controller类
 * @author John
 *
 */
@Controller
@RequestMapping("/user")
public class AnnotationController {

    /**
     * 请求路径配置
     * @return
     */
    @RequestMapping("/test/hello")
    public String hello(HttpServletRequest request) {
        request.setAttribute("msg", "张三");
        return "/index";
    }

    @RequestMapping("/gxt/index")
    public String index(HttpServletRequest request) {
        request.setAttribute("msg", "张三");
        return "/index";
    }
}
以上是关于第三次课:使用注解的方式配置springMVC的主要内容,如果未能解决你的问题,请参考以下文章