mariadb-10.1主从复制
Posted
tags:
篇首语:本文由小常识网(cha138.com)小编为大家整理,主要介绍了mariadb-10.1主从复制相关的知识,希望对你有一定的参考价值。
Mariadb版本:10.1.11
架构:node1.example.com(192.168.180.100)作为主服务器
node2.example.com(192.168.180.101)作为从服务器
Master:node1.example.com Slave:node2.example.com
主从复制原理介绍:mysql的二进制日志会记录所有对数据库进行更改的操作,也就是说只要是会对数据库产生修改的操作都会被记录到二进制日志中去。记录二进制日志的主要目的有两方面:
1、恢复(recovery)
2、复制(replication)
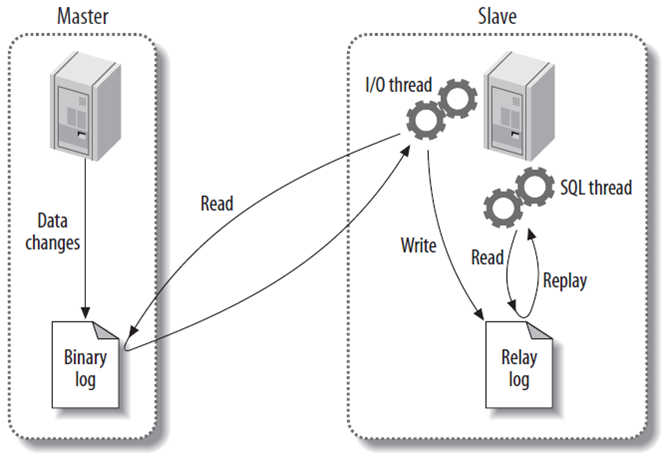
MySQL的复制就是基于二进制日志而完成的,其工作原理如下:
当Master的数据有更改的时候,Master会主动通知Slave,让Slave主动来Master要取二进制日志,于是Slave开启一个I/O thread,向Master请求二进制日志中记录的语句;Master将二进制日志中记录的语句发给Slave,Slave则将这些语句存到中继日志中,进而从中继日志中读取一句,执行一句,直到所有的语句被执行完。而经SQL语句从中继日志中读取出来,再一一执行的进程叫做SQL thread;将这些语句执行完之后,从服务器的数据就和主服务器的数据相同了,这就是所谓的MySQL主从复制;
由MySQL的主从复制原理可知:
1、Master必须开启二进制日志;
2、Slave必须开启中继日志;
3、Slave需关闭二进制日志;
4、Slave需连接到Master。
5、Master和Slave的server-id不得相同。
主从复制的配置:
Master(192.168.180.100):
1、改server-id;
2、启用二进制日志;
3、创建拥有复制权限的账号。
Slave(192.168.180.101):
1、改server-id;
2、启用中继日志;
3、连接主服务器;
4、启用复制线程。
实现过程:
Master:
[[email protected] ~]# vim /etc/my.cnf
    log-bin=/data/binlogs/mysql-bin
    server-id   = 1
#创建拥有复制权限的账号
MariaDB [(none)]> GRANT REPLICATION SLAVE, REPLICATION CLIENT ON *.* TO ‘repluser‘@‘192.
                    168.180.101‘ IDENTIFIED BY ‘redhat‘;
MariaDB [(none)]> FLUSH PRIVILEGES;
Slave:
[[email protected] ~]# vim /etc/my.cnf
    #log-bin=/data/binlogs/mysql-bin       #找到这一行,注释
    #binlog_format=mixed             #找到这一行,注释
    server-id   = 10             #在配置文件里修改这一行
    relay-log = /data/relaylogs/relay-bin   #添加这一行
[[email protected] ~]# mkdir /data/relaylogs
[[email protected] ~]# chown -R mysql:mysql /data/relaylogs/
[[email protected] ~]# service mysqld restart
MariaDB [(none)]> CHANGE MASTER TO MASTER_HOST=‘192.168.180.100‘, MASTER_USER=‘repluser‘,
         MASTER_PASSWORD=‘redhat‘;

    MariaDB [(none)]> SHOW SLAVE STATUS\G
*************************** 1. row ***************************
               Slave_IO_State: Waiting for master to send event
                  Master_Host: 192.168.180.100
                  Master_User: repluser
                  Master_Port: 3306
                Connect_Retry: 60
              Master_Log_File: mysql-bin.000004
          Read_Master_Log_Pos: 658
               Relay_Log_File: relay-bin.000006
                Relay_Log_Pos: 537
        Relay_Master_Log_File: mysql-bin.000004
             Slave_IO_Running: No
            Slave_SQL_Running: No
              Replicate_Do_DB:
          Replicate_Ignore_DB:
           Replicate_Do_Table:
       Replicate_Ignore_Table:
      Replicate_Wild_Do_Table:
  Replicate_Wild_Ignore_Table:
                   Last_Errno: 0
                   Last_Error:
                 Skip_Counter: 0
          Exec_Master_Log_Pos: 658
              Relay_Log_Space: 1526
              Until_Condition: None
               Until_Log_File:
                Until_Log_Pos: 0
           Master_SSL_Allowed: No
           Master_SSL_CA_File:
           Master_SSL_CA_Path:
              Master_SSL_Cert:
            Master_SSL_Cipher:
               Master_SSL_Key:
        Seconds_Behind_Master: 0
Master_SSL_Verify_Server_Cert: No
                Last_IO_Errno: 0
                Last_IO_Error:
               Last_SQL_Errno: 0
               Last_SQL_Error:
  Replicate_Ignore_Server_Ids:
             Master_Server_Id: 1
               Master_SSL_Crl:
           Master_SSL_Crlpath:
                   Using_Gtid: No
                  Gtid_IO_Pos:
      Replicate_Do_Domain_Ids:
  Replicate_Ignore_Domain_Ids:
                Parallel_Mode: conservative
MariaDB [(none)]> START SLAVE;
MariaDB [(none)]> START SLAVE;

    MariaDB [(none)]> SHOW SLAVE STATUS\G
*************************** 1. row ***************************
               Slave_IO_State: Waiting for master to send event
                  Master_Host: 192.168.180.100
                  Master_User: repluser
                  Master_Port: 3306
                Connect_Retry: 60
              Master_Log_File: mysql-bin.000004
          Read_Master_Log_Pos: 658
               Relay_Log_File: relay-bin.000006
                Relay_Log_Pos: 537
        Relay_Master_Log_File: mysql-bin.000004
             Slave_IO_Running: Yes
            Slave_SQL_Running: Yes
              Replicate_Do_DB:
          Replicate_Ignore_DB:
           Replicate_Do_Table:
       Replicate_Ignore_Table:
      Replicate_Wild_Do_Table:
  Replicate_Wild_Ignore_Table:
                   Last_Errno: 0
                   Last_Error:
                 Skip_Counter: 0
          Exec_Master_Log_Pos: 658
              Relay_Log_Space: 1526
              Until_Condition: None
               Until_Log_File:
                Until_Log_Pos: 0
           Master_SSL_Allowed: No
           Master_SSL_CA_File:
           Master_SSL_CA_Path:
              Master_SSL_Cert:
            Master_SSL_Cipher:
               Master_SSL_Key:
        Seconds_Behind_Master: 0
Master_SSL_Verify_Server_Cert: No
                Last_IO_Errno: 0
                Last_IO_Error:
               Last_SQL_Errno: 0
               Last_SQL_Error:
  Replicate_Ignore_Server_Ids:
             Master_Server_Id: 1
               Master_SSL_Crl:
           Master_SSL_Crlpath:
                   Using_Gtid: No
                  Gtid_IO_Pos:
      Replicate_Do_Domain_Ids:
  Replicate_Ignore_Domain_Ids:
                Parallel_Mode: conservative
到这里,MySQL的主从复制就已经搭建完成了,接下来,我们做一个验证。验证过程是这样的:1、在Master端创建数据库mydb,并在mydb数据库里创建表t1,并插入数据;
2、在Slave端查看是否有这样的库和表和表中的数据,当然前提是从服务器里面没有这样的表和库;
Master端:
MariaDB [(none)]> CREATE DATABASE mydb;
MariaDB [(none)]> USE mydb;
MariaDB [mydb]> CREATE TABLE t1 (ID INT NOT NULL);
MariaDB [mydb]> INSERT INTO t1 VALUES(1), (2), (3), (4);
MariaDB [mydb]> SELECT * FROM t1;
+-------+
| ID  |
+-------+
|   1  |
|   2  |
|   3  |
|   4  |
+-------+
Slave端进行查看:
MariaDB [(none)]> SHOW DATABASES;
+--------------------+
| Database           |
+--------------------+
| information_schema |
| mydb               |
| mysql              |
| performance_schema |
+--------------------+
MariaDB [(none)]> USE mydb;
Database changed
MariaDB [mydb]> SHOW TABLES;
+----------------+
| Tables_in_mydb |
+----------------+
| t1             |
+----------------+

MariaDB [mydb]> SELECT * FROM t1;
+----+
| ID |
+----+
|  1 |
|  2 |
|  3 |
|  4 |
+----+
至此,说明MySQL主从复制正常。。。
以上是关于mariadb-10.1主从复制的主要内容,如果未能解决你的问题,请参考以下文章
