CAS—改动默认登录页
Posted
tags:
篇首语:本文由小常识网(cha138.com)小编为大家整理,主要介绍了CAS—改动默认登录页相关的知识,希望对你有一定的参考价值。
1、 部署CAS-Server
本文以cas-server-3.4.11-release.zip为例。解压提取cas-server-3.4.11/modules/cas-server-webapp-3.4.11.war文件。然后,解压一个新的tomcat,我的文件夹为【H:\经常使用软件\03. Java\tomcat\apache-tomcat-6.0.33】,然后把上面提取的文件copy到 【H:\经常使用软件\03. Java\tomcat\apache-tomcat-6.0.33\webapps\】目下。并重命名为:cas.war。
例如以下图:
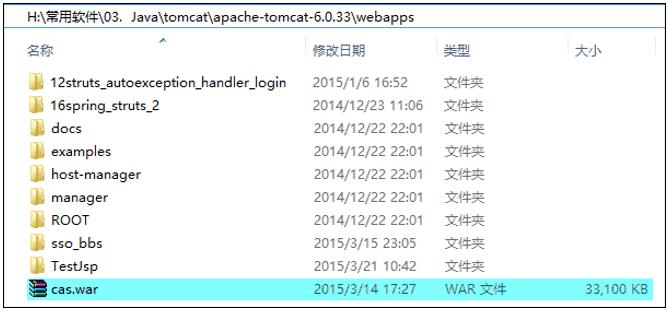
启动tomcat-cas。当cas.war部署成功后,会在当前文件夹上生成一个cas文件夹:
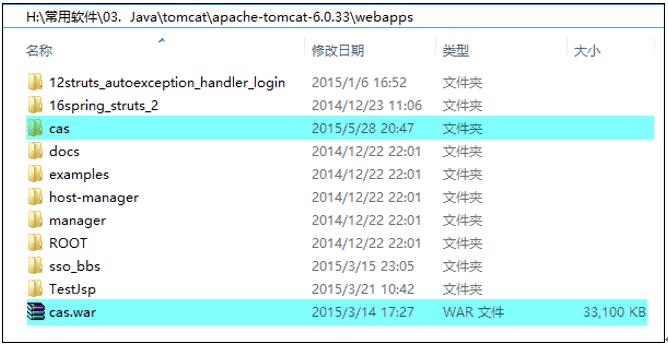
然后,在浏览器地址栏输入:http://localhost:8080/cas/login,回车可看到cas的默认登录页面:

这样代表CAS-Server已经部署成功了,可是我们在“生产环境”使用Web应用时肯定不能使用默认的登录页,须要定制与我们项目相关登录页。比如我这里简单地对在默认登录页基础上进行了改动。例如以下图:
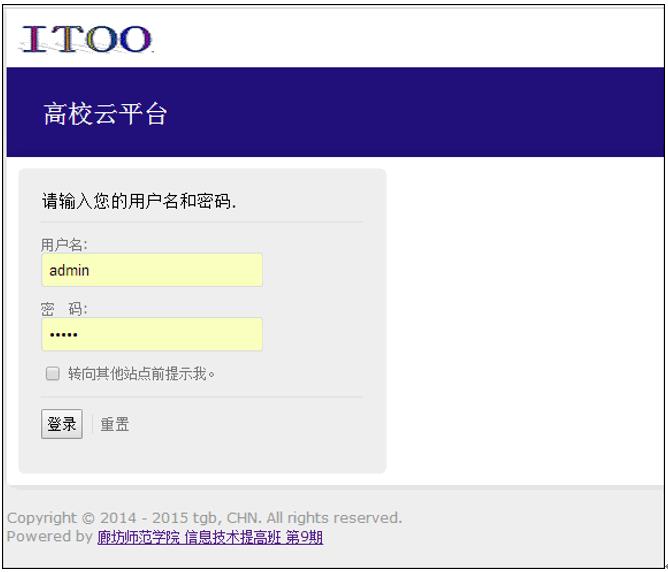
改动方法例如以下……
2、 改动步骤
首先。打开【H:\经常使用软件\03. Java\tomcat\apache-tomcat-6.0.33\webapps\cas】文件夹,该文件夹为cas文件夹,我们全部操作都在该文件夹下完毕。
要知道。cas统一认证的登陆页面位于:cas文件夹/WEB-INF/view/jsp/default/ui 文件夹里。当中casLoginView.jsp为登陆页面:
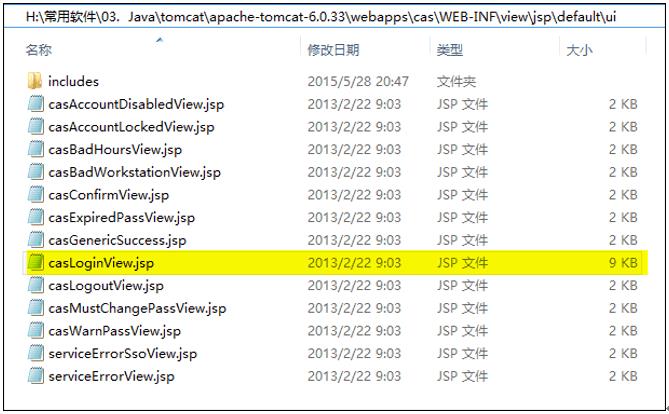
看到这个文件夹,从名字都能够知道,cas一些默认的页面都在这里。能够任意改动,它都是一些普通的jsp页面。
ok。以下就開始改动:
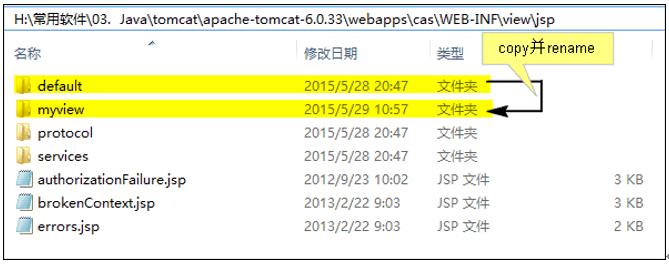
2.1 复制一份default目录。重命名为myview
主要是为了保留cas默认的一套jsp页面。我们将其拷贝一份,在副本上进行改动。然后更改配置,使得我们的那套副本jsp生效就可以。
例如以下图:
2.2 改动jsp
事实上从上面改动后的登录页能够看出。我改动的东西很少。这里我直接贴整个文件的代码了(里面详细改动的地方很easy。一看便知)。一共改动了3个jsp:
myview\ui文件夹下的casLoginView.jsp源代码例如以下:
<jsp:directive.include file="includes/top.jsp" />

<c:if test="${not pageContext.request.secure}">
</c:if>

  <div class="box fl-panel" id="login">
			<form:form method="post" id="fm1" cssClass="fm-v clearfix" commandName="${commandName}" htmlEscape="true">
                  <form:errors path="*" id="msg" cssClass="errors" element="div" />
                <!-- <spring:message code="screen.welcome.welcome" /> -->
                    <h2><spring:message code="screen.welcome.instructions" /></h2>
                    <div class="row fl-controls-left">
                        <label for="username" class="fl-label"><spring:message code="screen.welcome.label.netid" /></label>
						<c:if test="${not empty sessionScope.openIdLocalId}">
						<strong>${sessionScope.openIdLocalId}</strong>
						<input type="hidden" id="username" name="username" value="${sessionScope.openIdLocalId}" />
						</c:if>

						<c:if test="${empty sessionScope.openIdLocalId}">
						<spring:message code="screen.welcome.label.netid.accesskey" var="userNameAccessKey" />
						<form:input cssClass="required" cssErrorClass="error" id="username" size="25" tabindex="1" accesskey="${userNameAccessKey}" path="username" autocomplete="false" htmlEscape="true" />
						</c:if>
                    </div>
                    <div class="row fl-controls-left">
                        <label for="password" class="fl-label"><spring:message code="screen.welcome.label.password" /></label>
						<%--
						NOTE: Certain browsers will offer the option of caching passwords for a user.  There is a non-standard attribute,
						"autocomplete" that when set to "off" will tell certain browsers not to prompt to cache credentials.  For more
						information, see the following web page:
						http://www.geocities.com/technofundo/tech/web/ie_autocomplete.html
						--%>
						<spring:message code="screen.welcome.label.password.accesskey" var="passwordAccessKey" />
						<form:password cssClass="required" cssErrorClass="error" id="password" size="25" tabindex="2" path="password"  accesskey="${passwordAccessKey}" htmlEscape="true" autocomplete="off" />
                    </div>
                    <div class="row check">
                        <input id="warn" name="warn" value="true" tabindex="3" accesskey="<spring:message code="screen.welcome.label.warn.accesskey" />" type="checkbox" />
                        <label for="warn"><spring:message code="screen.welcome.label.warn" /></label>
                    </div>
                    <div class="row btn-row">
						<input type="hidden" name="lt" value="${loginTicket}" />
						<input type="hidden" name="execution" value="${flowExecutionKey}" />
						<input type="hidden" name="_eventId" value="submit" />

                        <input class="btn-submit" name="submit" accesskey="l" value="<spring:message code="screen.welcome.button.login" />" tabindex="4" type="submit" />
                        <input class="btn-reset" name="reset" accesskey="c" value="<spring:message code="screen.welcome.button.clear" />" tabindex="5" type="reset" />
                    </div>
            </form:form>
          </div>
<jsp:directive.include file="includes/bottom.jsp" />
myview\ui\includes文件夹下的top.jsp源代码例如以下:
<!DOCTYPE html PUBLIC "-//W3C//DTD XHTML 1.0 Strict//EN" "http://www.w3.org/TR/xhtml1/DTD/xhtml1-strict.dtd">
<%@ page session="true" %>
<%@ page pageEncoding="UTF-8" %>
<%@ page contentType="text/html; charset=UTF-8" %>
<%@ taglib prefix="c" uri="http://java.sun.com/jsp/jstl/core" %>
<%@ taglib prefix="spring" uri="http://www.springframework.org/tags" %>
<%@ taglib prefix="form" uri="http://www.springframework.org/tags/form" %>
<%@ taglib prefix="fn" uri="http://java.sun.com/jsp/jstl/functions" %>
<spring:theme code="mobile.custom.css.file" var="mobileCss" text="" />
<html xmlns="http://www.w3.org/1999/xhtml" lang="en">
	<head>
	    <title>CAS – Central Authentication Service</title>
        <c:if test="${not empty requestScope['isMobile'] and not empty mobileCss}">
             <meta name="viewport" content="width=device-width; initial-scale=1.0; maximum-scale=1.0; user-scalable=0;" />
             <meta name="apple-mobile-web-app-capable" content="yes" />
             <meta name="apple-mobile-web-app-status-bar-style" content="black" />
        </c:if>
		<spring:theme code="standard.custom.css.file" var="customCssFile" />
        <link type="text/css" rel="stylesheet" href="<c:url value="${customCssFile}" />" />
        <meta http-equiv="Content-Type" content="text/html; charset=UTF-8" />
	    <link rel="icon" href="<c:url value="/favicon.ico" />" type="image/x-icon" />
	</head>
	<body id="cas" class="fl-theme-iphone">
    <div class="flc-screenNavigator-view-container">
        <div class="fl-screenNavigator-view">
            <div id="header" class="flc-screenNavigator-navbar fl-navbar fl-table">
				<h1 id="company-name">tgb</h1>
                <h1 id="app-name" class="fl-table-cell">高校云平台</h1>
            </div>
            <div id="content" class="fl-screenNavigator-scroll-container"></div>
		</div>
	</div>
	</body>
</html>
myview\ui\includes文件夹下的bottom.jsp源代码例如以下:
<%@ taglib prefix="c" uri="http://java.sun.com/jsp/jstl/core" %>
</div>
<div id="footer" class="fl-panel fl-note fl-bevel-white fl-font-size-80">
<a id="jasig" href="http://www.jasig.org" title="go to Jasig home page"></a>
<div id="copyright">
<p>Copyright © 2014 - 2015 tgb, CHN. All rights reserved.</p>
<p>Powered by <a href="http://baike.baidu.com/link?url=UrN74H--uY4bXP6RmAk9lk3TAiyVG-FKjGemwU-zfkmeyBzbmTwp-9pF6qZUBTVD8OvSCQ2_pIEkbelXxCGE-_">廊坊师范学院 信息技术提高班 第9期</a></p>
</div> </div>
</div>
</div>
<script type="text/javascript" src="https://ajax.googleapis.com/ajax/libs/jquery/1.4.2/jquery.min.js"></script>
<script type="text/javascript" src="https://ajax.googleapis.com/ajax/libs/jqueryui/1.8.5/jquery-ui.min.js"></script>
<script type="text/javascript" src="<c:url value="/js/cas.js" />"></script>
</body>
</html>
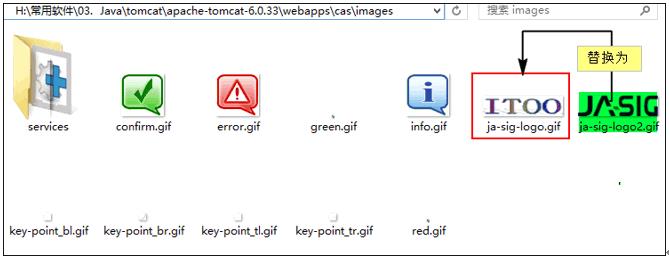
2.3 改动logo
将自己的logo重命名为ja-sig-logo.gif,并放到cas\images文件夹下:
2.4 改动配置,指向myview目录下jsp
复制cas/WEB-INF/classes/default.properties到当前文件夹下,并重命名为mytheme.properties:
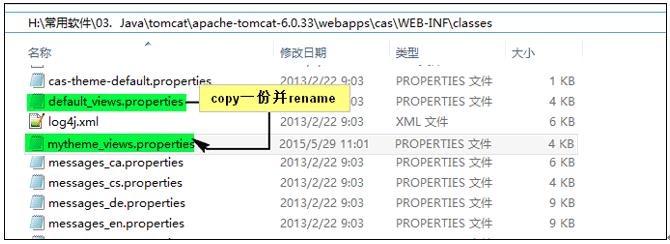
打开mytheme.properties 改动登陆页面的路径(casLoginView.url)为我们复制的myview 目录:

2.5 改动配置,指向mytheme.properties配置文件
打开cas\WEB-INF文件夹下的cas.properties文件:
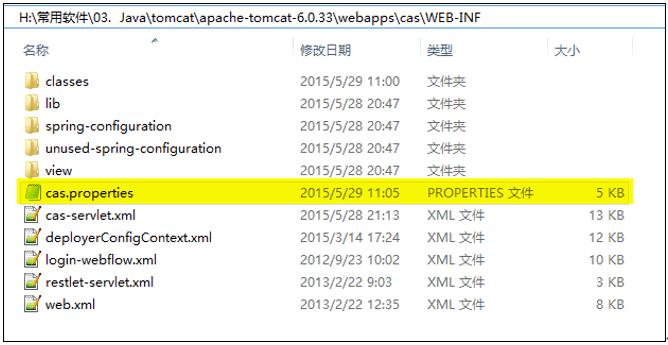
改动cas.viewResolver.basename的属性为mytheme_views:

2.6 重新启动tomcat
输入http://localhost:8080/cas/login预览登录页。例如以下:
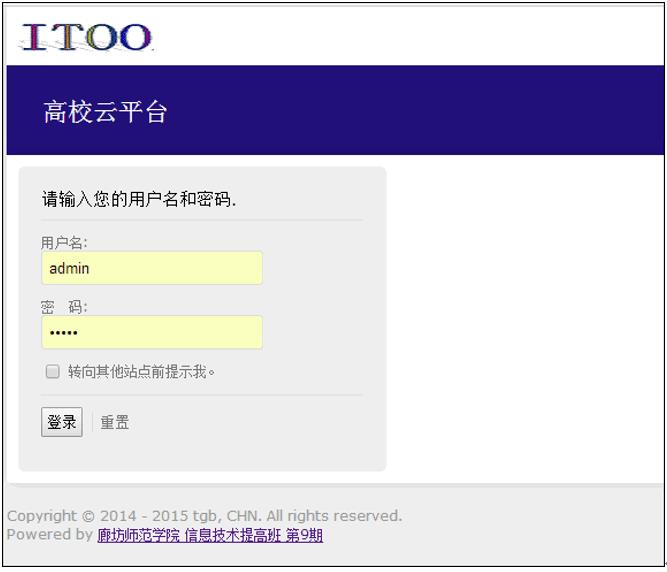
到此。改动完成。。。
以上是关于CAS—改动默认登录页的主要内容,如果未能解决你的问题,请参考以下文章