Solr搜索技术
Posted
tags:
篇首语:本文由小常识网(cha138.com)小编为大家整理,主要介绍了Solr搜索技术相关的知识,希望对你有一定的参考价值。
Solr搜索技术
今日大纲
回顾上一天的内容:
倒排索引
lucene和solr的关系
lucene api的使用 CRUD
文档、字段、目录对象(类)、索引写入器类、索引写入器配置类、IK分词器
查询解析器、查询对象(用户要查询的内容)、索引搜索器(索引库的物理位置)、排名文档集合(包含得分文档数组)
六种高级查询(相似度查询)
分词器(扩展词典、停用词典)
分页
得分(激励因子(作弊))
高亮
排序
● Solr简介、运行
● Solr基本使用
● Solr Core 配置
● Solr高级功能
● Solr与数据库交互
*****************************************************************************************************
1. Solr 4.x简介
1.1 什么是Solr
Solr是一个独立的企业级搜索应用服务器,它对外提供类似于Web-service的API接口。用户可以通过http请求,向搜索引擎服务器提交一定格式的文件,生成索引;也可以通过提出查找请求,并得到返回结果。
Solr实际上就是封装了lucene,提供更加强大的功能,更加方便的使用。(集群分布式)
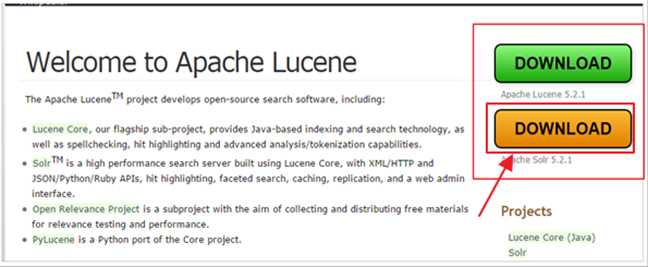
1.2 下载solr
官网:http://lucene.apache.org/solr/
下载网址:http://www.apache.org/dyn/closer.cgi/lucene/solr/
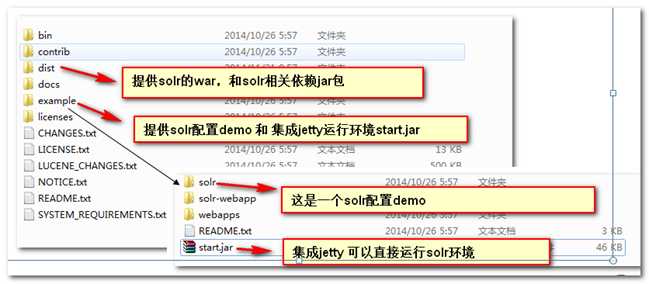
1.3 Solr包结构
主要负责用来存放索引数据,好比Lucene中的索引库文件。Solr可以同时拥有多个索引库。对应位置在:solr-4.10.2\\example\\solr\\collection1
2. Solr安装运行
2.1 运行Solr服务器
2.1.1 内嵌jetty服务器方式
浏览器中输入:http://localhost:8983/solr 进入管理页面
2.1.2 部署Tomcat服务器方式
1、部署Web应用程序:将solr-4.10.2/example/webapps/solr.war解压后,复制到tomcat/webapps下
3、创建索引库:将 solr-4.10.2/example/solr复制到 d:/mysolr/solr (目录随意)
5、启动Tomcat后,浏览器中输入:http://localhost:8080/solr 进入管理页面,注意端口与Tomcat的端口一致
2.2 Solr管理界面简介
2.2.1 Dashboard
2.2.2 logging
2.2.3 Core Admin
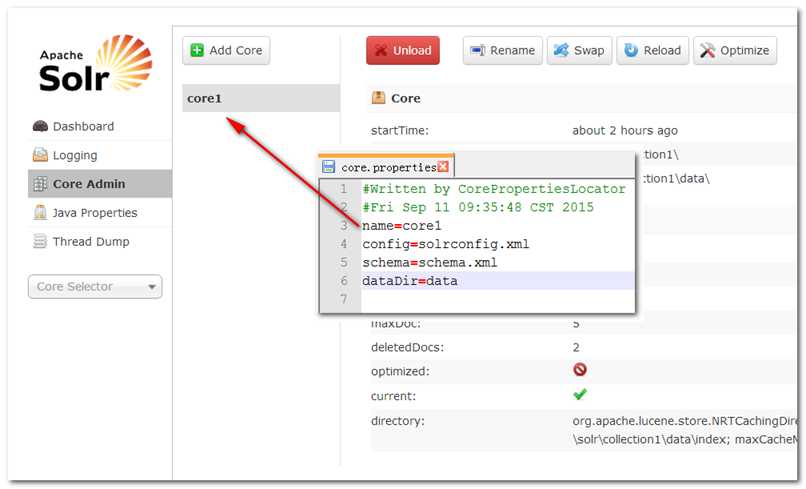
Core管理中心:所有索引库的管理界面,一个solr的core就好比是以前lucene的一个索引库
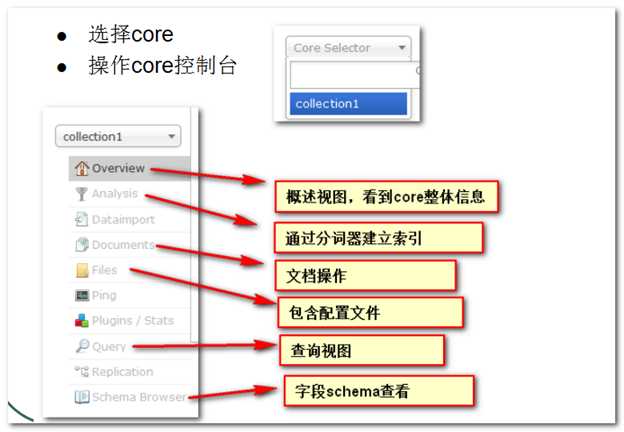
2.2.5 Core Selector
Core选择器:用于选择指定的Core,进行更详细的操作和管理
2.2.4 Theard Dump
3. Solr基本使用
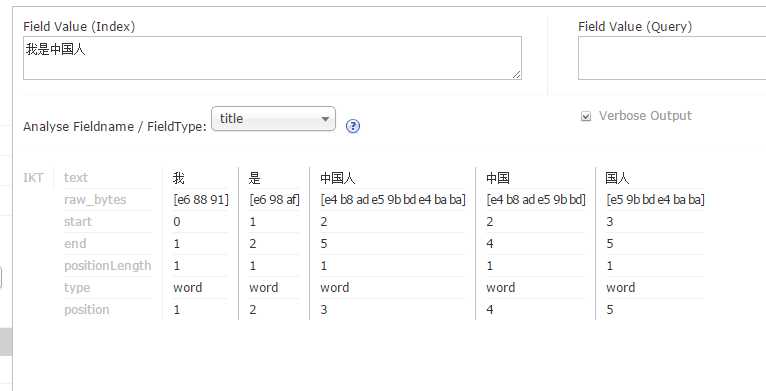
3.1 配置IK分词器
1、将IKAnalyzer-2012-4x.jar拷贝到WEB-INF\\lib下
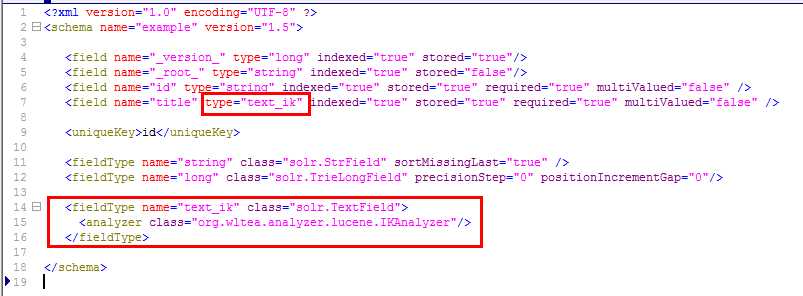
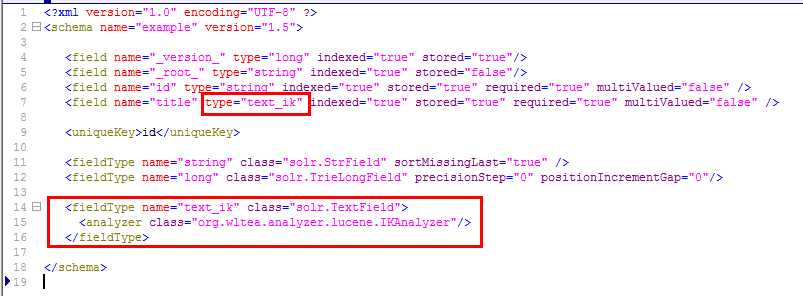
2、在D:\\mysolr\\solr\\collection1\\conf\\schema.xml文件中添加fieldType:
<fieldType name="text_ik" class="solr.TextField">
<analyzer class="org.wltea.analyzer.lucene.IKAnalyzer"/>
3、将指定名称的查询模式(比如:title)中的type="text_ik"
4、通过Core Selector选择指定的core并选择Analysis进行分词器测试
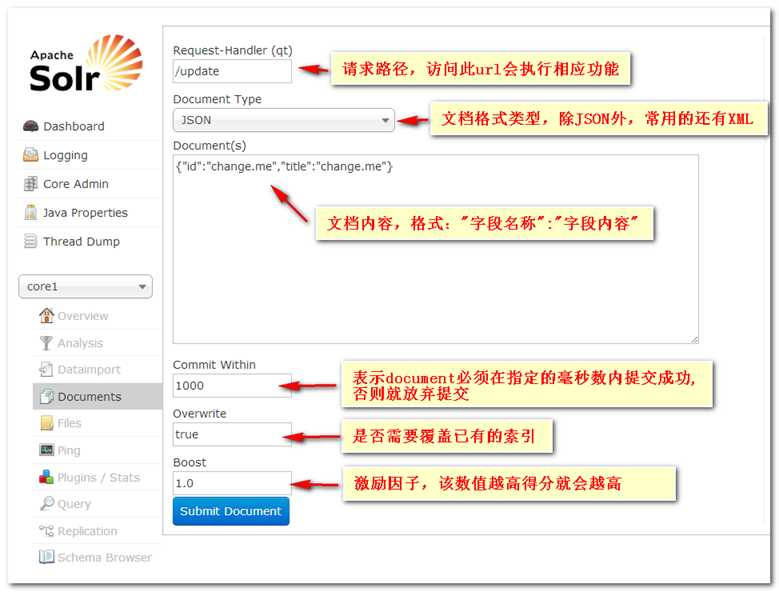
3.2 使用管理界面手动添加Documents
通过Core Selector选择指定的core并选择Documents
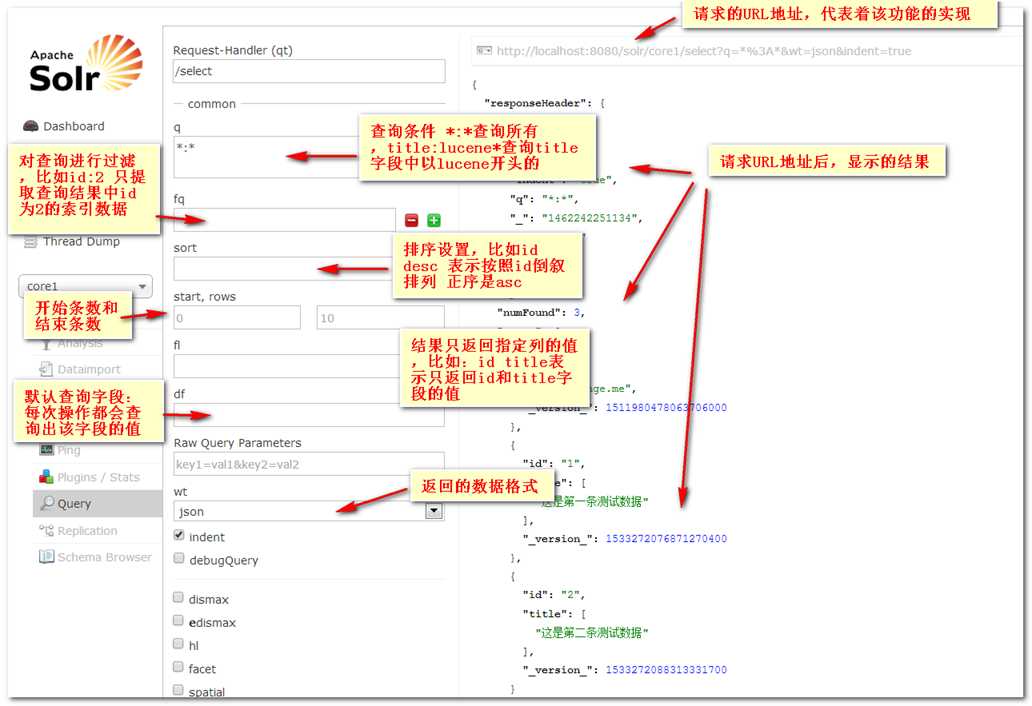
3.3 使用管理界面的Query功能
通过Core Selector选择指定的core并选择Query
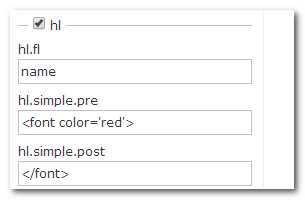
高亮显示(hl.fl:高亮显示的字段,hl.simple.pre:高亮标签,可自定义)
4. Solr Core配置详解
4.1 solr core的概念
一个core 就是一个索引的服务,里面包含大量功能(通过handler实现), 核心配置文件 schema.xml 和 solrconfig.xml
solrconfig.xml 是 core的搜索服务整体配置 (索引库的位置等等)
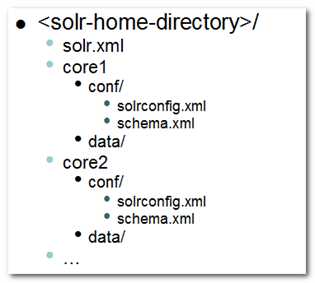
4.2 solr.home标准目录结构
主要包含三个配置文件 solr.xml 、solrconfig.xml 、schema.xml
solr.xml:整个solr索引服务器下的整体配置,主要用来配置当前solr服务器下拥有多少core。
solrconfig.xml:每个core下的配置,例如配置索引库的位置
schema.xml:每个core下具体索引的配置,例如配置field
4.3 solr.xml 配置multicore
如果solr_home下没有solr.xml ,那么solr服务器默认回去寻找名称为collection1的core
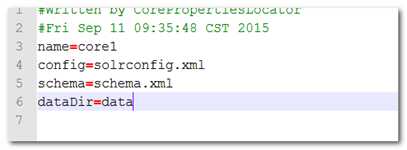
如果solr.xml 没有任何配置,那么solr_home下每个文件夹就是一个core,在文件夹里面需要提供core.properties
可以在solr.xml 配置多个core,这样就不在需要core.properties
<cores adminPath="/admin/cores">
<core name="core1" instanceDir = "core1" />
<core name="core2" instanceDir = "core2" />
adminPath 这是一个访问SolrCore 管理界面的相对URL路径
如果出错,要查看到solr启动的错误信息,需要载入log4j配置文件
4.4 core.properties
4.5 schema.xml
multiValued是否有多个值,如果字段可能有多个值,尽可能设为true
class指向org.apache.solr.analysis中定义的类型名称
solr.TextField 允许用户通过分析器来定制索引和查询,分析器包括一个分词器(tokenizer)和多个过滤器(filter)
<field name="mao" type="text_ik" indexed="true" stored="true" multiValued="true"/>
<!-- 动态字段的定义,只要以yun开头,都可以使用这个字段 -->
<dynamicField name="yun*" type="text_ik" indexed="true" stored="true"/>
4.6 solrconfig.xml
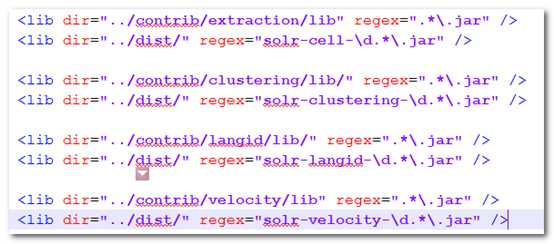
可以将 solr解压目录/contrib和dist 复制 solr.home 下
<luceneMatchVersion> solr低层使用lucene版本
<requestHandler name="/select" class="solr.SearchHandler">
<requestHandler name="/query" class="solr.SearchHandler">
<requestHandler name="/get" class="solr.RealTimeGetHandler">
<requestHandler name="/update" class="solr.UpdateRequestHandler">
wt是通讯数据格式,indent是否缩进,df是默认搜索的字段 ,q是查询条件
5. SolrJ基本功能
5.1 SolrJ的概念
solr的客户端代码和solr服务器之间的增删改查索引操作是通过类似WebService接口API,所以在操作时,只要遵循一定的接口规范即可。
5.2 添加、修改索引
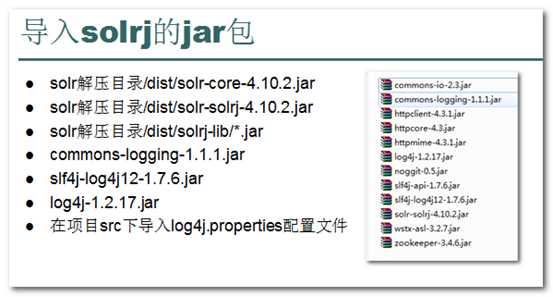
准备环境(注意)
5.2.1 传统方式
public void createIndex1() throws SolrServerException, IOException {
// 使用HttpSolr服务端(HttpSolrServer) 创建solr服务器端对象
HttpSolrServer solrServer = new HttpSolrServer(
"http://localhost:8080/solr/core1");
// 使用solr输入文档(SolrInputDocument) 创建文档对象
SolrInputDocument document = new SolrInputDocument();
document.addField("title", "这是来自solrj客户端的第一个title");
document.addField("content", "这是来自solrj客户端的第一个content");
5.2.2 Bean注解方式
1、创建实体bean类,对实体数据Bean 添加 @Field注解,直接传递Bean
import org.apache.solr.client.solrj.beans.Field;
* @author Administrator 文章实体Bean
public void setId(String id) {
public void setTitle(String title) {
public void setContent(String content) {
public void createIndex2() throws IOException, SolrServerException {
// 使用HttpSolr服务端(HttpSolrServer) 创建solr服务器端对象
HttpSolrServer solrServer = new HttpSolrServer(
"http://localhost:8080/solr/core1");
for (int i = 0; i < 30; i++) {
Article article = new Article();
article.setTitle("这是来自solrj客户端的第一个title"+i);
article.setContent("这是来自solrj客户端的第一个content"+i);
5.3 删除索引
5.3.1 根据id方式
public void deleteIndex1() throws SolrServerException, IOException {
// 使用HttpSolr服务端(HttpSolrServer) 创建solr服务器端对象
HttpSolrServer solrServer = new HttpSolrServer(
"http://localhost:8080/solr/core1");
5.3.2 Query表达式方式
public void deleteIndex2() throws SolrServerException, IOException {
// 使用HttpSolr服务端(HttpSolrServer) 创建solr服务器端对象
HttpSolrServer solrServer = new HttpSolrServer(
"http://localhost:8080/solr/core1");
solrServer.deleteByQuery("id:1*");
5.4 查询索引
5.4.1 传统方式
public void queryIndex1() throws SolrServerException {
// 使用HttpSolr服务端(HttpSolrServer) 创建solr服务器端对象
HttpSolrServer solrServer = new HttpSolrServer(
"http://localhost:8080/solr/core1");
// 创建solr查询对象(solrquery)并且载入要查询的内容
SolrQuery solrQuery = new SolrQuery("title:这是");
solrQuery.setSort("id", ORDER.desc);
// 开始查询,返回查询响应对象(QueryResponse)
QueryResponse response = solrServer.query(solrQuery);
// 通过查询响应对象(QueryResponse)获得结果
SolrDocumentList results = response.getResults();
for (SolrDocument solrDocument : results) {
System.out.println(solrDocument.getFieldValue("id"));
System.out.println(solrDocument.getFieldValue("title"));
//List titles = (List) solrDocument.getFieldValue("title");
//System.out.println(titles.get(0));
System.out.println(solrDocument.getFieldValue("content"));
5.4.2 Bean注解方式
public void queryIndex2() throws SolrServerException {
// 使用HttpSolr服务端(HttpSolrServer) 创建solr服务器端对象
HttpSolrServer solrServer = new HttpSolrServer(
"http://localhost:8080/solr/core1");
// 创建solr查询对象(solrquery)并且载入要查询的内容
SolrQuery solrQuery = new SolrQuery("title:这是");
// 开始查询,返回查询响应对象(QueryResponse)
QueryResponse response = solrServer.query(solrQuery);
// 通过查询响应对象(QueryResponse)获得结果(Bean返回形式)
List<Article> beans = response.getBeans(Article.class);
for (Article article : beans) {
System.out.println(article.getId());
System.out.println(article.getTitle());
System.out.println(article.getContent());
注意:如果配置schema.xml中配置指定的field的multiValued为true,其对应的实体Bean属性应为List,不然会出错。或者将multiValued的值改为false
6. SolrJ高级功能
6.1 多条件查询
SolrQuery solrQuery = new SolrQuery("title:3 or id:5");
6.1.1 常用查询语法(了解)
1、匹配所有文档:*:* (通配符?和*:"*"表示匹配任意字符;"?"表示匹配出现的位置)
3、子表达式查询(子查询):可以使用"()"构造子查询。 比如:(make AND up) OR (french AND Kiss)
4、模糊查询、相似查询:
(1)一般模糊查询:title:titla~
(2)门槛模糊查询:对模糊查询可以设置查询门槛,门槛是0~1之间的数值,门槛越高表面相似度越高。title:titla~0.5
6.2 查询结果高亮处理
public void queryIndex5() throws SolrServerException {
// 使用HttpSolr服务端(HttpSolrServer) 创建solr服务器端对象
HttpSolrServer solrServer = new HttpSolrServer(
"http://localhost:8080/solr/core1");
// 创建solr查询对象(solrquery)并且载入要查询的内容
SolrQuery solrQuery = new SolrQuery("title:这是");
solrQuery.addField("content");
/*************************高亮设置及查询********************************/
solrQuery.setHighlightFragsize(50);
solrQuery.setHighlightSimplePre("<font color=‘red‘>");
solrQuery.setHighlightSimplePost("</font>");
solrQuery.addHighlightField("title");
// 开始查询,返回查询响应对象(QueryResponse)
QueryResponse response = solrServer.query(solrQuery);
System.out.println(response.getResponse());
// 处理结果集 第一个Map的键是文档的ID,第二个Map的键是高亮显示的字段名
Map<String, Map<String, List<String>>> highlighting = response
for (Map.Entry<String, Map<String, List<String>>> entry : highlighting.entrySet()) {
System.out.println("key:"+entry.getKey());
System.out.println("value:" + entry.getValue());
/***********************************************************/
7. Solr数据导入并索引
7.1 Solr导入数据库中的数据
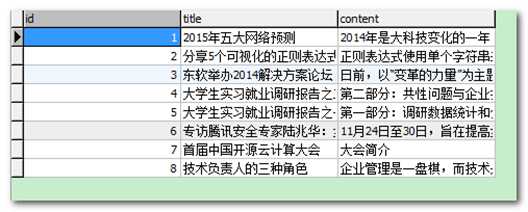
1、建立数据库 ,将 "solr搜索通过JDBC导入练习" 中article.sql 导入数据库
2、配置服务器core/conf/solrconfig.xml 添加导入handler
<lib dir="../dist/" regex="solr-dataimporthandler-\\d.*\\.jar" />
(3)在core/conf中新建配置文件 db-data-config.xml并写入内容:
<?xml version="1.0" encoding="UTF-8" ?>
<dataSource type="JdbcDataSource"
driver="com.mysql.jdbc.Driver"
url="jdbc:mysql://localhost:3306/solr"
<entity name="id" query="select id,title,content from article"></entity>
<requestHandler name="/import" class="org.apache.solr.handler.dataimport.DataImportHandler">
<str name="config">db-data-config.xml</str>
(5)将mysql驱动包 复制 tomcat/webapps/solr/WEB-INF/lib下
(6)启动服务,并访问 http://localhost:8080/solr/#/core1/dataimport//import 点击Execute按钮
或者直接访问 http://localhost:8080/solr/core1/import?command=full-import
*****************************************************************************************************
8. 总结
1、solr的启动(jetty方式,tomcat方式)
2、solr的管理界面(添加数据,查询数据)
3、solr配置文件
(1) solr.xml --> 配置多个core(索引库)
(2) schema.xml --> 配置字段类型,特性
(3) solrconfig.xml --> 索引库的jar包,导入数据功能
4、solrj使用:使用java代码访问solr服务器 crud new HttpSolrServer("xxxx不要有#");
5、solr导入数据库数据 步骤
*****************************************************************************************************
以上是关于Solr搜索技术的主要内容,如果未能解决你的问题,请参考以下文章
