本篇文章为系列文章,未读前几集的同学请猛戳这里:
本篇文章讲解 Config 如何实现配置中心加解密,配置中心用户安全认证。
配置中心加解密
考虑这样一个问题:所有的配置文件都存储在 Git 远程仓库,配置文件中的一些信息又是比较敏感的。所以,我们需要对这些敏感信息进行加密处理。主要的加密方法分为两种:一种是共享密钥加密(对称密钥加密),一种是公开密钥加密(非对称密钥加密)。
对称加解密 Symmetric encryption
对称加密是最快速、最简单的一种加密方式,加密(encryption)与解密(decryption)用的是同样的密钥(secret key)。
检查加密环境
点击链接观看:检查加密环境视频(获取更多请关注公众号「哈喽沃德先生」)
版本问题
访问 Config Server:http://localhost:8888/encrypt/status
检查结果如果是:{"description":"No key was installed for encryption service","status":"NO_KEY"} 说明没有为加密服务安装密钥,也说明你使用的是较低的 JDK 版本。
比较简单的解决办法:更换高版本 JDK,比如使用最新版的 LTS 版本 JDK-11.0.6。
复杂的解决办法:从 Oracle 官网下载对应 JCE,下载链接:https://www.oracle.com/java/technologies/javase-jce-all-downloads.html
下图红色框中内容已经足够说明原因:JDK 9 以及更高版本已附带策略文件,并在默认情况下启用。
如果你的当前环境必须使用低版本 JDK,那么请下载对应 JCE 压缩包,下载解压后把 local_policy.jar 和 US_export_policy.jar 文件安装到需要安装 JCE 机器上的 JDK 或 JRE 的 security 目录下即可。

配置问题
检查结果如果是:{"description":"The encryption algorithm is not strong enough","status":"INVALID"} 说明服务端未配置加密。

Config Server 创建配置文件,注意必须叫 bootstrap.yml,配置密钥信息即可。
# 密钥
encrypt:
  key: example
重启 Config Server 访问:http://localhost:8888/encrypt/status 结果如下:

加解密演示
点击链接观看:对称加解密视频(获取更多请关注公众号「哈喽沃德先生」)
配置中心服务端
使用 curl 命令访问 /encrypt 端点对属性值 root 进行加密。反向操作 /decrypt 可解密。
curl http://localhost:8888/encrypt -d root
加密结果:bfb5cf8d7cab63e4b770b76d4e96c3a57d40f7c9df13612cb3134e2f7ed26123

解密

Git 仓库
把加密后的数据更新到 Git 远程仓库的配置文件中。值得注意的是需要在加密结果前添加 {cipher} 串,如果远程属性源包含加密的内容(以开头的值{cipher}),则将其解密,然后再通过HTTP发送给客户端。

配置中心客户端
Config Client 控制层添加获取配置信息代码。
package com.example.controller;

import org.springframework.beans.factory.annotation.Value;
import org.springframework.cloud.context.config.annotation.RefreshScope;
import org.springframework.web.bind.annotation.GetMapping;
import org.springframework.web.bind.annotation.RestController;

@RefreshScope
@RestController
public class ConfigController {

    @Value("${name}")
    private String name;

    @Value("${password}")
    private String password;

    @GetMapping("/name")
    public String getName() {
        return name;
    }

    @GetMapping("/password")
    public String getPassword() {
        return password;
    }

}
修改 Config Client 配置文件,重启测试。
spring:
  cloud:
    config:
      name: order-service # 配置文件名称,对应 git 仓库中配置文件前半部分
      label: master # git 分支
      profile: prod # 指定环境
      discovery:
        enabled: true # 开启
        service-id: config-server # 指定配置中心服务端的 service-id

# 度量指标监控与健康检查
management:
  endpoints:
    web:
      base-path: /actuator    # 访问端点根路径,默认为 /actuator
      exposure:
        include: \'*\'          # 需要开启的端点,这里主要用到的是 refresh 这个端点
        #exclude:             # 不需要开启的端点
访问:http://localhost:9091/password 返回解密后的结果。

非对称加解密 Asymmetric encryption
对称加密和非对称加密的区别
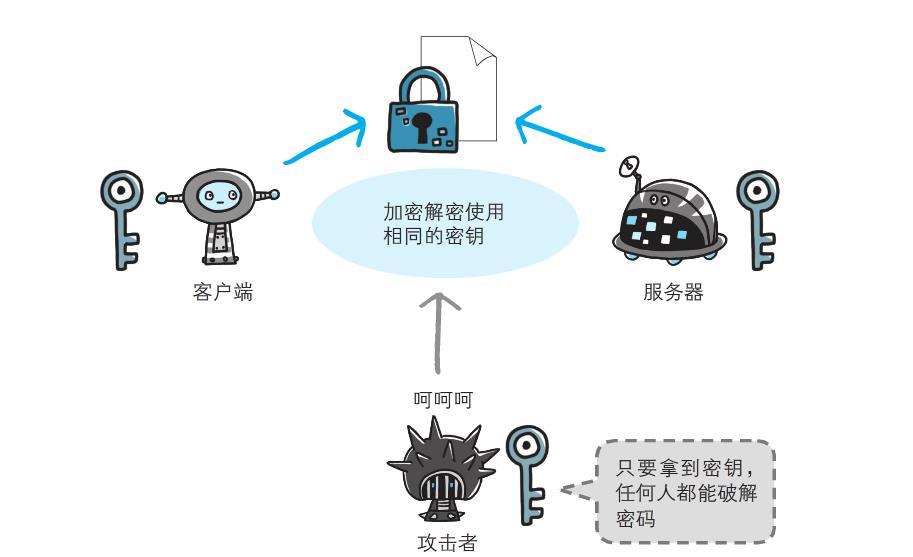
对称加密算法在加密和解密时使用的是同一个密钥。只要拿到密钥,任何人都能破jie。

非对称加密算法需要两个密钥来进行加密和解密,这两个密钥分别是公开密钥(public key 简称公钥)和私有密钥(private key 简称私钥)。在传输过程中,即使攻击者截获了传输的密文,并得到了公钥,也无法破 jie密文,因为使用专用密钥才能破jie密文。

图片取自图解HTTP一书。
Java-keytool 使用说明
Keytool 用来管理私钥仓库(keystore)和与之相关的X.509证书链(用以验证与私钥对应的公钥),也可以用来管理其他信任实体。
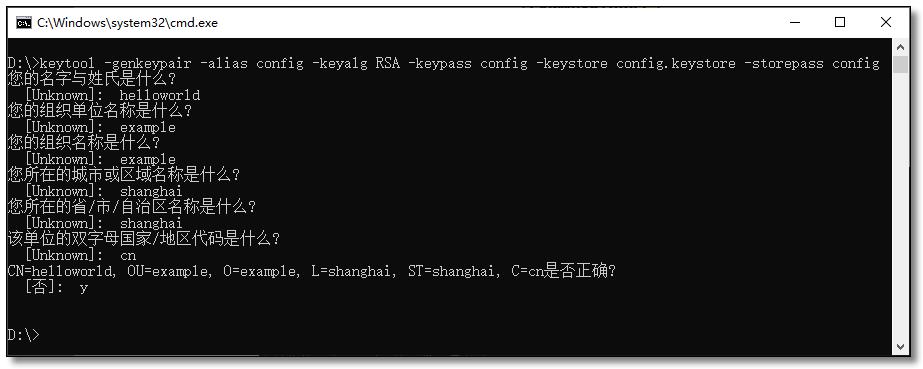
默认大家都配置了 Java 的环境变量,打开 CMD 窗口运行以下命令。
# 生成名为 config.keystore 的 keystore 文件,别名为 config,加密算法类型使用 RSA,密钥库口令和密钥口令均为:config
keytool -genkeypair -keystore config.keystore -alias config -keyalg RSA -keypass config -storepass config

此时在我的 D 盘下会生成一个 config.keystore 文件。
加解密演示
点击链接观看:非对称加解密视频(获取更多请关注公众号「哈喽沃德先生」)
配置中心服务端
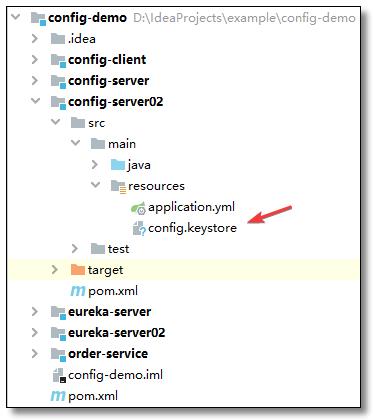
将 config.keystore 文件添加至 Config Server 项目 resources 目录中。

创建 bootstrap.yml 添加非对称加解密配置。注意:值要跟 CMD 里输入的值对应不然会出错。
# 非对称加解密
encrypt:
  key-store:
    location: classpath:config.keystore # keystore 文件存储路径
    alias: config # 密钥对别名
    password: config # storepass 密钥仓库
    secret: config # keypass 用来保护所生成密钥对中的私钥
pom.xml 添加避免 maven 过滤文件的配置。
<!-- build标签 常用于添加插件及编译配置 -->
<build>
    <!-- 读取配置文件 -->
    <resources>
        <resource>
            <directory>src/main/resources</directory>
        </resource>
        <resource>
            <directory>src/main/java</directory>
            <includes>
                <include>**/*.xml</include>
                <include>**/*.properties</include>
                <include>**/*.tld</include>
                <include>**/*.keystore</include>
            </includes>
            <filtering>false</filtering>
        </resource>
    </resources>
</build>
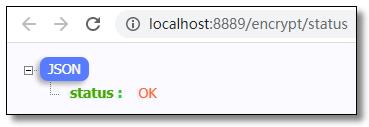
检查加密环境,访问:http://localhost:8889/encrypt/status 结果如下:

使用 curl 命令访问 /encrypt 端点对属性值 root 进行加密。反向操作 /decrypt 可解密。
curl http://localhost:8889/encrypt -d root
加密结果:

解密

Git 仓库
把加密后的数据更新到 Git 远程仓库的配置文件中。值得注意的是需要在加密结果前添加 {cipher} 串,如果远程属性源包含加密的内容(以开头的值{cipher}),则将其解密,然后再通过HTTP发送给客户端。

配置中心客户端
Config Client 配置文件如下。
spring:
  cloud:
    config:
      name: order-service # 配置文件名称,对应 git 仓库中配置文件前半部分
      label: master # git 分支
      profile: prod # 指定环境
      discovery:
        enabled: true # 开启
        service-id: config-server # 指定配置中心服务端的 service-id

# 度量指标监控与健康检查
management:
  endpoints:
以上是关于Spring Cloud 之配置中心的主要内容,如果未能解决你的问题,请参考以下文章