cobbler自动化系统安装
Posted
tags:
篇首语:本文由小常识网(cha138.com)小编为大家整理,主要介绍了cobbler自动化系统安装相关的知识,希望对你有一定的参考价值。
基于centos7系统
ip地址192.168.56.254,关闭防火墙,selinux
首先修改一下环境,大家都知道centos7安装完后网卡名字都变成了eno****这些 ,这样看着不爽 所以我们需要修改grub,让他变回原来的命名 ,如eth0
编辑配置文件,添加如下部分 ,红色字体 添加net.ifnames=0 biosdevname=0
vi /etc/sysconfig/grub
执行 grub2-mkconfig -o /boot/grub2/grub.cfg
mv /etc/sysconfig/network-scripts/ifcfg-enoxxxxxx /etc/sysconfig/network-scripts/ifcfg-eth0
vi /etc/sysconfig/network-scripts/ifcfg-eth0
修改其name字段
1.安装
rpm -ivh http://mirrors.aliyun.com/epel/epel-release-latest-7.noarch.rpm
yum install -y cobbler cobbler-web dhcp tftp-server pykickstart httpd xinetd rsync
2.启动cobbler
systemctl start cobblerd
systemctl enable cobblerd
3.检测
cobbler check
一般情况下会报八种错误
3.1编辑配置文件
vim /etc/cobbler/settings
字段修改
next_server:192.168.56.254
server:192.168.56.254
manage_dhcp:1
default-password_crypted:"$1$123456$wOSEtcyiP2N/IfIl15W6Z0"
生成一下密码
openssl passwd -1 -salt ‘root‘ ‘123456‘
我生成的密码如下 粘贴到上面的配置
$1$123456$wOSEtcyiP2N/IfIl15W6Z0
3.2 执行命令
cobbler get-loaders
3.3安装软件包可忽略
yum -y install debmirror yum-utils fence-agents
配置xinetd
vim /etc/xinetd.d/tftp
disable参数修改为 disable = no
systemctl enable rsyncd
systemctl restart xinetd.service
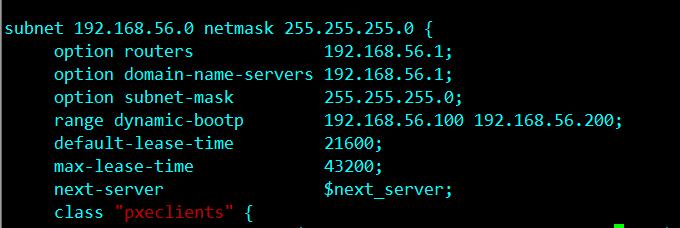
3.4配置dhcp
vim /etc/cobbler/dhcp.template
配置subnet为你自己的网段
3.5执行同步
cobbler sync
3.6挂载光盘
mount /dev/cdrom /mnt
3.7复制镜像到 /var/www/cobbler/ks_mirror/
cobbler import --path=/mnt --name=Centos-7.1-x86_64 --arch=x86_64
3.8上传一个ks文件到此目录,我这里是CentOS-7.1-x86_64.cfg
/var/lib/cobbler/kickstarts/
3.8修改启动ks文件,
此配置文件上传附件,请大家直接下载使用即可
[[email protected] kickstarts]# cobbler profile edit --name=CentOS-7.1-x86_64 --kickstart=/var/lib/cobbler/kickstarts/CentOS-7.1-x86_64.cfg
修改网卡信息为eth0,centos7需要操作 其他不需要
[[email protected] kickstarts]# cobbler profile edit --name=CentOS-7.1-x86_64 --kopts="net.ifnames=0 biosdevname=0"
查看profile
cobbler profile report --name=“CentOS-7.1-x86_64”
4.再次同步配置
cobbler sync
5.1 不自定义,直接打开一台主机,使用网卡启动即可,网段要一致
修改这个配置可以更改默认显示界面,里面的内容当然可以改成你自己的,比如作者。也可以默认不修改
/etc/cobbler/pxe/pxedefault.template
5.2自定义安装主机,我的mac地址是00:50:56:3E:DB:77
cobbler system add --name="Centos7" --mac="00:50:56:3E:DB:77" --profile="Centos-7.1-x86_64" --ip-address="192.168.56.100" --subnet="255.255.255.0" --interface="eth0" --hostname="node1.example.com"
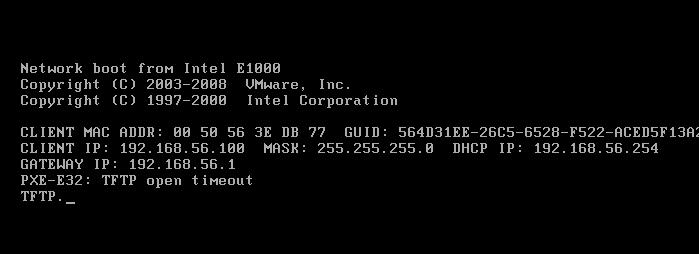
打开一台主机,使用网卡启动
正在执行安装
安装完毕打开目标主机
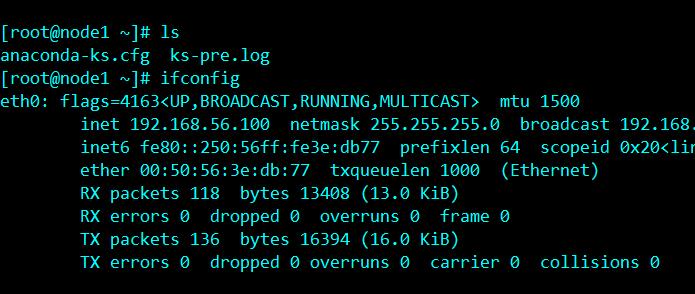
帐号密码为root 123456 这个在最前面生成密码那块 openssl
发现ip地址与主机名与我们设置的一样,当然你也可以添加其他预定义配置
具体其他参数请参考
cobbler system add --help
网页查看,可视化,操作比较简单
https://192.168.56.254/cobbler_web
默认帐号密码都是cobbler
本文出自 “linux 虚拟化” 博客,转载请与作者联系!
以上是关于cobbler自动化系统安装的主要内容,如果未能解决你的问题,请参考以下文章


