DrawerLayout 和 NavigationView 的使用
Posted 从Android出发
tags:
篇首语:本文由小常识网(cha138.com)小编为大家整理,主要介绍了DrawerLayout 和 NavigationView 的使用相关的知识,希望对你有一定的参考价值。
参考:
2.NavigationView更改菜单icon和title颜色变化效果
转了第一篇
NavigationView 的引入让 android 侧边栏实现起来相当方便,最近公司项目中也使用这个新的控件完成了侧边栏的改版。在使用过程中遇到一些坑,写篇博文记录一下。
本文分为两大主要部分,第一部分是基本使用,第二部分是各种使用小细节(坑),如果你对其使用已经熟悉了,可以跳过第一部分。
基本使用
1. NavigationView 在 design 库中,添加依赖(最新的是 23.2.0);
compile \'com.android.support:design:23.1.1\'
2. 然后在 DrawerLayout 布局中添加 NavigationView ;
<?xml version="1.0" encoding="utf-8"?>

<android.support.v4.widget.DrawerLayout
    android:id="@+id/drawer_layout"
    xmlns:android="http://schemas.android.com/apk/res/android"
    xmlns:app="http://schemas.android.com/apk/res-auto"
    android:layout_width="match_parent"
    android:layout_height="match_parent">

    <FrameLayout
        android:layout_width="match_parent"
        android:layout_height="match_parent">

        <LinearLayout
            android:id="@+id/main"
            android:layout_width="match_parent"
            android:layout_height="match_parent"
            android:orientation="vertical">

            <android.support.v7.widget.Toolbar
                android:id="@+id/toolbar"
                android:layout_width="match_parent"
                android:layout_height="?attr/actionBarSize"
                android:background="@color/colorPrimary"
                app:popupTheme="@style/ThemeOverlay.AppCompat.Light"
                app:theme="@style/ThemeOverlay.AppCompat.Dark.ActionBar"/>

           ......

        </LinearLayout>
    </FrameLayout>

    <android.support.design.widget.NavigationView
        android:id="@+id/navigation"
        android:layout_width="wrap_content"
        android:layout_height="match_parent"
        android:layout_gravity="start"
        app:headerLayout="@layout/nav_header"
        app:menu="@menu/activity_main_drawer"/>

</android.support.v4.widget.DrawerLayout>
其中需要注意给 NavigationView 设置 android:layout_gravity="start" 属性。
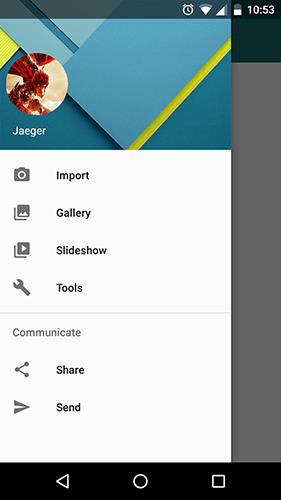
3.然后注意到 NavigationView 其实是分两个部分的,一个是头部,一个是下面的菜单列表部分,如下图所示:

app:headerLayout="@layout/nav_header" 属性添加,nav_header 的布局如下:
<?xml version="1.0" encoding="utf-8"?>
<FrameLayout xmlns:android="http://schemas.android.com/apk/res/android"
             android:layout_width="match_parent"
             android:layout_height="192dp"
             android:theme="@style/ThemeOverlay.AppCompat.Dark">

    <ImageView
        android:layout_width="match_parent"
        android:layout_height="match_parent"
        android:background="@drawable/nav_header_bg"
        android:scaleType="centerCrop"/>

    <ImageView
        android:layout_width="96dp"
        android:layout_height="96dp"
        android:layout_gravity="bottom"
        android:layout_marginBottom="36dp"
        android:padding="8dp"
        android:src="@drawable/ic_avatar"/>

    <TextView
        android:layout_width="match_parent"
        android:layout_height="wrap_content"
        android:layout_gravity="bottom"
        android:padding="16dp"
        android:text="Jaeger"
        android:textAppearance="@style/TextAppearance.AppCompat.Body1"/>

</FrameLayout>
下面的菜单列表部分是一个 menu 文件,通过 app:menu="@menu/activity_main_drawer"属性添加。
activity_main_drawer.xml 文件在 menu 文件夹下,内容为:
<?xml version="1.0" encoding="utf-8"?>
<menu xmlns:android="http://schemas.android.com/apk/res/android">

    <group android:checkableBehavior="single">
        <item
            android:id="@+id/nav_camera"
            android:icon="@drawable/ic_menu_camera"
            android:title="Import"/>
        <item
            android:id="@+id/nav_gallery"
            android:icon="@drawable/ic_menu_gallery"
            android:title="Gallery"/>
        <item
            android:id="@+id/nav_slideshow"
            android:icon="@drawable/ic_menu_slideshow"
            android:title="Slideshow"/>
        <item
            android:id="@+id/nav_manage"
            android:icon="@drawable/ic_menu_manage"
            android:title="Tools"/>
    </group>

    <item android:title="Communicate">
        <menu>
            <item
                android:id="@+id/nav_share"
                android:icon="@drawable/ic_menu_share"
                android:title="Share"/>
            <item
                android:id="@+id/nav_send"
                android:icon="@drawable/ic_menu_send"
                android:title="Send"/>
        </menu>
    </item>

</menu>
4. 菜单列表的点击事件
菜单列表的点击事件设置代码如下:
navigationView.setNavigationItemSelectedListener(new NavigationView.OnNavigationItemSelectedListener() {
            @Override
            public boolean onNavigationItemSelected(MenuItem item) {
               switch (item.getItemId()){
                   case R.id.nav_personal_info:
                           // do something
                       break;
                   ...
               }
                return false;
            }
        });
至此,NavigationView 的基本使用就差不多搞定了,效果就是前面图片显示的效果。接下来是各种填坑环节。??
使用小细节(和坑)
1. 获得头部(header)内控件
ImageView,你可以在 activity 中直接调用 findViewById() 方法来获得。但是在 Support Library 23.1.0 版本之后,这个不再适用,在我使用的 Support Library 23.1.1 版本中,可以直接调用 getHeaderView()方法先得到 Header,然后在通过header来获得头部内的控件。
View headerView = navigationView.getHeaderView(0);
ImageView ivAvatar = (ImageView) headerView.findViewById(R.id.nav_avatar);
然后就可以进行各种愉快的头像设置,用户名设置了~
关于这个问题,如果你用的不是23.1.1版本的话,你可以看 stackoverflow 上的讨论 NavigationView get/find header layout,针对其他版本也有解决方法说明。
2. 菜单列表中的图标不显示原始颜色
当设计师为每一项的图标都设置了不同的颜色时,你将切好的彩色图标文件放进去,运行后发现全变成灰色了。此时可以通过 app:itemIconTint="@color/blue" 为图标统一设置颜色,前后效果如下:

然而这还不是我们需要的效果,我们需要的是彩色的图标,而不是统一的图标颜色。
解决方法是调用 NavigationView 的 setItemIconTintList(ColorStateList tint) 方法,传入 null 参数:
navigationView.setItemIconTintList(null);
最终效果如下:

3. 添加分割线
如上面的截图所示,菜单列表分成了两个部分,中间用一个分割线隔开。解决方法是在 menu 文件中分成多个 group ,且为每个 group 设置 id ,如下:
<?xml version="1.0" encoding="utf-8"?>
<menu xmlns:android="http://schemas.android.com/apk/res/android">
    <group
        android:id="@+id/first_group"
        android:checkableBehavior="none">
        <item
            android:id="@+id/nav_personal_info"
            android:icon="@drawable/nav_personal_info"
            android:title="@string/personal_info_setting"/>

        ...

        <item
            android:id="@+id/nav_system_setting"
            android:icon="@drawable/nav_setting"
            android:title="@string/system_setting"/>
    </group>

    <group android:id="@+id/second_group">
        <item
            android:id="@+id/nav_score"
            android:icon="@drawable/nav_score"
            android:title="@string/score"/>
        <item
            android:id="@+id/nav_feedback"
            android:icon="@drawable/nav_feedback"
            android:title="@string/feedback"/>
    </group>

</menu>
4. 隐藏某个菜单列表项
公司项目会根据你是否是管理员,来控制某个菜单列表项的显示和隐藏,因此就出现了这个问题。
原以为比较麻烦,后来搜了下,也比较简单地解决了,直接上代码:
MenuItem menuItem = navigationView.getMenu().findItem(R.id.some_menu_item);
menuItem.setVisible(false);    // true 为显示,false 为隐藏
这个问题也就这么解决了。??
5. 使用 NavigationView 时透明状态栏的处理
这个问题可以看我上一篇文章来解决 Android App 沉浸式状态栏解决方案,里面会讲到如何处理抽屉视图的透明状态栏的实现。
写在最后感谢原作者的分享。我在此仅作学习记录之用~
以上是关于DrawerLayout 和 NavigationView 的使用的主要内容,如果未能解决你的问题,请参考以下文章