activemq+zookeeper 集群部署基于levedb
Posted
tags:
篇首语:本文由小常识网(cha138.com)小编为大家整理,主要介绍了activemq+zookeeper 集群部署基于levedb相关的知识,希望对你有一定的参考价值。
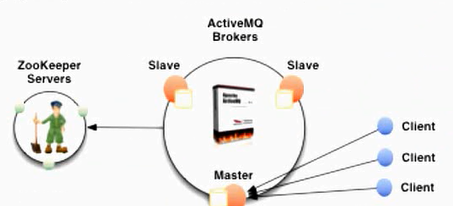
集群图
zookeeper集群,上一篇博客写了zookeeper集群的部署
Ip 服务注册端口 主机名 192.168.56.15 2181 zk01 192.168.56.16 2181 zk02 192.168.56.17 2181 zk03 activemq部署
IP 管控台端口 集群通讯端口 消息端口 192.168.56.15 8161 61621 51511 192.168.56.16 8162 61622 51512 192.168.56.17 8163 61623 51513 host解析必须做
[[email protected] conf]# cat /etc/hosts
192.168.56.15 zk01
192.168.56.16 zk02
192.168.56.17 zk03
5.
5.1 zookeeper 集群不在配置,参看前面博客
5.2 activemq 安装包
 说明:zk03 是zookeeper的 activemq03 是activemq的 jdk 是java环境 redis不用管
 三台机器全部部署
 [[email protected] opt]# pwd
/opt
[[email protected] opt]# ll
total 12
lrwxrwxrwx  1 root root    21 Dec 31 18:20 activemq03 -> apache-activemq-5.9.0
drwxr-xr-x 10  501 games 4096 Oct 15  2013 apache-activemq-5.9.0
lrwxrwxrwx  1 root root    11 Dec 25 01:27 jdk -> jdk1.7.0_80
drwxr-xr-x  8   10   143 4096 Apr 11  2015 jdk1.7.0_80
lrwxrwxrwx  1 root root    11 Dec 25 19:35 redis -> redis-3.0.6
drwxr-xr-x  4 root root    27 Dec 25 19:38 redis-3.0.6
drwxr-xr-x  2 root root   125 Dec 31 18:20 tools
lrwxrwxrwx  1 root root    15 Dec 25 01:29 zk03 -> zookeeper-3.4.9
drwxr-xr-x 12 1001  1001 4096 Dec 25 01:48 zookeeper-3.4.9
[[email protected] opt]#
5.3 修改所有activemq管控台的端口
只需要该118行的端口
[[email protected] conf]# pwd
/opt/activemq01/conf
[[email protected] conf]# grep 8161 jetty.xml
 118:      <property name="port" value="8161"/>
[[email protected] conf]# grep -n  8161 jetty.xml
118:        <property name="port" value="8161"/>
[[email protected] conf]#
[[email protected] conf]# grep -n 8162  jetty.xml
118:        <property name="port" value="8162"/>
135:                    <property name="port" value="8162" />  #默认注释的端口 不用管
[[email protected] conf]#
[[email protected] conf]# grep -n  8163 jetty.xml
118:        <property name="port" value="8163"/>
[[email protected] conf]#
5.4 修改broker的名称
 vi activemq.xml
 只需要修改brokerName="dubboedu"   默认是localhost
 三台改成一样的
 <broker xmlns="http://activemq.apache.org/schema/core" brokerName="dubboedu" dataDirectory="${activemq.data}">
5.5 修改集群通讯的端口以及leveldb存储模式
 vim activemq.xml文件中<persistenceAdapter>中的内容
  zk01:
        <persistenceAdapter>
              <replicatedLevelDB
                  directory="${activemq.data}/leveldb"   #基于leveldb数据存放路径
                  replicas="3"   #复制的分片的个数 这里是三台
                  bind="tcp://0.0.0.0:62621"   #集群通讯的端口
                  zkAddress="192.168.56.51:2181,192.168.56.16:2181,192.168.56.17:2181"
                  hostname="zk01"  #主机名
                  zkPath="/activemq/leveldb-stores" #zookeeper中的路径
                />
        </persistenceAdapter>
  zk02:
      <persistenceAdapter>
                  <replicatedLevelDB
                        directory="${activemq.data}/leveldb"
                        replicas="3"
                        bind="tcp://0.0.0.0:62622"
                        zkAddress="192.168.56.51:2181,192.168.56.16:2181,192.168.56.17:2181"
                        hostname="zk02"
                        zkPath="/activemq/leveldb-stores"
                      />
        </persistenceAdapter>

  zk03:
           <persistenceAdapter>
                <replicatedLevelDB
                  directory="${activemq.data}/leveldb"
                  replicas="3"
                  bind="tcp://0.0.0.0:62623"
                  zkAddress="192.168.56.51:2181,192.168.56.16:2181,192.168.56.17:2181"
                  hostname="zk03"
                  zkPath="/activemq/leveldb-stores"
/>
        </persistenceAdapter>
5.6 修改消息端口
activemq.xml配置文件 zk01 [[email protected] conf]# grep -n 51511 activemq.xml 120: <transportConnector name="openwire" uri="tcp://0.0.0.0:51511?maximumConnections=1000&wireFormat.maxFrameSize=104857600"/> [[email protected] conf]# zk02 [[email protected] conf]# grep -n 51512 activemq.xml 120: <transportConnector name="openwire" uri="tcp://0.0.0.0:51512?maximumConnections=1000&wireFormat.maxFrameSize=104857600"/> [[email protected] conf]# zk03 [[email protected] conf]# grep -n 51513 activemq.xml 120: <transportConnector name="openwire" uri="tcp://0.0.0.0:51513?maximumConnections=1000&wireFormat.maxFrameSize=104857600"/>
6.启动activemq
zookeeper一定要提前启动
顺序启动activemq
[[email protected] bin]# /opt/activemq01/bin/activemq start
INFO: Using default configuration
(you can configure options in one of these file: /etc/default/activemq /root/.activemqrc)

INFO: Invoke the following command to create a configuration file
/opt/activemq01/bin/activemq setup [ /etc/default/activemq | /root/.activemqrc ]

INFO: Using java ‘/opt/jdk/bin/java‘
INFO: Starting - inspect logfiles specified in logging.properties and log4j.properties to get details
INFO: pidfile created : ‘/opt/activemq01/data/activemq-zk01.pid‘ (pid ‘4541‘)


[[email protected] conf]# /opt/activemq02/bin/activemq start
INFO: Using default configuration
(you can configure options in one of these file: /etc/default/activemq /root/.activemqrc)

INFO: Invoke the following command to create a configuration file
/opt/activemq02/bin/activemq setup [ /etc/default/activemq | /root/.activemqrc ]

INFO: Using java ‘/opt/jdk/bin/java‘
INFO: Starting - inspect logfiles specified in logging.properties and log4j.properties to get details
INFO: pidfile created : ‘/opt/activemq02/data/activemq-zk02.pid‘ (pid ‘4492‘)
[[email protected] conf]#


[[email protected] conf]# /opt/activemq03/bin/activemq start
INFO: Using default configuration
(you can configure options in one of these file: /etc/default/activemq /root/.activemqrc)

INFO: Invoke the following command to create a configuration file
/opt/activemq03/bin/activemq setup [ /etc/default/activemq | /root/.activemqrc ]

INFO: Using java ‘/opt/jdk/bin/java‘
INFO: Starting - inspect logfiles specified in logging.properties and log4j.properties to get details
INFO: pidfile created : ‘/opt/activemq03/data/activemq-zk03.pid‘ (pid ‘2296‘)
7.查看分片以及zookeeper的信息
登录任意一台zookeeper就行
[[email protected] bin]# pwd
/opt/zk02/bin
[[email protected] bin]# ./zkCli.sh   -server 192.168.56.16:2181
[zk: 192.168.56.16:2181(CONNECTED) 0] ls  /
[activemq, dubbo, zookeeper]
[zk: 192.168.56.16:2181(CONNECTED) 1] ls /activemq
[leveldb-stores]
[zk: 192.168.56.16:2181(CONNECTED) 2] ls /activemq/leveldb-stores
[00000000002, 00000000001, 00000000000]
[zk: 192.168.56.16:2181(CONNECTED) 3]
elected值不为空的是消息activemq的master节点
[zk: 192.168.56.16:2181(CONNECTED) 3] get /activemq/leveldb-stores/00000000002
{"id":"dubboedu","container":null,"address":null,"position":-1,"weight":1,"elected":null}
cZxid = 0x400000012
ctime = Sat Dec 31 19:33:44 CST 2016
mZxid = 0x400000012
mtime = Sat Dec 31 19:33:44 CST 2016
pZxid = 0x400000012
cversion = 0
dataVersion = 0
aclVersion = 0
ephemeralOwner = 0x259544b516a0000
dataLength = 89
numChildren = 0
[zk: 192.168.56.16:2181(CONNECTED) 4] get /activemq/leveldb-stores/00000000001
{"id":"dubboedu","container":null,"address":null,"position":-1,"weight":1,"elected":null}
cZxid = 0x400000008
ctime = Sat Dec 31 19:33:16 CST 2016
mZxid = 0x400000015
mtime = Sat Dec 31 19:33:45 CST 2016
pZxid = 0x400000008
cversion = 0
dataVersion = 8
aclVersion = 0
ephemeralOwner = 0x359544bcfbb0001
dataLength = 89
numChildren = 0
[zk: 192.168.56.16:2181(CONNECTED) 5] get /activemq/leveldb-stores/00000000000
{"id":"dubboedu","container":null,"address":"tcp://zk01:62621","position":-1,"weight":1,"elected":"0000000000"}
cZxid = 0x400000005
ctime = Sat Dec 31 19:32:51 CST 2016
mZxid = 0x40000000d
mtime = Sat Dec 31 19:33:17 CST 2016
pZxid = 0x400000005
cversion = 0
dataVersion = 4
aclVersion = 0
ephemeralOwner = 0x359544bcfbb0000
dataLength = 111
numChildren = 0
[zk: 192.168.56.16:2181(CONNECTED) 6]
8 测试高可用activemq
8.1 正产三个节点:
[zk: 192.168.56.16:2181(CONNECTED) 3] ls /activemq/leveldb-stores
[00000000002, 00000000001, 00000000000]
[zk: 192.168.56.16:2181(CONNECTED) 4]
8.2 此时activemq02处于主节点,停掉主节点
停掉主节点activemq:
[[email protected] bin]# ./activemq stop
查看消息队列的信息,可以看出重新选出来主节点
[zk: 192.168.56.16:2181(CONNECTED) 4] ls /activemq/leveldb-stores
[00000000002, 00000000000]
[zk: 192.168.56.16:2181(CONNECTED) 5] ls /activemq/leveldb-stores/00000000002
[]
[zk: 192.168.56.16:2181(CONNECTED) 6] get /activemq/leveldb-stores/00000000002
{"id":"dubboedu","container":null,"address":null,"position":-1,"weight":1,"elected":null}
cZxid = 0x400000012
ctime = Sat Dec 31 19:33:44 CST 2016
mZxid = 0x400000012
mtime = Sat Dec 31 19:33:44 CST 2016
pZxid = 0x400000012
cversion = 0
dataVersion = 0
aclVersion = 0
ephemeralOwner = 0x259544b516a0000
dataLength = 89
numChildren = 0
[zk: 192.168.56.16:2181(CONNECTED) 7] get /activemq/leveldb-stores/00000000000
{"id":"dubboedu","container":null,"address":"tcp://zk01:62621","position":-1,"weight":1,"elected":"0000000000"}
cZxid = 0x400000005
ctime = Sat Dec 31 19:32:51 CST 2016
mZxid = 0x40000000d
mtime = Sat Dec 31 19:33:17 CST 2016
pZxid = 0x400000005
cversion = 0
dataVersion = 4
aclVersion = 0
ephemeralOwner = 0x359544bcfbb0000
8.3 启动activemq02
[[email protected] bin]# ./activemq start

查看消息队列的信息
[zk: 192.168.56.16:2181(CONNECTED) 8] ls /activemq/leveldb-stores
[00000000003, 00000000002, 00000000000]               #重新加进来
[zk: 192.168.56.16:2181(CONNECTED) 9]
8.5java代码链接activemq
java conf 消息队列的配置文件
failover:(tcp://192.168.56.15:51511,tcp://192.168.56.16:51512.tcp://192.168.56.17:51513)?random=false
mq.username=admin
my.password=admin        #这是消息队列的用户名和密码 生产场景自己修改
mq.pool.maxConnection=10
queueName=队列的名称
9.开机自动启动不要忘了做了!!
本文出自 “砖家博客” 博客,请务必保留此出处http://wsxxsl.blog.51cto.com/9085838/1887846
以上是关于activemq+zookeeper 集群部署基于levedb的主要内容,如果未能解决你的问题,请参考以下文章
