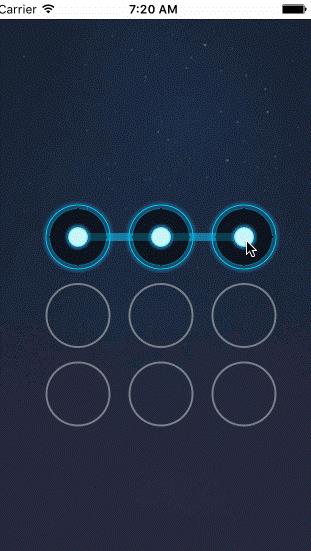
iOS项目-支付宝手势密码锁
Posted
tags:
篇首语:本文由小常识网(cha138.com)小编为大家整理,主要介绍了iOS项目-支付宝手势密码锁相关的知识,希望对你有一定的参考价值。
难点在于 九宫格button的布局 还有 手势移动时记住手势位置
上代码
@property (nonatomic,strong)NSMutableArray *selectedBtns;
@property (nonatomic,assign)CGPoint currentPoint;
两个变量,一个记录选中的button,一个记录当前点
-(NSMutableArray *)selectedBtns
{
if (!_selectedBtns) {
_selectedBtns = [NSMutableArray array];
}
return _selectedBtns;
}
-(instancetype)initWithFrame:(CGRect)frame
{
if (self = [super initWithFrame:frame]) {
[self addBtn];
}
return self;
}
-(instancetype)initWithCoder:(NSCoder *)aDecoder
{
if (self = [super initWithCoder:aDecoder]) {
[self addBtn];
}
return self;
}
初始化
-(void)addBtn{
for (int i = 0; i<BtnCount; i++) {
UIButton *button = [UIButton buttonWithType:UIButtonTypeCustom];
[button setBackgroundImage:[UIImage imageNamed:@"gesture_node_normal"] forState:UIControlStateNormal];
[button setBackgroundImage:[UIImage imageNamed:@"gesture_node_highlighted"] forState:UIControlStateSelected];
button.userInteractionEnabled = NO;
button.tag = i;
int row = i / columnCount;
int column = i % columnCount;
CGFloat margin = (self.frame.size.width - btnWidth*columnCount)/(columnCount+1);
CGFloat btnX = margin *column + column*(margin+btnWidth);
CGFloat btnY = (margin+btnWidth)*row;
button.frame = CGRectMake(btnX, btnY, btnWidth, btnWidth);
[self addSubview:button];
}
}
创建九宫格button
- (CGPoint)pointWithTouch:(NSSet *)touches{
UITouch *touch = [touches anyObject];
CGPoint point = [touch locationInView:self];
return point;
}
- (UIButton *)buttonWithPoint:(CGPoint)point{
for (UIButton *btn in self.subviews) {
//
if (CGRectContainsPoint(btn.frame, point)) {
return btn;
}
}
return nil;
}
#pragma mark - 触摸方法
-(void)touchesBegan:(NSSet *)touches withEvent:(UIEvent *)event{
//1.拿到触摸的点
CGPoint point = [self pointWithTouch:touches];
//2.根据触摸的点拿到响应的按钮
UIButton *btn = [self buttonWithPoint:point];
//3.设置状态
if (btn && btn.selected == NO) {
btn.selected = YES;
[self.selectedBtns addObject:btn];//往数组或字典中添加对象的时候,要判断这个对象是否存在
}
}
-(void)touchesMoved:(NSSet *)touches withEvent:(UIEvent *)event{
//1.拿到触摸的点
CGPoint point = [self pointWithTouch:touches];
//2.根据触摸的点拿到响应的按钮
UIButton *btn = [self buttonWithPoint:point];
//3.设置状态
if (btn && btn.selected == NO) {
btn.selected = YES;
[self.selectedBtns addObject:btn];
}else{
self.currentPoint = point;
}
[self setNeedsDisplay];
}
-(void)touchesEnded:(NSSet *)touches withEvent:(UIEvent *)event{
if ([self.delegate respondsToSelector:@selector(LockView:didFinishAtPath:)]) {
NSMutableString *path = [NSMutableString string];
for (UIButton *btn in self.selectedBtns) {
[path appendFormat:@"%ld",(long)btn.tag];
}
[self.delegate LockView:self didFinishAtPath:path];
}
//清空按钮
//makeObjectsPerformSelector 向数组中的每一个对象发送方法 setSelected:,方法参数为 NO
// [self.selectedBtns makeObjectsPerformSelector:@selector(setSelected:) withObject:@(NO)];
for(UIButton *button in self.selectedBtns){
button.selected = NO;
}
[self.selectedBtns removeAllObjects];
[self setNeedsDisplay];
}
-(void)touchesCancelled:(NSSet<UITouch *> *)touches withEvent:(UIEvent *)event
{
[self touchesEnded:touches withEvent:event];
}
手势方法
- (void)drawRect:(CGRect)rect {
if (self.selectedBtns.count == 0) {
return;
}
UIBezierPath *path = [UIBezierPath bezierPath];
path.lineWidth = 8;
path.lineJoinStyle = kCGLineJoinRound;
[[UIColor colorWithRed:32/255.0 green:210/255.0 blue:254/255.0 alpha:0.5] set];
//遍历按钮
for (int i = 0; i < self.selectedBtns.count; i++) {
UIButton *button = self.selectedBtns[i];
if (i == 0) {//设置起点
[path moveToPoint:button.center];
}else{//连线
[path addLineToPoint:button.center];
}
}
[path addLineToPoint:self.currentPoint];
[path stroke];
}
画线
最后 在viewcontroller上设置代理响应
-(void)LockView:(LockView *)lockView didFinishAtPath:(NSString *)path
{
if ([path isEqualToString:@"012345678"]) {
UIAlertController *alert = [UIAlertController alertControllerWithTitle:@"密码正确" message:nil
preferredStyle:UIAlertControllerStyleAlert];
[alert addAction:[UIAlertAction actionWithTitle:@"确定" style:UIAlertActionStyleDestructive handler:nil]];
[alert addAction:[UIAlertAction actionWithTitle:@"取消" style:UIAlertActionStyleCancel handler:nil]];
[self presentViewController:alert animated:YES completion:nil];
}else{
UIAlertController *alert = [UIAlertController alertControllerWithTitle:@"密码错误" message:nil
preferredStyle:UIAlertControllerStyleAlert];
[alert addAction:[UIAlertAction actionWithTitle:@"确定" style:UIAlertActionStyleDestructive handler:nil]];
[alert addAction:[UIAlertAction actionWithTitle:@"取消" style:UIAlertActionStyleCancel handler:nil]];
[self presentViewController:alert animated:YES completion:nil];
}
}

以上是关于iOS项目-支付宝手势密码锁的主要内容,如果未能解决你的问题,请参考以下文章