N版openstack——镜像服务glance
Posted
tags:
篇首语:本文由小常识网(cha138.com)小编为大家整理,主要介绍了N版openstack——镜像服务glance相关的知识,希望对你有一定的参考价值。
【N版】openstack——镜像服务glance
一.openstack之glance镜像服务
1.1glance介绍
glance主要是由三部分组成
glance-api:接收云系统镜像的创建,删除,读取请求,类似nova-api,通过其他模块(glance-registry及image store)来完成诸如镜像的查找、获取、上传、删除等操作,api监听端口9292。
glance-registry:云系统的镜像注册服务,用于与mysql数据库交互,存储或获取镜像的元数据(metadata);提供镜像元数据相关的REST接口,通过glance-registry,可以向数据库中写入或获取镜像各种数据,glance-registry监听端口9191,glance数据库中有两张表,一张是image表,另一张是image property表。image表保存了镜像格式、大小等信息;image property表则主要保存镜像的定制化信息。
image store:是一个存储的接口层,通过这个接口,glance可以获取镜像,imagestore支持的存储有Amazon的S3、Openstack本身的Swift还有注入ceph,sheepdog,GFS等分布式存储。image store是镜像保存与获取的接口,它仅仅是一个接口层,具体的实现需要外部的存储支持。
glance配置
项目及端点配置
[[email protected] ~]# openstack service create --nameglance --description "OpenStack Image" image <- 创建glance服务实体 ->
[[email protected] ~]# openstack endpoint create --regionRegionOne \
image public http://192.168.56.11:9292
[[email protected] ~]# openstack endpoint create --regionRegionOne \
image internal http://192.168.56.11:9292
[[email protected] ~]# openstack endpoint create --regionRegionOne \
image admin http://192.168.56.11:9292
<-创建镜像服务API端点 ->
[[email protected] ~]# openstack endpoint list <- 查看列表->
1.2 连接数据库配置
[[email protected] ~]# vim /etc/glance/glance-api.conf <- glance-api配置->
1748 connection = mysql+pymysql://glance:[email protected]/glance
[[email protected] ~]# vim/etc/glance/glance-registry.conf <- registry配置->
1038 connection =mysql+pymysql://glance:[email protected]/glance
[[email protected] ~]# su -s /bin/sh -c"glance-manage db_sync" glance <- 同步->
[[email protected] ~]# mysql -uglance -pglance-h192.168.56.11 -e "use glance;show tables" <-检查->
1.3连接keystone配置
[[email protected] ~]# vim /etc/glance/glance-api.conf <- glance-api配置->
3178 [keystone_authtoken] 下面添加 <- 连接keystone配置->
3179 auth_uri = http://192.168.56.11:5000
3180 auth_url = http://192.168.56.11:35357
3181 memcached_servers = 192.168.56.11:11211
3182 auth_type = password
3183 project_domain_name = default
3184 user_domain_name = default
3185 project_name = service
3186 username = glance
3187 password = glance
打开3990 flavor = keystone的注释 <- 配置认证服务访问->
打开1864 stores = file,http的注释 <- 配置本地文件系统和镜像存储位置>
打开1896 default_store = file的注释
打开2196 filesystem_store_datadir = /var/lib/glance/images的注释
[[email protected] ~]# vim/etc/glance/glance-registry.conf <- registry配置->
1127 [keystone_authtoken] 下面添加
1128 auth_uri = http://192.168.56.11:5000
1129 auth_url = http://192.168.56.11:35357
1130 memcached_servers = 192.168.56.11:11211
1131 auth_type = password
1132 project_domain_name = default
1133 user_domain_name = default
1134 project_name = service
1135 username = glance
1136 password = glance
打开 1910 flavor = keystone 注释 <- 配置认证服务访问->
1.4 检查配置文件
[[email protected] ~]# grep ‘^[a-z]‘/etc/glance/glance-api.conf
connection =mysql+pymysql://glance:[email protected]/glance
stores = file,http
default_store = file
filesystem_store_datadir = /var/lib/glance/images
auth_uri = http://192.168.56.11:5000
auth_url = http://192.168.56.11:35357
memcached_servers = 192.168.56.11:11211
auth_type = password
project_domain_name = default
user_domain_name = default
project_name = service
username = glance
password = glance
flavor = keystone
[[email protected] ~]# grep ‘^[a-z]‘/etc/glance/glance-registry.conf
connection =mysql+pymysql://glance:[email protected]/glance
auth_uri = http://192.168.56.11:5000
auth_url = http://192.168.56.11:35357
memcached_servers = 192.168.56.11:11211
auth_type = password
project_domain_name = default
user_domain_name = default
project_name = service
username = glance
password = glance
flavor = keystone
1.5 启动服务
[[email protected] ~]# systemctl enableopenstack-glance-api.service \
openstack-glance-registry.service
[[email protected] ~]# systemctl startopenstack-glance-api.service \
openstack-glance-registry.service
1.6上传镜像
注: 把镜像放到任意目录下,执行以下命令,进入那个目录,否则要加绝对路径
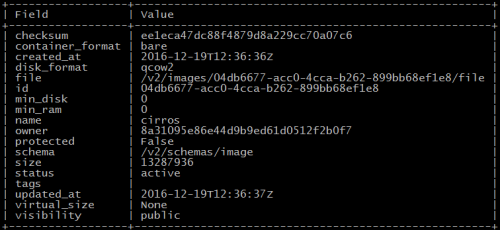
[[email protected] ~]# openstack image create"cirros" \
--file cirros-0.3.4-x86_64-disk.img \
--disk-format qcow2 --container-format bare \
--public
1.7查看镜像列表
[[email protected] ~]# openstack image list
[[email protected] ~]# glance image-list <- 老版本命令 ->
本文出自 “good cook” 博客,转载请与作者联系!
以上是关于N版openstack——镜像服务glance的主要内容,如果未能解决你的问题,请参考以下文章
浅谈OpenStack T版服务组件--Glance镜像服务(#^.^#)
浅谈OpenStack T版服务组件--Glance镜像服务(#^.^#)(持续更新~~~)


