第68课 基础图形绘制(下)
Posted 浅墨浓香
tags:
篇首语:本文由小常识网(cha138.com)小编为大家整理,主要介绍了第68课 基础图形绘制(下)相关的知识,希望对你有一定的参考价值。
1. GraphicsView体系结构
(1)Graphics View框架结构的主要特点
①Graphics View框架结构中系统可以利用Qt绘图系统的反锯齿、OpenGL工具来改善绘图性能。
②Graphics View支持事件传播体系结构,可以使图元在场影(Scene)中交互能力提高一倍,图元能够处理键盘事件和鼠标事件。其中,鼠标事件包括鼠标按下、移动、释放和双击,还可以跟踪鼠标的移动。
③在Graphics View框架中,通过二元空间划分树(BSP,Binary Space Partitioning)来提供快速的图元查找,这样就能实时地显示大场景。
(2)GraphicsView框架结构的内容
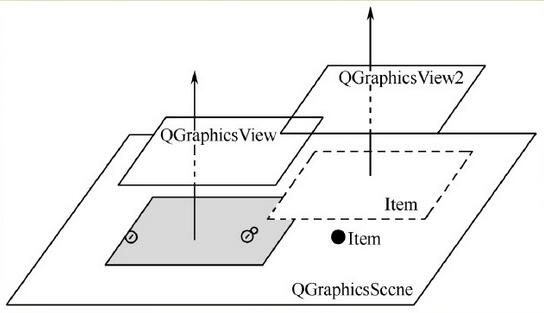
①GraphicsView框架结构主要包含了场景类(QGrahicsScene)、视图类(QGraphicsView)和图元类(QGraphicsItem)。场景类提供了一个用于管理位于其中的众多图元容器,视图类用于显示场景中的图元,一个场景可以通过多个视图来表现,一个场景包括多个几何图形。它们三者之间的关系如下图。
(3)3个主要的类
①场景类(QGraphicsScene类):它是一个用于放置图元的容器,本身是不可见的,必须通过与之相连的视图来显示及与外界进行交互操作。通过QGraphicsScene::addItem()可以加入一个图元到场景中。图元可以通过多个函数进行检索。QGraphicsScene::Items()和一些重载的函数可以返回和点、矩形、多边形或向量路径相交的所有图元。
②视图类(QGraphicsView类):它提供一个可视的窗口,用于显示场景中的图元。在同一个场景中可以有多个视口,也可以为相同的数据集提供几种不同的视图。QGraphicsView是可滚动的窗口部件,可以提供滚动条来浏览大的场景。如果需要使用OpenGL,可以使用QGraphicsView::setViewport()将视口设置为QGLWidget。
③图元类(QGraphicsItem类):它是场景中各个图元的基类,在它的基础上可以继承出各种图元类,Qt己经预置的有如直线(QGraphicsLineItem)、椭圆(QGraphicsEllipseItem)、文本(QGraphicsTextItem)、矩形(QGraphicsRectItem)等,当然也可以在QGraphicsItem类的基础上实现自定义的图元类,即用户可继承QGraphicsItem实现符合自己需要的图元。它提供以下的功能:
A.处理鼠标按下、移动、释放、双击、悬停、滚轮和右键菜单事件 B.处理键盘输入事件 C.处理拖放事件 D.分组 E.碰撞检测
2. GraphicsView坐标系统
(1)场景坐标
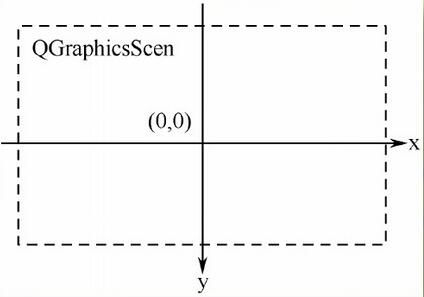
①场景坐标是所有图元的基础坐标系统。场景坐标系统描述了顶层的图元,每个图元都有场景坐标和相应的包容框。场景坐标的原点在场景中心,坐标原点是x轴正方向向右,y。轴正方向向下。
②QGraphicsScene类的坐标系是以中心为原点(0,0),如下图
(2)视图坐标
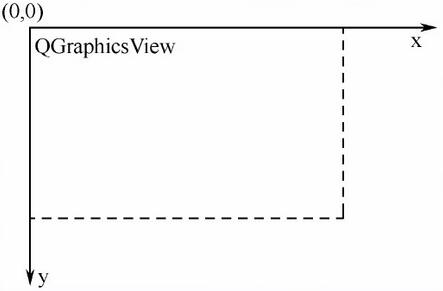
①视图坐标是窗口部件的坐标。视图坐标的单位是像素。QGraphicsView视口的左上角为(0,0),x轴正方向向右,y轴正方向向下。所有的鼠标事件都最开始都使用视图坐标。
②QGraphicsView类继承自QWiget类,因此它和其他的QWidget类一样以窗口的左上角作为自己坐标系统的原点,如下图所示
(3)图元坐标
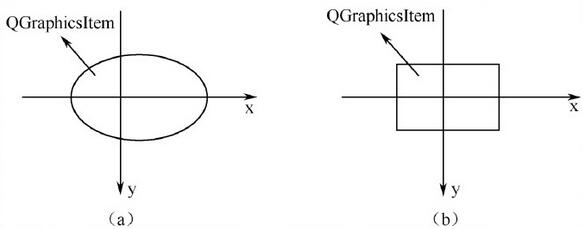
①图元使用自己的本地坐标,这个坐标系统通常以图元中心为原点,这也是所有变换的原点。图元坐标方向是x轴正方向向右,y正方向向下。创建图元后,只需要注意图元坐标就可以了,QGraphicsScene和QGraphicsView会完成所有的变换。
②GraphicsItem类的坐标系,在调用QGrahpicsItem类的paint()函数重画图元时,则以此坐标系统为基准,如下图所示。
3. GraphicsView框架提供多种变换函数
|
映射函数 |
转换类型 |
|
QGrahpicsView::mapToScene() |
视图到场景 |
|
QGrahpicsView::mapFromScene() |
场景到视图 |
|
QGraphicsItem::mapToScene() |
图元到场景 |
|
QGrahpicsItem::mapFromScene() |
场景到图元 |
|
QGraphicsItem::mapToParent() |
子图元到父图元 |
|
QGraphicsItem::mapFromParent() |
父图元到子图元 |
|
QGraphicsItem::mapToItem() |
本图元到其他图元 |
|
QGraphicsItem::mapFromItem() |
其他图元到本图元 |
4. 自定义图形项(QMyGraphicsItem)
(1)自定义图形项的类设计
①从QGraphicsItem继承
②实现两个来自父类的纯虚函数
QRectF boundingRect() const; //返回绘制图形项的矩形区域
void paint(QPainter *painter, const QStyleOptionGraphicsItem *option, QWidget *widget= Q_NULLPTR); //实际的绘图操作
(2)光标和提示
①setToolTip("Click and drag me!"); //提示
②setCursor(Qt::OpenHandCursor); //改变光标形状
(3)键盘和鼠标事件
①void mousePressEvent(QGraphicsSceneMouseEvent *event);
②void mouseMoveEvent(QGraphicsSceneMouseEvent *event);
③void mouseReleaseEvent(QGraphicsSceneMouseEvent *event);
④void keyPressEvent(QKeyEvent* event); //要让QGraphicsItem接受键盘事件,需要先调用setFlag(QGraphicsItem::ItemIsFocusable)来让图形可获得焦点;
(4)拖放事件
①对接收拖放事件的对象调用setAccpetDrops成员函数
②重写dragEnterEvent函数(拖动对象进入目标对象时调用该函数)
③重写dropEvent函数(当拖动对象离开目标对象时))
④重写dropEvent函数(拖动对象放入目标对象时调用)
(5)碰撞检测函数
①collidesWithItem() //本图形与指定图形项是否碰撞
②collidesWithPath() //与指定路径是否碰撞
③collidingItems() //返回与该图形项碰撞的图形项列表。
|
三个函数的共同参数:Qt::ItemSelectionMode枚举类型 |
|
|
值 |
含义 |
|
Qt::ContainsItemShape |
只有图形项的shape被完全包含时。(默认) |
|
Qt::IntersectsItemShape |
当图形项的shape被完全包含时,或者图形项与其边界相交 |
|
Qt::ContainsItemBoundingRect |
只有图形项的bounding rectangle被完全包含时。 |
|
Qt::IntersectsItemBoundingRect |
只有图形项的bounding rectangle被完全包含时,或者图形项与其边界相交。 |
④shape() //返回能确定图形项的真实形状,它是一个QPainterPath对象。
⑤boundingRect(); //返回图形项的矩形形状
5. 场景(QGraphicsScene)
(1)场景的主要功能
①提供一个管理大量图形项的快速接口
②向每个图形项传播事件
③管理图形项的状态,比如选择或焦点处理
④提供无转换的渲染功能,主要用于打印
(2)场景层的分层
①背景层(BackgroundLayer):场景的绘制总是从背景层开始的。
如,scene.setBackgroundBrush(QPixmap("./test.jpg"));或重新实现drawBackground()函数。
②图形项层(ItemLayer)
③前景层(ForegroundLayer):最后绘制前景层。
(3)索引算法:在场景中进行图形项的查找
①setItemIndexMethod:设置索引算法,如QGphicsScene::BspTreeIndex(适合大于量静态图形项)或QGraphicsScene::NoIndex。
②QGraphicsScene::items() //返回符合条件的所有图形项
③QGraphics::itemAt() //返回指定点的最顶层图形项。如scene.addItem(50,50)表示获取点(50,50)的图形项
(4) 场景边界
①场景大小默认是没有限制的。而场景边界仅用于场景内部进行索引的维护。因为如果没有边界矩形,场景就要搜索所有的图形项,然后确定其边界,这将十分费时。
②设置边界矩形:setSceneRect()
6. 视图(QGraphicsView)
(1)缩放与旋转
①scale()
②rotate(θ)顺时针旋转θ度
(2)场景边框与对齐方式
①setSceneRect() :如果不定义场景边框时,当场景中的图形项移动视图窗口以外,视图就会自动出现滚动条,即使图形项再次回到可视区域,滚动条也不会消失。这里可以场景边框,这样当图形项移动到场景边框以外,视图不会提供额外的滚动区域。
②setAlignment(Qt::AlignLeft|Qt::AlignTop):当整个场景都是可视时,视图是没有滚动条的。可以通过来设置场景在视图中的对齐方式。
(3)拖动模式:
①设置拖放模式:setDragMode()
A.QGraphicsView::NoDrag //忽略鼠标事件,不可以拖动
B.QGraphicsView::ScrollHandDrag://光标变成手型,可以拖动场景进行移动
C.QGraphicsView::RubberBandDrag://使用橡皮筋效果,进行区域选择,可以选中一个区域内所有图形项。
②在QMyScene::mousePressEvent()中增加一行代码:QGraphicsView::mousePressEvent(event);
(4)事件传递
①在图形视图框架中,鼠标键盘等事件从视图进入,视图将它们传递给场景,场景再将事件传递给该点的图形项。
②如果选择多个图形项,那么就传递给最顶层的图形项。
③可以重新实现事件处理函数,然后在该函数后面将event参数传递给默认的事件处理函数。
(5)背景缓存
①setCacheMode(QGraphicsView::CacheBackground),默认为QGraphicsView::CacheNone。
②如果场景的背景需要大量耗时的渲染时,可以利用CacheBackground来缓存背景。当下次需要渲染背景时,可以快速进行渲染。
③其工作原理是,把整个视口中先绘制在一个pixmap上。但是这只适合较小的视口,也就是说,如果视图窗口很大且有滚动条,那么就不再适合缓存背景
(6)图形项查找与图形项组
①创建图形项组:也是一个图形项,它有图形项所拥有的所有特性,其作用是将加入它的所有项作为一个整体,对这个图形项组的操作,就相当于对所有图形项进行操作。
QGraphicsItemGroup* group = new QGraphicsItemGroup;

group->addToGroup(item1);

group->addToGroup(item2);

scene->addItem(group);
②图形项的查找
itemAt(x,y) //查找(x,y)点的图形项
items(); //返回场景中所有的图形项,图形项列表是按栈的降序排序的,即items().at(0)表示最后加入场景的图形项。
③图形项的区域选择
scene.setSelectionArea(); //设置选择区域
scene.selectedItems(); //获取当前选取的所有图形项的列表
④为图形项设置焦点
scene.setFocusItem(); //为一个图形项设置焦点
scene.focusItem() //获取当前获得焦点的图形项
(7)打印
①图形视图框架提供了两个打印函数:QGraphicsScene::render()和QGraphicsView::render();
②打印示例:在QMyView类中实现打印
QPixmap pixmap(400,400); //必须指定大小

QPainter painter(&pixmap);

render(&painter, QRectF(0,0,400,400),QRect(0,0,400,400)); //打印视图指定区域内容,其中QRectF指定设备的区域,这里指pixmap。而QRect参数是视图上要打印的区域。

pixmap.save("../graphicsView/save.png"); //保存(打印)成图像文件
【编程实验】图形视图框架
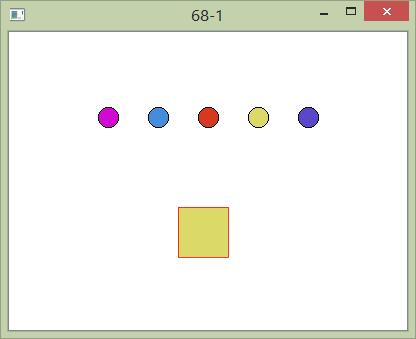
//main.cpp
#include <QApplication>
#include <QTime>
#include <QGraphicsScene>
#include <QGraphicsView>
#include "QMyItem.h"
#include "QRectItem.h"

int main(int argc, char *argv[])
{
    QApplication a(argc, argv);

    qsrand(QTime(0,0,0).secsTo(QTime::currentTime()));

    QGraphicsScene* scene = new QGraphicsScene;

    //在不同的位置新建5个圆形
    for(int i=0; i<5; i++)
    {
        QMyItem* item = new QMyItem();
        item->setPos(i*50 + 20, 100);
        scene->addItem(item);
    }

    //新建矩形
    QRectItem* rect = new QRectItem;
    rect->setPos(100, 200);
    scene->addItem(rect);

    QGraphicsView* view = new QGraphicsView;
    view->setScene(scene);
    view->resize(400, 300); //设置设图大小
    view->show();

    return a.exec();
}
//QMyItem.h
#ifndef QMYITEM_H
#define QMYITEM_H
#include <QGraphicsItem>

class QMyItem : public QGraphicsItem
{
    QColor color;

protected:
    void mousePressEvent(QGraphicsSceneMouseEvent *event);
    void mouseMoveEvent(QGraphicsSceneMouseEvent *event);
    void mouseReleaseEvent(QGraphicsSceneMouseEvent *event);
public:

    void paint(QPainter *painter, const QStyleOptionGraphicsItem *option, QWidget *widget= Q_NULLPTR);


    virtual QRectF boundingRect() const;

    QMyItem(QGraphicsItem *parent = Q_NULLPTR);
};

#endif // QMYITEM_H
//QMyItem.cpp
#include "QMyItem.h"
#include <QPainter>
#include <QCursor>
#include <QGraphicsSceneMouseEvent>
#include <QApplication>
#include <QDrag>
#include <QMimeData>
#include <QPixmap>
#include <QDebug>

QRectF QMyItem::boundingRect() const
{
    const qreal penWidth = 1;
    return QRectF(0-penWidth /2, 0-penWidth/2,
                  20+penWidth, 20+penWidth);

}

void QMyItem::mousePressEvent(QGraphicsSceneMouseEvent *event)
{
    if(event->button() != Qt::LeftButton)
    {
        event->ignore();
        return;
    }

    setCursor(Qt::ClosedHandCursor);

}

void QMyItem::mouseMoveEvent(QGraphicsSceneMouseEvent *event)
{
    if(QLineF(event->screenPos(), event->buttonDownScreenPos(Qt::LeftButton))
            .length() < QApplication::startDragDistance())
    {
        return;
    }

    QDrag*  drag = new QDrag(reinterpret_cast<QObject*>(event->widget())); //为event所在窗口部件新建拖动对象
    QMimeData* mime = new QMimeData;  //用来存储拖动的数据
    drag->setMimeData(mime); //关联
    mime->setColorData(color);

    QPixmap pix(21, 21); //新建画布,用来显示拖动时的图形
    pix.fill(Qt::transparent);

    QPainter painter(&pix);
    paint(&painter, 0, 0);  //调用paint,在这块移动画布上画圆
    drag->setPixmap(pix);   //拖动对象画布

    drag->setHotSpot(QPoint(10, 15));
    drag->exec();

    delete drag;

    setCursor(Qt::OpenHandCursor);
}

void QMyItem::mouseReleaseEvent(QGraphicsSceneMouseEvent *event)
{
    Q_UNUSED(event);
    setCursor(Qt::OpenHandCursor);   //改变光标形状
}

void QMyItem::paint(QPainter *painter, const QStyleOptionGraphicsItem *option, QWidget *widget)
{
    Q_UNUSED(option);
    Q_UNUSED(widget);

    //碰撞检测
    //painter->setBrush(!collidingItems().isEmpty() ? Qt::black : color );

    painter->setBrush(color);
    painter->drawEllipse(0, 0, 20, 20);
    //painter->drawRect(0,0,20,20);
}

QMyItem::QMyItem(QGraphicsItem *parent):QGraphicsItem(parent)
{
    setToolTip("click and drag me!");
    setCursor(Qt::OpenHandCursor);

    color = QColor(qrand() % 256, qrand() % 256,qrand() % 256);
}
//QRectItem.h
#ifndef QRECTITEM_H
#define QRECTITEM_H
#include <QGraphicsItem>

class QRectItem : public QGraphicsItem
{
    QColor color;
    bool dragOver; //标志是否有拖动进入

protected:
    void dragEnterEvent(QGraphicsSceneDragDropEvent *event);
    void dropEvent(QGraphicsSceneDragDropEvent *event);
    void dragLeaveEvent(QGraphicsSceneDragDropEvent *event);

    void keyPressEvent(QKeyEvent *event);

public:
    QRectItem(QGraphicsItem *parent = Q_NULLPTR);

    QRectF boundingRect() const;
    void paint(QPainter *painter, const QStyleOptionGraphicsItem *option,QWidget *widget);
};

#endif // QRECTITEM_H
//QRectItem.cpp
#include "QRectItem.h"
#include <QPainter>
#include <QMimeData>
#include <QVariant>
#include <QColor>
#include <QKeyEvent>
#include <QGraphicsSceneDragDropEvent>
#include <QDebug>

QRectItem::QRectItem(QGraphicsItem *parent):QGraphicsItem(parent)
{
    setAcceptDrops(true); //设置接收拖放
    color = QColor(Qt::lightGray);

    setFlag(QGraphicsItem::ItemIsFocusable);  //图形项可获得焦点
}

void QRectItem::dragEnterEvent(QGraphicsSceneDragDropEvent *event)
{
    qDebug() << "dragEnterEvent";
    //如果拖动的数据中有颜色数据,便接收
    if(event->mimeData()->hasColor())
    {
        event->setAccepted(true);
        dragOver = true;
        update();
    }
    else
    {
        event->setAccepted(false);
    }

}

void QRectItem::dropEvent(QGraphicsSceneDragDropEvent *event)
{
    dragOver = false;

    if(event->mimeData()->hasColor())
    {
        //通过类型转换来获得颜色
        QVariant v = event->mimeData()->colorData();
        color =  v.value<QColor>();
        update();
    }
}

void QRectItem::dragLeaveEvent(QGraphicsSceneDragDropEvent *event)
{
    Q_UNUSED(event);
    dragOver = false;

    update();
}

void QRectItem::keyPressEvent(QKeyEvent *event)
{
    int x = 0;
    int y = 0;
    switch (event->key())
    {
    case Qt::Key_Left:
        x = -1;
        break;
    case Qt::Key_Right:
        x = 1;
        break;
    case Qt::Key_Up:
        y = -1;
        break;
    case Qt::Key_Down:
        y = 1;
        break;
    }

    setPos(this->x() + x, this->y() + y);
}

QRectF QRectItem::boundingRect() const
{
    return QRectF(0, 0, 50, 50);
}

void QRectItem::paint(QPainter *painter, const QStyleOptionGraphicsItem *option, QWidget *widget)
{
    Q_UNUSED(option);
    Q_UNUSED(widget);

    //获取和失去焦点时的状态
    if(hasFocus())
    {
        painter->setPen(QPen(QColor(255,0,0,200)));
    }
    else
    {
        painter->setPen(QPen(QColor(100,100,100,100)));
    }

    //如果其上有拖动,颜色变亮
    painter->setBrush(dragOver ? color.light(130) : color);
    painter->drawRect(0, 0, 50, 50);
}
以上是关于第68课 基础图形绘制(下)的主要内容,如果未能解决你的问题,请参考以下文章