centos6.6-zabbix2.4.5安装实战
Posted
tags:
篇首语:本文由小常识网(cha138.com)小编为大家整理,主要介绍了centos6.6-zabbix2.4.5安装实战相关的知识,希望对你有一定的参考价值。
1. 安装前环境准备
系统环境:
[[email protected] ~]# uname -r
2.6.32-504.el6.x86_64
[[email protected] ~]# uname -m
x86_64
[[email protected] ~]# cat/etc/redhat-release
CentOS release 6.6 (Final)
IP地址及主机名规划:
主机名 | IP地址 | 角色 |
zbserver | 192.168.0.131 | zabbix服务端 |
zbclient | 192.168.0.132 | zabbix客户端 |
1.1 server端安装基础软件包
在server安装基础软件包,这里的环境使用yum安装,如果使用源码安装也是可以的。
[[email protected] ~]# yum -y install wgetvim tree gcc gcc-c++ autoconf httpd php mysql mysql-server php-mysqlhttpd-manual mod_ssl mod_perl mod_auth_mysql php-gd php-xml php-mbstring php-ldapphp-pear php-xmlrpc php-bcmath mysql-connector-odbc mysql-devellibdbi-dbd-mysql net-snmp net-snmp-devel curl-devel
1.2 启动httpd及mysql服务
[[email protected] ~]# /etc/init.d/httpdstart
[[email protected] ~]# /etc/init.d/mysqldstart
[[email protected] ~]# chkconfig httpd on
[[email protected] ~]# chkconfig mysqld on
1.3 配置防火墙
#允许80端口及zabbix的10050,10051端口
iptables -I INPUT -p tcp -m multiport --destination-port 80,10050:10051
1.4 配置PHP参数
[[email protected] ~]# cp /etc/php.ini/etc/php.ini.bak_20160226
[[email protected] ~]# sed -i "[email protected];[email protected] = Asia/[email protected]" /etc/php.ini
[[email protected] ~]# sed -i"[email protected]_execution_time = [email protected]_execution_time = [email protected]" /etc/php.ini
[[email protected] ~]# sed -i"[email protected]_max_size = [email protected]_max_size = [email protected]" /etc/php.ini
[[email protected] ~]# sed -i"[email protected]_input_time = [email protected]_input_time = [email protected]" /etc/php.ini
[[email protected] ~]# sed -i"[email protected]_limit = [email protected]_limit = [email protected]" /etc/php.ini
[[email protected] ~]# sed -i"[email protected];mbstring.func_overload = [email protected]_overload = [email protected]"/etc/php.ini
1.5 修改httpd服务FQDN错误
[[email protected] ~]#  echo "ServerName localhost:80">>/etc/httpd/conf/httpd.conf
[[email protected] ~]# /etc/init.d/httpdrestart
1.6 下载zabbix2.4.5.tar.gz
wget http://jaist.dl.sourceforge.net/project/zabbix/ZABBIX%20Latest%20Stable/2.4.5/zabbix-2.4.5.tar.gz
1.7 创建zabbix用户及zabbix用户组
[[email protected] ~]# groupadd -g 201zabbix
[[email protected] ~]# useradd -g zabbix -u201 -s /sbin/nologin zabbix
1.8 安装zabbix server端
[[email protected] ~]# tar xfzabbix-2.4.5.tar.gz
[[email protected] ~]# cd zabbix-2.4.5
[[email protected] zabbix-2.4.5]#./configure --prefix=/usr/local/zabbix --enable-server --enable-proxy--enable-agent --with-mysql=/usr/bin/mysql_config --with-net-snmp--with-libcurl
[[email protected] zabbix-2.4.5]# make&& make install
1.9 创建zabbix数据库及相关表
[[email protected] zabbix-2.4.5]# mysql -e"create database zabbix default charset utf8;"
[[email protected] zabbix-2.4.5]# mysql -e"grant all on zabbix.* to [email protected] identified by ‘zabbix‘;"
[[email protected] zabbix-2.4.5]# mysql-uzabbix -pzabbix zabbix<./database/mysql/schema.sql
[[email protected] zabbix-2.4.5]# mysql-uzabbix -pzabbix zabbix<./database/mysql/images.sql
[[email protected] zabbix-2.4.5]# mysql-uzabbix -pzabbix zabbix<./database/mysql/data.sql
2. 配置软链接及启动文件信息
[[email protected] zabbix-2.4.5]# mkdir/var/log/zabbix
[[email protected] zabbix-2.4.5]# chownzabbix.zabbix /var/log/zabbix
[[email protected] zabbix-2.4.5]# ln -s/usr/local/zabbix/etc/ /etc/zabbix
[[email protected] zabbix-2.4.5]# ln -s/usr/local/zabbix/bin/* /usr/bin/
[[email protected] zabbix-2.4.5]# ln -s/usr/local/zabbix/sbin/* /usr/sbin/
[[email protected] zabbix-2.4.5]# cp/root/zabbix-2.4.5/misc/init.d/fedora/core/zabbix_* /etc/init.d
[[email protected] zabbix-2.4.5]#  chmod 755 /etc/init.d/zabbix_*
2.1 修改/etc/init.d下zabbix_seraver及zabbix_agentd启动文件
[[email protected] zabbix-2.4.5]# sed -i"[email protected]=/usr/[email protected]=/usr/local/[email protected]"/etc/init.d/zabbix_server
[[email protected] zabbix-2.4.5]# sed -i"[email protected]=/usr/[email protected]=/usr/local/[email protected]"/etc/init.d/zabbix_agentd
2.2 修改/etc/zabbix/zabbix_server.conf
#修改mysql数据库种zabbix库的账号及密码信息
sed -i"[email protected][email protected][email protected]" /etc/zabbix/zabbix_server.conf
sed -i"[email protected]#[email protected][email protected]" /etc/zabbix/zabbix_server.conf
sed -i "[email protected]#[email protected][email protected]" /etc/zabbix/zabbix_server.conf
2.3 修改/etc/zabbix/zabbix_agentd.conf
#这里的IP地址写的是zabbix_server的IP地址,即192.168.0.131
sed -i"[email protected][email protected]=127.0.0.1,[email protected]"/etc/zabbix/zabbix_agentd.conf
sed -i "[email protected][email protected]=192.168.0.131:[email protected]"/etc/zabbix/zabbix_agentd.conf
sed -i"[email protected]/[email protected]/log/zabbix/[email protected]"/etc/zabbix/zabbix_agentd.conf
sed -i "[email protected]^#[email protected]=1\[email protected]" /etc/zabbix/zabbix_agentd.conf
2.4 复制zabbix站点文件到/var/www/html/
[[email protected] zabbix-2.4.5]# cp -r/root/zabbix-2.4.5/frontends/php/ /var/www/html/zabbix/
[[email protected] zabbix-2.4.5]# chown -Rapache.apache /var/www/html/zabbix/
[[email protected] zabbix-2.4.5]# chkconfigzabbix_server on
[[email protected] zabbix-2.4.5]# chkconfigzabbix_agentd on
[[email protected] zabbix-2.4.5]#/etc/init.d/zabbix_server start
Starting zabbix_server:                                    [  OK  ]
[[email protected] zabbix-2.4.5]# /etc/init.d/zabbix_agentdstart
Starting zabbix_agentd:                                    [  OK  ]
2.5 通过web界面配置zabbix
1.安装界面:在浏览器输入:192.168.0.131/zabbix/setup.php
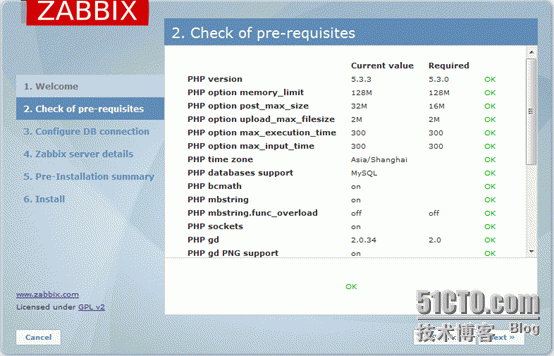
2. PHP配置检查界面,结果是OK表示正常,如果是fail状态,请修改相关的php配置参数,并重启httpd服务
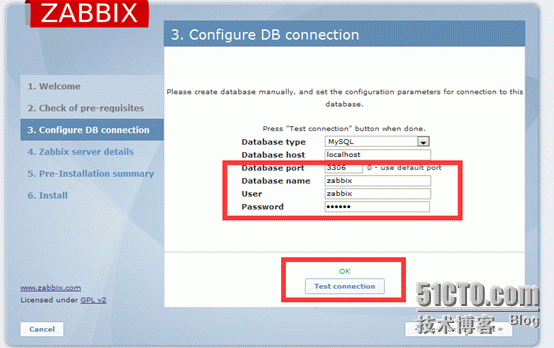
3.填写数据库相关信息端口及zabbix授权用户及密码
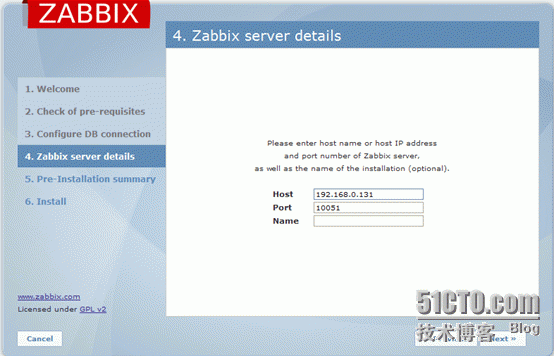
4. 填写zabbix的server地址,我这里填写的是本机的IP地址192.168.0.131
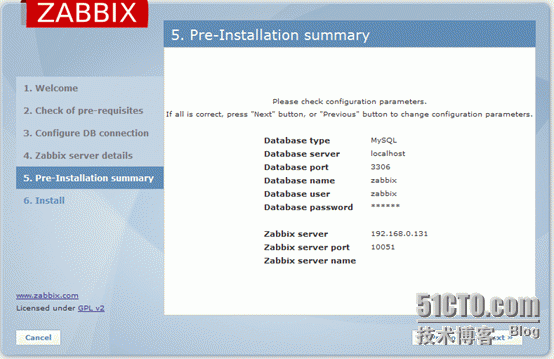
5.最后配置结果预览
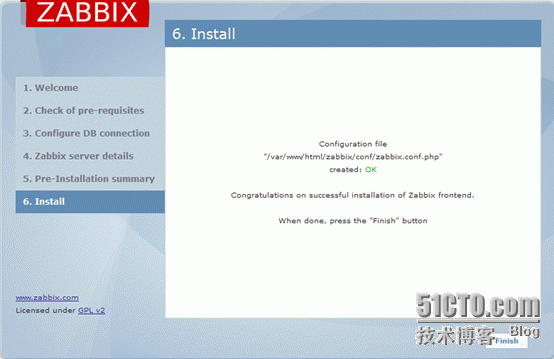
6.安装完成
2.6 访问zabbix web管理界面
#安装完成后通过http://192.168.0.131/zabbix/index.php就能直接访问zabbix管理界面
默认用户名:admin密码:zabbix
2.7 调整zabbix语言
2.8 zabbix语言设置后乱码解决方法
zabbix语言设置成中文后,有乱码解决如下
1.从windows下控制面板->字体->选择一种中文字库例如“楷体”
2.将字体上传至/var/www/html/zabbix/fonts目录下
3.修改zabbix页面管理的中文字体设置
[[email protected] zabbix-2.4.5]# vim/var/www/html/zabbix/include/defines.inc.php
#修改如下2行
define(‘ZBX_FONT_NAME‘, ‘simkai‘);
define(‘ZBX_GRAPH_FONT_NAME‘,  ‘simkai‘);
2.9 安装zabbix client端
#安装基础软件包
[[email protected] ~]# yum install wget vimtree gcc gcc-c++ -y
3. 安装zabbix_agentd
[[email protected] ~]# groupadd -g 201zabbix
[[email protected] ~]# useradd -g zabbix -u201 -s /sbin/nologin zabbix
[[email protected] ~]# tar xfzabbix-2.4.5.tar.gz
[[email protected] ~]# cd zabbix-2.4.5
[[email protected] zabbix-2.4.5]#./configure --prefix=/usr/local/zabbix --enable-agent
[[email protected] zabbix-2.4.5]# make&& make install
3.1 创建zabbix日志目录
[[email protected] zabbix-2.4.5]# mkdir/var/log/zabbix
[[email protected] zabbix-2.4.5]# chownzabbix.zabbix /var/log/zabbix
3.2 复制zabbix_agentd启动文件到/etc/init.d目录下
[[email protected]]#cpmisc/init.d/fedora/core/zabbix_agentd /etc/init.d/
[[email protected] zabbix-2.4.5]# chmod 755/etc/init.d/zabbix_agentd
3.3 修改启动配置文件和软链接
[[email protected] zabbix-2.4.5]#sed -i"[email protected]=/usr/[email protected]=/usr/local/[email protected]"/etc/init.d/zabbix_agentd
[[email protected] zabbix-2.4.5]# ln -s/usr/local/zabbix/etc/ /etc/zabbix
[[email protected] zabbix-2.4.5]# ln -s/usr/local/zabbix/bin/*  /usr/bin
[[email protected] zabbix-2.4.5]# ln -s/usr/local/zabbix/sbin/*  /usr/sbin/
3.4 修改/etc/zabbix/zabbix_agentd.conf
#这里的IP地址写的是zabbix_server端的IP地址
[[email protected] zabbix-2.4.5]#sed -i "[email protected][email protected][email protected]"/etc/zabbix/zabbix_agentd.conf
[[email protected] zabbix-2.4.5]#sed -i "[email protected][email protected]=192.168.0.131:[email protected]"/etc/zabbix/zabbix_agentd.conf
[[email protected] zabbix-2.4.5]#sed -i"[email protected]/[email protected]/log/zabbix/[email protected]"  /etc/zabbix/zabbix_agentd.conf
[[email protected] zabbix-2.4.5]#sed -i "[email protected]^# [email protected]=1\[email protected]"/etc/zabbix/zabbix_agentd.conf
3.5 设置zabbix_agentd开机自动启动,并启动zabbix_agentd服务
[[email protected] zabbix-2.4.5]# chkconfigzabbix_agentd on
[[email protected] zabbix-2.4.5]#/etc/init.d/zabbix_agentd start
Starting zabbix_agentd:             [  OK  ]
3.6 安装小结
#安装前请配置好时间同步、关闭selinux、防火墙、配置好yum源等
本文出自 “Linux运维” 博客,请务必保留此出处http://enzhi.blog.51cto.com/11193298/1745388
以上是关于centos6.6-zabbix2.4.5安装实战的主要内容,如果未能解决你的问题,请参考以下文章

