NIC Teaming on CentOS 7 with nmtui
Posted
tags:
篇首语:本文由小常识网(cha138.com)小编为大家整理,主要介绍了NIC Teaming on CentOS 7 with nmtui相关的知识,希望对你有一定的参考价值。
NIC Teaming on CentOS 7 with nmtui
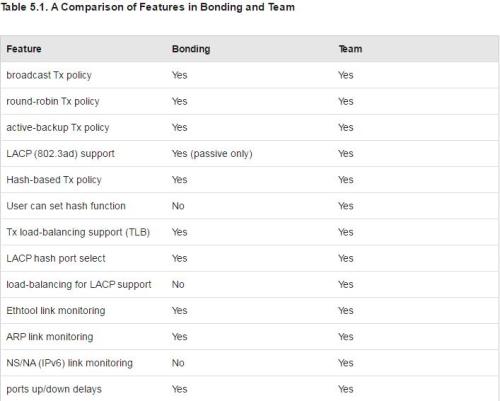
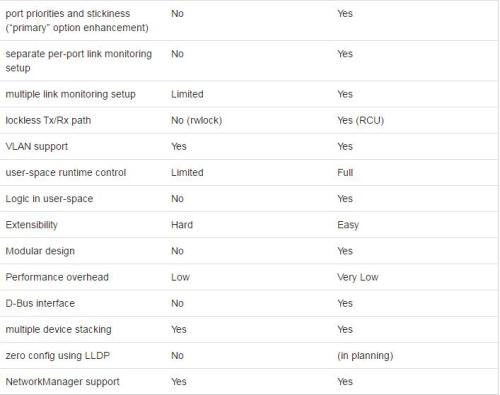
在Linux,可以将多个网络链路聚合成一个逻辑链路,可以增加网络吞吐量或冗余。例如,我们可以将IP地址分配给由两个网络接口组成的组,使我们的吞吐量加倍,或者为备份预留一个接口,如果第一个失败,第二个网卡继续工作。链路聚合在过去做了bond,但在RHEL7中,team将是首选方法。因为team可以聚合更高效,比bonding更具优势。下图为team与bond差异列表。
这里我们将介绍如何创建和配置具有两个不同网络接口的team。
1、Teaming Daemon安装
为了使用teaming功能,首先必须安装teamd包,系统通常不会安装。使用如下命令进行安装。
#yum install teamd -y
2、nmtui配置teaming
首先查看系统当前connection及device配置
[[email protected] Desktop]# nmcli device status
DEVICE TYPE STATE CONNECTION
eno16777736 ethernet disconnected --
eno33554992 ethernet disconnected --
lo loopback unmanaged --
[[email protected] Desktop]# nmcli connection show
NAME UUID TYPE DEVICE
[[email protected] Desktop]#
两块网卡上均没有connection.执行nmtui配置teaming。
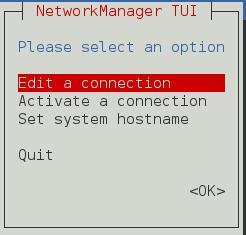
选择"edit a connection"移动光标至ok,回车进入下一步。
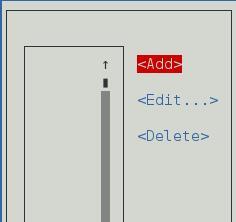
选择add,回车。
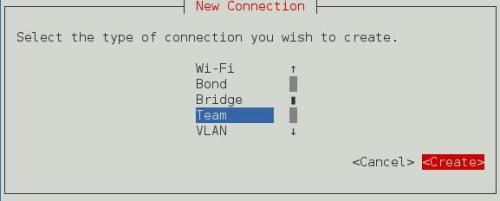
选择设备类型team,crate.
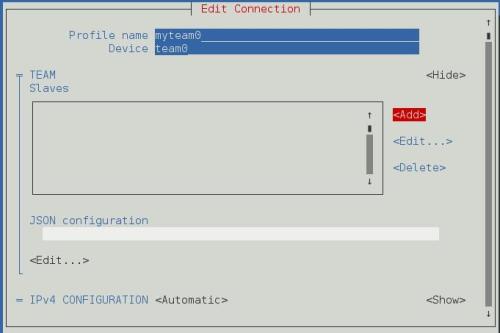
profile name根据需求设置,此处设置为myteam0,device也可以根据需求设定,此处设定为team0。设置完成后移动光标add处,添加slave设备。
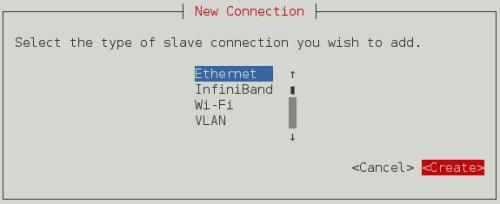
选择Ethernet类型创建
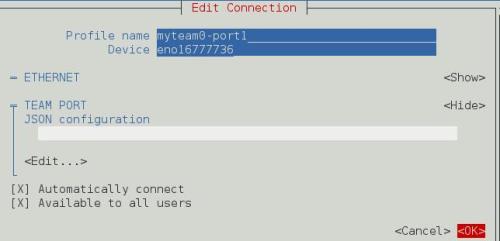
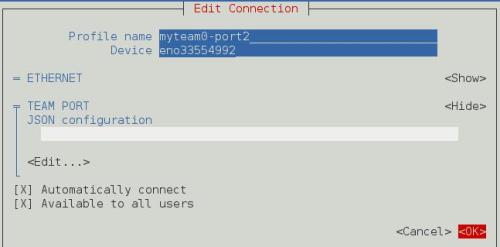
profile name根据需求设置,此处设置为myteam0-port1,device设置为服务器网卡设备名称。
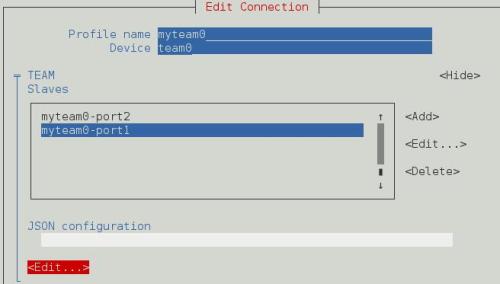
同上添加第二块网卡并设置profile name与device.设置完成后如下图结果。
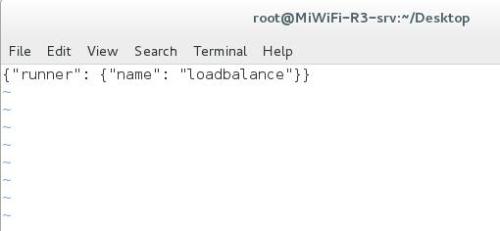
json配置,移动光标至Edit处,回车将临时打开一个vim窗口,在vim窗口中输入{ "runner": {"name": "loadbalance"}},
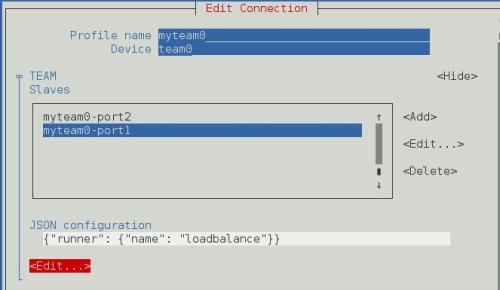
保存退出后,显示如下。
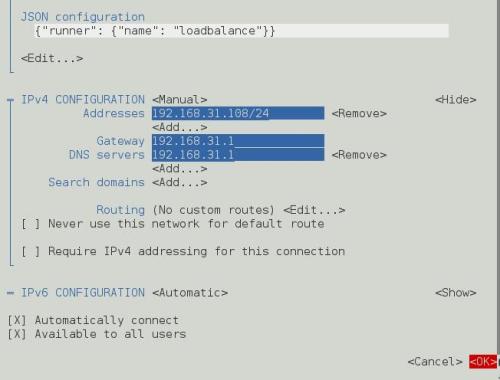
配置ipv4,设置为manual,设置ip,网关,dns如下
完成后保存退出,teaming配置完成自动创建相关配置文件,如下:
[[email protected] network-scripts]# cat ifcfg-myteam0
DEVICE=team0
TEAM_CONFIG="{\"runner\": {\"name\": \"loadbalance\"}}"
DEVICETYPE=Team
BOOTPROTO=none
DNS1=192.168.31.1
DEFROUTE=yes
IPV4_FAILURE_FATAL=no
IPV6INIT=yes
IPV6_AUTOCONF=yes
IPV6_DEFROUTE=yes
IPV6_FAILURE_FATAL=no
NAME=myteam0
UUID=1f4ed5e2-46a1-4dbf-a870-5b088957a434
ONBOOT=yes
IPADDR=192.168.31.108
PREFIX=24
GATEWAY=192.168.31.1
IPV6_PEERDNS=yes
IPV6_PEERROUTES=yes
[[email protected] network-scripts]# cat ifcfg-myteam0-port1
NAME=myteam0-port1
UUID=2b975876-780f-4181-971e-a79cf6a07a40
DEVICE=eno16777736
ONBOOT=yes
TEAM_MASTER=1f4ed5e2-46a1-4dbf-a870-5b088957a434
DEVICETYPE=TeamPort
[[email protected] network-scripts]# cat ifcfg-myteam0-port2
NAME=myteam0-port2
UUID=24e3ef82-fb93-4d11-9a6e-4c27227f7f66
DEVICE=eno33554992
ONBOOT=yes
TEAM_MASTER=1f4ed5e2-46a1-4dbf-a870-5b088957a434
DEVICETYPE=TeamPort
[[email protected] network-scripts]#
再次查看当前connection状态。
[[email protected] Desktop]# nmcli connection show
NAME UUID TYPE DEVICE
myteam0 1f4ed5e2-46a1-4dbf-a870-5b088957a434 team team0
myteam0-port2 24e3ef82-fb93-4d11-9a6e-4c27227f7f66 802-3-ethernet eno33554992
myteam0-port1 2b975876-780f-4181-971e-a79cf6a07a40 802-3-ethernet eno16777736
查看服务器当前设备的状态。
[[email protected] Desktop]# nmcli device status
DEVICE TYPE STATE CONNECTION
eno16777736 ethernet connected myteam0-port1
eno33554992 ethernet connected myteam0-port2
team0 team connected myteam0
lo loopback unmanaged --
查看ip地址信息。
[[email protected] Desktop]# ip a s
1: lo: <LOOPBACK,UP,LOWER_UP> mtu 65536 qdisc noqueue state UNKNOWN
link/loopback 00:00:00:00:00:00 brd 00:00:00:00:00:00
inet 127.0.0.1/8 scope host lo
valid_lft forever preferred_lft forever
inet6 ::1/128 scope host
valid_lft forever preferred_lft forever
2: eno16777736: <BROADCAST,MULTICAST,UP,LOWER_UP> mtu 1500 qdisc pfifo_fast master team0 state UP qlen 1000
link/ether 00:0c:29:51:e8:75 brd ff:ff:ff:ff:ff:ff
3: eno33554992: <BROADCAST,MULTICAST,UP,LOWER_UP> mtu 1500 qdisc pfifo_fast master team0 state UP qlen 1000
link/ether 00:0c:29:51:e8:75 brd ff:ff:ff:ff:ff:ff
5: team0: <BROADCAST,MULTICAST,UP,LOWER_UP> mtu 1500 qdisc noqueue state UP
link/ether 00:0c:29:51:e8:75 brd ff:ff:ff:ff:ff:ff
inet 192.168.31.108/24 brd 192.168.31.255 scope global team0
valid_lft forever preferred_lft forever
inet6 fe80::20c:29ff:fe51:e875/64 scope link tentative dadfailed
valid_lft forever preferred_lft forever
查看myteam0的详细信息及状态如下
[[email protected] Desktop]# teamdctl team0 state
setup:
runner: loadbalance
ports:
eno16777736
link watches:
link summary: up
instance[link_watch_0]:
name: ethtool
link: up
down count: 0
eno33554992
link watches:
link summary: up
instance[link_watch_0]:
name: ethtool
link: up
down count: 0
通过teamnl查看slave网卡状态
[[email protected] ~]# teamnl team0 ports
3: eno33554992: up 1000Mbit FD
2: eno16777736: up 1000Mbit FD
[[email protected] ~]#
3、测试
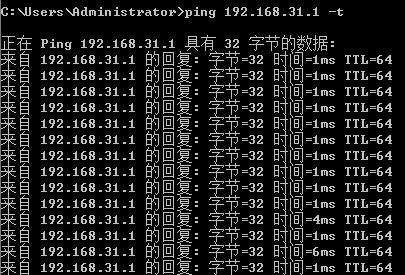
在客户及ping 192.168.31.108,然后在服务器端断开某块网卡链接,ping命令不终端。
[[email protected] Desktop]# nmcli device disconnect eno16777736
Device ‘eno16777736‘ successfully disconnected.
[[email protected] Desktop]#
[[email protected] Desktop]# nmcli connection show
NAME UUID TYPE DEVICE
myteam0-port2 1a0f2bfd-cea1-4c7b-b2de-d34199b8561e 802-3-ethernet eno33554992
myteam0-port1 8e0c325c-d069-4014-bb75-1fa1f4674618 802-3-ethernet --
myteam0 e2976c8e-da7d-4901-88c6-db8a9913947c team team0
[[email protected] Desktop]# nmcli device status
DEVICE TYPE STATE CONNECTION
eno33554992 ethernet connected myteam0-port2
team0 team connected myteam0
eno16777736 ethernet disconnected --
lo loopback unmanaged --
[[email protected] Desktop]#
[[email protected] Desktop]# teamdctl team0 state
setup:
runner: loadbalance
ports:
eno33554992
link watches:
link summary: up
instance[link_watch_0]:
name: ethtool
link: up
down count: 0
[[email protected] Desktop]#
断开链接后,查看客户端ping未终端。
4、修改team配置
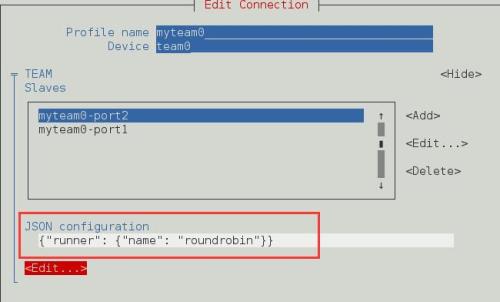
对于team的配置可以通过nmtui或者nmcli进行修改,nmtui打开图形,在json配置界面,选择edit修改vim窗口的内容保存退出即可。
[[email protected] Desktop]# nmcli connection down myteam0
Connection ‘myteam0‘ successfully deactivated (D-Bus active path: /org/freedesktop/NetworkManager/ActiveConnection/9)
[[email protected] Desktop]# nmcli connection show
NAME UUID TYPE DEVICE
myteam0-port1 2b975876-780f-4181-971e-a79cf6a07a40 802-3-ethernet --
myteam0-port2 24e3ef82-fb93-4d11-9a6e-4c27227f7f66 802-3-ethernet --
myteam0 1f4ed5e2-46a1-4dbf-a870-5b088957a434 team --
[[email protected] Desktop]# nmcli device status
DEVICE TYPE STATE CONNECTION
eno16777736 ethernet disconnected --
eno33554992 ethernet disconnected --
lo loopback unmanaged --
[[email protected] Desktop]# nmcli connection up myteam0-port1
Connection successfully activated (D-Bus active path: /org/freedesktop/NetworkManager/ActiveConnection/12)
[[email protected] Desktop]# nmcli connection up myteam0-port2
Connection successfully activated (D-Bus active path: /org/freedesktop/NetworkManager/ActiveConnection/14)
[[email protected] Desktop]# nmcli connection up myteam0
Connection successfully activated (master waiting for slaves) (D-Bus active path: /org/freedesktop/NetworkManager/ActiveConnection/15)
[[email protected] Desktop]# nmcli device status
DEVICE TYPE STATE CONNECTION
eno16777736 ethernet connected myteam0-port1
eno33554992 ethernet connected myteam0-port2
team0 team connected myteam0
bond0 bond unmanaged --
lo loopback unmanaged --
[[email protected] Desktop]# nmcli connection show
NAME UUID TYPE DEVICE
myteam0-port1 2b975876-780f-4181-971e-a79cf6a07a40 802-3-ethernet eno16777736
myteam0-port2 24e3ef82-fb93-4d11-9a6e-4c27227f7f66 802-3-ethernet eno33554992
myteam0 1f4ed5e2-46a1-4dbf-a870-5b088957a434 team team0
[[email protected] Desktop]# teamdctl team0 state
setup:
runner: roundrobin
ports:
eno16777736
link watches:
link summary: up
instance[link_watch_0]:
name: ethtool
link: up
down count: 0
eno33554992
link watches:
link summary: up
instance[link_watch_0]:
name: ethtool
link: up
down count: 0
[[email protected] Desktop]#
备注:
(1)、team配置文件的可以看考/usr/share/doc/teamd-1.25/目录中文档的写法,也可以参考
man teamd.conf帮助内容
[[email protected] ~]# cd /usr/share/doc/teamd-1.25/
[[email protected] teamd-1.25]# ls
COPYING example_configs example_ifcfgs
[[email protected] teamd-1.25]# cd example_configs/
[[email protected] example_configs]# ls
activebackup_arp_ping_1.conf activebackup_ethtool_3.conf broadcast.conf loadbalance_3.conf
activebackup_arp_ping_2.conf activebackup_multi_lw_1.conf lacp_1.conf random.conf
activebackup_ethtool_1.conf activebackup_nsna_ping_1.conf loadbalance_1.conf roundrobin_2.conf
activebackup_ethtool_2.conf activebackup_tipc.conf loadbalance_2.conf roundrobin.conf
[[email protected] example_configs]#
(2)、runners available are listed below(配置时‘-‘去除输入)
broadcast (data is transmitted over all ports)
round-robin (data is transmitted over all ports in turn)
active-backup (one port or link is used while others are kept as a backup)
loadbalance (with active Tx load balancing and BPF-based Tx port selectors)
lacp (implements the 802.3ad Link Aggregation Control Protocol)
本文出自 “技术成就梦想!” 博客,请务必保留此出处http://dreamsanqin.blog.51cto.com/845412/1885538
以上是关于NIC Teaming on CentOS 7 with nmtui的主要内容,如果未能解决你的问题,请参考以下文章
