基于windows的resin配置
Posted 在路上的牛小牛
tags:
篇首语:本文由小常识网(cha138.com)小编为大家整理,主要介绍了基于windows的resin配置相关的知识,希望对你有一定的参考价值。
Resin 与 Eclipse for JavaEE 的整合方法:
1.新建一个项目,将web application配置到resin.conf中
附上resin_struts2-111.conf文件:(为方便区分我将这个conf文件命名为resin_项目名.conf)
<!--
   -  Resin 3.1 配置文件.
  -->
<resin xmlns="http://caucho.com/ns/resin"
       xmlns:resin="http://caucho.com/ns/resin/core">

  <!-- 加载resin/lib下的所有.jar文件 -->
  <class-loader>
    <tree-loader path="${resin.home}/ext-lib"/>
    <tree-loader path="${resin.root}/ext-lib"/>

    <tree-loader path="${resin.home}/lib"/>
    <tree-loader path="${resin.root}/lib"/>
  </class-loader>

  <!--
     管理配置
    -->
  <management path="${resin.root}/admin">
    <user name="admin" password="password" disable="true"/>

    <resin:if test="${resin.professional}">
      <deploy-service/>
      <jmx-service/>
      <log-service/>
      <xa-log-service/>
    </resin:if>
  </management>

  <!--
    -JDK日志接口的配置
     -
    -->
  <log name="" level="info" path="stdout:"
       timestamp="[%H:%M:%S.%s] {%{thread}} "/>

  <!--
     日志信息的级别:\'info\' 生产环境 \'fine\' 开发环境 \'finer\' 调试环境
    -->
  <logger name="com.caucho" level="info"/>

  <logger name="com.caucho.java" level="config"/>
  <logger name="com.caucho.loader" level="config"/>

  <!--
     - 环境上下文的检测时间,对于生产站点, 这个要设置长一点,例如600秒,10分钟
    -->
  <dependency-check-interval>2s</dependency-check-interval>

  <!--
     - 发送邮件通知的SMTP服务器
    -->
  <system-property mail.smtp.host="127.0.0.1"/>
  <system-property mail.smtp.port="25"/>

  <!--
     - Sets the default character encoding to utf-8
     -
     - <character-encoding>utf-8</character-encoding>
    -->

  <!--
     -你可以把编译器改成 "javac", "eclipse" 或者 "internal".
    -->
  <javac compiler="internal" args="-source 1.5"/>

  <!-- Security providers.
     - <security-provider>
     -    com.sun.net.ssl.internal.ssl.Provider
     - </security-provider>
    -->

  <!-- 去掉注释,如果你使用resin提供的xml应用
     -
     - <system-property javax.xml.parsers.DocumentBuilderFactory
     -                 ="com.caucho.xml.parsers.XmlDocumentBuilderFactory"/>
     - <system-property javax.xml.parsers.SAXParserFactory
     -                 ="com.caucho.xml.parsers.XmlSAXParserFactory"/>
    -->

  <cluster id="app-tier">
    <!-- 设置集群上下文的根, 相对于server.root -->
    <root-directory>.</root-directory>

    <server-default>
      <!--  HTTP服务的端口 -->
      <http address="*" port="8001"/>

      <!--
         - SSL端口配置:
         -
         - <http address="*" port="8443">
         -   <openssl>
         -     <certificate-file>keys/gryffindor.crt</certificate-file>
         -     <certificate-key-file>keys/gryffindor.key</certificate-key-file>
         -     <password>test123</password>
         -   </openssl>
         - </http>
        -->

      <!--
         - JVM参数设置
        -->
      <jvm-arg>-Xmx256m</jvm-arg>
      <jvm-arg>-Xss1m</jvm-arg>
      <jvm-arg>-Xdebug</jvm-arg>
      <jvm-arg>-Dcom.sun.management.jmxremote</jvm-arg>

      <!--
         - Uncomment to enable admin heap dumps
         去掉这个如果你想管理内存堆的倾倒
         - <jvm-arg>-agentlib:resin</jvm-arg>
        -->

      <!--
         - arguments for the watchdog process
        -->
      <watchdog-jvm-arg>-Dcom.sun.management.jmxremote</watchdog-jvm-arg>
      <watchdog-port>6600</watchdog-port>

      <!--
         - 强制resin强制重起时的最小空闲内存
        -->
      <memory-free-min>1M</memory-free-min>

      <!-- 最大线程数量 -->
      <thread-max>256</thread-max>

      <!-- 套接字等待时间  -->
      <socket-timeout>65s</socket-timeout>

      <!--  配置 keepalive-->
      <keepalive-max>128</keepalive-max>
      <keepalive-timeout>15s</keepalive-timeout>

      <!--
         -如果使用的是UNIX,这里是启动的帐号和用户组.
         -
         - <user-name>resin</user-name>
         - <group-name>resin</group-name>
        -->
    </server-default>

    <!--定义群集服务器-->
    <server id="" address="127.0.0.1" port="6800"/>

    <!--
       -配置独立服务器或者群集的持久化存储,专业版的功能
      -->
    <resin:if test="${resin.professional}">
      <persistent-store type="cluster">
        <init path="session"/>
      </persistent-store>
    </resin:if>

    <!--
       -为了安全, 你可以为SSL会话(SSL sessions)定义一个不同的cookie.
       - <ssl-session-cookie>SSL_JSESSIONID</ssl-session-cookie>
      -->

    <!--
       - 缓存启用 (专业版的功能)
      -->
    <resin:if test="${resin.professional}">
      <cache path="cache" memory-size="64M">
        <!-- Vary header rewriting for IE -->
        <rewrite-vary-as-private/>
      </cache>
    </resin:if>

    <!--
       - 启用周期性的服务器状态检查和死锁检查,所有的服务器可以添加 <url> 来检查。
      -->
    <resin:if test="${resin.professional}">
      <ping>
        <!-- <url>http://localhost:8080/test-ping.jsp</url> -->
      </ping>
    </resin:if>

    <!--
       - Defaults applied to each web-app.
      -->
    <web-app-default>
      <prologue>
        <!--
           -扩展库的公共jar文件,扩展是安全的即使没有类装载器知道的jars,装载的类将为每个应用分别装载,也就是这些类都是不同的
          -->
        <class-loader>
          <tree-loader path="${resin.root}/ext-webapp-lib"/>
        </class-loader>

        <!--
           - 启用EL表达式
          -->
        <allow-servlet-el/>
      </prologue>

      <!--
         - 设置缓存页、静态也的延时值
        -->
      <cache-mapping url-pattern="/" expires="5s"/>
      <cache-mapping url-pattern="*.gif" expires="60s"/>
      <cache-mapping url-pattern="*.jpg" expires="60s"/>
      <cache-mapping url-pattern="*.png" expires="60s"/>

      <!--
         - 安全原因, 默认禁用了会话的URLs
        -->
      <session-config>
        <enable-url-rewriting>false</enable-url-rewriting>
      </session-config>

      <!--
         - 安全原因, 在cookies中设置HttpOnly标志
         - <cookie-http-only/>
        -->

      <!--
         -一些JSP包有不正确的 .tld文件。可以把validate-taglib-schema设置成false,可能继续正常工作
        -->
        <jsp>
          <validate-taglib-schema>true</validate-taglib-schema>
          <fast-jstl>true</fast-jstl>
        </jsp>
    </web-app-default>

    <!-- includes the app-default for default web-app behavior -->
    <resin:import path="${resin.home}/conf/app-default.xml"/>

    <!--
       - 简单的数据池配置
       -
       - The JDBC name is java:comp/env/jdbc/test
         <database>
           <jndi-name>jdbc/mysql</jndi-name>
           <driver type="org.gjt.mm.mysql.Driver">
             <url>jdbc:mysql://localhost:3306/test</url>
             <user></user>
             <password></password>
            </driver>
            <prepared-statement-cache-size>8</prepared-statement-cache-size>
            <max-connections>20</max-connections>
            <max-idle-time>30s</max-idle-time>
          </database>
      -->

    <!--
       - 定义所有虚拟主机的默认配置
      -->
    <host-default>
      <!--
         -如果和别的web服务器整合,这个可以被去掉,因为web服务器也可以记录这些信息。
        -->
      <access-log path="logs/access.log"
            format=\'%h %l %u %t "%r" %s %b "%{Referer}i" "%{User-Agent}i"\'
            rollover-period="1W"/>

      <!-- war 文件的布置目录 -->
      <web-app-deploy path="webapps"/>

      <!--  ear文件的布置目录 -->
      <ear-deploy path="deploy">
        <ear-default>
          <ejb-server>
            <config-directory>WEB-INF</config-directory>
          </ejb-server>
        </ear-default>
      </ear-deploy>

      <!-- rar文件的布置目录 -->
      <resource-deploy path="deploy"/>
    </host-default>

    <!-- 虚拟主机的布置目录 -->
    <host-deploy path="hosts">
      <host-default>
        <resin:import path="host.xml" optional="true"/>
      </host-default>
    </host-deploy>

    <!--  默认的虚拟主机配置 -->
    <host id="" root-directory=".">
      <!--
         -  配置默认的应用 webapp\'s ROOT
        -->
<!--
注意:若使用myeclipse/eclipse创建项目,会有一个项目名(projectName),而此处的root-directory并非项目路径,而是一个特殊的目录,该目录的子目录以及文件必须符合Servlet规范,通常就是eclipse默认创建的WebContent,这个名字可以随便改。btw,这个规范的层级结构主要有三个元素:
/WEB-INF/web.xml
/WEB-INF/classes/
/WEB-INF/lib/
必须包含有上面三个东西。配置文件(*.properties, *.xml等等)需要放在classes下
-->

      <web-app id="/struts2" root-directory="D:\\RuahoDemo\\projectWorkpace\\struts2-111\\WebContent"/>

      <web-app id="/resin-admin" root-directory="${resin.home}/php/admin">
        <!--
           - 管理应用程序 /resin-admin
          -->
        <prologue>
          <resin:set var="resin_admin_external" value="false"/>
          <resin:set var="resin_admin_insecure" value="true"/>
        </prologue>
      </web-app>


    </host>
  </cluster>

  <!--
     - Configuration for the web-tier/load-balancer
    -->
  <resin:if test="${resin.professional}">
    <cluster id="web-tier">
      <server-default>
        <!-- The http port -->
        <http address="*" port="9080"/>
      </server-default>

      <server id="web-a" address="127.0.0.1" port="6700"/>

      <cache path="cache" memory-size="64M"/>

      <host id="">
        <web-app id="/">

           <rewrite-dispatch>
             <load-balance regexp="" cluster="app-tier"/>
           </rewrite-dispatch>

        </web-app>
      </host>
    </cluster>
  </resin:if>
</resin>
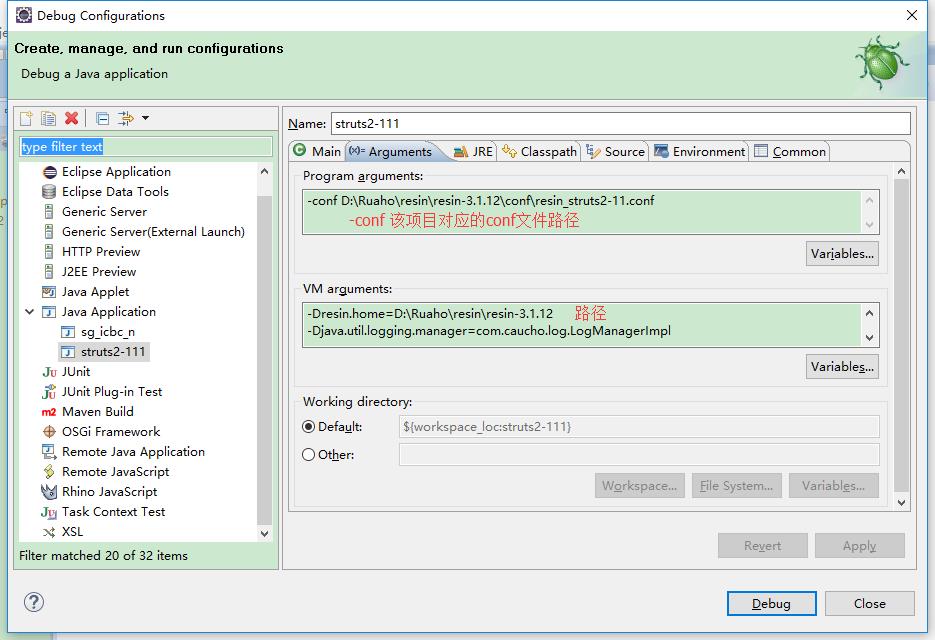
2.Run – Run Configurations(在本地调试的话,选择Debug Configurations)
弹出的会话中,双击“Java Application”创建一个Configuration,在右边的Name中随意填写一个名字,标签页Main中,Project选择待运行web application,Main class填写resin的主类,查找该类有两种方法:
- 该类可以在${RESIN_HOME}/lib/resin.jar中的META-INF/MANIFEST.MF文件中找到,即Main-Class的值;
- 将${RESIN_HOME}/lib添加到项目的classpath后,即在Main标签页点击“搜索”,在弹出的对话框中搜索“resin”,如果是3.0.x,选择com.caucho.server.resin.Resin,如果是3.1.x,选择com.caucho.boot.ResinBoot,具体的选择,还是要参考META-INF/MANIFEST.MF文件的Main-Class值,如图:

标签页 Arguments中:

VM Arguments中:
-
-Dresin.home=D:\\Ruaho\\resin\\resin-3.1.12 (实际路径)
-Djava.util.logging.manager=com.caucho.log.LogManagerImpl
-Xmx1024m
ClassPath标签页中:导入jar包 
完成以上各步之后,点击Run即可启动resin。
以上是关于基于windows的resin配置的主要内容,如果未能解决你的问题,请参考以下文章