LVS负载均衡之NAT配置
Posted
tags:
篇首语:本文由小常识网(cha138.com)小编为大家整理,主要介绍了LVS负载均衡之NAT配置相关的知识,希望对你有一定的参考价值。
1.实验环境:
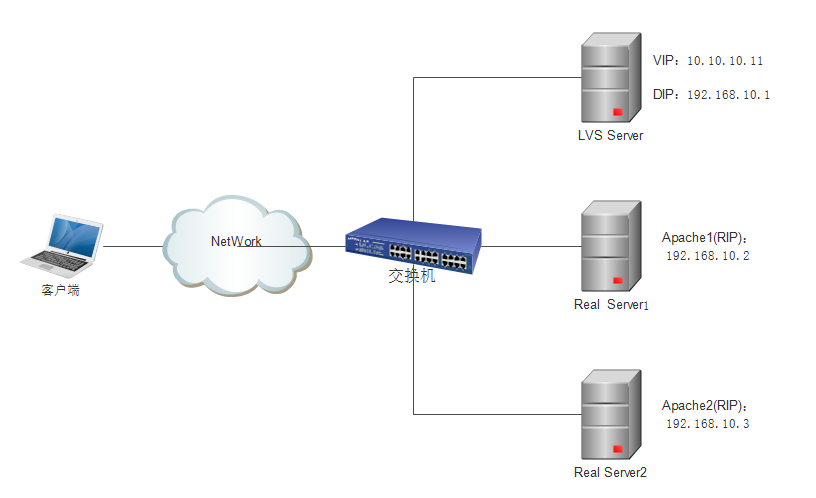
1.1 三台服务器,其中一台为LVS服务器,另外两台为APACHE
1.2 LVS服务器具有两块网卡,VIP为10.10.10.11(提供服务的地址);DIP为192.168.10.1(与RIP通信的地址)。
1.3 另外两台服务器都是一块网卡,地址与LVS服务器的内网网卡在同一个网段;APACHE1网址为192.168.10.2,APACHE2地址为192.168.10.3。
2.基本的配置:
2.1 由于LVS不能和iptables一起使用,确保LVS服务器上iptables已经关闭;
2.2 为了实验方便起见,各Real Server的iptables也关闭;
2.3 关闭所有的selinux。
在所有服务器执行以下命令:
[[email protected] ~]# /etc/init.d/iptables stop
[[email protected] ~]# setenforce 0
3.配置各服务器IP地址及:
3.1 配置LVS服务器的IP:eth0为VIP,eth1为DIP。
[[email protected] ~]# ifconfig eth0 10.10.10.11/24 up
[[email protected] ~]# ifconfig eth1 192.168.10.1/24 up
3.2 配置Real Server的IP地址和网关地址:
3.2.1 Apache1:
[[email protected] ~]# ifconfig eth0 192.168.10.2/24 up
[[email protected] ~]# route add default gw 192.168.10.1
3.2.2 Apache2:
[[email protected] ~]# ifconfig eth0 192.168.10.3/24 up
[[email protected] ~]# route add default gw 192.168.10.1
4.配置LVS提供负载均衡服务:
4.1 安装ipvsadm服务:
[[email protected] ~]# yum install -y ipvsadm
4.2 添加LVS集群服务:
[[email protected] ~]# ipvsadm -A -t 10.10.10.11:80 -s rr
4.3 向LVS集群服务中添加Real Server:
[[email protected] ~]# ipvsadm -a -t 10.10.10.11:80 -r 192.168.10.2 -m
[[email protected] ~]# ipvsadm -a -t 10.10.10.11:80 -r 192.168.10.3 -m
4.4 开启服务器的转发模式(临时):
[[email protected] ~]# echo 1 >/proc/sys/net/ipv4/ip_forward
4.5 开启服务器的转发模式(永久):
[[email protected] ~]# sed -i ‘[email protected]\(net.ipv4.ip_forward = \)[email protected]\[email protected]‘ /etc/sysctl.conf
5.为Real Server提供httpd服务,Apache1提供网页文件内容为web1,Apache2提供网页文件内容为web2:(两台服务器操作基本一致,我只演示其中一个):
5.1 安装httpd服务:
[[email protected] ~]# yum install -y httpd
5.2 提供网页文件:
[[email protected] ~]# echo "<h1>web1</h1>" > /var/www/html/index.html
5.3 启动服务器:
[[email protected] ~]# service httpd start
到此已经配置结束,各位可以自行测试。我就不贴图了!
本文出自 “bigmanager” 博客,请务必保留此出处http://minux.blog.51cto.com/8994862/1744626
以上是关于LVS负载均衡之NAT配置的主要内容,如果未能解决你的问题,请参考以下文章
