在STM32上实现NTFS之3:DPT与MBR的实现
Posted
tags:
篇首语:本文由小常识网(cha138.com)小编为大家整理,主要介绍了在STM32上实现NTFS之3:DPT与MBR的实现相关的知识,希望对你有一定的参考价值。
上一节讲到了NTFS的大致结构,这一节就其引导区中的扇区0,即引导扇区做说明。
图1为WinHEX截取的一个“标准的”NTFS的引导扇区数据。
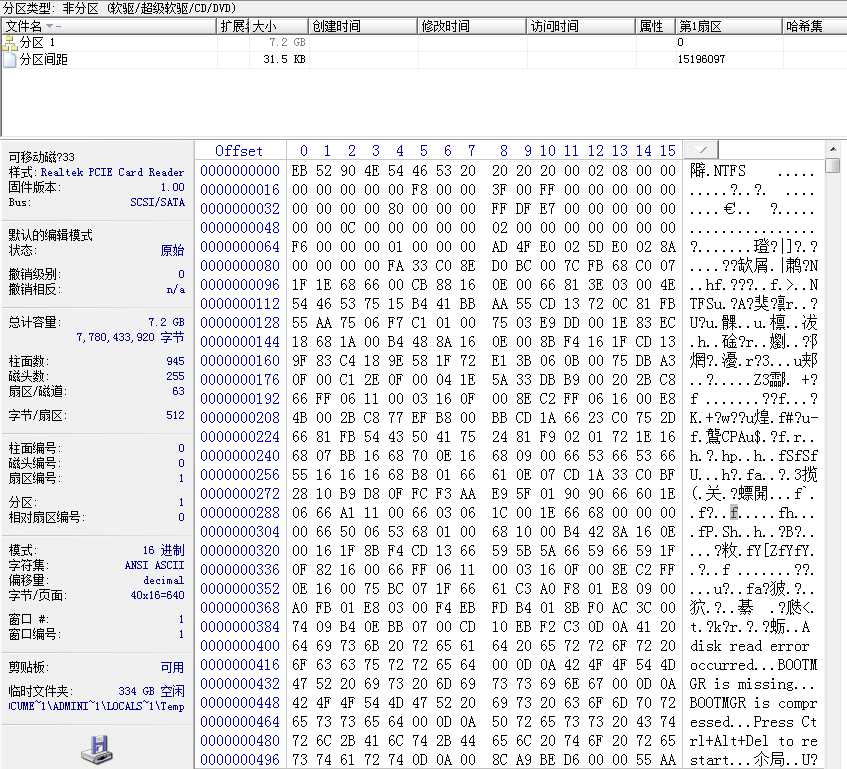
图1 SD卡的物理0扇区
可以看到,柱面磁头扇区编号0,0,1,那么这是整个磁盘的0号扇区了。现在给出MBR的数据结构如下表(表格翻译整理自MSDN):
|
字节偏移量 |
数据长度(字节) |
范例数值 |
数据项说明 |
|
0x00 |
3 |
4E 54 46 53 20 20 20 20 |
跳转代码(0xEB5290) |
|
0x03 |
8 |
|
OEM号,这里是“NTFS” |
|
0x0B |
2 |
00 02 |
每扇区字节数。 |
|
0x0D |
1 |
08 |
每簇扇区数 |
|
0x0E |
2 |
00 00 |
保留扇区数 |
|
0x10 |
3 |
00 00 00 |
未使用 |
|
0x13 |
2 |
00 00 |
未使用 |
|
0x15 |
1 |
F8 |
介质描述符 |
|
0x16 |
2 |
00 00 |
未使用 |
|
0x18 |
2 |
3F 00 |
每磁道扇区数 |
|
0x1A |
2 |
FF 00 |
每柱面磁头数 |
|
0x1C |
4 |
3F 00 00 00 |
隐含扇区数 |
|
0x20 |
4 |
00 00 00 00 |
未使用 |
|
0x24 |
4 |
80 00 80 00 |
未使用,一般总是0x80008000 |
|
0x28 |
8 |
1C 91 11 01 00 00 00 00 |
总扇区数 |
|
0x30 |
8 |
00 00 04 00 00 00 00 00 |
MFT起始簇号 |
|
0x38 |
8 |
11 19 11 00 00 00 00 00 |
MFT备份起始簇号 |
|
0x40 |
1 |
F6 |
每个MFT项大小 |
|
0x41 |
3 |
00 00 00 |
未使用 |
|
0x44 |
1 |
01 |
每个索引所占的簇数 |
|
0x45 |
3 |
00 00 00 |
未使用 |
|
0x48 |
8 |
3A B2 7B 82 CD 7B 82 14 |
卷序列号 |
|
0x50 |
4 |
00 00 00 00 |
校验和 |
|
0x54 |
426 |
|
启动代码 |
|
0x01FE |
2 |
55 AA |
结束标记,0x55AA |
在这里我们要先普及一个概念:簇。簇是由若干个扇区构成,构成数量可以是1,2,4,8,……个扇区。一个文件系统在操作文件时,往往不以扇区而是以为单位,而是以簇为单位,原因很简单:执行效率。在很多时候一个文件是大于一个扇区所能容纳的字节数,此时如果继续采用扇区作为基本单位,整个磁盘的碎片化会很严重,并且也不利于文件的读取,所以,由用户可选择的一个单位“簇”诞生了,我们可以在格式化界面看到他,在Windows界面格式化里是“分配单元大小”。这个数值往往决定了分区的小文件传输速度和硬盘使用率。
簇的大小选择很重要,很大的簇有利于一定体积的文件直接由1个簇存储,但过大的簇会导致空间利用效率低。例如10K的文件,如果用8个扇区为1簇,则需要使用3个簇(此处忽略一个文件系统对文件附加的属性,仅作为例子),第3个簇的后4个扇区将被浪费掉,而如果采用8KB的簇,那么会有12个扇区被浪费,如果采用2KB的簇,则不会出现浪费情况。但相对应的寻找簇的次数为3,2,5次,在某些时候,可能有上万个KB级的文件等待传输,2KB的簇显然不符合我们的传输速度考虑,但8KB的将有更大的可能浪费更多扇区,这样考虑,用户需要为每个扇区合理的选择簇大小。NTFS给出的默认簇大小是8个扇区,见上表,也就是4KB。
由此我们可以做出一个结构体如下:
 1 typedef struct
 2 {
 3     uint8_t  JmpCode[3];//跳转指令
 4     uint8_t  OEMName[8];//OEM名
 5     uint16_t BytesPerSector;//每扇区字节数
 6     uint8_t  SectorsPerCluster;//每簇扇区数
 7     uint8_t  ReservedSector[2];//保留扇区数
 8     uint8_t  Unuse1[5];//未使用
 9     uint8_t  MediaDescriptor;//介质描述符
10     uint8_t  Unuse2[2];//未使用
11     uint16_t SectorsPerTrack;//每磁道扇区数
12     uint16_t MegnaticHeadPerCylinder;//每柱面磁头数
13     uint32_t HiddenSectors;//隐含扇区数
14     uint8_t  Unuse3[4];//未使用
15     uint8_t  Unuse4[4];//未使用,此处总是0x80008000
16     uint64_t TotalSectors;//文件系统扇区总数
17     uint64_t MFTStartCluster;//MFT起始簇号
18     uint64_t MFTBackupStartCluster;//MFT备份起始簇号
19     uint8_t SizePerMFT;//每MFT大小
20     uint8_t  Unuse5[3];//未使用
21     uint8_t ClusterPerIndex;//每个索引的大小簇数
22     uint8_t  Unuse6[3];//未使用
23     uint64_t SerialNumber;//序列号
24     uint32_t CheckSum;//校验和
25 uint8_t BootCode[426];//启动代码
26 uint8_t EndSign[2];//结束标记
27 }MBR_Byte;
要注意的是NTFS中使用的是小端模式,小端模式就是每个数据的第0个字节代表低8位,第1字节代表次低8位……依此类推,有关小端模式和大端模式,自行百度就可以,这里将不进行讲解。
所以我们当按字节读取第0扇区到MBR的时候,需要按照NTFS所运行的CPU平台,把MBR_Byte结构转化为有意义的正确的数据,我们再建立一个MBR_Info结构,里面的是正确的数据:
 1 typedef struct
 2
 3 {
 4
 5     uint8_t  OEMName[8];//OEM名
 6
 7     uint16_t BytesPerSector;//每扇区字节数
 8
 9     uint8_t  SectorsPerCluster;//每簇扇区数
10
11     uint16_t ReservedSector;//保留扇区数
12
13     uint8_t  MediaDescriptor;//介质描述符
14
15     uint16_t SectorsPerTrack;//每磁道扇区数
16
17     uint16_t MegnaticHeadPerCylinder;//每柱面磁头数
18
19     uint32_t HiddenSectors;//隐含扇区数
20
21     uint64_t TotalSectors;//文件系统扇区总数
22
23     uint64_t MFTStartCluster;//MFT起始簇号
24
25     uint64_t MFTBackupStartCluster;//MFT备份起始簇号
26
27     uint8_t SizePerMFT;//每MFT大小
28
29     uint8_t ClusterPerIndex;//每个索引的大小簇数
30
31     uint64_t SerialNumber;//序列号
32
33     uint32_t CheckSum;//校验和
34
35 }MBR_Info;
有关小端转化的问题,一会再说,先来专注于本节的所有结构描述。
我们针对一个“标准的NTFS分区”的分析就是这样,从图1也非常容易看到正确数据。那么MBR的位置处在哪?根据MSDN的描述,处于引导扇区的0号扇区,但这个0号扇区并不代表整个磁盘的0号扇区,我们姑且将整个磁盘的扇区数命名为“物理扇区”和“绝对扇区”,将每个NTFS分区的从引导扇区起的扇区编号称之为“逻辑扇区”和“相对扇区”。这样概念就明确了,如果NTFS的分区信息无误,那么每个物理扇区至多会对应一个逻辑扇区号,反过来一个逻辑扇区一定会对应一个物理扇区,当然这是NTFS分区信息无误的情况。我们可以使用DiskGenius来构建一个物理0扇区与逻辑0扇区不同的,也即NTFS分区不是从物理0扇区开始的磁盘,操作过程见图2。
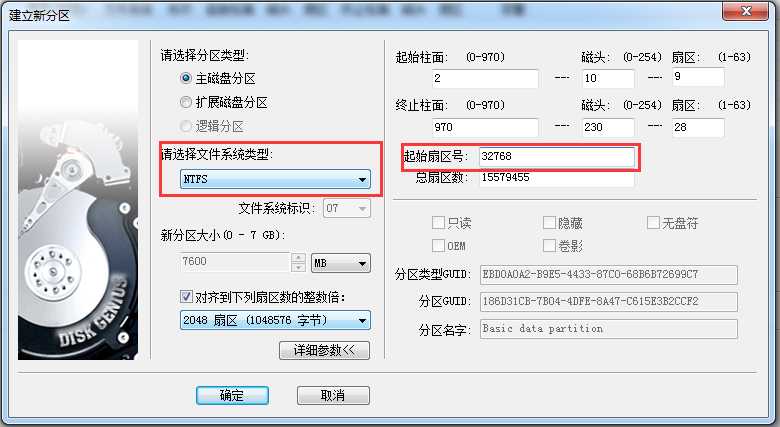
图2 新的分区选项

图3 新的分区结构
现在我们得到了一个并不十分标准的NTFS卷,结构如图3,可以看到前面剁了一小块没被使用的灰色区域。现在再打开WinHEX看一下物理0扇区,如图4。
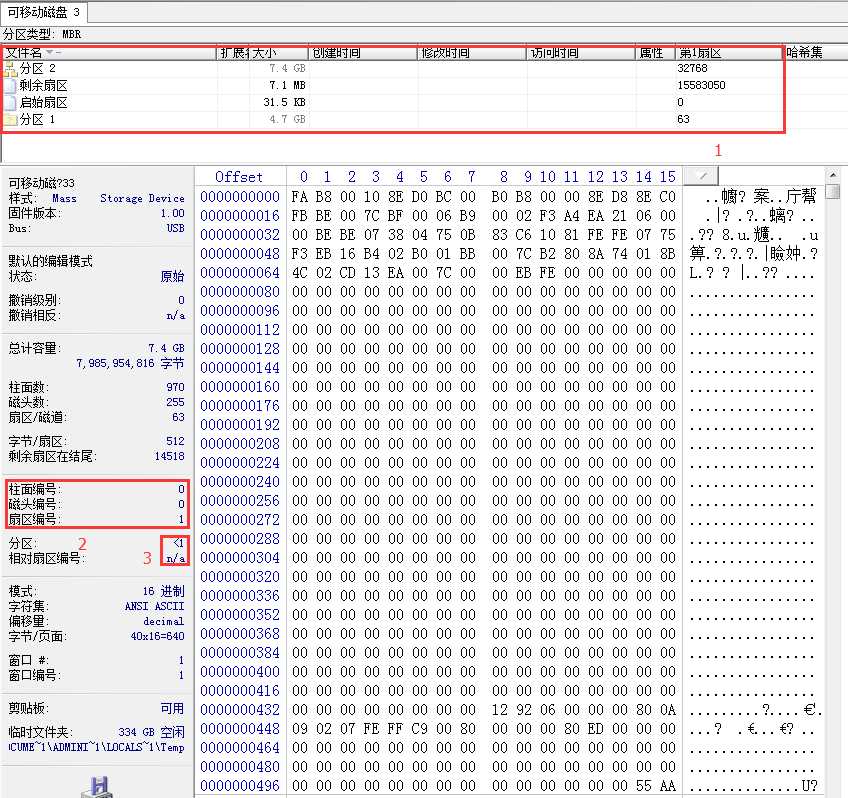
图4 “不标准”的0扇区
和图1中出现了明显的差别,MBR的信息消失了,再次定位于物理32768扇区我们又会发现扇区数据和图1相似。那么此时,物理0扇区所描述的,就不是MBR,而是DPT(Disk Partition Table,硬盘分区表)了,DPT的结构如下:
|
字节偏移量 |
数据长度(字节) |
数据项说明 |
|
0x00 |
1 |
是否为活动分区,是则为80H,否则为00H |
|
0x01 |
1 |
该分区起始磁头号 |
|
0x02 |
1 |
该分区起始扇区号(低6位)和起始柱面号(高2位) |
|
0x03 |
1 |
该分区起始柱面号的低8位 |
|
0x04 |
1 |
系统标志 |
|
0x05 |
1 |
该分区结束磁头号 |
|
0x06 |
1 |
该分区结束扇区号(低6位)和结束柱面号(高2位) |
|
0x07 |
1 |
该分区结束柱面号的低8位 |
|
0x08 |
4 |
相对扇区号 |
|
0x12 |
4 |
分区所用扇区数 |
每个分区都有一个DPT项,放在整个磁盘的物理0扇区,为了不使物理扇区与逻辑扇区重合时MBR与DPT互相覆盖,MBR出让了一块区域,从第446字节起的64个字节,作为4个分区的DPT项,并规定,当MBR在物理0扇区时,这个MBR包含有其他所有分区的DPT(也就是64个字节全是有效数据),否则只包含自身所在扇区的DPT。
那么现在可以大致描述出从系统上电到进入NTFS分区这一段的顺序:
首先读取物理0扇区,得到4个分区表和每个分区的逻辑0扇区相对物理0扇区的偏移量(也就是该分区的起始磁头、柱面、扇区,可以直接算出来物理扇区);然后根据每个逻辑0扇区的偏移量去读取对应扇区,得到每个分区的MBR;如果有第四个分区,把第四个逻辑0扇区作为扩展分区表继续进行解析;分析每个MBR,得到当前分区的所有信息,以及最重要的MFT项的起始地址和MFT尺寸。下图5就是磁盘存储结构和读取的顺序。
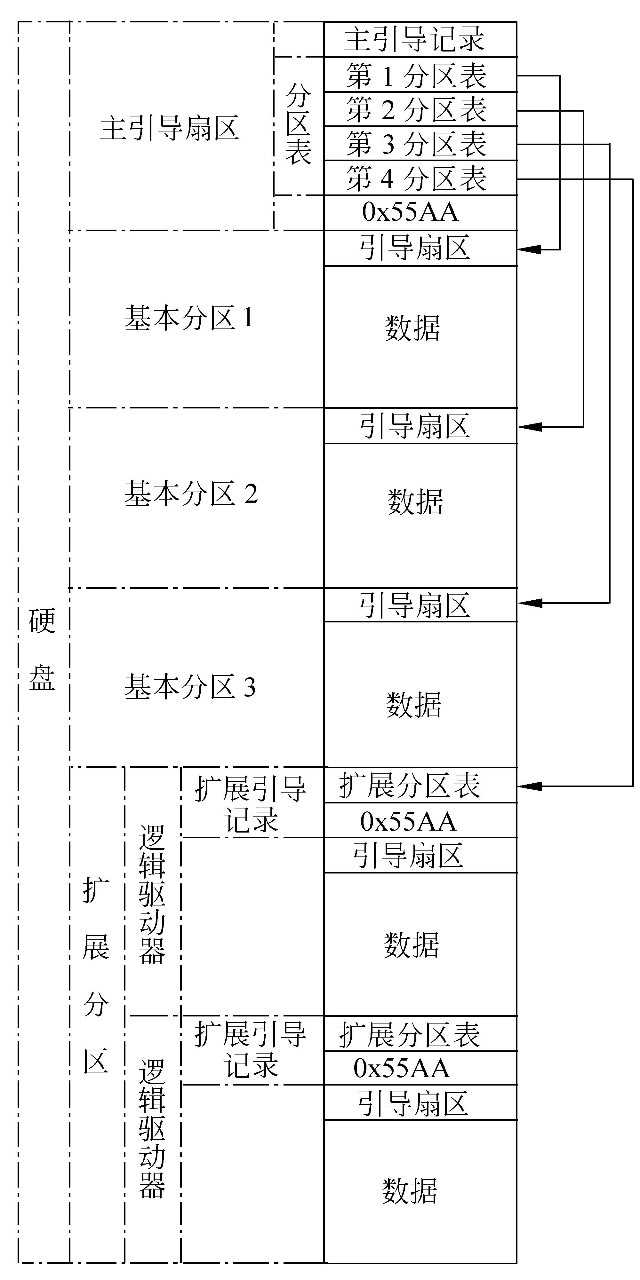
图5 硬盘数据存储结构
DPT的数据结构实现如下:
typedef struct

{

    uint8_t  ActivePartition;    //活动分区

    uint8_t  StartInfo[3];       //本分区的起始磁头号、扇区号、柱面号

    uint8_t  PartitionType;      //分区类型

    uint8_t  EndInfo[3];         //本分区的结束磁头号、扇区号、柱面号

    uint8_t  UsedSector[4];      //本分区前已使用的扇区数

    uint8_t  TotalSector[4];     //本分区的总扇区数

}DPT_Byte;
同时添加一个有效的数据信息结构:
typedef struct

{

    bool           ActivePartition;      //活动分区

    uint8_t        StartMagneticHead;    //起始磁头号

    uint8_t        StartSector;          //起始扇区号

    uint16_t       StartCylinder;        //起始柱面号

    Partition_Type PartitionType;        //分区类型

    uint8_t        EndMagneticHead;      //结束磁头号

    uint8_t        EndSector;            //结束扇区号

    uint16_t       EndCylinder;          //结束柱面号

    uint32_t       UsedSector;           //本分区前已使用的扇区数

    uint32_t       TotalSector;          //本分区的总扇区数

}DPT_Info;
Partition_Type是一个枚举类型,它代表了DPT中对于分区的操作系统描述,在这里我们将其完全枚举出来:
typedef enum

{

    fsptNullType                          = 0x00,

    fsptFAT32                             = 0x01,

    fsptXENIX__root                       = 0X02,

    fsptXENIX_usr                         = 0X03,

    fsptFAT16_32M                         = 0X04,

    fsptExtended                          = 0X05,

    fsptFAT16                             = 0X06,

    fsptHPFS_NTFS                         = 0X07,

    fsptAIX                               = 0X08,

    fsptAIX_bootable                      = 0X09,

    fsptOS_2_Boot_Manage                  = 0X0A,

    fsptWin95_FAT32                       = 0X0B,

    fsptWin95_Fat32                       = 0X0C,

    fsptWin95_FAT16                       = 0X0E,

    fsptWin95_Extended_8GB                = 0X0F,

    fsptOPUS                              = 0X10,

    fsptHidden_FAT12                      = 0X11,

    fsptCompaq_diagnost                   = 0X12,

    fsptHidden_FAT16                      = 0X16,

    fsptHidden_FAT16_32GB                 = 0X14,

    fsptHidden_HPFS_NTFS                  = 0X17,

    fsptAST_Windows_swap                  = 0X18,

    fsptHidden_FAT32                      = 0X1B,

    fsptHidden_FAT32_partition            = 0X1C,

    fsptHidden_LBA_VFAT_partition         = 0X1E,

    fsptNEC_DOS                           = 0X24,

    fsptPartition_Magic                   = 0X3C,

    fsptVenix_80286                       = 0X40,

    fsptPPC_PreP_Boot                     = 0X41,

    fsptSFS                               = 0X42,

    fsptQNX4_x                            = 0X4D,

    fsptQNX4_x_2nd_part                   = 0X4E,

    fsptQNX4_x_3rd_part                   = 0X4F,

    fsptOntrack_DM                        = 0X50,

    fsptOntrack_DM6_Aux                   = 0X51,

    fsptCP_M                              = 0X52,

    fsptOnTrack_DM6_AUX                   = 0X53,

    fsptOnTrack_DM6                       = 0X54,

    fsptEZ_Drive                          = 0X55,

    fsptGolden_Bow                        = 0X56,

    fsptPriam_Edisk                       = 0X5C,

    fsptSpeed_Stor                        = 0X61,

    fsptGNU_HURD_or_Sys                   = 0X63,

    fsptNovell_Netware                    = 0X64,

    fsptNovell_NetWare                    = 0X65,

    fsptDisk_Secure_Mult                  = 0X70,

    fsptPC_IX                             = 0X75,

    fsptOld_Minix                         = 0X80,

    fsptMinix_Old_Linux                   = 0X81,

    fsptLinux_swap                        = 0X82,

    fsptLinux                             = 0X83,

    fsptOS_2_hidden_C                     = 0X84,

    fsptLinux_extended                    = 0X85,

    fsptNTFS_volume_set                   = 0X86,

    fsptNTFS_Volume_Set                   = 0X87,

    fsptAmoeba                            = 0X93,

    fsptAmoeba_BBT                        = 0X94,

    fsptIBM_Thinkpad_hidden               = 0XA0,

    fsptBSD_386                           = 0XA5,

    fsptOpen_BSD                          = 0XA6,

    fsptNextSTEP                          = 0XA7,

    fsptBSDI_fs                           = 0XB7,

    fsptBSDI_swap                         = 0XB8,

    fsptSolaris_boot_partition            = 0XBE,

    fsptDRDOS_NovellDOS_secured_Partition = 0XC0,

    fsptDRDOS_sec                         = 0XC1,

    fsptDRDOS_Sec                         = 0XC4,

    fsptDRDOS_SEC                         = 0XC6,

    fsptSyrinx                            = 0XC7,

    fsptCP_M_CTOS                         = 0XDB,

    fsptDOS_access                        = 0XE1,

    fsptDOS_R_O                           = 0XE3,

    fsptSpeedStor                         = 0XE4,

    fsptBeOS_fs                           = 0XEB,

    fsptSpeedstor                         = 0XF1,

    fsptDOS3_3_secondary_partition        = 0XF2,

    fsptSpeed_stor                        = 0XF4,

    fsptLAN_step                          = 0XFE,

    fsptBBT                               = 0XFF

}Partition_Type;
从主引导记录的结构可以知道,它仅仅包含一个64个字节的硬盘分区表。由于每个分区信息需要16个字节,所以对于采用MBR型分区结构的硬盘,最多只能识别4个主要分区(Primary partition)。所以对于一个采用此种分区结构的硬盘来说,想要得到4个以上的主要分区是不可能的。这里就需要引出扩展分区了。扩展分区也是主要分区的一种,但它与主分区的不同在于理论上可以划分为无数个逻辑分区。
扩展分区中逻辑驱动器的引导记录是链式的。每一个逻辑分区都有一个和MBR结构类似的扩展引导记录(EBR),其分区表的第一项指向该逻辑分区本身的引导扇区,第二项指向下一个逻辑驱动器的EBR,分区表第三、第四项没有用到。
完成了基本数据类型,我们就可以开始写代码了,MBR和DPT部分的代码读写实现很简单,注意读取到结构体时使用内存按1字节对齐的关键字,因为结构体有很多1,2,3字节的项,如果不按照字节对齐,会导致结构体字节数不对,从而读取时出现错位。在VC++6.0中,以#pragma pack(1)和pack()两个预编译指令作为字节对齐命令。
需要注意的是,在Windows中只能以Win32API操作磁盘,操作磁盘需要用到CreateFileA()、ReadFile()、WriteFile()这三个函数。
为了便于移植,将读写操作封装成为了单独的读写扇区的函数,要注意WriteFile()时的操作需要小心处理,因为是对磁盘直接进行数据写入,一单写入错误数据,就得重新分区了!在这里我我使用一块1TB的移动硬盘来做实验,如图6,我们可以看到使用的是磁盘4,即物理磁盘号4,这个数在后面的代码中会用到。

图6 移动硬盘在“计算机管理”中
图7为上述磁盘分区读取DPT、EBR和MBR主要信息的程序运行效果。
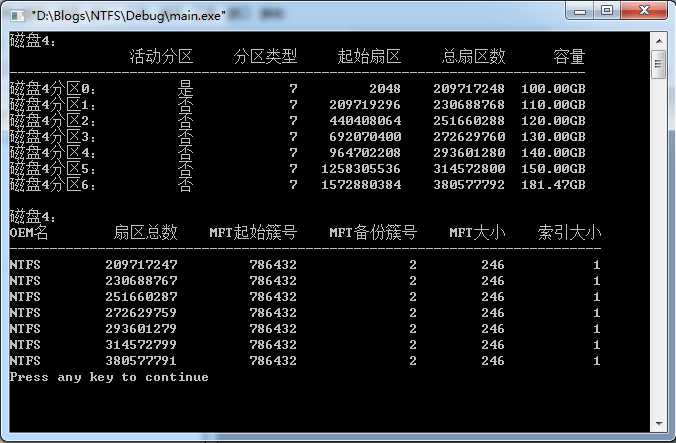
图7 本节程序运行效果
完整代码在最后给出,因为Windows 7中磁盘扇区的直接读写需要获取一定的权限,所以为了避免我们的程序变成“病毒”,本节和后面在PC部分的操作都将以读取为主,而NTFS的格式化、创建文件/目录、删除文件/目录,修改属性等等,都将在STM32平台进行。关于代码中逻辑结构的不合理和需要优化的地方,也会在以后进行优化。下一篇我们将进行MFT项的实现。

 1 //main.cpp
 2 #include <stdio.h>
 3 #include <windows.h>
 4 #include "ntfs_types.h"
 5 #include "ntfs_diskio.h"
 6 #include "ntfs_basic.h"
 7
 8 DPT_Info DPT[10];
 9 MBR_Info MBR[10];
10 int main(void)
11 {
12     GetPartitioninformation(DPT);
13     DisplayPartitionInformation(DPT);
14     for(int i = 0; i < 7; i++)
15     {
16         GetMBR(&MBR[i], &DPT[i]);
17     }
18     printf("\\n");
19     DisplayMBR(MBR);
20
21     return 0;
22 }

 1 //ntfs_diskio.cpp
 2 #include <stdio.h>
 3 #include <windows.h>
 4 #include "ntfs_diskio.h"
 5 #include "ntfs_basic.h"
 6
 7 BOOL ReadSectorData( HANDLE& hDevice,UINT64 redpos, char * lpOutBuffer512 )
 8 {
 9     memset(lpOutBuffer512,0,512);
10     LARGE_INTEGER li;
11     li.QuadPart = redpos*0x200;//0x200 = 512,求出扇区的 字节地址,通过设置读取的地址和长度进行read
12     SetFilePointer(hDevice,li.LowPart,&li.HighPart,FILE_BEGIN);
13     DWORD DCount=0; //计数
14     BOOL bResult=ReadFile(hDevice, lpOutBuffer512, 512, &DCount, NULL);
15     return bResult;
16 }
17
18 //通过给定磁盘的编号,获取到磁盘的句柄
19 HANDLE GetDiskHandle(int iDiskNo)
20 {
21     char szDriverBuffer[128];
22     memset(szDriverBuffer,0,128);
23     //格式化设备文件名称
24     sprintf(szDriverBuffer,"\\\\\\\\.\\\\PhysicalDrive%d",iDiskNo);
25     HANDLE m_hDevice = NULL;
26     //CreateFile获取到设备句柄
27     m_hDevice = CreateFileA(
28         szDriverBuffer,// 设备名称,这里指第一块硬盘,多个硬盘的自己修改就好了
29         GENERIC_READ, // 指定读访问方式
30         FILE_SHARE_READ | FILE_SHARE_WRITE, // 共享模式为读|写,0表示不能共享
31         NULL, // NULL表示该句柄不能被子程序继承
32         OPEN_EXISTING, // 打开已经存在的文件,文件不存在则函数调用失败
33         NULL, // 指定文件属性
34         NULL);
35     if (m_hDevice==INVALID_HANDLE_VALUE)
36     {
37         m_hDevice = NULL;
38         //无效
39         return INVALID_HANDLE_VALUE;
40     }
41     //设备句柄
42     return m_hDevice;
43 }

 1 //ntfs_diskio.h
 2 #ifndef __NTFS_DISKIO_H
 3 #define __NTFS_DISKIO_H
 4
 5 #include "ntfs_types.h"
 6
 7 BOOL ReadSectorData( HANDLE& hDevice,UINT64 redpos, char * lpOutBuffer512 );//读取扇区函数,移植到MCU改变函数实现
 8 HANDLE GetDiskHandle(int iDiskNo);
 9
10 #endif

 1 //ntfs_basic.h
 2 #ifndef __NTFS_BASIC_H
 3 #define __NTFS_BASIC_H
 4
 5 #include "ntfs_types.h"
 6
 7 uint16_t ArrayToU16LittleEnd(uint8_t *str);
 8 uint32_t ArrayToU32LittleEnd(uint8_t *str);
 9 uint64_t ArrayToU64LittleEnd(uint8_t *str);
10 //获取扇区MBR信息
11 void GetMBR(MBR_Info *MBR, DPT_Info *DPT);
12 //获取磁盘分区信息,不区分扩展分区和主分区,均以“分区”表示,DPT_Info中保存物理起始扇区
13 void GetPartitioninformation(DPT_Info* DPT);
14 //扇区信息转成可以识别的Info结构
15 void DptTransferLittleEnd(DPT_Byte* src, DPT_Info *dest);
16 void EbrTransferLittleEnd(DPT_Byte* src, DPT_Info *dest);
17 void MbrTransferLittleEnd(MBR_Byte* src, MBR_Info *dest);
18
19 //以下为PC机调试显示用,移植到MCU需要移除
20 void DisplayPartitionInformation(DPT_Info* DPT);
21 void DisplayMBR(MBR_Info *MBR);
22
23 #endif

  1 //ntfs_basic.cpp
  2 #include <stdio.h>
  3 #include <windows.h>
  4 #include "ntfs_basic.h"
  5 #include "ntfs_diskio.h"
  6
  7 #define PHYDRIVE 4
  8
  9 uint16_t ArrayToU16LittleEnd(uint8_t *str)
 10 {
 11     return (str[0] + (str[1] << 8));
 12 }
 13
 14 uint32_t ArrayToU32LittleEnd(uint8_t *str)
 15 {
 16     return (str[0] + (str[1] << 8) + (str[2] << 16) + (str[3] << 24));
 17 }
 18
 19 uint64_t ArrayToU64LittleEnd(uint8_t *str)
 20 {
 21     return (str[0] + (str[1] << 8) + (str[2] << 16) + (str[3] << 24) + (str[4] << 32) + (str[5] << 40) + (str[6] << 48) + (str[7] << 56));
 22 }
 23
 24 void GetMBR(MBR_Info *MBR, DPT_Info *DPT)
 25 {
 26     MBR_Byte MBRsector;
 27     HANDLE hdl = GetDiskHandle(PHYDRIVE);//获取一个指定物理驱动器句柄
 28     ReadSectorData(hdl, DPT->RealOffset, (char*)(void*)&MBRsector);
 29     MbrTransferLittleEnd(&MBRsector, MBR);
 30 }
 31 void GetPartitioninformation(DPT_Info* DPT)
 32 {
 33     DPT_Byte DPTsector;//定义DPT扇区作为buffer,注意MCU的栈尺寸要大于512字节
 34     unsigned long sectorsoffset = 0;
 35     unsigned long extendsoffset = 0;
 36     HANDLE hdl = GetDiskHandle(PHYDRIVE);//获取一个指定物理驱动器句柄
 37     ReadSectorData(hdl, 0, (char*)(void*)&DPTsector);//载入DPT
 38     DptTransferLittleEnd(&DPTsector, DPT);//小端模式转换扇区数据为分区信息
 39     int k;
 40     for(k = 0; k < 4; k++)
 41     {
 42         if(DPT[k].PartitionType == fsptWin95_Extended_8GB || DPT[k].PartitionType == fsptExtended)//两种扩展分区
 43             break;
 44         DPT[k].RealOffset = DPT[k].UsedSector;
 45     }
 46     extendsoffset = DPT[k].UsedSector;
 47     sectorsoffset = extendsoffset;
 48     int i = k;
 49     unsigned char Partitions = 255;//sizeof(DPT) / sizeof(DPT_Info);
 50     while(i < Partitions)//最大遍历分区数量Partitions,防止由于分区过多导致下标越界
 51     {
 52         if(DPT[i].PartitionType == fsptWin95_Extended_8GB || DPT[i].PartitionType == fsptExtended)//两种扩展分区
 53         {
 54             if(i == k)
 55                 DPT[i].RealOffset = extendsoffset;
 56             else
 57                 DPT[i].RealOffset = extendsoffset + DPT[i].UsedSector + DPT[i+1].UsedSector;
 58             ReadSectorData(hdl, sectorsoffset, (char*)(void*)&DPTsector);//载入EBR
 59             DptTransferLittleEnd(&DPTsector, &DPT[i]);//小端模式转换扇区数据为分区信息
 60             sectorsoffset = extendsoffset + DPT[i+1].UsedSector;
 61             DPT[i].RealOffset+=DPT[i].UsedSector;//对扩展扇区MBR地址做补偿
 62             i++;
 63         }
 64         else if(DPT[i].TotalSector == NULL)
 65         {
 66             break;
 67         }
 68     }
 69
 70 }
 71
 72 void DisplayPartitionInformation(DPT_Info* DPT)
 73 {
 74     printf("磁盘%d:\\n", PHYDRIVE);
 75     printf("               活动分区     分区类型     起始扇区     总扇区数      容量\\n");
 76     printf("------------------------------------------------------------------------\\n");
 77     int i = 0;
 78     unsigned char Partitions = 255;//sizeof(DPT) / sizeof(DPT_Info);
 79     while(DPT[i].TotalSector != NULL && i < Partitions)
 80     {
 81         printf("磁盘4分区%d:  ", i);
 82         if(DPT[i].ActivePartition)
 83             printf("       是");
 84         else
 85             printf("       否");
 86         printf("%13d",    DPT[i].PartitionType);
 87         printf("%13d",    DPT[i].RealOffset);
 88         printf("%13d",    DPT[i].TotalSector);
 89         printf("%8.2fGB", DPT[i].TotalSector/2097152.0);
 90         printf("\\n");
 91         i++;
 92     }
 93 }
 94
 95 void DisplayMBR(MBR_Info *MBR)
 96 {
 97     printf("磁盘%d:\\n", PHYDRIVE);
 98     printf("OEM名        扇区总数    MFT起始簇号    MFT备份簇号    MFT大小    索引大小\\n");
 99     printf("--------------------------------------------------------------------------\\n");
100     int i = 0;
101     unsigned char Partitions = 255;//sizeof(MBR) / sizeof(MBR_Info);
102     while(MBR[i].TotalSectors != NULL && i < Partitions)
103     {
104         printf("%s",     MBR[i].OEMName);
105         printf("%13lld", MBR[i].TotalSectors);
106         printf("%15lld", MBR[i].MFTStartCluster);
107         printf("%15lld", MBR[i].MFTBackupStartCluster);
108         printf("%11d",   MBR[i].SizePerMFT);
109         printf("%12lld", MBR[i].ClusterPerIndex);
110         printf("\\n");
111         i++;
112     }
113 }
114 void DptTransferLittleEnd(DPT_Byte* src, DPT_Info *dest)
115 {
116     for(int i = 0; i < 4; i++)
117     {
118         dest[i].ActivePartition   = src->DPT_Table[i].ActivePartition == 0x80 ? true : false;//0x80是活动扇区,0x00是非活动扇区
119         dest[i].StartMagneticHead = src->DPT_Table[i].StartInfo[0];
120         dest[i].StartSector       = src->DPT_Table[i].StartInfo[1] & 0x3F;
121         dest[i].StartCylinder     = src->DPT_Table[i].StartInfo[2] + ((src->DPT_Table[i].StartInfo[1] & 0xC0) << 2);
122         dest[i].PartitionType     = (Partition_Type)src->DPT_Table[i].PartitionType;
123         dest[i].EndMagneticHead   = src->DPT_Table[i].EndInfo[0];
124         dest[i].EndSector         = src->DPT_Table[i].EndInfo[1] & 0x3F;
125         dest[i].EndCylinder       = src->DPT_Table[i].EndInfo[2] + ((src->DPT_Table[i].EndInfo[1] & 0xC0) << 2);
126         dest[i].UsedSector        = ArrayToU32LittleEnd(src->DPT_Table[i].UsedSector);
127         dest[i].TotalSector       = ArrayToU32LittleEnd(src->DPT_Table[i].TotalSector);
128     }
129 }
130
131 void EbrTransferLittleEnd(DPT_Byte* src, DPT_Info *dest)
132 {
133     for(int i = 0; i < 2; i++)
134     {
135         dest[i].ActivePartition   = src->DPT_Table[i].ActivePartition == 0x80 ? true : false;//0x80是活动扇区,0x00是非活动扇区
136         dest[i].StartMagneticHead = src->DPT_Table[i].StartInfo[0];
137         dest[i].StartSector       = src->DPT_Table[i].StartInfo[1] & 0x3F;
138         dest[i].StartCylinder     = src->DPT_Table[i].StartInfo[2] + ((src->DPT_Table[i].StartInfo[1] & 0xC0) << 2);
139         dest[i].PartitionType     = (Partition_Type)src->DPT_Table[i].PartitionType;
140         dest[i].EndMagneticHead   = src->DPT_Table[i].EndInfo[0];
141         dest[i].EndSector         = src->DPT_Table[i].EndInfo[1] & 0x3F;
142         dest[i].EndCylinder       = src->DPT_Table[i].EndInfo[2] + ((src->DPT_Table[i].EndInfo[1] & 0xC0) << 2);
143         dest[i].UsedSector        = ArrayToU32LittleEnd(src->DPT_Table[i].UsedSector);
144         dest[i].TotalSector       = ArrayToU32LittleEnd(src->DPT_Table[i].TotalSector);
145     }
146 }
147
148 void MbrTransferLittleEnd(MBR_Byte* src, MBR_Info *dest)
149 {
150     dest->OEMName[0]              = src->OEMName[0];
151     dest->OEMName[1]              = src->OEMName[1];
152     dest->OEMName[2]              = src->OEMName[2];
153     dest->OEMName[3]              = src->OEMName[3];
154     dest->OEMName[4]              = src->OEMName[4];
155     dest->OEMName[5]              = src->OEMName[5];
156     dest->OEMName[6]              = src->OEMName[6];
157     dest->OEMName[7]              = src->OEMName[7];
158     dest->OEMName[8]              = 0;
159     dest->BytesPerSector          = ArrayToU16LittleEnd(src->BytesPerSector);
160     dest->SectorsPerCluster       = src->SectorsPerCluster;
161     dest->ReservedSector          = ArrayToU16LittleEnd(src->ReservedSector);
162     dest->MediaDescriptor         = src->MediaDescriptor;
163     dest->SectorsPerTrack         = ArrayToU16LittleEnd(src->SectorsPerTrack);
164     dest->MegnaticHeadPerCylinder = ArrayToU16LittleEnd(src->MegnaticHeadPerCylinder);
165     dest->HiddenSectors           = ArrayToU32LittleEnd(src->HiddenSectors);
166     dest->TotalSectors            = ArrayToU64LittleEnd(src->TotalSectors);
167     dest->MFTStartCluster         = ArrayToU64LittleEnd(src->MFTStartCluster);
168     dest->MFTBackupStartCluster   = ArrayToU64LittleEnd(src->MFTBackupStartCluster);
169     dest->SizePerMFT              = src->SizePerMFT;
170     dest->ClusterPerIndex         = src->ClusterPerIndex;
171     dest->SerialNumber            = ArrayToU64LittleEnd(src->SerialNumber);
172     dest->CheckSum                = ArrayToU32LittleEnd(src->CheckSum);
173 }
部分内容参考自:
http://www.blogfshare.com/mbr-dpt-ebr.html
http://blog.csdn.net/jha334201553/article/details/9088921
http://bbs.csdn.net/topics/390374342
https://support.microsoft.com/zh-cn/kb/942448
https://technet.microsoft.com/en-us/library/cc781134(v=ws.10).aspx
http://www.youranshare.com/push/code/win-c-cpp/278.html
以上是关于在STM32上实现NTFS之3:DPT与MBR的实现的主要内容,如果未能解决你的问题,请参考以下文章
求 在stm32上实现 tft彩屏(控制芯片为 ssd1289)显示简单汉字和图片 工程
