安装helm服务以及搭建Helm测试环境
Posted
tags:
篇首语:本文由小常识网(cha138.com)小编为大家整理,主要介绍了安装helm服务以及搭建Helm测试环境相关的知识,希望对你有一定的参考价值。
参考技术A Helm will figure out where to install Tiller by reading your Kubernetes configuration file (usually $HOME/.kube/config). This is the same file that kubectl uses.各release版本:
helm指定特定的kubectl配置中特定的context dev描述的集群去部署:
tiller支持两种存储:
无论使用哪种部署方式,这两种存储都可以使用.memory存储在tiller重启后,release等数据会丢失.
执行helm init后,会
在k8s集群kube-system namespace下安装了deployment tiller-deploy和service tiller-deploy.
补充 :
https://github.com/kubernetes/helm/issues/2409
未解决.
尝试了几次,又成功了.
已解决:
在kubelet node上安装socat即可. https://github.com/kubernetes/helm/issues/966
2.5版本安装的tiller,在出现 context deadline exceeded 时,使用2.4版本的helm执行 heml reset --remove-helm-home --force 并不能移除tiller创建的pod和配置.这是2.4版本的问题.
https://docs.helm.sh/using_helm/#running-tiller-locally
When Tiller is running locally, it will attempt to connect to the Kubernetes cluster that is configured by kubectl. (Run kubectl config view to see which cluster that is.)
必须要执行 helm init --client-only 来初始化helm home下的目录结构.否则helm repo list会报以下的错误:
这种方法如果k8s集群,没有办法测试 helm install ./testChart --dry-run 类似的命令,
即使通过 ./tiller -storage=memory 配置存储为内存
在本地运行tiller,但指定后端运行的k8s集群
helm还是和之前的一样.
Helm安装使用
目录
Helm安装使用
Helm这个东西其实早有耳闻,但是一直没有用在生产环境,而且现在对这货的评价也是褒贬不一。正好最近需要再次部署一套测试环境,对于单体服务,部署一套测试环境我相信还是非常快的,但是对于微服务架构的应用,要部署一套新的环境,就有点折磨人了,微服务越多、你就会越绝望的。虽然我们线上和测试环境已经都迁移到了kubernetes环境,但是每个微服务也得维护一套yaml文件,而且每个环境下的配置文件也不太一样,部署一套新的环境成本是真的很高。如果我们能使用类似于yum的工具来安装我们的应用的话是不是就很爽歪歪了啊?Helm就相当于kubernetes环境下的yum包管理工具。
用途
做为 Kubernetes 的一个包管理工具,Helm具有如下功能:
- 创建新的 chart
- chart 打包成 tgz 格式
- 上传 chart 到 chart 仓库或从仓库中下载 chart
- 在
Kubernetes集群中安装或卸载 chart - 管理用
Helm安装的 chart 的发布周期
重要概念
Helm 有三个重要概念:
- chart:包含了创建
Kubernetes的一个应用实例的必要信息 - config:包含了应用发布配置信息
- release:是一个 chart 及其配置的一个运行实例
Helm组件
Helm 有以下两个组成部分:

Helm Client 是用户命令行工具,其主要负责如下:
- 本地 chart 开发
- 仓库管理
- 与 Tiller sever 交互
- 发送预安装的 chart
- 查询 release 信息
- 要求升级或卸载已存在的 release
Tiller Server是一个部署在Kubernetes集群内部的 server,其与 Helm client、Kubernetes API server 进行交互。Tiller server 主要负责如下:
- 监听来自 Helm client 的请求
- 通过 chart 及其配置构建一次发布
- 安装 chart 到
Kubernetes集群,并跟踪随后的发布 - 通过与
Kubernetes交互升级或卸载 chart - 简单的说,client 管理 charts,而 server 管理发布 release
安装
我们可以在Helm Realese页面下载二进制文件,这里下载的v2.10.0版本,解压后将可执行文件helm拷贝到/usr/local/bin目录下即可,这样Helm客户端就在这台机器上安装完成了。
# helm-v2
# wget https://get.helm.sh/helm-v2.10.0-rc.1-linux-amd64.tar.gz

# helm-v3
# wget https://get.helm.sh/helm-v3.3.4-linux-amd64.tar.gz

# tart -zxvf helm-v3.3.4-linux-amd64.tar.gz

# mv linux-amd64/helm /usr/local/bin/helm

# helm version
version.BuildInfo{Version:"v3.3.4", GitCommit:"a61ce5633af99708171414353ed49547cf05013d", GitTreeState:"clean", GoVersion:"go1.14.9"}
命令补全
临时设定
source <(helm completion bash)
写配置文件
echo "source <(helm completion bash)" >> ~/.bash_profile
bash-completion添加配置
helm completion bash > /usr/share/bash-completion/completions/helm
现在我们可以使用Helm命令查看版本了,会提示无法连接到服务端Tiller:
$ helm version
Client: &version.Version{SemVer:"v2.10.0", GitCommit:"9ad53aac42165a5fadc6c87be0dea6b115f93090", GitTreeState:"clean"}
Error: could not find tiller
要安装 Helm 的服务端程序,我们需要使用到kubectl工具,所以先确保kubectl工具能够正常的访问 kubernetes 集群的apiserver哦。
然后我们在命令行中执行初始化操作:
$ helm init
由于 Helm 默认会去gcr.io拉取镜像,所以如果你当前执行的机器没有配置科学上网的话可以实现下面的命令代替:
$ helm init --upgrade --tiller-image cnych/tiller:v2.10.0
$HELM_HOME has been configured at /root/.helm.

Tiller (the Helm server-side component) has been installed into your Kubernetes Cluster.

Please note: by default, Tiller is deployed with an insecure 'allow unauthenticated users' policy.
To prevent this, run `helm init` with the --tiller-tls-verify flag.
For more information on securing your installation see: https://docs.helm.sh/using_helm/#securing-your-helm-installation
Happy Helming!
如果一直卡住或者报 google api 之类的错误,可以使用下面的命令进行初始化:
$ helm init --upgrade --tiller-image cnych/tiller:v2.10.0 --stable-repo-url https://cnych.github.io/kube-charts-mirror/
这个命令会把默认的 google 的仓库地址替换成我同步的一个镜像地址。
如果在安装过程中遇到了一些其他问题,比如初始化的时候出现了如下错误:
E0125 14:03:19.093131   56246 portforward.go:331] an error occurred forwarding 55943 -> 44134: error forwarding port 44134 to pod d01941068c9dfea1c9e46127578994d1cf8bc34c971ff109dc6faa4c05043a6e, uid : unable to do port forwarding: socat not found.
2018/01/25 14:03:19 (0xc420476210) (0xc4203ae1e0) Stream removed, broadcasting: 3
2018/01/25 14:03:19 (0xc4203ae1e0) (3) Writing data frame
2018/01/25 14:03:19 (0xc420476210) (0xc4200c3900) Create stream
2018/01/25 14:03:19 (0xc420476210) (0xc4200c3900) Stream added, broadcasting: 5
Error: cannot connect to Tiller
解决方案:在节点上安装socat可以解决
$ sudo yum install -y socat
Helm 服务端正常安装完成后,Tiller默认被部署在kubernetes集群的kube-system命名空间下:
$ kubectl get pod -n kube-system -l app=helm
NAME                             READY     STATUS    RESTARTS   AGE
tiller-deploy-86b844d8c6-44fpq   1/1       Running   0          7m
此时,我们查看 Helm 版本就都正常了:
$ helm version
Client: &version.Version{SemVer:"v2.10.0", GitCommit:"9ad53aac42165a5fadc6c87be0dea6b115f93090", GitTreeState:"clean"}
Server: &version.Version{SemVer:"v2.10.0", GitCommit:"9ad53aac42165a5fadc6c87be0dea6b115f93090", GitTreeState:"clean"}
另外一个值得注意的问题是RBAC,我们的 kubernetes 集群是1.10.0版本的,默认开启了RBAC访问控制,所以我们需要为Tiller创建一个ServiceAccount,让他拥有执行的权限,详细内容可以查看 Helm 文档中的Role-based Access Control。 创建rbac.yaml文件:
apiVersion: v1
kind: ServiceAccount
metadata:
  name: tiller
  namespace: kube-system
---
apiVersion: rbac.authorization.k8s.io/v1beta1
kind: ClusterRoleBinding
metadata:
  name: tiller
roleRef:
  apiGroup: rbac.authorization.k8s.io
  kind: ClusterRole
  name: cluster-admin
subjects:
  - kind: ServiceAccount
    name: tiller
    namespace: kube-system
然后使用kubectl创建:
$ kubectl create -f rbac-config.yaml
serviceaccount "tiller" created
clusterrolebinding.rbac.authorization.k8s.io "tiller" created
创建了tiller的 ServceAccount 后还没完,因为我们的 Tiller 之前已经就部署成功了,而且是没有指定 ServiceAccount 的,所以我们需要给 Tiller 打上一个 ServiceAccount 的补丁:
$ kubectl patch deploy --namespace kube-system tiller-deploy -p '{"spec":{"template":{"spec":{"serviceAccount":"tiller"}}}}'
上面这一步非常重要,不然后面在使用 Helm 的过程中可能出现
Error: no available release name found的错误信息。
至此, Helm客户端和服务端都配置完成了,接下来我们看看如何使用吧。
使用
我们现在了尝试创建一个 Chart:
$ helm create hello-helm
Creating hello-helm
$ tree hello-helm
hello-helm
├── charts
├── Chart.yaml
├── templates
│   ├── deployment.yaml
│   ├── _helpers.tpl
│   ├── ingress.yaml
│   ├── NOTES.txt
│   └── service.yaml
└── values.yaml

2 directories, 7 files
我们通过查看templates目录下面的deployment.yaml文件可以看出默认创建的 Chart 是一个 nginx 服务,具体的每个文件是干什么用的,我们可以前往 Helm 官方文档进行查看,后面会和大家详细讲解的。比如这里我们来安装 1.7.9 这个版本的 nginx,则我们更改 value.yaml 文件下面的 image tag 即可,将默认的 stable 更改为 1.7.9,为了测试方便,我们把 Service 的类型也改成 NodePort
...
image:
  repository: nginx
  tag: 1.7.9
  pullPolicy: IfNotPresent

nameOverride: ""
fullnameOverride: ""

service:
  type: NodePort
  port: 80
...
现在我们来尝试安装下这个 Chart :
$ helm install ./hello-helm
NAME:   iced-ferret
LAST DEPLOYED: Thu Aug 30 23:39:45 2018
NAMESPACE: default
STATUS: DEPLOYED

RESOURCES:
==> v1/Service
NAME                    TYPE       CLUSTER-IP     EXTERNAL-IP  PORT(S)  AGE
iced-ferret-hello-helm  ClusterIP  10.100.118.77  <none>       80/TCP   0s

==> v1beta2/Deployment
NAME                    DESIRED  CURRENT  UP-TO-DATE  AVAILABLE  AGE
iced-ferret-hello-helm  1        0        0           0          0s

==> v1/Pod(related)
NAME                                     READY  STATUS   RESTARTS  AGE
iced-ferret-hello-helm-58cb69d5bb-s9f2m  0/1    Pending  0         0s


NOTES:
1. Get the application URL by running these commands:
  export POD_NAME=$(kubectl get pods --namespace default -l "app=hello-helm,release=iced-ferret" -o jsonpath="{.items[0].metadata.name}")
  echo "Visit http://127.0.0.1:8080 to use your application"
  kubectl port-forward $POD_NAME 8080:80

$ kubectl get pods -l app=hello-helm
NAME                                      READY     STATUS    RESTARTS   AGE
iced-ferret-hello-helm-58cb69d5bb-s9f2m   1/1       Running   0          2m
$ kubectl get svc -l app=hello-helm
NAME                       TYPE       CLUSTER-IP       EXTERNAL-IP   PORT(S)        AGE
iced-ferret-hello-helm   NodePort   10.104.127.141   <none>        80:31236/TCP   3m
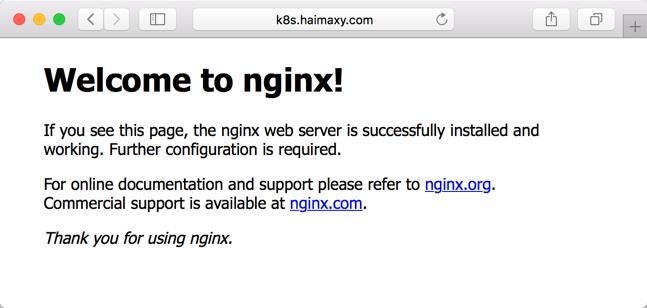
等到 Pod 创建完成后,我们可以根据创建的 Service 的 NodePort 来访问该服务了,然后在浏览器中打开http://k8s.haimaxy.com:31236就可以正常的访问我们刚刚部署的 nginx 应用了。

查看release:
$ helm list
NAME             REVISION    UPDATED                     STATUS      CHART               APP VERSION    NAMESPACE
winning-zebra    1           Thu Aug 30 23:50:29 2018    DEPLOYED    hello-helm-0.1.0    1.0            default
打包chart:
$ helm package hello-helm
Successfully packaged chart and saved it to: /root/course/kubeadm/helm/hello-helm-0.1.0.tgz
然后我们就可以将打包的tgz文件分发到任意的服务器上,通过helm fetch就可以获取到该 Chart 了。
删除release:
$ helm delete winning-zebra
release "winning-zebra" deleted
然后我们看到kubernetes集群上的该 nginx 服务也已经被删除了。
$ kubectl get pods -l app=hello-helm
No resources found.
还有更多关于Helm的使用命令,我们可以前往官方文档查看。
以上是关于安装helm服务以及搭建Helm测试环境的主要内容,如果未能解决你的问题,请参考以下文章
Kubernetes(k8s)之k8s的应用的包管理工具Helm