使用ViewPager+Fragment实现选项卡切换效果
Posted
tags:
篇首语:本文由小常识网(cha138.com)小编为大家整理,主要介绍了使用ViewPager+Fragment实现选项卡切换效果相关的知识,希望对你有一定的参考价值。
参考链接:http://www.jianshu.com/p/7bc9a1ff137e
http://www.devstore.cn/code/info/245.html
http://www.tuicool.com/articles/FfeiumV
本人参考了三篇文章来写这个页面,但是运行这上面给出的源码,发现每个fragment的flag并不能实现切换。
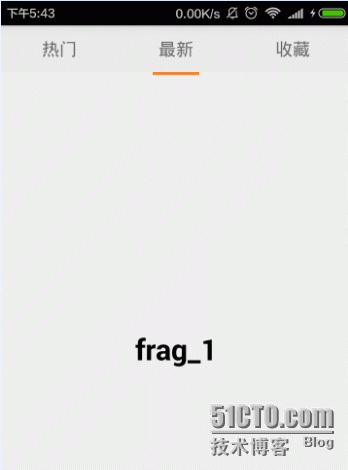
要实现的效果如下:
在activity_main.xml中设置布局。xml内容如下:
<LinearLayout xmlns:android="http://schemas.android.com/apk/res/android"
              xmlns:tools="http://schemas.android.com/tools"
              android:layout_width="match_parent"
              android:layout_height="match_parent"
              android:orientation="vertical"
              tools:context="com.example.fengzhengapp.MainActivity" >
    <LinearLayout
        android:layout_width="match_parent"
        android:layout_height="48dp"
        android:orientation="horizontal" >
        <TextView
            android:id="@+id/tv_hot"
            android:layout_width="wrap_content"
            android:layout_height="fill_parent"
            android:layout_weight="1.0"
            android:background="#ffEAEAEA"
            android:gravity="center"
            android:text="@string/tab_hot"
            android:textSize="18sp" />
        <TextView
            android:id="@+id/tv_news"
            android:layout_width="wrap_content"
            android:layout_height="fill_parent"
            android:layout_weight="1.0"
            android:background="#ffEAEAEA"
            android:gravity="center"
            android:text="@string/tab_news"
            android:textSize="18sp" />
        <TextView
            android:id="@+id/tv_fav"
            android:layout_width="wrap_content"
            android:layout_height="fill_parent"
            android:layout_weight="1.0"
            android:background="#ffEAEAEA"
            android:gravity="center"
            android:text="@string/tab_favorite"
            android:textSize="18sp" />
    </LinearLayout>

    <LinearLayout
        android:layout_width="match_parent"
        android:layout_height="3dp"
        android:orientation="horizontal">
        <View
            android:id="@+id/activity_order_flag_all"
            android:layout_height="match_parent"
            android:layout_width="0dp"
            android:layout_weight="1"
            android:layout_marginLeft="36dp"
            android:layout_marginRight="36dp"
            android:background="@color/app_style_red"
            android:gravity="center"/>
        <View
            android:id="@+id/activity_order_flag_uncomplete"
            android:layout_height="match_parent"
            android:layout_width="0dp"
            android:layout_weight="1"
            android:layout_marginLeft="36dp"
            android:layout_marginRight="36dp"
            android:background="@color/app_style_red"
            android:gravity="center"
            android:visibility="invisible"/>
        <View
            android:id="@+id/activity_order_flag_complete"
            android:layout_height="match_parent"
            android:layout_width="0dp"
            android:layout_weight="1"
            android:layout_marginLeft="36dp"
            android:layout_marginRight="36dp"
            android:background="@color/app_style_red"
            android:gravity="center"
            android:visibility="invisible"/>
    </LinearLayout>
    <android.support.v4.view.ViewPager
        android:id="@+id/myViewPager"
        android:layout_width="match_parent"
        android:layout_height="0dp"
        android:layout_weight="1"
        android:flipInterval="30" >
    </android.support.v4.view.ViewPager>
</LinearLayout>
接下来,增加3个Fragment布局页 ,分别在里面填充简单的内容
第一个 :
<?xml version="1.0" encoding="utf-8"?>
<LinearLayout xmlns:android="http://schemas.android.com/apk/res/android"
              android:layout_width="match_parent"
              android:layout_height="match_parent"
              android:orientation="vertical" >
    <TextView
        android:id="@+id/txtHot"
        android:layout_width="match_parent"
        android:layout_height="match_parent"
        android:layout_weight="1"
        android:text="this is the hot tab" >
    </TextView>
</LinearLayout>
第二个 :
<?xml version="1.0" encoding="utf-8"?>
<LinearLayout xmlns:android="http://schemas.android.com/apk/res/android"
              android:layout_width="match_parent"
              android:layout_height="match_parent"
              android:orientation="vertical" >
    <TextView
        android:id="@+id/txtNews"
        android:layout_width="match_parent"
        android:layout_height="match_parent"
        android:layout_gravity="center"
        android:gravity="center"
        android:text="frag_1"
        android:textSize="30dp"
        android:textStyle="bold"
        android:textColor="#000000" />
</LinearLayout>
第三个 :
<?xml version="1.0" encoding="utf-8"?>
<LinearLayout xmlns:android="http://schemas.android.com/apk/res/android"
              android:layout_width="match_parent"
              android:layout_height="match_parent"
              android:orientation="vertical" >
    <TextView
        android:id="@+id/txtFav"
        android:layout_width="match_parent"
        android:layout_height="match_parent"
        android:layout_weight="1"
        android:text="this is the Fav tab" >
    </TextView>
</LinearLayout>
以上3个Fragment的布局文件已创建完毕,每个文件中只显示简单的文本内容,用做演示。
加载3个Fragment到Activity中。
首先实现3个Fragment对应的后台类
热门布局页对应的类:
import android.os.Bundle;
import android.support.v4.app.Fragment;
import android.view.LayoutInflater;
import android.view.View;
import android.view.ViewGroup;

import org.ganinfo.interfacepractice.R;

public class FragmentHot extends Fragment {
    @Override
    public View onCreateView(LayoutInflater inflater, ViewGroup container,Bundle savedInstanceState) {
        View view = inflater.inflate(R.layout.fragmenthot, container, false);
        return view;
    }
}
news布局页对应的类:
import android.os.Bundle;
import android.support.v4.app.Fragment;
import android.view.LayoutInflater;
import android.view.View;
import android.view.ViewGroup;
import org.ganinfo.interfacepractice.R;
public class FragmentNews extends Fragment {
    @Override
    public View onCreateView(LayoutInflater inflater, ViewGroup container,Bundle savedInstanceState) {
        View view = inflater.inflate(R.layout.fragmentnews, container, false);
        return view;
    }
}
收藏布局页对应的类:
import android.os.Bundle;
import android.support.v4.app.Fragment;
import android.view.LayoutInflater;
import android.view.View;
import android.view.ViewGroup;
import org.ganinfo.interfacepractice.R;
public class FragmentFavorite extends Fragment {
    @Override
    public View onCreateView(LayoutInflater inflater, ViewGroup container,Bundle savedInstanceState) {
        View view = inflater.inflate(R.layout.fragmentfav, container, false);
        return view;
    }
}
之后再activity中初始化这3个Fragment
注意要点:
MainActivity继承自FragmentActivity
要实现一个FragmentPagerAdapter,内容如下:
import android.support.v4.app.Fragment;
import android.support.v4.app.FragmentManager;
import android.support.v4.app.FragmentPagerAdapter;
import java.util.ArrayList;
public class MyFragmentAdapter extends FragmentPagerAdapter {
    ArrayList<Fragment> list;
    public MyFragmentAdapter(FragmentManager fm,ArrayList<Fragment> list){
        super(fm);
        this.list = list;
    }
    @Override
    public Fragment getItem(int arg0) {
        return list.get(arg0);
    }
    @Override
    public int getCount() {
        return list.size();
    }
}
然后在MainActivity中实现切换和动画效果,代码如下:
import android.os.Bundle;
import android.support.v4.app.Fragment;
import android.support.v4.app.FragmentActivity;
import android.support.v4.view.ViewPager;
import android.view.MenuItem;
import android.view.View;
import android.widget.TextView;
import java.util.ArrayList;
import adapter.MyFragmentAdapter;
import fragment.FragmentFavorite;
import fragment.FragmentHot;
import fragment.FragmentNews;
public class MainActivity extends FragmentActivity implements View.OnClickListener{
    private ViewPager mViewPager;
    private ArrayList fragments;
    private TextView view1, view2, view3;
    private int mCurrentOption = 0;
    private View flag0, flag1, flag2;
    @Override
    protected void onCreate(Bundle savedInstanceState) {
        super.onCreate(savedInstanceState);
        setContentView(R.layout.activity_main);
        initViewPager();
        initView();
    }
    @Override
      public boolean onOptionsItemSelected(MenuItem item) {
        int id = item.getItemId();
        if (id == R.id.action_settings) {
            return true;
        }
        return super.onOptionsItemSelected(item);
    }
    private void initView(){
        view1 = (TextView) findViewById(R.id.tv_hot);
        view2 = (TextView) findViewById(R.id.tv_news);
        view3 = (TextView) findViewById(R.id.tv_fav);
        flag0 = findViewById(R.id.activity_order_flag_all);
        flag1 = findViewById(R.id.activity_order_flag_uncomplete);
        flag2 = findViewById(R.id.activity_order_flag_complete);
        view1.setOnClickListener(this);
        view2.setOnClickListener(this);
        view3.setOnClickListener(this);
    }
    @Override
    public void onClick(View v) {
        switch (v.getId()){
            case R.id.tv_hot:
                if(mCurrentOption == 0) return;
                mCurrentOption = 0;
                flag0.setVisibility(View.VISIBLE);
                flag1.setVisibility(View.INVISIBLE);
                flag2.setVisibility(View.INVISIBLE);
                mViewPager.setCurrentItem(mCurrentOption);
                break;
            case R.id.tv_news:
                if(mCurrentOption == 1) return;
                mCurrentOption = 1;
                flag0.setVisibility(View.INVISIBLE);
                flag1.setVisibility(View.VISIBLE);
                flag2.setVisibility(View.INVISIBLE);
                mViewPager.setCurrentItem(mCurrentOption);
                break;
            case R.id.tv_fav:
                if(mCurrentOption == 2) return;
                mCurrentOption = 2;
                flag0.setVisibility(View.INVISIBLE);
                flag1.setVisibility(View.INVISIBLE);
                flag2.setVisibility(View.VISIBLE);
                mViewPager.setCurrentItem(mCurrentOption);
                break;
            default:
                return;
        }
    }
    private void initViewPager(){
        mViewPager = (ViewPager)findViewById(R.id.myViewPager);
        fragments = new ArrayList<Fragment>();
        Fragment fragmentHot = new FragmentHot();
        Fragment fragmentNews = new FragmentNews();
        Fragment fragmentFav = new FragmentFavorite();
        fragments.add(fragmentHot);
        fragments.add(fragmentNews);
        fragments.add(fragmentFav);
        mViewPager.setAdapter(new MyFragmentAdapter(getSupportFragmentManager(), fragments));
        mViewPager.setCurrentItem(0);
        mViewPager.setOnPageChangeListener(new ViewPager.OnPageChangeListener() {
            @Override
            public void onPageScrolled(int i, float v, int i2) {
            }
            @Override
            public void onPageSelected(int i) {
                switch (i){
                    case 0:
                        flag0.setVisibility(View.VISIBLE);
                        flag1.setVisibility(View.INVISIBLE);
                        flag2.setVisibility(View.INVISIBLE);
                        break;
                    case 1:
                        flag0.setVisibility(View.INVISIBLE);
                        flag1.setVisibility(View.VISIBLE);
                        flag2.setVisibility(View.INVISIBLE);
                        break;
                    case 2:
                        flag0.setVisibility(View.INVISIBLE);
                        flag1.setVisibility(View.INVISIBLE);
                        flag2.setVisibility(View.VISIBLE);
                        break;
                    default:
                        return;
                }
            }
            @Override
            public void onPageScrollStateChanged(int i) {
            }
        });
    }
}
-------------------------------------------------------------------------------------
package com.ganinfo.collect.activity;
import java.util.ArrayList;
import com.ganinfo.collect.R;
import com.ganinfo.collect.fragment.GzMyFragment;
import com.ganinfo.collect.fragment.GzTaskFragment;
import com.ganinfo.collect.utils.GzLog;
import com.ganinfo.collect.utils.GzNetwork;
import com.ganinfo.collect.widget.MyFragmentAdapter;
import android.annotation.SuppressLint;
import android.app.AlertDialog;
import android.os.Bundle;
import android.support.v4.view.ViewPager;
import android.view.MenuItem;
import android.view.View;
import android.widget.ImageView;
import android.widget.TextView;
@SuppressLint("ResourceAsColor") public class GzMainActivity extends GzBaseActivity {
private String TAG = "GzMainActivity";
private long lastTime = 0; //再按一次退出的时间标志
private ArrayList<android.support.v4.app.Fragment> fragments;
private int mCurrentOption = 0;
private ViewPager mViewPager;
private ImageView mTaskIV,mTaskMyIV;
private TextView mTaskTV,mTaskMyTV;
@Override
protected void onCreate(Bundle savedInstanceState) {
super.onCreate(savedInstanceState);
setContentView(R.layout.activity_main);
GzLog.d(TAG, "onCreate");
initview();
initViewPager();
CheckNetwork();
}
 private void initview() {
 mTaskIV = (ImageView) findViewById(R.id.main_iv_shop);
 mTaskMyIV = (ImageView) findViewById(R.id.main_iv_my);
 mTaskTV = (TextView) findViewById(R.id.main_tv_shop);
 mTaskMyTV = (TextView) findViewById(R.id.main_tv_my);


}
@Override
     public boolean onOptionsItemSelected(MenuItem item) {
       int id = item.getItemId();
       if (id == R.id.action_settings) {
           return true;
       }
       return super.onOptionsItemSelected(item);
   }
private void CheckNetwork() {
if(!GzNetwork.isNetworkAvailable()){
new AlertDialog.Builder(this).
setMessage(R.string.network_not_avail).
setPositiveButton(R.string.ok, null).
create().show();
}
}
 private void initViewPager(){
        mViewPager = (ViewPager)findViewById(R.id.main_viewpager);
        fragments = new ArrayList<android.support.v4.app.Fragment>();
        GzTaskFragment fragmentTask = new GzTaskFragment();
        GzMyFragment fragmentMy = new GzMyFragment();
        fragments.add(fragmentTask);
        fragments.add(fragmentMy);
        mViewPager.setAdapter(new MyFragmentAdapter(getSupportFragmentManager(), fragments));
        mViewPager.setCurrentItem(mCurrentOption);
        mViewPager.setOnPageChangeListener(new ViewPager.OnPageChangeListener() {
@Override
public void onPageSelected(int i) {
if(mCurrentOption == i){
}
}
@Override
public void onPageScrolled(int arg0, float arg1, int arg2) {
}
@Override
public void onPageScrollStateChanged(int arg0) {
}
});
    }
 @SuppressLint("ResourceAsColor") public void onClickTab(View view){
switch (view.getId()) {
case R.id.main_fg_task:
if(mCurrentOption == 0) return;
                mCurrentOption = 0;
                mViewPager.setCurrentItem(mCurrentOption);
                mTaskTV.setTextColor(R.color.app_style_normal);
break;
case R.id.main_fg_my:
if(mCurrentOption == 1) return;
                mCurrentOption = 1;
                mViewPager.setCurrentItem(mCurrentOption);
                mTaskMyTV.setTextColor(R.color.app_style_normal);
break;
default:
            return;
}
}

@Override
public void onBackPressed() {
if(System.currentTimeMillis() - lastTime > 2000){
showToast(R.string.back_hint);
lastTime = System.currentTimeMillis();
return;
}
super.onBackPressed();
}
}
本文出自 “亦可亦心蕊” 博客,请务必保留此出处http://asaderas.blog.51cto.com/9344932/1744415
以上是关于使用ViewPager+Fragment实现选项卡切换效果的主要内容,如果未能解决你的问题,请参考以下文章
