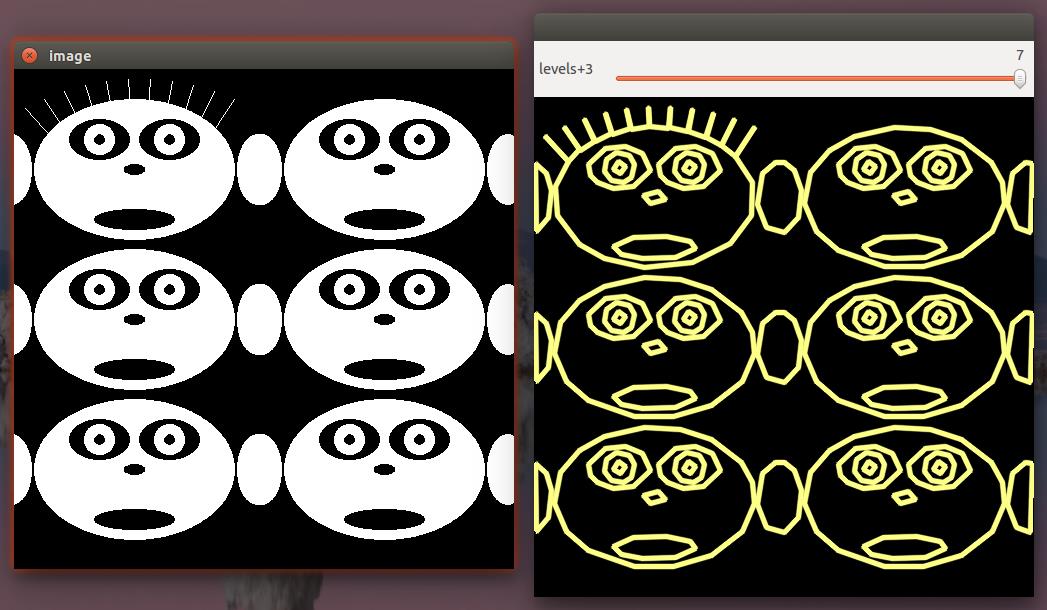
[OpenCV] Samples 04: contours2
Posted 机器学习水很深
tags:
篇首语:本文由小常识网(cha138.com)小编为大家整理,主要介绍了[OpenCV] Samples 04: contours2相关的知识,希望对你有一定的参考价值。
要先变为二值图像:cvThreshold
提取轮廓:cvFindContours

参数描述:
hiararchy:参数和轮廓个数相同。
每个轮廓contours[ i ] 对应4个hierarchy元素的索引编号,即:
-
- hierarchy[ i ][ 0 ] 后一个轮廓
- hierarchy[ i ][ 1 ] 前一个轮廓
- hierarchy[ i ][ 2 ] 父轮廓
- hierarchy[ i ][ 3 ] 内嵌轮廓
如果没有对应项,该值设置为负数。
mode:表示轮廓的检索模式
CV_RETR_EXTERNAL 表示只检测外轮廓
CV_RETR_LIST 检测的轮廓不建立等级关系
CV_RETR_CCOMP 建立两个等级的轮廓,上面的一层为外边界,里面的一层为内孔的边界信息。如果内孔内还有一个连通物体,这个物体的边界也在顶层。
CV_RETR_TREE 建立一个等级树结构的轮廓。
method:为轮廓的近似办法
CV_CHAIN_APPROX_NONE 存储所有的轮廓点,相邻的两个点的像素位置差不超过1,即max(abs(x1-x2),abs(y2-y1))==1
CV_CHAIN_APPROX_SIMPLE 压缩水平方向,垂直方向,对角线方向的元素,只保留该方向的终点坐标,例如一个矩形轮廓只需4个点来保存轮廓信息
CV_CHAIN_APPROX_TC89_L1,CV_CHAIN_APPROX_TC89_KCOS 使用teh-Chinl chain 近似算法
offset:表示代表轮廓点的偏移量,可以设置为任意值。对ROI图像中找出的轮廓,并要在整个图像中进行分析时,这个参数还是很有用的。
findContours 后会对输入的二值图像改变,最好需创建新MAT来存放;
findContours 后的轮廓信息contours可能过于复杂不平滑,可以用 approxPolyDP() 对该多边形曲线做适当近似。
contourArea() 函数可以得到当前轮廓包含区域的大小,方便轮廓的筛选。
findContours经常与 drawContours() 配合使用,用来将轮廓绘制出来。
- 第一个参数,image表示目标图像
- 第二个参数,contours表示输入的轮廓组,每一组轮廓由点vector构成
- 第三个参数,contourIdx指明画第几个轮廓,如果该参数为负值,则画全部轮廓
- 第四个参数,color为轮廓的颜色
- 第五个参数,thickness为轮廓的线宽,如果为负值或CV_FILLED表示填充轮廓内部
- 第六个参数,lineType为线型
- 第七个参数,为轮廓结构信息
- 第八个参数,为maxLevel
得到了复杂轮廓往往不适合特征的检测,这里再介绍一个点集凸包络的提取函数convexHull(),
- 输入参数,是contours组中的一个轮廓
- 返回,外凸包络的点集。
还可以得到轮廓的外包络矩形,使用函数 boundingRect(),
如果想得到旋转的外包络矩形,使用函数 minAreaRect(),返回值为RotatedRect;
也可以得到轮廓的外包络圆,对应的函数为 minEnclosingCircle();
想得到轮廓的外包络椭圆,对应的函数为 fitEllipse(),返回值也是RotatedRect,可以用ellipse函数画出对应的椭圆。
如果想根据多边形的轮廓信息 => 多边形的多阶矩,可以使用 类moments,这个类可以得到多边形和光栅形状的3阶以内的所有矩,
类内有变量m00,m10,m01,m20,m11,m02,m30,m21,m12,m03,
比如多边形的质心为 x = m10 / m00,y = m01 / m00。
如果想获得一点与多边形封闭轮廓的信息,可以调用 pointPolygonTest(),这个函数返回值为该点距离轮廓最近边界的距离,为正值为在轮廓内部,负值为在轮廓外部,0表示在边界上。
#include "opencv2/imgproc/imgproc.hpp"
#include "opencv2/highgui/highgui.hpp"
#include <math.h>
#include <iostream>

using namespace cv;
using namespace std;

static void help()
{
    cout
    << "\\nThis program illustrates the use of findContours and drawContours\\n"
    << "The original image is put up along with the image of drawn contours\\n"
    << "Usage:\\n"
    << "./contours2\\n"
    << "\\nA trackbar is put up which controls the contour level from -3 to 3\\n"
    << endl;
}

const int w = 500;
int levels = 3;

vector<vector<Point> > contours;
vector<Vec4i> hierarchy;

static void on_trackbar(int, void*)
{
    Mat cnt_img = Mat::zeros(w, w, CV_8UC3);
    int _levels = levels - 3;
    drawContours( cnt_img, contours, _levels <= 0 ? 3 : -1, Scalar(128,255,255),
                  3, LINE_AA, hierarchy, std::abs(_levels) );

    imshow("contours", cnt_img);
}

int main( int argc, char** argv)
{
    cv::CommandLineParser parser(argc, argv, "{help h||}");
    if (parser.has("help"))
    {
        help();
        return 0;
    }
//    Mat img = Mat::zeros(w, w, CV_8UC1);

    //Jeff --> we don\'t need to draw this by ourselves.
    //Draw 6 faces
//    for( int i = 0; i < 6; i++ )
//    {
//        int dx = (i%2)*250 - 30;
//        int dy = (i/2)*150;
//        const Scalar white = Scalar(255);
//        const Scalar black = Scalar(0);

//        if( i == 0 )
//        {
//            for( int j = 0; j <= 10; j++ )
//            {
//                double angle = (j+5)*CV_PI/21;
//                line(img, Point(cvRound(dx+100+j*10-80*cos(angle)),
//                    cvRound(dy+100-90*sin(angle))),
//                    Point(cvRound(dx+100+j*10-30*cos(angle)),
//                    cvRound(dy+100-30*sin(angle))), white, 1, 8, 0);
//            }
//        }

//        ellipse( img, Point(dx+150, dy+100), Size(100,70), 0, 0, 360, white, -1, 8, 0 );
//        ellipse( img, Point(dx+115, dy+70), Size(30,20), 0, 0, 360, black, -1, 8, 0 );
//        ellipse( img, Point(dx+185, dy+70), Size(30,20), 0, 0, 360, black, -1, 8, 0 );
//        ellipse( img, Point(dx+115, dy+70), Size(15,15), 0, 0, 360, white, -1, 8, 0 );
//        ellipse( img, Point(dx+185, dy+70), Size(15,15), 0, 0, 360, white, -1, 8, 0 );
//        ellipse( img, Point(dx+115, dy+70), Size(5,5), 0, 0, 360, black, -1, 8, 0 );
//        ellipse( img, Point(dx+185, dy+70), Size(5,5), 0, 0, 360, black, -1, 8, 0 );
//        ellipse( img, Point(dx+150, dy+100), Size(10,5), 0, 0, 360, black, -1, 8, 0 );
//        ellipse( img, Point(dx+150, dy+150), Size(40,10), 0, 0, 360, black, -1, 8, 0 );
//        ellipse( img, Point(dx+27, dy+100), Size(20,35), 0, 0, 360, white, -1, 8, 0 );
//        ellipse( img, Point(dx+273, dy+100), Size(20,35), 0, 0, 360, white, -1, 8, 0 );
//    }

    Mat img = imread("/home/unsw/lolo.jpg");
    Mat gray;
    cvtColor(img, gray, COLOR_RGB2GRAY );
    Mat binary;
    threshold(gray, binary, 200,255,THRESH_BINARY);

    // (1) Pic One Show: show the faces
    namedWindow( "image", 1 );
    imshow( "image", binary );

    // (2) Pic Two Show
    //Extract the contours so that
    vector<vector<Point> > contours0;
    findContours( binary, contours0, hierarchy, RETR_TREE, CHAIN_APPROX_SIMPLE);

    contours.resize(contours0.size());
    for( size_t k = 0; k < contours0.size(); k++ )
        approxPolyDP(Mat(contours0[k]), contours[k], 3, true);

    // Jeff --> the same name to bind window and trackbar together.
    //          qt qml to draw would be much better.
    //          callback: on_trackbar()
    namedWindow( "contours", 1 );
    createTrackbar( "levels+3", "contours", &levels, 7, on_trackbar );
    on_trackbar(0,0);

    waitKey();
    return 0;
}
Reference: http://blog.csdn.net/felix86/article/details/38121959
采用cvFindContours提取轮廓,并过滤掉小面积轮廓,最后将轮廓保存。
 1 static int getContoursByCplus(char* Imgname, double minarea, double whRatio)
 2 {
 3     cv::Mat src, dst, canny_output;
 4     /// Load source image and convert it to gray
 5     src = imread(Imgname, 0);
 6
 7     if (!src.data)
 8     {
 9         std::cout << "read data error!" << std::endl;
10         return -1;
11     }
12     blur(src, src, Size(3, 3));
13
14
15     //the pram. for findContours,
16     vector<vector<Point> > contours;
17     vector<Vec4i> hierarchy;
18
19     /// Detect edges using canny
20     Canny(src, canny_output, 80, 255, 3);
21     /// Find contours
22     findContours(canny_output, contours, hierarchy, CV_RETR_TREE, CV_CHAIN_APPROX_SIMPLE, Point(0, 0));
23     //CV_RETR_CCOMP, CV_CHAIN_APPROX_SIMPLE
24
25     double maxarea = 0;
26     int maxAreaIdx = 0;
27
28     for (int i = 0; i<contours.size(); i++)
29     {
30
31         double tmparea = fabs(contourArea(contours[i]));
32         if (tmparea>maxarea)
33         {
34             maxarea = tmparea;
35             maxAreaIdx = i;
36             continue;
37         }
38
39         if (tmparea < minarea)
40         {
41             // *** 删除面积小于设定值的轮廓
42             contours.erase(contours.begin() + i);
43             std::wcout << "delete a small area" << std::endl;
44             continue;
45         }
46         //计算轮廓的直径宽高
47         Rect aRect =boundingRect(contours[i]);
48         if ((aRect.width / aRect.height)<whRatio)
49         {
50             // *** 删除宽高比例小于设定值的轮廓
51             contours.erase(contours.begin() + i);
52             std::wcout << "delete a unnomalRatio area" << std::endl;
53             continue;
54         }
55     }
56     /// Draw contours,彩色轮廓
57     dst= Mat::zeros(canny_output.size(), CV_8UC3);
58     for (int i = 0; i< contours.size(); i++)
59     {
60         //随机颜色
61         Scalar color = Scalar(rng.uniform(0, 255), rng.uniform(0, 255), rng.uniform(0, 255));
62         drawContours(dst, contours, i, color, 2, 8, hierarchy, 0, Point());
63     }
64     // Create Window
65     char* source_window = "countors";
66     namedWindow(source_window, CV_WINDOW_NORMAL);
67     imshow(source_window, dst);
68     cv:; waitKey(0);
69
70     return 0;
71 }
以上是关于[OpenCV] Samples 04: contours2的主要内容,如果未能解决你的问题,请参考以下文章