CentOS7 企业级分布式监控系统Zabbix(01)
Posted
tags:
篇首语:本文由小常识网(cha138.com)小编为大家整理,主要介绍了CentOS7 企业级分布式监控系统Zabbix(01)相关的知识,希望对你有一定的参考价值。
本次以CentOS 7.2 x64系统为例
系统环境
[[email protected] ~]# cat /etc/redhat-release
CentOS Linux release 7.2.1511 (Core)
[[email protected] ~]# uname -r
3.10.0-327.el7.x86_64
[[email protected] ~]# uname -m
x86_64
[[email protected] ~]# hostname
centos72-node1.wangdong.com
[[email protected] ~]# ifconfig | grep -w "inet" | awk ‘{print $2}‘
192.168.56.51
127.0.0.1
设置yum源和epel源为阿里
[[email protected] ~]# wget -O /etc/yum.repos.d/CentOS-Base.repo http://mirrors.aliyun.com/repo/Centos-7.repo
......
[[email protected] ~]# wget -O /etc/yum.repos.d/epel.repo http://mirrors.aliyun.com/repo/epel-7.repo
......
安装Apache
[[email protected] ~]# yum install httpd -y
......
启动Apache
[[email protected] ~]# systemctl start httpd
设置开机启动
[[email protected] ~]# systemctl enable httpd
Created symlink from /etc/systemd/system/multi-user.target.wants/httpd.service to /usr/lib/systemd/system/httpd.service.
设置防火墙策略(若不启用防火墙,此步骤跳过)
[[email protected] ~]# firewall-cmd --permanent --add-service=http
success
[[email protected] ~]# systemctl restart firewalld
测试Apache(Apache默认使用TCP/80端口,确保没有其他程序占用此端口)
安装MariaDB(即mysql)
[[email protected] ~]# yum install mariadb-server mariadb -y
......
启动MariaDB
[[email protected] ~]# systemctl start mariadb
设置开机启动
[[email protected] ~]# systemctl enable mariadb
Created symlink from /etc/systemd/system/multi-user.target.wants/mariadb.service to /usr/lib/systemd/system/mariadb.service.
初始化MariaDB
[[email protected] ~]# mysql_secure_installation
......
Enter current password for root (enter for none):    # 输入MySQL的root原密码,密码为空,直接回车
......

Set root password? [Y/n] Y         # 是否设置root密码,是
New password:            # 输入新密码,我设置123456
Re-enter new password:    # 输入新密码,我设置123456
......

Remove anonymous users? [Y/n] Y
......

Disallow root login remotely? [Y/n] n
......
Remove test database and access to it? [Y/n] Y
......
Reload privilege tables now? [Y/n] Y
......
安装php
[[email protected] ~]# yum install php php-mysql php-gd php-pear -y
......
测试PHP
[[email protected] ~]# vim /var/www/html/testphp.php    # 创建php测试文件,将下面3行内容写入文件保存
<?php
phpinfo();
?>
[[email protected] ~]# systemctl restart httpd
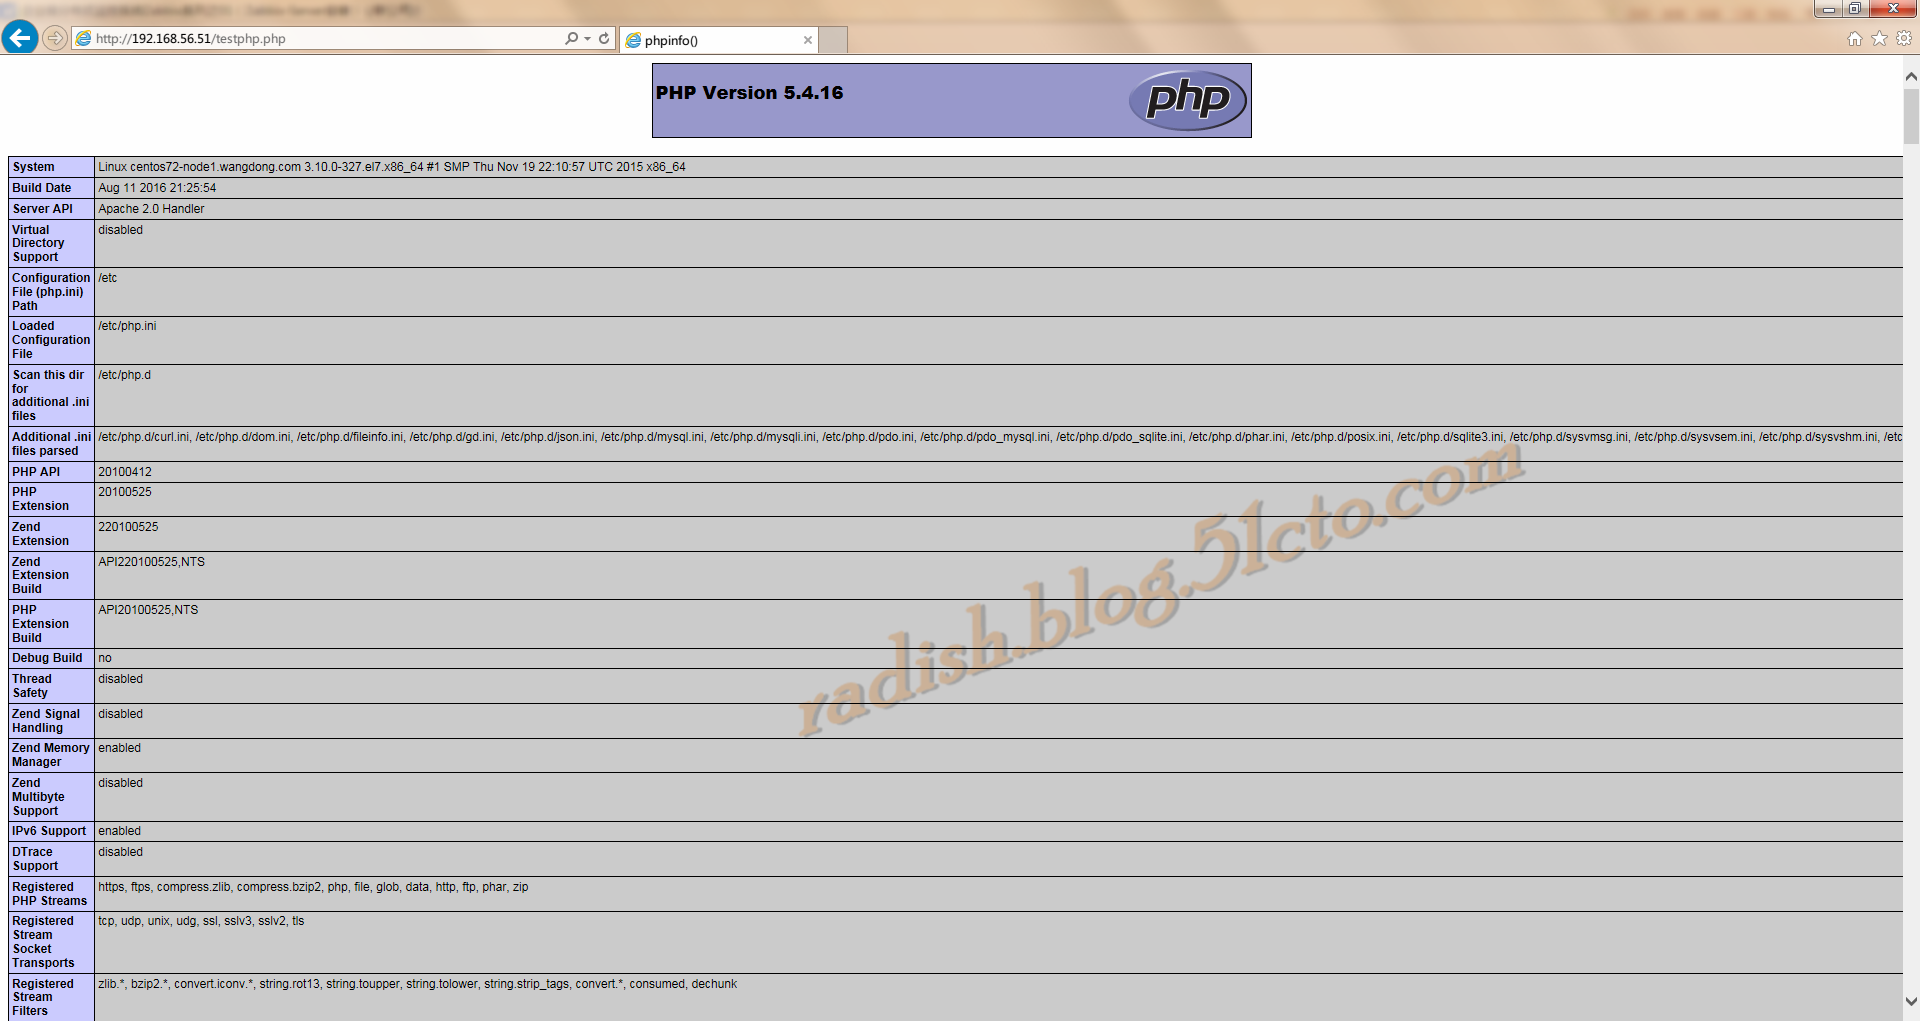
使用浏览器访问服务器地址的/testphp.php
配置zabbix源
[[email protected] ~]# yum install epel-release -y
......
[[email protected] ~]# rpm --import http://repo.zabbix.com/RPM-GPG-KEY-ZABBIX
[[email protected] ~]# rpm -Uv http://repo.zabbix.com/zabbix/2.4/rhel/7/x86_64/zabbix-release-2.4-1.el7.noarch.rpm
Retrieving http://repo.zabbix.com/zabbix/2.4/rhel/7/x86_64/zabbix-release-2.4-1.el7.noarch.rpm
Preparing packages...
zabbix-release-2.4-1.el7.noarch
安装zabbix和相关
[[email protected] ~]# yum install zabbix-server-mysql zabbix-web-mysql zabbix-agent zabbix-java-gateway -y
......
设置zabbix
[[email protected] ~]# vim /etc/httpd/conf.d/zabbix.conf
#
# Zabbix monitoring system php web frontend
#
Alias /zabbix /usr/share/zabbix
<Directory "/usr/share/zabbix">
    Options FollowSymLinks
    AllowOverride None
    Require all granted
    <IfModule mod_php5.c>
        php_value max_execution_time 300
        php_value memory_limit 128M
        php_value post_max_size 16M
        php_value upload_max_filesize 2M
        php_value max_input_time 300
        php_value date.timezone Asia/Shanghai    # 设置时区为上海
        # php_value date.timezone Europe/Riga
    </IfModule>
</Directory>
<Directory "/usr/share/zabbix/conf">
    Require all denied
</Directory>
<Directory "/usr/share/zabbix/include">
    Require all denied
</Directory>

[[email protected] ~]# systemctl restart httpd
MariaDB创建zabbix库
[[email protected] ~]# mysql -u root -p123456
......
MariaDB [(none)]> create database zabbix character set utf8;
Query OK, 1 row affected (0.00 sec)
MariaDB [(none)]> grant all privileges on zabbix.* to ‘zabbix‘@‘localhost‘ identified by ‘zabbix‘;
Query OK, 0 rows affected (0.00 sec)
MariaDB [(none)]> grant all privileges on zabbix.* to ‘zabbix‘@‘%‘ identified by ‘zabbix‘;
Query OK, 0 rows affected (0.00 sec)
MariaDB [(none)]> flush privileges;
Query OK, 0 rows affected (0.00 sec)
MariaDB [(none)]> exit;
Bye
[[email protected] ~]#
MariaDB导入zabbix模板
[[email protected] ~]# mysql -u zabbix -pzabbix
......
MariaDB [(none)]> use zabbix;
Database changed
MariaDB [zabbix]> source /usr/share/doc/zabbix-server-mysql-2.4.7/create/schema.sql
......
MariaDB [zabbix]> source /usr/share/doc/zabbix-server-mysql-2.4.7/create/images.sql
......
MariaDB [zabbix]> source /usr/share/doc/zabbix-server-mysql-2.4.7/create/data.sql
......
MariaDB [zabbix]> exit;
Bye
配置zabbix server
[[email protected] ~]# vim /etc/zabbix/zabbix_server.conf
......
DBName=zabbix
......
DBUser=zabbix
......
DBPassword=zabbix
......
配置zabbix agent
[[email protected] ~]# vim /etc/zabbix/zabbix_agentd.conf
......
Server=127.0.0.1        # 约在85行
......
ServerActive=127.0.0.1    # 约在126行
......
Hostname=127.0.0.1    # 约在137行
......
修改PHP配置
[[email protected] ~]# vim /etc/php.ini
......
max_execution_time = 600        # 约384行
......
max_input_time = 600        # 约394行
......
memory_limit = 256        # 约405行
......
post_max_size = 32M        # 约672行
......
upload_max_filesize = 16M    # 约800行
......
[date]
......
date.timezone = Asia/Shanghai        # 此项默认没有配置,需要添加,约880行
......
修改防火墙配置(若没有开启防火墙,则忽略)
[[email protected] ~]# firewall-cmd --permanent --add-port=10050/tcp
success
[[email protected] ~]# firewall-cmd --permanent --add-port=10051/tcp
success
[[email protected] ~]# systemctl restart firewalld
重启服务
[[email protected] ~]# systemctl start zabbix-server
[[email protected] ~]# systemctl start zabbix-agent
[[email protected] ~]# systemctl restart httpd
[[email protected] ~]# systemctl restart mariadb
[[email protected] ~]# systemctl enable zabbix-server
Created symlink from /etc/systemd/system/multi-user.target.wants/zabbix-server.service to /usr/lib/systemd/system/zabbix-server.service.
[[email protected] ~]# systemctl enable zabbix-agent
Created symlink from /etc/systemd/system/multi-user.target.wants/zabbix-agent.service to /usr/lib/systemd/system/zabbix-agent.service.
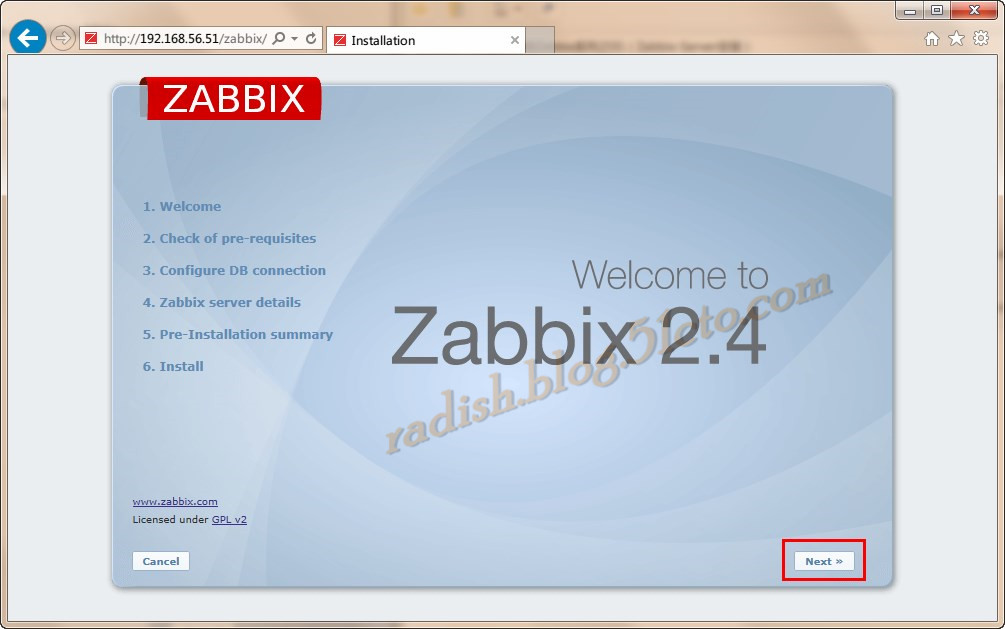
配置zabbix,访问服务器地址的/zabbix/
点击“Next”按钮
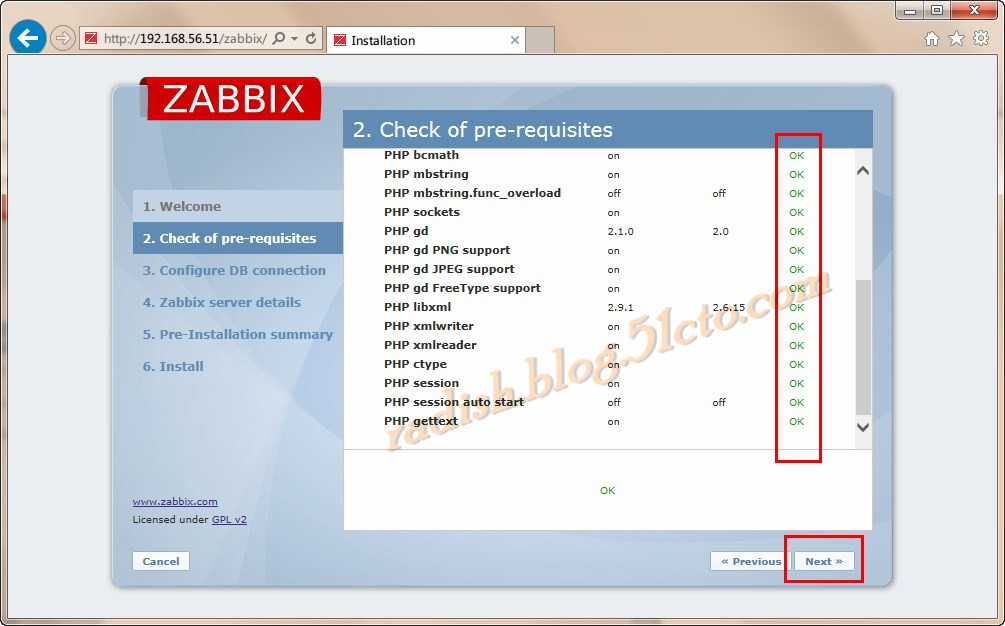
检查各种测试,应全部显示OK,点击“Next”
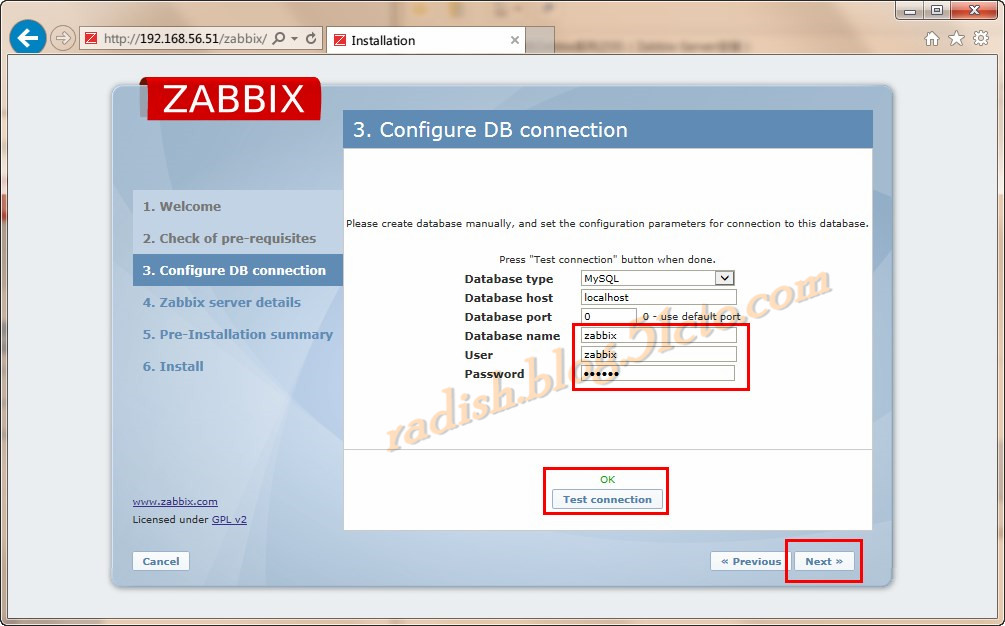
选择数据库类型为MySQL,库名为zabbix,用户名zabbix,密码我使用的zabbix,点击“Test connection”,显示OK后点击“Next”
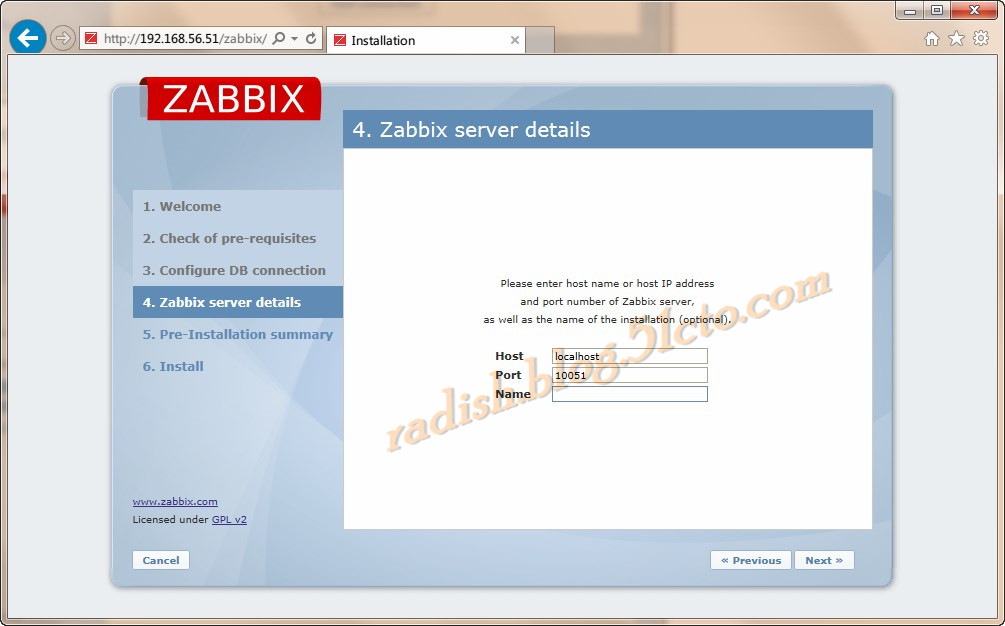
输入Server Name(可选)
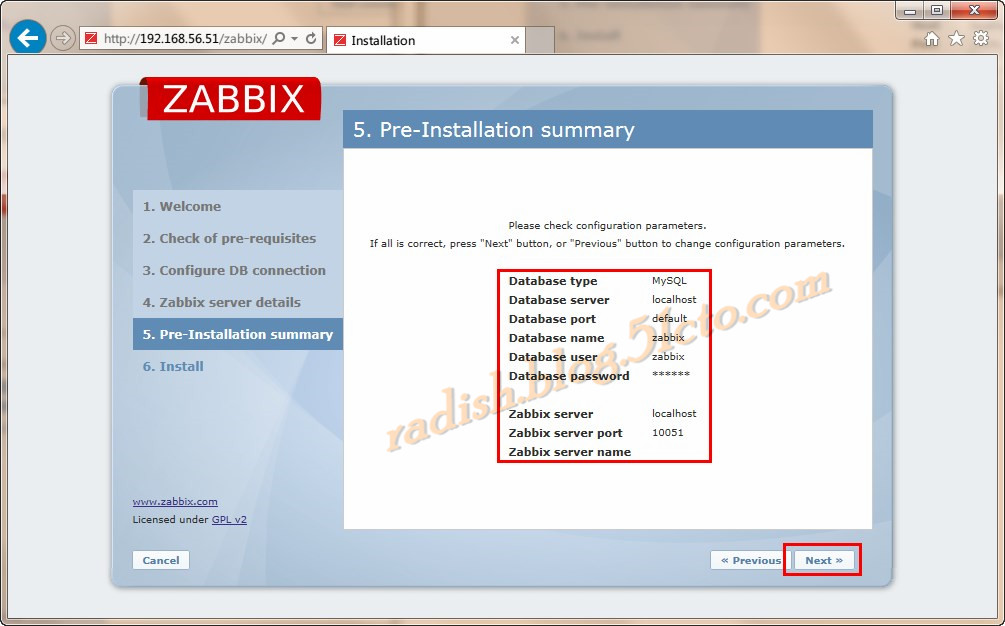
检查信息是否有误,点击“Next”按钮
配置完成,点击“Finish”按钮
进入Zabbix的管理界面,默认用户名为admin,默认密码为zabbix
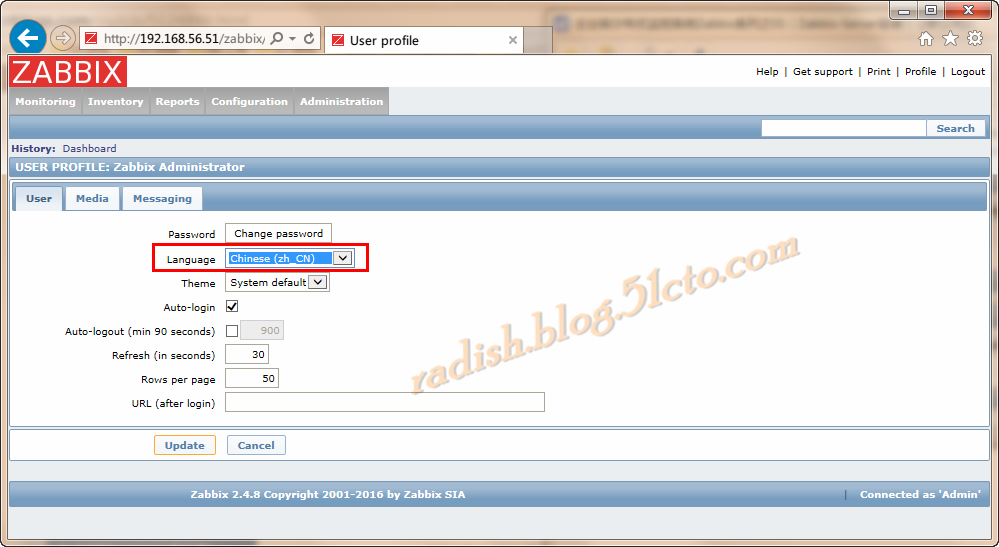
进入界面后,如果想要使用中文,可以点击进入Profile
本文出自 “菜鸟东” 博客,请务必保留此出处http://radish.blog.51cto.com/5944322/1875709
以上是关于CentOS7 企业级分布式监控系统Zabbix(01)的主要内容,如果未能解决你的问题,请参考以下文章

