Spring Boot入门===Hello World
Posted
tags:
篇首语:本文由小常识网(cha138.com)小编为大家整理,主要介绍了Spring Boot入门===Hello World相关的知识,希望对你有一定的参考价值。
昨天无意间看到Spring Boot ,今天又了解了一下,试着写一个Hello World! 今天看了半天,最后还是要用Maven最方便!以下:
一、工具
JDK1.7
Eclipse
Maven
这里Eclipse集成Maven的这一步就省了!
二、编码
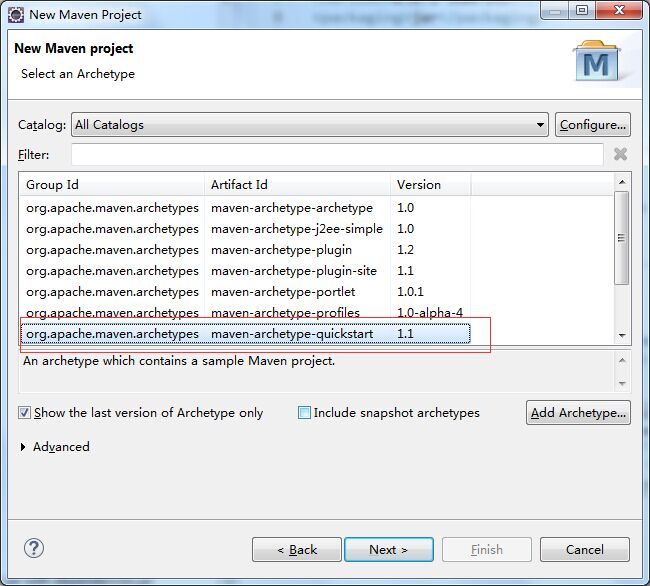
新建Maven Project 命名为:SpringBoot 选项如图

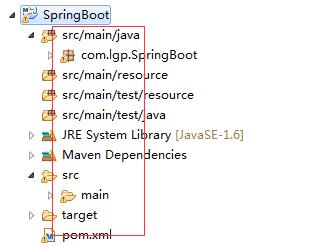
2、修改工程目录,添加源文件夹后目录如下:

3、修改pom.xml文件如下:

<project xmlns="http://maven.apache.org/POM/4.0.0" xmlns:xsi="http://www.w3.org/2001/XMLSchema-instance"
    xsi:schemaLocation="http://maven.apache.org/POM/4.0.0 http://maven.apache.org/xsd/maven-4.0.0.xsd">
    <modelVersion>4.0.0</modelVersion>

  <groupId>com.lgp</groupId>
  <artifactId>SpringBoot</artifactId>
  <version>0.0.1-SNAPSHOT</version>
  <packaging>jar</packaging>

  <name>SpringBoot</name>
  <url>http://maven.apache.org</url>

  <properties>
    <project.build.sourceEncoding>UTF-8</project.build.sourceEncoding>
  </properties>

     <!-- Inherit defaults from Spring Boot -->
    <parent>
        <groupId>org.springframework.boot</groupId>
        <artifactId>spring-boot-starter-parent</artifactId>
        <version>1.4.0.BUILD-SNAPSHOT</version>
    </parent>

    <!-- Add typical dependencies for a web application -->
    <dependencies>
        <dependency>
            <groupId>org.springframework.boot</groupId>
            <artifactId>spring-boot-starter-web</artifactId>
        </dependency>
          <dependency>
          <groupId>junit</groupId>
          <artifactId>junit</artifactId>
          <version>3.8.1</version>
           <scope>test</scope>
        </dependency>
    </dependencies>

    <!-- Package as an executable jar -->
    <build>
        <plugins>
            <!-- <plugin>
                <groupId>org.springframework.boot</groupId>
                <artifactId>spring-boot-maven-plugin</artifactId>
            </plugin> -->

            <!-- Maven Assembly Plugin -->
            <plugin>
                <groupId>org.apache.maven.plugins</groupId>
                <artifactId>maven-assembly-plugin</artifactId>
                <version>2.4.1</version>
                <configuration>
                    <!-- get all project dependencies -->
                    <descriptorRefs>
                        <descriptorRef>jar-with-dependencies</descriptorRef>
                    </descriptorRefs>
                    <!-- MainClass in mainfest make a executable jar -->
                    <archive>
                      <manifest>
                        <mainClass>com.lgp.SpringBoot.App</mainClass>
                      </manifest>
                    </archive>

                </configuration>
                <executions>
                  <execution>
                    <id>make-assembly</id>
                     <!-- bind to the packaging phase -->
                    <phase>package</phase>
                    <goals>
                        <goal>single</goal>
                    </goals>
                  </execution>
                </executions>
            </plugin>

        </plugins>
    </build>


    <!-- Add Spring repositories -->
    <!-- (you don‘t need this if you are using a .RELEASE version) -->
    <repositories>
        <repository>
            <id>spring-snapshots</id>
            <url>http://repo.spring.io/snapshot</url>
            <snapshots><enabled>true</enabled></snapshots>
        </repository>
        <repository>
            <id>spring-milestones</id>
            <url>http://repo.spring.io/milestone</url>
        </repository>
    </repositories>
    <pluginRepositories>
        <pluginRepository>
            <id>spring-snapshots</id>
            <url>http://repo.spring.io/snapshot</url>
        </pluginRepository>
        <pluginRepository>
            <id>spring-milestones</id>
            <url>http://repo.spring.io/milestone</url>
        </pluginRepository>
    </pluginRepositories>
</project>
4、编辑JAVA代码新建APP.class

package com.lgp.SpringBoot;

import org.springframework.boot.SpringApplication;
import org.springframework.boot.autoconfigure.EnableAutoConfiguration;
import org.springframework.web.bind.annotation.RequestMapping;
import org.springframework.web.bind.annotation.RestController;

@RestController
@EnableAutoConfiguration
public class App
{
      @RequestMapping("/h")
      public String home() {
        return "Hello";
      }

      @RequestMapping("/w")
      public String word() {
        return "World";
      }

    public static void main( String[] args )
    {
        System.out.println( "Hello World ! App!" );
        SpringApplication.run(App.class, args);
        //SpringApplication.run(UserController.class, args);
    }
}
运行此代码 服务端口默认8080 访问localhost:8080/h 展示Hello
localhost:8080/w 展示World
OK!!!!!!!!!!!!!!!!!!!!!!!!!!!!!
---------------风格线---------------------
新建RestController风格的Controller
新建UserController

package com.lgp.SpringBoot;

import org.springframework.context.annotation.ComponentScan;
import org.springframework.context.annotation.Configuration;
import org.springframework.web.bind.annotation.PathVariable;
import org.springframework.web.bind.annotation.RequestMapping;
import org.springframework.web.bind.annotation.RestController;

@ComponentScan
@Configuration
@RestController
@RequestMapping("/user")
public class UserController {

    @RequestMapping("/{id}")
    public User getUser(@PathVariable String id){
        User user  = new User();
        user.setId(id);
        user.setUsername("id==="+Math.random());
        return user;
    }


    private class User{

        private  String id;
        private  String username;

        public String getId() {
            return id;
        }
        public void setId(String id) {
            this.id = id;
        }
        public String getUsername() {
            return username;
        }
        public void setUsername(String username) {
            this.username = username;
        }
    }
}
需修改App.java

package com.lgp.SpringBoot;

import org.springframework.boot.SpringApplication;
import org.springframework.boot.autoconfigure.EnableAutoConfiguration;
import org.springframework.web.bind.annotation.RequestMapping;
import org.springframework.web.bind.annotation.RestController;

@RestController
@EnableAutoConfiguration
public class App
{
      @RequestMapping("/h")
      public String home() {
        return "Hello";
      }

      @RequestMapping("/w")
      public String word() {
        return "World";
      }

    public static void main( String[] args )
    {
        System.out.println( "Hello World ! App!" );
        //SpringApplication.run(App.class, args);
        SpringApplication.run(UserController.class, args);
    }
}
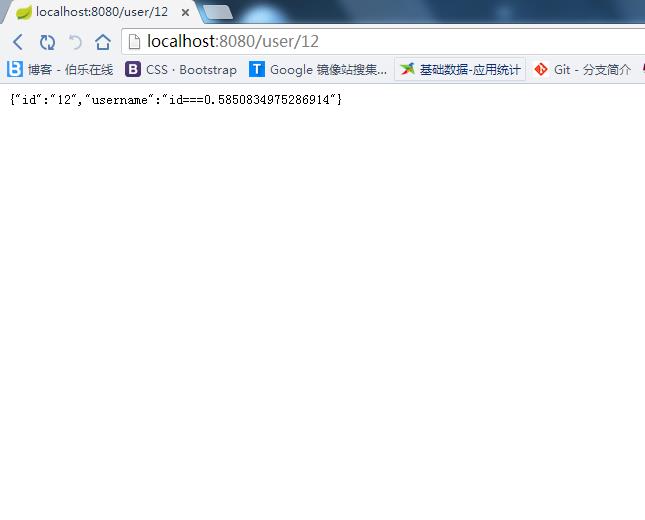
运行App.java 访问 http://localhost:8080/user/12

新建其他Controller
package com.lgp.SpringBoot;

import org.springframework.context.annotation.ComponentScan;
import org.springframework.context.annotation.Configuration;
import org.springframework.web.bind.annotation.RequestMapping;
import org.springframework.web.bind.annotation.RestController;

@ComponentScan
@Configuration
@RestController
@RequestMapping("/file")
public class FileController {

    @RequestMapping("/name")
    public String getFileName(){

        return "filename.....";
    }

}
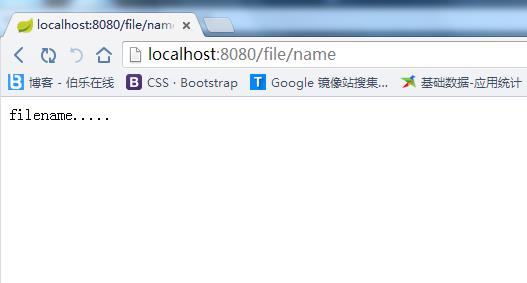
重启程序 访问http://localhost:8080/file/name

======================================================
以上是关于Spring Boot入门===Hello World的主要内容,如果未能解决你的问题,请参考以下文章
