漫谈HTTP(下)
Posted
tags:
篇首语:本文由小常识网(cha138.com)小编为大家整理,主要介绍了漫谈HTTP(下)相关的知识,希望对你有一定的参考价值。
http简介:
httpd是由apache软件基金会开发的一款著名的web服务器软件。由于其开放源代码,并且拥有跨平台、功能强大、安全稳定等特性,而被广泛使用。早期httpd是在修修补补的基础上成长起来的,所以早期也叫作a pachey server,由于开发httpd的组织叫作apache,因此httpd也被称作apache。httpd有三个长线维护版本,分别是httpd2.0、httpd2.2和httpd2.4。使用最为广泛的还是2.2和2.4的版本,虽然两个版本看起来数字相差不大,但是这两个版本改变还是挺大。
httpd支持许多特性,大部分特性都是通过编译模块实现,因此httpd是以核心加模块组成的方式工作。httpd的模块分两种,一种叫作动态可装载模块(DSO),另一种叫作多道处理模块(MPM)。DSO动态可装模块每个模块对应httpd的某项功能,也就是我们广泛意义上理解的功能模块。但是,MPM多道处理模块和DSO不一样,它并不是指一种模块,它代表的是httpd的一种工作特性,常用的MPM有,prefork、worker、event。
多道处理模块(MPM)
httpd2.X 支持插入式并行处理模块,称为多路处理模块(MPM)。在编译apache时必须选择也只能选择一个MPM,对类UNIX系统,有几个不同的MPM可供选择,它们会影响到apache的速度和可伸缩性。
prefork:进程模型,两级结构,master/worker, 每worker处理一个请求;
# 多进程模型,每个进程响应一个请求;一个主进程负责生成n个子进程,子进程也为工作进程,每个子进程处理一个用户请求,即没有用户请求,也会预先生成多个空闲进程,随时等待请求到达;最大不会超过1024个
worker:线程模型,三级结构,master/worker/thread,每thread处理一个请求;
#多线程模型,每个线程响应一个请求,一个主进程生成多个子进程,每个子进程负责生成多个线程,每个线程响应一个请求;如果有m个进程,每个进程有n个线程,则可处理请求个数为:m*n
event:事件驱动的线程模型,两级结构,master/worker,每worker响应多个请求;
#事件驱动模型,每个线程响应n个请求;一个主进程:生成m个子进程,每个进程直接n个请求;m*n
prefork(默认) | worker | event | |
工作特性 | 一个进程响应一个请求 | 一个进程产生多个线程,一个线程响应一个请求 | 一个进程产生多个线程,一个线程响应多个请求 |
| 版本支持 | httpd2.2、httpd2.4 | httpd2.2、httpd2.4 | httpd2.4 |
注:(在httpd-2.2版本中event为测试使用,在httpd-2.4当中event可生产使用。)
在httpd2.2中修改/etc/sysconfig/httpd配置文件可以改变当前服务器所使用的模块。在编译
安装httpd2.4时,构建MPM模块,通常有两种选择,一种是把MPM编译成静态模块,还有一种是把MPM编译成动态模块。如果把MPM编译成了静态模块,那么要改变MPM,只能通过重新编译安装HTTPD修改。
如果在编译安装httpd时,把MPM编译成了动态模块,那么改变MPM,可以在/etc/httpd/httpd.conf配置文件中编辑LoadModule指令选择不同的MPM重新载入即可
在httpd2.4中MPM模块的配置文件为/etc/httpd/extra/httpd-mpm.conf。
httpd2.2只支持prefork和worker模块,所以在其配置文件/etc/httpd/conf/httpd.conf中,我们可以看到以下两项
<IFModule></IFModule>这个标签表示的是,如果加载了指定的那个模块,则标签内定义的参数生效。
httpd2.2中prefork和worker各参数说明如下:
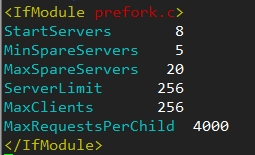
<IfModule prefork.c>  如果prefork.c模块存在,则定义在标签内的参数有效
    StartServers:     服务开启时默认启动的工作进程数,不包括主进程
    MinSpareServers:  最少空闲进程数;
    MaxSpareServers:  最大空闲进程数;
    ServerLimit:      最大活动进程数;
    MaxClients:       并发请求的最大数,一条进程最多能处理多少个请求
    MaxRequestsPerClient: 每个子进程在生命周期内所能够服务的最多请求个数
</IfModule>
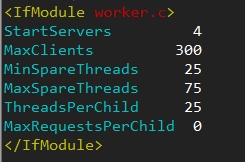
<IfModule worker.c>  如果worker.c模块存在,则定义在标签内的参数有效
    StartServers:   服务器开启时,启动的子进程的个数
    MaxClients:      并发请求的最大数;
    MinSpareThreads:最小空闲线程数;
    MaxSpareThreads:最大空闲线程数;
    ThreadsPerChild:每个子进程可生成的线程数;
    MaxRequestsPerChild:每个子进程在生命周期内所能够服务的最多请求个数,0表示不限定;
</IfModule>
httpd2.4中event参数说明如下:
<IfModule mpm_event_module>
    StartServers             默认进程数
    MinSpareThreads          最小空闲线程数
    MaxSpareThreads          最大空闲线程数
    ThreadsPerChild          每个子进程可以生成的线程数
    MaxRequestWorkers        最大线程数量
    MaxConnectionsPerChild   子进程的最大连接数,当达到设置值以后,APACHE就会结束当前的子进程
</IfModule>
httpd的MPM模块通常用来应对各种生产环境的情况,在生产环境中web服务器的访问量并不是一成不变的,所以有的时候我们可能需要修改相关参数来应对各种访问量,熟悉各个模块的特性及参数配置是很有必要的!
LAMP基础应用:
lamp即为:
Linux+Apache+mysql/MariaDB+Perl/php/Python一组常用来搭建动态网站或者服务器的开源软件,本身都是各自独立的程序,但是因为常被放在一起使用,拥有了越来越高的兼容度,共同组成了一个强大的Web应用程序平台。
这里我们介绍的lamp即为linux+apache+mysql+php:
httpd+php:
CGI
Module
prefork:libphp
worker, event:libphp-zts
FastCGI
php以fpm机制独立地监听在一个套接字上;
工作模式类似于httpd的prefork;
mysql简述:
MySQL:插件式存储引擎mysql和mariadb是一种关联数据库管理系统,关联数据库将数据保存在不同的表中,而不是将所有数据放在一个大仓库内,这样就增加了速度并提高了灵活性。(在centos7开始使用mariadb)
MySQL is a multi-user, multi-threaded SQL database server.
C/S:
Server: mysqld, mysqld_safe, mysqld_multi
Client:mysql
MySQL:
Community Edtion
Enterprise Edtion
CentOS 6: mysql-server, mysql
额外添加的配置项:
    [mysqld]
    ...
    skip_name_resolve = ON  #禁止域名解析
    innodb_file_per_table=ON #修改InnoDB为独立表空间模式
MariaDB:
CentOS 7: mariadb-server, mariadb
配置文件:/etc/my.cnf, /etc/my.cnf.d/*.cnf
额外添加的配置项:
[mysql]
skip_name_resolve = ON
innodb_file_per_table = ON
默认的管理员用户为:root,密码为空;首次安装后建议使用mysql_secure_installation命令进行安全设定;
客户端连接mysql server:
mysql --> mysql protocol --> mysql server
mysql [options] db_name
options:
-hHOST
-uUSERNAME
-pPASSWORD
mysql的用户账号:
username:用户名
host:此用户可通过哪些客户端主机登录当前服务器上的mysql服务;主机名和IP地址属性于不同的主机;
可使用通配符:
_:任意单个字符;
%:任意长度以的任意字符;
[email protected]‘10.1.%.%‘
mysql> 可接受输入mysql命令,分两类
客户端命令:
help可获取命令列表
服务端命令:SQL语句,必须使用语句结束符,默认为分号;
DDL:CREATE, ALTER, DROP
DML:INSERT, DELETE, UPDATE, SELECT
授权命令:
GRANT ALL [PRIVILEGES] ON db.tbl TO ‘username‘@‘host‘ IDENTIFIED BY ‘password‘;
db:数据库的名字,可以使用*通配;
tbl:表的名称,可以使用*通配;
mydb.*, *.*, mydb.tbl1
FLUSH PRIVILEGES
快速部署lamp环境:
CentOS 7:
# yum install mariadb-server httpd php php-mysql
# systemctl start httpd.service mariadb.service
CentOS 6:
# yum install httpd php php-mysql mysql-server
# service httpd start
# service mysqld start
php应用程序:
开源代表:wordpress, discuzX, phpwind, drupal...
LAMP搭建示例;
CentOS7环境
第一步:
# yum -y install httpd php php-mysql mariadb-server
第二步:安装完成后,各项相关配置
MySQL额外添加的配置项:
[mysqld]
...
skip_name_resolve = ON
innodb_file_per_table=ON
[[email protected] ~]# systemctl start mariadb.service
[[email protected] ~]# ss -tnl
State       Recv-Q Send-Q Local Address:Port               Peer Address:Port
LISTEN      0      50        *:3306                   *:*
默认的管理员用户为:root,密码为空;首次安装后建议使用mysql_secure_installation命令进行安全设定;
[[email protected] ~]# mysql_secure_installation
①给管理员添加密码:
Set root password? [Y/n] y
New password:
Re-enter new password:
Password updated successfully!
②删除匿名用户
Remove anonymous users? [Y/n] y
... Success!
③禁用管理员远程登录(出于安全考虑可以禁用,示例此处为不禁用)
Disallow root login remotely? [Y/n] n
... skipping.
④移除测试数据库(此处未移除)
Remove test database and access to it? [Y/n] n
... skipping.
⑤重载授权表
Reload privilege tables now? [Y/n] y
... Success!
使用命令“mysql -u用户名 -p密码”即可登录,
第三步:启动HTTP服务
# systemctl start httpd.service
第四步:
下载php安装包,并解压至/var/www/html目录下
为了方便使用,给目录创建一个软链接:
[[email protected] html]# ln -sv phpMyAdmin-4.0.5-all-languages/ pma
‘pma’ -> ‘phpMyAdmin-4.0.5-all-languages/’
[[email protected] pma]# cp config.sample.inc.php  config.inc.php
为php安装扩展文件,使其支持中文
[[email protected] pma]# yum -y install php-mbstring.x86_64 php-mcrypt.x86_64
第五步:重载HTTP服务:
[[email protected] pma]# systemctl reload httpd.service
这时就可以使用浏览器进行访问:
输入用户名,密码即可登录


第六步:进行压力测试:
可使用ab命令进行压测:
[[email protected] pma]# ab -c8 -n 100 http://10.1.252.81/pma/index.php
第七步:安装PHP加速器:xcache
[[email protected] pma]# yum install php-xcache.x86_64 -y
xcache配置文件:
/etc/php.d/xcache.ini
[xcache.admin] 管理xcache
xcache.size = 60M xcache的大小
xcache.count = 1 xcache可以使用cpu核心数
xcache.slots = 8K
xcache.ttl = 0 缓存清理时间
xcache.gc_interval = 0
xcache.var_size = 4M
xcache.var_count = 1
xcache.var_slots = 8K
xcache.var_ttl = 0
xcache.var_maxttl = 0
xcache.var_gc_interval = 300
修改配置文件后,要是配置生效,需重新加载
[[email protected] pma]# systemctl reload httpd.service
然后可以再次进行压测:
[[email protected] pma]# ab -c8 -n 100 http://10.1.252.81/pma/index.php
PHP配置文件:
配置文件:/etc/php.ini, /etc/php.d/*.ini
注释符;
;后跟一个空格表示可启用的选项,后跟多个空格表示纯注释信息
注意配置文件中date.timezone这项,需要更改,若不更改,很多情况下会出现报错
如:date.timezone = Asia/Shanghai
php.ini的核心配置选项:
http://php.net/manual/zh/ini.core.php
php.ini配置选项列表:
http://php.net/manual/zh/ini.list.php
php-fpm:FASTCGI进程管理器,与模块化机制工作特性不同,是一个独立的守护进程
注:php-fpm与模块化的php是相互冲突的,两者只能安装一个
安装方式:
# yum install php-fpm
主程序:/usr/sbin/php-fpm
Unit File:/usr/lib/systemd/system/php-fpm.service
配置文件:
ini类:配置php解释器工作环境;
/etc/php.ini, /etc/php.d/*.ini
conf类:配置fpm守护进程的工作模式;
/etc/php-fpm.conf, /etc/php-fpm.d/*.conf
配置:
[global]
[pool-id]
listen = 127.0.0.1:9000
listen.backlog = -1 队列长度
listen.allowed_clients = 127.0.0.1
user = apache 运行子进程的用户名
group = apache
pm = dynamic 进程管理器
定义process管理机制:static, dynamic
static:服务启动时创建出所有子进程;
dynamic:根据用户请求量的变化来维护子进程数量;
pm.max_children = 50 最大子进程数量
pm.start_servers = 5 启动时启动的进程
pm.min_spare_servers = 5 最少空闲子进程
pm.max_spare_servers = 35 最大空闲子进程
pm.max_requests = 500 最大请求数
pm.status_path = /fpm-status URL
rlimit_files = 1024
rlimit_core = 0
编辑配置文件
[[email protected] ~]# vim /etc/php-fpm.d/www.conf
ping.path = /ping
pm.status_path = /pm-status
[[email protected] ~]# vim /etc/httpd/conf.d/vhost.conf
1 <Virtualhost *:80>
2     ServerName www.magedu.com
3     DocumentRoot "/vhosts/www"
4     <Directory "/vhosts/www">
5         Options None
6         AllowOverride None
7         Require all granted
8     </Directory>
9 #  关闭正向代理
ProxyRequests Off
10 # 配置反向代理
ProxyPassMatch  ^/(.*\.php)$ fcgi://127.0.0.1:9000/vhosts/www/$1
或ProxyPass  /phpinfo.php  fcgi://127.0.0.1:9000/vhosts/www/phpinfo.php
11     ProxyPassMatch ^/(pm-status|ping)$ fcgi://127.0.0.1:9000/$1
12     DirectoryIndex index.php index.html
13 </Virtualhost>
# mkdir -pv /vhosts/www
#  vim /vhosts/www/phpinfo.php
1 <?php
2     phpinfo();
3 ?>
fpm配置:
fpm配置虚拟主机反代配置示例1:
<VirtualHost *:80>
    ServerName www.zh.com
    DocumentRoot "/vhosts/www"
    <Directory "/vhosts/www">
        Options None
        AllowOverride None
        Require all granted
    </Directory>
    ProxyRequests Off
    ProxyPassMatch ^/(.*\.php)$ fcgi://127.0.0.1:9000/vhosts/www/$1
    DirectoryIndex index.php index.html
</VirtualHost>
fpm配置虚拟主机反代配置示例2:
<VirtualHost *:80>
    ServerName www.zh.com
    DocumentRoot "/vhosts/www"
    <Directory "/vhosts/www">
        Options None
        AllowOverride None
        Require all granted
    </Directory>
    ProxyRequests Off
    ProxyPassMatch ^/(.*\.php)$ fcgi://127.0.0.1:9000/vhosts/www/$1
    ProxyPassMatch ^/(pm-status|ping)$ fcgi://127.0.0.1:9000/$1
    DirectoryIndex index.php index.html
</VirtualHost>
http://WEB_SERVER:PORT/pm-status

pool: www # 连接池名称
process manager: dynamic # 进程管理器类型
start time: 26/Sep/2016:15:10:26 +0800 # 启动时间
start since: 7437 # 运行时长
accepted conn: 6 # 连接池已经处理过的总请求数
listen queue: 0 # 队列的长度
max listen queue: 0 # 请求队列的最大长度
listen queue len: 128 # socket等待队列的最大长度;
idle processes: 4 # 空闲的进程数;
active processes: 1 # 活跃的进程数量;
total processes: 5 # 总进程数;
max active processes: 1 # 连接池当中过去最大活跃进程度;
max children reached: 0 # 进程数量达到连接池上限的次数;
slow requests: 0 # 慢请求的数量;
其它格式的输出:
/pm-status?json
/pm-status?xml
/pm-status?html
/pm-status?full
full格式的输出:

pid: 33095
state: Idle # 当前进程的状态,idle, running, ...
start time: 26/Sep/2016:15:10:26 +0800 # 进程启动的日期时间
start since: 7968 # 运行时长
requests: 2 # 处理过的请求数量
request duration: 112 # 请求处理过程的时长
request method: GET # 请求方法
request URI: /pm-status?html # 请求的URL
content length: 0 # 请求内容的长度,POST方法才有意义
user: - # 用户
script: - # php脚本;
last request cpu: 0.00 # 最近一次请求消耗CPU
last request memory: 262144 # 最近一次请求消耗的内存量
注意:
httpd-2.2默认没有自带fcgi模块;php-5.3.3-默认不支持fpm,需要打补丁方可;
CentOS 6.X:
# yum install httpd mod_proxy_fcgi php-fpm php-mysql mysqld-server
编译安装amp:
(1) 系统环境:CentOS 6, 7
CentOS 6:apr, apr-util的版本为1.3.9,不适用于httpd-2.4;
CentOS 7:apr, apr-util的版本为1.4+,
(2) 开发环境:
Development Tools, Server Platform Development
(3) 各程序版本
httpd: 2.2, 2.4
php:5.3.x 5.4.x, 5.6.x
mysql:5.1, 5.5, 5.6, 5.7, 5.8, 8.0
mariadb:5.x, 10.x
(4) httpd+php
php的编译选项:
Modules:--with-apxs
httpd MPM:
prefork:
worker, event:专用选项--enable-maintainer-zts
ftm:--enable-fpm
CentOS 7:httpd-2.4, mariadb, php-5.4
安装次序:httpd, mariadb, php
安装MariaDB:
预制的包管理器格式的程序包:
rpm包:
os vendor:mariadb-devel
MariaDB官方
通用二进制格式的程序包:
源码包编译:项目构建工具为cmake, 而非流行的make;
通用二进制格式包的安装配置步骤:
# useradd -r mysql
# tar xf mariadb-VERSION-linux-x86_64.tar.gz -C /usr/local/
# cd /usr/local/
# ln -sv mariadb-VERSION-linux-x86_64 mysql
# cd mysql
# chown -R root:mysql ./*
# mkdir -pv /mydata/data
# chown -R mysql.mysql /mydata/data
#./ scripts/mysql_install_db  --user=mysql  --datadir=/mydata/data --skip_name_resolve
# cp support-files/my-large.cnf  /etc/my.cnf
[mysqld]
.......
datadir = /mydata/data
skip_name_resolve = ON
innodb_file_per_table = ON
# cp support-files/mysql.server  /etc/rc.d/init.d/mysqld
# chkconfig --add mysqld
编译安装:httpd-2.4:
~]# yum install pcre-devel openssl-devel libevent-devel apr-devel apr-util-devel -y
# ./configure --prefix=/usr/local/apache2 --sysconfdir=/etc/httpd --enable-so --enable-ssl --enable-cgi --enable-rewrite --enable-modules=most --enable-mpms-shared=all --with-mpm=prefork --with-pcre --with-zlib --with-apr=/usr --with-apr-util=/usr
# make
# make install
# echo ‘export PATH=/usr/local/apache2/bin:$PATH‘ > /etc/profile.d/httpd.sh
# . /etc/profile.d/httpd.sh
# apachectl start
安装php5:
(1) 作为httpd的模块安装:
# ./configure --prefix=/usr/local/php5 --with-mysql=/usr/local/mysql --with-mysqli=/usr/local/mysql/bin/mysql_config --with-openssl --enable-mbstring --enable-xml --enable-sockets --with-freetype-dir --with-gd --with-libxml-dir=/usr --with-zlib --with-jpeg-dir --with-png-dir --with-mcrypt --with-apxs2=/usr/local/apache2/bin/apxs --with-config-file-path=/etc/php.ini --with-config-file-scan-dir=/etc/php.d/
# make -j # && make install
注意:如果mpm为线程模型,则需要额外使用--enable-maintainer-zts
(2) 安装为fpm:
# ./configure --prefix=/usr/local/php5 --with-mysql=/usr/local/mysql --with-mysqli=/usr/local/mysql/bin/mysql_config --with-openssl --enable-mbstring --enable-xml --enable-sockets --with-freetype-dir --with-gd --with-libxml-dir=/usr --with-zlib --with-jpeg-dir --with-png-dir --with-mcrypt --enable-fpm --with-config-file-path=/etc/php.ini --with-config-file-scan-dir=/etc/php.d/
# make -j # && make install
复制配置文件:
cp php.ini-production /etc/php.ini
编译php为httpd的模块后,整合php至httpd:
编译httpd.conf,添加:
DirectoryIndex index.php index.html
AddType application/x-httpd-php .php
本文出自 “I'm Groot” 博客,请务必保留此出处http://groot.blog.51cto.com/11448219/1874759
以上是关于漫谈HTTP(下)的主要内容,如果未能解决你的问题,请参考以下文章