第十一周作业
Posted
tags:
篇首语:本文由小常识网(cha138.com)小编为大家整理,主要介绍了第十一周作业相关的知识,希望对你有一定的参考价值。
源码编译安装LNMP架构环境;
]# yum groupinstall  Development tools       # 安装开发环境
]# yum install pcre-devel
]# yum install openssl-devel
~]# groupadd -r nginx#添加用户和组
~]# useradd -r -g nginx nginx
]# tar zvxf nginx-1.10.1.tar.gz #解压
~]# cd nginx-1.10.1
]# ./configure \#配置
  --prefix=/usr/local/nginx   --sbin-path=/usr/local/nginx/sbin/nginx   --conf-path=/etc/nginx/nginx.conf   --error-log-path=/var/log/nginx/error.log   --http-log-path=/var/log/nginx/access.log   --pid-path=/var/run/nginx/nginx.pid    --lock-path=/var/lock/nginx.lock   --user=nginx   --group=nginx   --with-http_ssl_module   --with-http_flv_module   --with-http_stub_status_module   --with-http_gzip_static_module   --http-client-body-temp-path=/var/tmp/nginx/client/   --http-proxy-temp-path=/var/tmp/nginx/proxy/   --http-fastcgi-temp-path=/var/tmp/nginx/fcgi/   --http-uwsgi-temp-path=/var/tmp/nginx/uwsgi   --http-scgi-temp-path=/var/tmp/nginx/scgi   --with-pcre
]# make && make install#编译和安装
]# setenforce 0#关闭selinux和iptables
]# vim /etc/sysconfig/selinux
SELINUX=disabled
]# service iptables stop
]# chkconfig iptables off
]# /usr/local/nginx/sbin/nginx #启动nginx
~]# vim /etc/init.d/nginx#编写启动脚本
#!/bin/bash
#
# chkconfig - 85 15
start(){
/usr/local/nginx/sbin/nginx
}
stop(){
/usr/local/nginx/sbin/nginx -s stop
}
reload(){
/usr/local/nginx/sbin/nginx -s reload
}
restart(){
/usr/local/nginx/sbin/nginx -s reopen
}


case $1 in
start)
        start;;
stop)
        stop;;
reload)
        reload;;
restart)
        restart;;
*)
esac
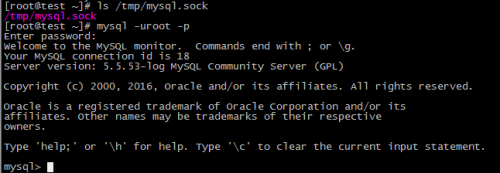
安装mysql
# tar xf mysql-5.5.28-linux2.6-i686.tar.gz -C /usr/local
# cd /usr/local/
# ln -sv mysql-5.5.24-linux2.6-i686  mysql#此步骤不可省略
# cd mysql

# chown -R mysql:mysql  .
# scripts/mysql_install_db --user=mysql --datadir=/data#初始化
# chown -R root  .

为mysql提供主配置文件:

# cd /usr/local/mysql
# cp support-files/my-large.cnf  /etc/my.cnf

并修改此文件中thread_concurrency的值为你的CPU个数乘以2,比如这里使用如下行:
thread_concurrency = 2
另外还需要添加如下行指定mysql数据文件的存放位置:
datadir = /data
保存退出
# /usr/local/mysql/bin/mysql_secure_installation    ##安全初始化脚本
# echo "export PATH=$PATH:/usr/local/mysql-5.5.53-linux2.6-x86_64//bin/" >> /root/.bash_profile ##把mysql管理命令加环境变量中安装php: # Yum groupinstall Desktop Platform Development #安装依赖包 # yum install libmcrypt # yum install libmcrypt-devel # yum install mhash # yum install mhash-devel # yum install mcrypt #yum install libxml2 #yum install libcurl-devel #yum install libcurl #yum install libxml2-devel # tar zxvf php-5.6.28.tar.gz#解压 #cd php-5.6.28 # ./configure --prefix=/usr/local/php --with-mysql=/usr/local/mysql --with-openssl --enable-fpm --enable-sockets --enable-sysvshm --with-mysqli=/usr/local/mysql/bin/mysql_config --enable-mbstring --with-freetype-dir --with-jpeg-dir --with-png-dir --with-zlib-dir --with-libxml-dir=/usr --enable-xml --with-mhash --with-mcrypt --with-config-file-path=/etc --with-config-file-scan-dir=/etc/php.d --with-bz2 --with-curl #配置 # make#编译和安装 过程很慢 # make test # make intall ]# cp php.ini-production /etc/php.ini#复制php配置文件 ]# cp sapi/fpm/init.d.php-fpm /etc/init.d/php-fpm#复制启动脚本 ]# chmod +x /etc/init.d/php-fpm # chkconfig --add php-fpm # chkconfig php-fpm on ]# cp /usr/local/php/etc/php-fpm.conf.default /usr/local/php/etc/php-fpm.conf #生成配置文件 编辑php-fpm的配置文件: # vim /usr/local/php/etc/php-fpm.conf 配置fpm的相关选项为你所需要的值,并启用pid文件(如下最后一行): pm.max_children = 150 pm.start_servers = 8 pm.min_spare_servers = 5 pm.max_spare_servers = 10 pid = /usr/local/php/var/run/php-fpm.pid ]# service php-fpm start
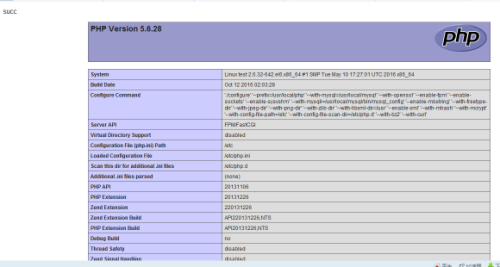
#vim /usr/local/nginx/html/index.php#生成测试网页
<?php
$conn = mysql_connect(‘127.0.0.1’,’root’,’123..com’);
If ( $conn)
echo succ;
else
echo fail;
mysql_close();
phpinfo();
?>
# vim /etc/nginx/nginx.conf,#修改nginx配置文件
location / {
            root   html;
            index  index.php index.html index.htm;    ###增加index.php
        }
并启用如下选项:
location ~ \.php$ {
            root           html;
            fastcgi_pass   127.0.0.1:9000;
            fastcgi_index  index.php;
            fastcgi_param  SCRIPT_FILENAME  /scripts$fastcgi_script_name;
            include        fastcgi_params;
        }
# vim /etc/nginx/fastcgi_params,将其内容更改为如下内容:
fastcgi_param  GATEWAY_INTERFACE  CGI/1.1;
fastcgi_param  SERVER_SOFTWARE    nginx;
fastcgi_param  QUERY_STRING       $query_string;
fastcgi_param  REQUEST_METHOD     $request_method;
fastcgi_param  CONTENT_TYPE       $content_type;
fastcgi_param  CONTENT_LENGTH     $content_length;
fastcgi_param  SCRIPT_FILENAME    $document_root$fastcgi_script_name;
fastcgi_param  SCRIPT_NAME        $fastcgi_script_name;
fastcgi_param  REQUEST_URI        $request_uri;
fastcgi_param  DOCUMENT_URI       $document_uri;
fastcgi_param  DOCUMENT_ROOT      $document_root;
fastcgi_param  SERVER_PROTOCOL    $server_protocol;
fastcgi_param  REMOTE_ADDR        $remote_addr;
fastcgi_param  REMOTE_PORT        $remote_port;
fastcgi_param  SERVER_ADDR        $server_addr;
fastcgi_param  SERVER_PORT        $server_port;
fastcgi_param  SERVER_NAME        $server_name;
]# service nginx reload
# service php-fpm restart
##### 我实验时候启动php-fpm时报错,好几个模块在对应目录下找不到,后来发现/etc/php.d/下有好几个模块的.ini文件,把他们删除报错即可消除。
##### 还有测试网页注意:’ 单引号的中英文区分。
结合图形描述LVS的工作原理;
LVS (Linux Virtual Server)是一种集群(Cluster)技术,采用IP负载均衡技术和基于内容请求分发技术。调度器具有很好的吞吐率,将请求均衡地转移到不同的服务器上执行,且调度器自动屏蔽掉服务器的故障,从而将一组服务器构成一个高性能的、高可用的虚拟服务器。整个服务器集群的结构对客户是透明的,而且无需修改客户端和服务器端的程序。
为此,在设计时需要考虑系统的透明性、可伸缩性、高可用性和易管理性。一般来说,LVS集群采用三层结构,其体系结构如图所示:
LVS主要的组成部分为负载调度器,它是整个集群对外面的前端机,负责将客户的请求发送到一组服务器上执行,而客户认为服务是来自一个IP地址上的;服务器池,是一组真正执行客户请求的服务器,执行的服务一般有WEB、MAIL、FTP和DNS等;共享存储,它为服务器池提供一个共享的存储区,这样很容易使得服务器池拥有相同的内容,提供相同的服务。
LVS负载均衡分为三种方式,分别是NAT、TUN、DR。下面我分别进行介绍:
1、NAT是一种最简单的方式,所有的RealServer只需要将自己的网关指向Director即可。客户端可以是任意操作系统,但此方式下,一个Director能够带动的RealServer比较有限。在VS/NAT的方式下,Director也可以兼为一台RealServer。VS/NAT的体系结构如下图所示:
2、IP隧道(IP tunneling)是将一个IP报文封装在另一个IP报文的技术,这可以使得目标为一个IP地址的数据报文能被封装和转发到另一个IP地址。IP隧道技术亦称为IP封装技术(IP encapsulation)。IP隧道主要用于移动主机和虚拟私有网络(Virtual Private Network),在其中隧道都是静态建立的,隧道一端有一个IP地址,另一端也有唯一的IP地址。它的连接调度和管理与VS/NAT中的一样,只是它的报文转发方法不同。调度器根据各个服务器的负载情况,动态地选择一台服务器,将请求报文封装在另一个IP报文中,再将封装后的IP报文转发给选出的服务器;服务器收到报文后,先将报文解封获得原来目标地址为 VIP 的报文,服务器发现VIP地址被配置在本地的IP隧道设备上,所以就处理这个请求,然后根据路由表将响应报文直接返回给客户,如下图所示:
3、DR方式是通过改写请求报文中的MAC地址部分来实现的。Director和RealServer必需在物理上有一个网卡通过不间断的局域网相连。 RealServer上绑定的VIP配置在各自Non-ARP的网络设备上(如lo或tunl),Director的VIP地址对外可见,而RealServer的VIP对外是不可见的。RealServer的地址即可以是内部地址,也可以是真实地址,如下图所示:
阐述varnish的功能及其应用场景,并通过实际的应用案例来描述配置、测试、调试过程
[[email protected] ~]# cd /etc/varnish/
[[email protected] varnish]# cp default.vcl default.vcl.bak
[[email protected] varnish]# vim default.vcl
######定义ACL
acl purgers {                    #定义acl,实现IP地址过滤
    "127.0.0.1";
    "172.16.0.0"/16;
}
######定义健康状态检测
probe dynamic {                  #设置动态网站服务器健康状态检测
    .url = "/index.html";
    .interval = 5s;
    .timeout = 1s;
    .expected_response = 200;
}            #这里设置了两个健康状态检测主要是为了区分动、静网站
probe static {                   #设置动态网站服务器健康状态检测
    .url = "/index.html";        #定义检测的页面
    .interval = 5s;              #探测请求的发送周期,默认为5秒
    .timeout = 1s;               #每次探测请求的过期时间
    .expected_response = 200;
}
######定义后端服务器
backend app1 {                  #定义一个后端服务器
    .host = "172.16.14.2";      #服务器地址
    .port = "80";               #服务器监听端口
    .probe = dynamic;           #健康状态检测
}
backend app2 {
    .host = "172.16.14.3";
    .port = "80";
    .probe = dynamic;
}
backend web {
    .host = "172.16.14.4";
    .port = "80";
    .probe = static;
}
######定义后端服务器组,实现负载均衡效果
director apps random {          #定义一个后端服务器组,实现负载均衡效果
    {
         .backend = app1;       #调用前面已定义过的后端主机
     .weight = 2;           #设置权重
    }
    {
     .backend = app2;
     .weight = 2;
    }
}
######定义vcl_recv函数,实现请求到达并成功接收后调用此函数中定义的规则
sub vcl_recv {
######定义动、静分离,以".php"或".php?后面跟所有文件"结尾的请求都发送到动态服务器,其他请求都发送到静态服务器
    if (req.url ~ "\.php(\?\.*|$)") {
    set req.backend = apps;
    } else {
    set req.backend = web;
    }
    return(lookup);
######定义允许清除缓存的IP地址,调用的是前面定义的ACL
    if (req.request == "PURGE") {
        if (!client.ip ~ purgers) {
        error 405 "Method not allowed";
    }
        return(lookup);
    }
######重新定义http请求首部,让后端服务器可以记录请求客户端的真实IP地址
        if (req.restarts == 0) {
            if (req.http.x-forwarded-for) {
               set req.http.X-Forwarded-For =
               req.http.X-Forwarded-For + ", " + client.ip;
            } else {
                 set req.http.X-Forwarded-For = client.ip;
            }
         }
######除了定义的请求方法外,其他请求都到后端服务器
    if (req.request != "GET" &&
        req.request != "HEAD" &&
        req.request != "PUT" &&
        req.request != "POST" &&
        req.request != "TRACE" &&
        req.request != "OPTIONS" &&
        req.request != "DELETE") {
        return (pipe);
    }
    if (req.request != "GET" && req.request != "HEAD") {
        return (pass);
    }
######定义不缓存认证与Cookie信息
    if (req.http.Authorization || req.http.Cookie) {
        return (pass);
    }
######定义压缩功能
    if (req.http.Accept-Enconding) {
       if (req.url ~ "\.(jpg|jpeg|gif|bmp|png|flv|gz|tgz|tbz|mp3)$") {
           remove req.http.Accept-Encoding;
       remove req.http.Cookie;
       } else if (req.http.Accept-Encoding ~ "gzip") {
       set req.http.Accept-Encoding = "gzip";
       } else if (req.http.Accept-Encoding ~ "deflate") {
       set req.http.Accept-Encoding = "deflate";
       } else { remove req.http.Accept-Encoding;
       }
    }
######定义指定格式结尾的文件去除Cookie信息
    if (req.request == "GET" && req.url ~ "\.(jpeg|jpg|gif|png|bmp|swf)$") {
    unset req.http.cookie;
    }
######定义防盗链设置
    if (req.http.referer ~ "http://.*") {
        if (!(req.http.referer ~ "http://.*\.baidu\.com" || req.http.referer ~"http://.*\.google\.com.*")) {
              set req.http.host = "www.allen.com";
          set req.url = "http://172.16.14.4/error.html";
    }
    }
}
######定义vcl_hash函数
sub vcl_hash {
    hash_data(req.url);
    if (req.http.host) {
        hash_data(req.http.host);
    } else {
        hash_data(server.ip);
    }
    return(hash);
}
######定义vcl_hit函数
sub vcl_hit {
    if (req.request == "PURGE") { #语法方法为"PURGE"
       purge;                     #清除缓存
       error 200 "Purged.";       #返回错误状态码为"200"
    }
    return(deliver);
}
######定义vcl_miss函数
sub vcl_miss {
    if (req.request == "PURGE") {
    purge;
    error 404 "Not In Cache.";
    }
    return(fetch);
}
######定义vcl_psss函数
sub vcl_pass {
    if (req.request == "PURGE") {
       error 502 "Purged On A Passed Object.";
    }
    return(pass);
}
######定义vcl_fetch函数
sub vcl_fetch {
######定义缓存,如果匹配到已定义文件结尾的缓存1天,其他则缓存1小时
    if (req.request == "GET" && req.url ~ "\.(html|jpg|png|bmp|jpeg|gif|js|ico|swf|css)$") {
       set beresp.ttl = 1d;
       set beresp.http.expires = beresp.ttl;
    } else {
       set beresp.ttl = 1h;
    }
    return(deliver);
}
######定义在http首部中,如果请求命中显示"HIT",未命中则显示"MISS"
sub vcl_deliver {
    if (obj.hits > 0) {
       set resp.http.X-Cache = "HIT";
    } else {
       set resp.http.X-Cache = "MISS";
    }
}
----------------------------------------------------------------------
[[email protected] ~]# service varnish restart    #重启服务生效,重启服务器后所有缓存将被清除,当然也可以不用重启服务使其生效,如下:
----------------------------------------------------------------------
[[email protected] ~]# varnishadm -S /etc/varnish/secret -T 127.0.0.1:6082
varnish> help                        #获取帮助
varnish> vcl.load acl_1 default.vcl  #加载acl文件,acl_1为配置名称
200
VCL compiled.
varnish> vcl.list                    #查看加载的acl文件列表
200
active          7 boot
available       0 acl_1
varnish> vcl.use acl_1               #应用acl文件
200
varnish> quit                        #退出
------------------------------------------------------------------------
注释:  -S:指定varnish的密钥文件  -T:指定varnish服务器地址及管理端口,默认端口为"6082"
搭建一套LVS-DR模型的高性能集群,并用Keepalived实现nginx与lvs的高可用集群,同时实现以下功能:
(1)、wordpress程序通过nfs共享给各个realserver;
(2)、后端realserver中的nginx和php分离
###安装LNMP上述方法即可,这里就不在重复了。这里说下nfs挂载的方法:
###两个real server 都要挂载。
]# yum install -y nfs-utils.x86_64 nfs-utils-lib.x86_64 \ nfs-utils-lib-devel.x86_64 # yum安装nfs程序
]# /etc/init.d/rpcbind start
]# /etc/init.d/nfs start
]# mkdir -pv /data/www
]# cat /etc/exports
/data/www   192.168.2.0/24(rw,no_root_squash)
# ll -d /data/www/
drwxrwxrwx 2 root root 4096 Aug 13 04:02 /data/www/.
# service nfs restart
]# showmount -e 192.168.2.214
### 下载wordpress到/date/www/下解压即可

###为两台keepalived主机编辑配置文件
为两台keepalived主机编辑配置文件
]# yum install keepalived -y ###安装keepalived
]# cp -a keepalived.conf{,.bak} ####先备份
]# vim keepalived.conf 编辑配置文件
###节点1配置如下
! Configuration File for keepalived

global_defs {
   notification_email {
     [email protected]
   }
   notification_email_from [email protected]
   smtp_server 172.0.0.1
   smtp_connect_timeout 30
   router_id node1
   vrrp_mcast_group4 224.0.100.19
}

vrrp_instance VI_1 {
    state MASTER
    interface eth0
    virtual_router_id 1
    priority 100
    advert_int 1
    authentication {
        auth_type PASS
        auth_pass cb77b8da
    }
    virtual_ipaddress {
        192.168.25.142/32 dev eth0 #此处写DR模型中的VIP地址
    }
    notify_master "/etc/keepalived/notify.sh master"
    notify_backup "/etc/keepalived/notify.sh backup"
    notify_fault "/etc/keepalived/notify.sh fault"
}

virtual_server 192.168.25.142 80 { #此处写DR模型中的VIP地址
    delay_loop 3
    lb_algo rr
    lb_kind DR
    protocol TCP

    real_server 192.168.25.140 80 {
        weight 1
        HTTP_GET {
            url {
              path /
              status_code 200
            }
            connect_timeout 1
            nb_get_retry 3
            delay_before_retry 1
        }
    }
    real_server 192.168.25.141 80 {
        weight 1
        HTTP_GET {
            url {
              path /
              status_code 200
            }
            connect_timeout 1
            nb_get_retry 3
            delay_before_retry 1
        }
    }
}
###节点2配置
! Configuration File for keepalived

global_defs {
   notification_email {
     [email protected]
   }
   notification_email_from [email protected]
   smtp_server 172.0.0.1
   smtp_connect_timeout 30
   router_id node2
   vrrp_mcast_group4 224.0.100.19
}

vrrp_instance VI_1 {
    state BACKUP
    interface eth0
    virtual_router_id 1
    priority 99
    advert_int 1
    authentication {
        auth_type PASS
        auth_pass cb77b8da
    }
    virtual_ipaddress {
        192.168.25.142/32 dev eth0
    }
    notify_master "/etc/keepalived/notify.sh master"
    notify_backup "/etc/keepalived/notify.sh backup"
    notify_fault "/etc/keepalived/notify.sh fault"
}

virtual_server 192.168.25.142 80 {
    delay_loop 3
    lb_algo rr
    lb_kind DR
    protocol TCP

    real_server 192.168.25.140 80 {
        weight 1
        HTTP_GET {
            url {
              path /
              status_code 200
            }
            connect_timeout 1
            nb_get_retry 3
            delay_before_retry 1
        }
    }
    real_server 192.168.25.141 80 {
        weight 1
        HTTP_GET {
            url {
              path /
              status_code 200
            }
            connect_timeout 1
            nb_get_retry 3
            delay_before_retry 1
        }
    }
}
##修改完配置文件重启服务
以上是关于第十一周作业的主要内容,如果未能解决你的问题,请参考以下文章


