Home界面的启动
Posted jltxgcy
tags:
篇首语:本文由小常识网(cha138.com)小编为大家整理,主要介绍了Home界面的启动相关的知识,希望对你有一定的参考价值。
继上篇文章Launcher进程的启动,我们继续分析Home界面的启动。
public final class ActivityThread {
	......

	public static final void main(String[] args) {
		SamplingProfilerIntegration.start();

		Process.setArgV0("<pre-initialized>");

		Looper.prepareMainLooper();
		if (sMainThreadHandler == null) {
			sMainThreadHandler = new Handler();
		}

		ActivityThread thread = new ActivityThread();
		thread.attach(false);

		if (false) {
			Looper.myLooper().setMessageLogging(new
				LogPrinter(Log.DEBUG, "ActivityThread"));
		}
		Looper.loop();

		if (Process.supportsProcesses()) {
			throw new RuntimeException("Main thread loop unexpectedly exited");
		}

		thread.detach();
		String name = (thread.mInitialApplication != null)
			? thread.mInitialApplication.getPackageName()
			: "<unknown>";
		Slog.i(TAG, "Main thread of " + name + " is now exiting");
	}

	......
}
private final void attach(boolean system) {
        sThreadLocal.set(this);
        mSystemThread = system;
        if (!system) {
            ......
            IActivityManager mgr = ActivityManagerNative.getDefault();
            try {
                mgr.attachApplication(mAppThread);
            } catch (RemoteException ex) {
            }
        } else {
            ......
        }
		......
}
static public IActivityManager getDefault()
{
if (gDefault != null) {
//if (Config.LOGV) Log.v(
// "ActivityManager", "returning cur default = " + gDefault);
return gDefault;
}
IBinder b = ServiceManager.getService("activity");
if (Config.LOGV) Log.v(
"ActivityManager", "default service binder = " + b);
gDefault = asInterface(b);
if (Config.LOGV) Log.v(
"ActivityManager", "default service = " + gDefault);
return gDefault;
} static public IActivityManager asInterface(IBinder obj)
{
if (obj == null) {
return null;
}
IActivityManager in =
(IActivityManager)obj.queryLocalInterface(descriptor);
if (in != null) {
return in;
}
return new ActivityManagerProxy(obj);
}
mgr.attachApplication(mAppThread)实际上调用的是ActivityManagerProxy的attachApplication,如下:
class ActivityManagerProxy implements IActivityManager
{

   public void attachApplication(IApplicationThread app) throws RemoteException
    {
        Parcel data = Parcel.obtain();
        Parcel reply = Parcel.obtain();
        data.writeInterfaceToken(IActivityManager.descriptor);
        data.writeStrongBinder(app.asBinder());
        mRemote.transact(ATTACH_APPLICATION_TRANSACTION, data, reply, 0);
        reply.readException();
        data.recycle();
        reply.recycle();
    }
    ......
}
final ApplicationThread mAppThread = new ApplicationThread();由于是同步传输,所以Launcher进程子线程睡眠等待,程序继续执行Looper.loop(),此时主线程的消息循环机制创立。
此时System进程Binder主线程池和子线程池都开启了,正在等待来自Launcher进程的请求。
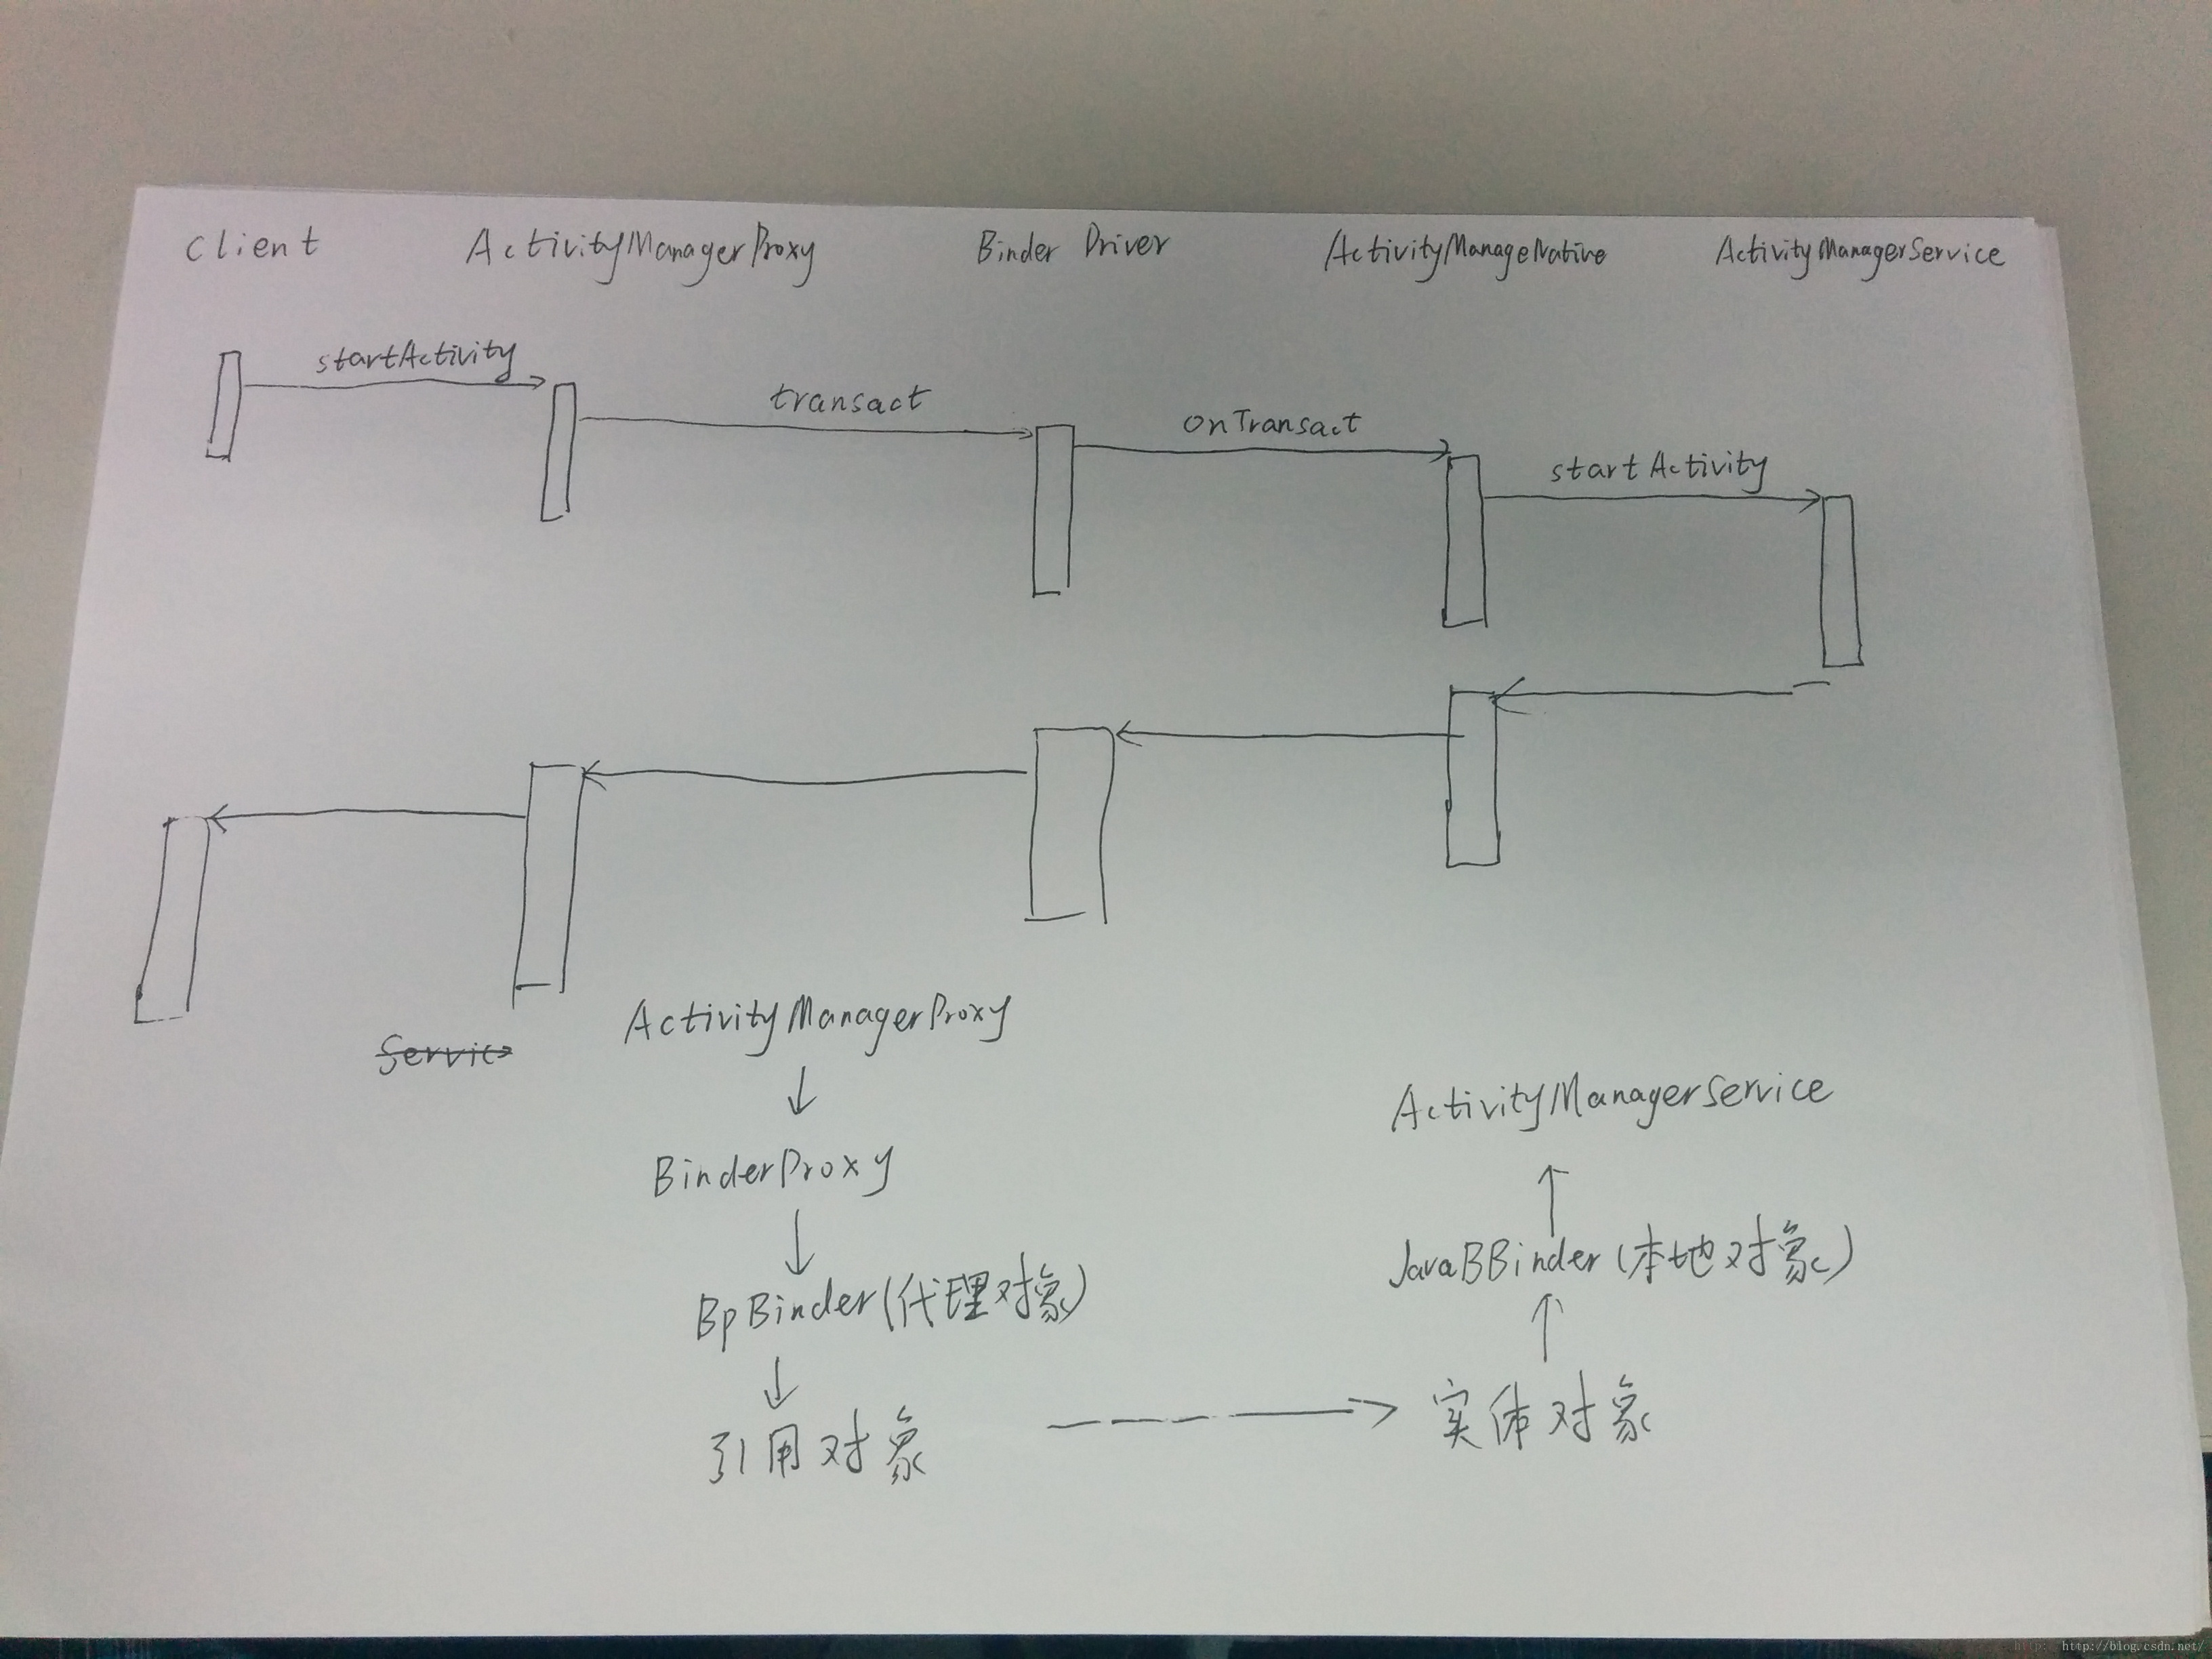
System进程,接收到请求后,如上图的Binder进程间通信的省略步骤一样,会执行如下代码,是在System进程的一个子线程中执行:
public abstract class ActivityManagerNative extends Binder implements IActivityManager
{
    ......
    public boolean onTransact(int code, Parcel data, Parcel reply, int flags)
            throws RemoteException {
        switch (code) {
        case ATTACH_APPLICATION_TRANSACTION: {
            data.enforceInterface(IActivityManager.descriptor);
            IApplicationThread app = ApplicationThreadNative.asInterface(
                    data.readStrongBinder());
            if (app != null) {
                attachApplication(app);
            }
            reply.writeNoException();
            return true;
        }
    .......
}
然后生成ApplicationThreadProxy对象,里面mRemote指向BinderProxy对象。
由于ActivityManagerService类继承于ActivityManagerNative类,所以attachApplication,实际上执行的是位于ActivityManagerService中的。
public final class ActivityManagerService extends ActivityManagerNative{

    public final void attachApplication(IApplicationThread thread) {
        synchronized (this) {
            int callingPid = Binder.getCallingPid();
            final long origId = Binder.clearCallingIdentity();
            attachApplicationLocked(thread, callingPid);
            Binder.restoreCallingIdentity(origId);
        }
    }
    .....
}public final class ActivityManagerService extends ActivityManagerNative
implements Watchdog.Monitor, BatteryStatsImpl.BatteryCallback {
......
private final boolean attachApplicationLocked(IApplicationThread thread,
int pid) {
// Find the application record that is being attached... either via
// the pid if we are running in multiple processes, or just pull the
// next app record if we are emulating process with anonymous threads.
ProcessRecord app;
if (pid != MY_PID && pid >= 0) {
synchronized (mPidsSelfLocked) {
app = mPidsSelfLocked.get(pid);//取回ProcessRecord对象,保存在app中,app就是用来描述新创建的应用程序进程的
}
} else if (mStartingProcesses.size() > 0) {
......
} else {
......
}
if (app == null) {
......
return false;
}
......
String processName = app.processName;
try {
thread.asBinder().linkToDeath(new AppDeathRecipient(
app, pid, thread), 0);
} catch (RemoteException e) {
......
return false;
}
......
app.thread = thread;//thread设置为参数thread所指向的一个ApplicationThread代理对象
......
mHandler.removeMessages(PROC_START_TIMEOUT_MSG, app);//删除ActivityMangerService所运行在的线程的消息队列中PROC_START_TIMEOUT_MSG消息
boolean normalMode = mProcessesReady || isAllowedWhileBooting(app.info);
......
thread.bindApplication(processName, app.instrumentationInfo != null
? app.instrumentationInfo : app.info, providers,
app.instrumentationClass, app.instrumentationProfileFile,
app.instrumentationArguments, app.instrumentationWatcher, testMode,
isRestrictedBackupMode || !normalMode,
mConfiguration, getCommonServicesLocked());
boolean badApp = false;
boolean didSomething = false;
// See if the top visible activity is waiting to run in this process...
ActivityRecord hr = mMainStack.topRunningActivityLocked(null);//位于栈顶的ActivityRecord是Home界面的ActivityRecord
if (hr != null && normalMode) {
if (hr.app == null && app.info.uid == hr.info.applicationInfo.uid
&& processName.equals(hr.processName)) {
try {
if (mMainStack.realStartActivityLocked(hr, app, true, true)) {//最后走这里
didSomething = true;
}
} catch (Exception e) {
......
}
} else {
......
}
}
......
return true;
}
......
}然后对app初始化,其中最重要的是将它的成员变量thread设置为参数thread所指向的一个ApplicationThread代理对象。这样,ActivityManagerService以后就可以通过这个ApplicationThread代理对象来和新创建的应用程序进程进行通信了。
还记得在System进程的启动流程第二部分,最后一部分,会向ActivityManagerService所运行的线程的消息队列发送一个类型为PROC_START_TIMEOUT_MSG的消息,并且指定这个消息在PROC_START_TIMEOUT毫秒之后处理。
Message msg = mHandler.obtainMessage(PROC_START_TIMEOUT_MSG);
msg.obj = app;
mHandler.sendMessageDelayed(msg, PROC_START_TIMEOUT); mHandler.removeMessages(PROC_START_TIMEOUT_MSG, app)
public class ActivityStack {

	......

	final boolean realStartActivityLocked(ActivityRecord r,
			ProcessRecord app, boolean andResume, boolean checkConfig)
			throws RemoteException {

		......

		r.app = app;//r的成员变量app的值设置为参数app,表示它描述的Activity组件是在参数app所描述的应用程序进程中启动的

		......

		int idx = app.activities.indexOf(r);
		if (idx < 0) {
			app.activities.add(r);//将该Activity添加到参数app所描述的应用程序进程的Activity组件列表中
		}

		......

		try {
			......

			List<ResultInfo> results = null;
			List<Intent> newIntents = null;
			if (andResume) {
				results = r.results;
				newIntents = r.newIntents;
			}

			......

			app.thread.scheduleLaunchActivity(new Intent(r.intent), r,
				System.identityHashCode(r),
				r.info, r.icicle, results, newIntents, !andResume,
				mService.isNextTransitionForward());

			......

		} catch (RemoteException e) {
			......
		}

		......

		return true;
	}

	......

}
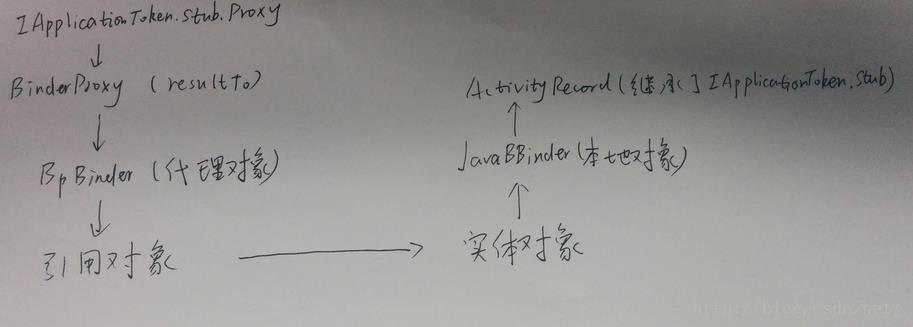
这里最终通过app.thread进入到ApplicationThreadProxy的scheduleLaunchActivity函数中,注意,这里的第二个参数r,是一个ActivityRecord类型的Binder对象,用来作来这个Activity的token值。
public final void scheduleLaunchActivity(Intent intent, IBinder token, int ident,
            ActivityInfo info, Bundle state, List<ResultInfo> pendingResults,
    		List<Intent> pendingNewIntents, boolean notResumed, boolean isForward)
    		throws RemoteException {
        Parcel data = Parcel.obtain();
        data.writeInterfaceToken(IApplicationThread.descriptor);
        intent.writeToParcel(data, 0);
        data.writeStrongBinder(token);
        data.writeInt(ident);
        info.writeToParcel(data, 0);
        data.writeBundle(state);
        data.writeTypedList(pendingResults);
        data.writeTypedList(pendingNewIntents);
        data.writeInt(notResumed ? 1 : 0);
        data.writeInt(isForward ? 1 : 0);
        mRemote.transact(SCHEDULE_LAUNCH_ACTIVITY_TRANSACTION, data, null,
                IBinder.FLAG_ONEWAY);
        data.recycle();
    }
我们传递的数据token,是一个ActivityRecord类型的Binder对象,如下图:

1、执行完scheduleLaunchActivity,此时SystemServer进程向Launcher进程发送了两个Binder请求,一个是SCHEDULE_LAUNCH_ACTIVITY_TRANSACTION,一个是ATTACH_APPLICATION_TRANSACTION的返回值。
2、由于Launcher进程在子线程中等待Binder进程间通信请求,所以分别处理这个两个请求,对于第二个请求的处理代码如下:
class ActivityManagerProxy implements IActivityManager
{

   public void attachApplication(IApplicationThread app) throws RemoteException
    {
        Parcel data = Parcel.obtain();
        Parcel reply = Parcel.obtain();
        data.writeInterfaceToken(IActivityManager.descriptor);
        data.writeStrongBinder(app.asBinder());
        mRemote.transact(ATTACH_APPLICATION_TRANSACTION, data, reply, 0);
        reply.readException();
        data.recycle();
        reply.recycle();
    }
    ......
}
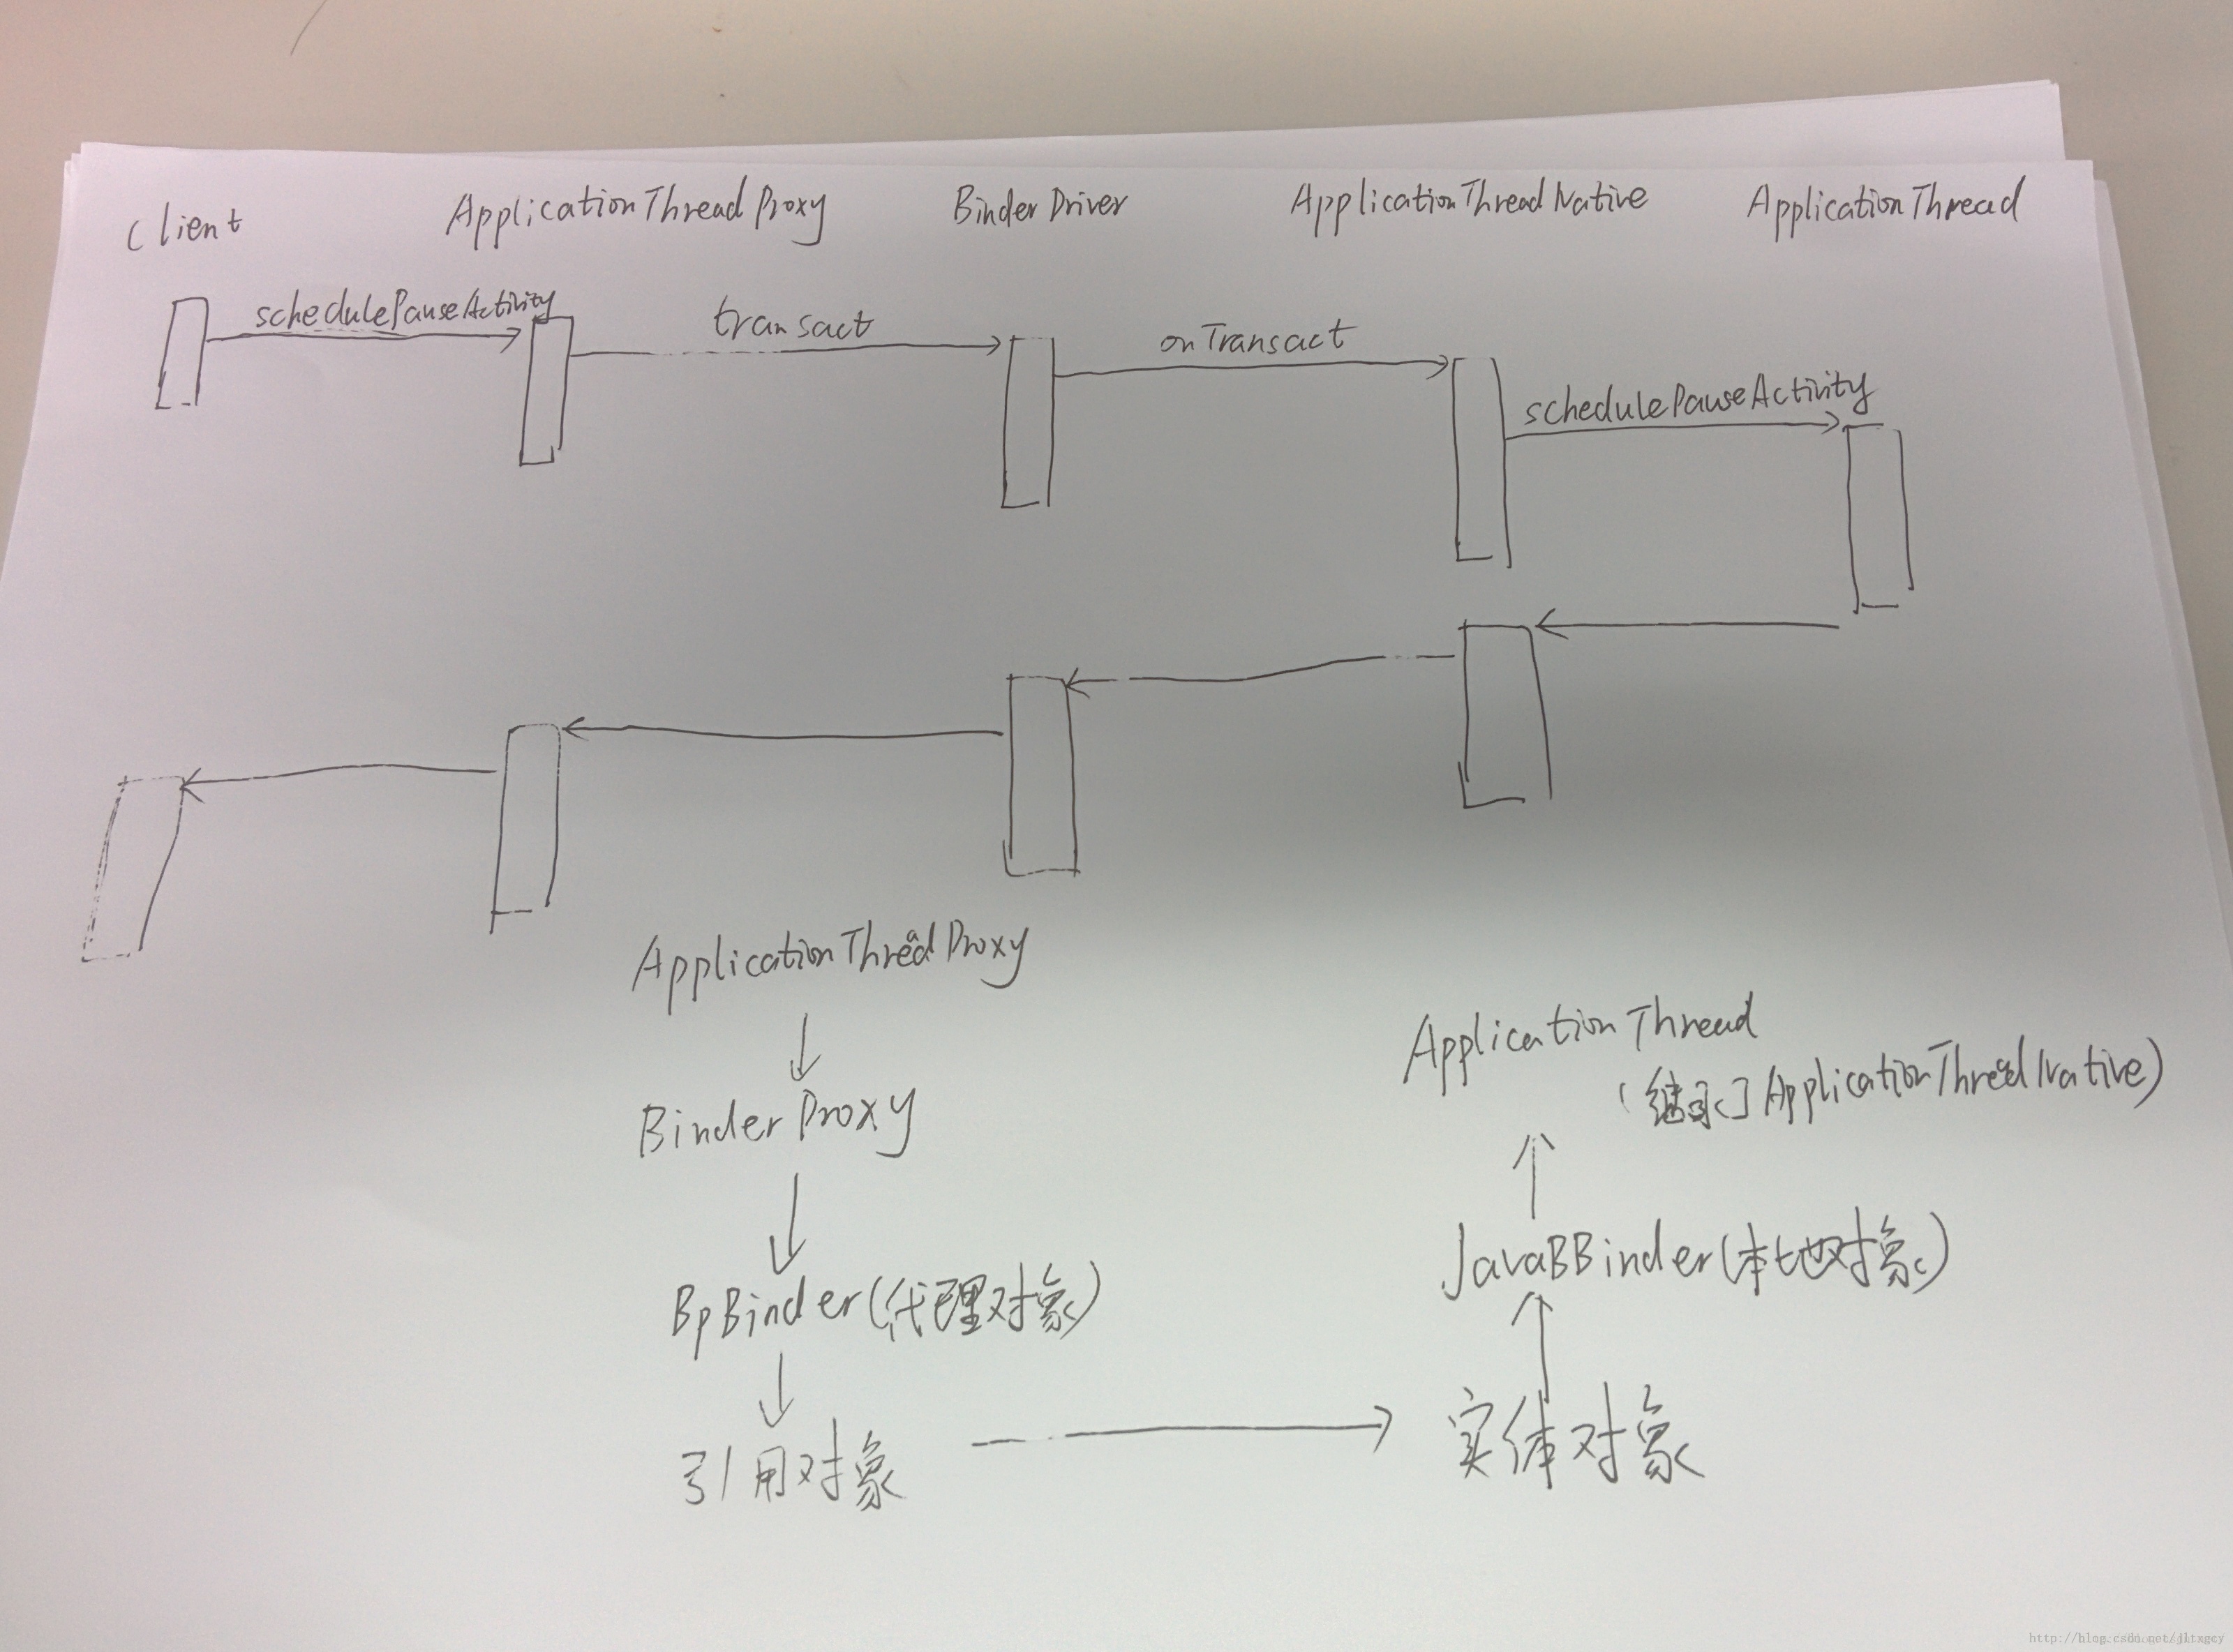
3、对于第一个Binder请求处理如下,如Binder类图所示,开始执行如下代码:
public abstract class ApplicationThreadNative extends Binder
        implements IApplicationThread {
    ........
    public boolean onTransact(int code, Parcel data, Parcel reply, int flags)
            throws RemoteException {
        switch (code) {
        case SCHEDULE_LAUNCH_ACTIVITY_TRANSACTION:
        {
            data.enforceInterface(IApplicationThread.descriptor);
            Intent intent = Intent.CREATOR.createFromParcel(data);
            IBinder b = data.readStrongBinder();
            int ident = data.readInt();
            ActivityInfo info = ActivityInfo.CREATOR.createFromParcel(data);
            Bundle state = data.readBundle();
            List<ResultInfo> ri = data.createTypedArrayList(ResultInfo.CREATOR);
            List<Intent> pi = data.createTypedArrayList(Intent.CREATOR);
            boolean notResumed = data.readInt() != 0;
            boolean isForward = data.readInt() != 0;
            scheduleLaunchActivity(intent, b, ident, info, state, ri, pi,
                    notResumed, isForward);
            return true;
        }
        .....
}由于ApplicationThread继承于ApplicationThreadNative,所以真正执行的是ApplicationThread里面的scheduleLaunchActivity方法。
public final class ActivityThread {

	......

	private final class ApplicationThread extends ApplicationThreadNative {

		......

		// we use token to identify this activity without having to send the
		// activity itself back to the activity manager. (matters more with ipc)
		public final void scheduleLaunchActivity(Intent intent, IBinder token, int ident,
				ActivityInfo info, Bundle state, List<ResultInfo> pendingResults,
				List<Intent> pendingNewIntents, boolean notResumed, boolean isForward) {
			ActivityClientRecord r = new ActivityClientRecord();

			r.token = token;
			r.ident = ident;
			r.intent = intent;
			r.activityInfo = info;
			r.state = state;

			r.pendingResults = pendingResults;
			r.pendingIntents = pendingNewIntents;

			r.startsNotResumed = notResumed;
			r.isForward = isForward;

			queueOrSendMessage(H.LAUNCH_ACTIVITY, r);
		}

		......

	}

	......
}public final class ActivityThread {
......
private final class ApplicationThread extends ApplicationThreadNative {
......
// if the thread hasn't started yet, we don't have the handler, so just
// save the messages until we're ready.
private final void queueOrSendMessage(int what, Object obj) {
queueOrSendMessage(what, obj, 0, 0);
}
......
private final void queueOrSendMessage(int what, Object obj, int arg1, int arg2) {
synchronized (this) {
......
Message msg = Message.obtain();
msg.what = what;
msg.obj = obj;
msg.arg1 = arg1;
msg.arg2 = arg2;
mH.sendMessage(msg);
}
}
......
}
......
}
public final class ActivityThread {

	......

	private final class H extends Handler {

		......

		public void handleMessage(Message msg) {
			......
			switch (msg.what) {
			case LAUNCH_ACTIVITY: {
				ActivityClientRecord r = (ActivityClientRecord)msg.obj;

				r.packageInfo = getPackageInfoNoCheck(
					r.activityInfo.applicationInfo);
				handleLaunchActivity(r, null);
			} break;
			......
			}

		......

	}

	......
}
public final class ActivityThread {

	......

	private final void handleLaunchActivity(ActivityClientRecord r, Intent customIntent) {
		......

		Activity a = performLaunchActivity(r, customIntent);

		if (a != null) {
			r.createdConfig = new Configuration(mConfiguration);
			Bundle oldState = r.state;
			handleResumeActivity(r.token, false, r.isForward);

			......
		} else {
			......
		}
	}

	......
}
public final class ActivityThread {

	......

	private final Activity performLaunchActivity(ActivityClientRecord r, Intent customIntent) {

		......

		ComponentName component = r.intent.getComponent();
		......

		Activity activity = null;
		try {
			java.lang.ClassLoader cl = r.packageInfo.getClassLoader();
			activity = mInstrumentation.newActivity(
				cl, component.getClassName(), r.intent);
			......
		} catch (Exception e) {
			......
		}

		try {
			Application app = r.packageInfo.makeApplication(false, mInstrumentation);

			......

			if (activity != null) {
				ContextImpl appContext = new ContextImpl();
				appContext.init(r.packageInfo, r.token, this);
				appContext.setOuterContext(activity);
				CharSequence title = r.activityInfo.loadLabel(appContext.getPackageManager());
				Configuration config = new Configuration(mConfiguration);
				......
				activity.attach(appContext, this, getInstrumentation(), r.token,
					r.ident, app, r.intent, r.activityInfo, title, r.parent,
					r.embeddedID, r.lastNonConfigurationInstance,
					r.lastNonConfigurationChildInstances, config);

				.......
				mInstrumentation.callActivityOnCreate(activity, r.state);
				......
			}
			......

			mActivities.put(r.token, r);

		} catch (SuperNotCalledException e) {
			......

		} catch (Exception e) {
			......
		}

		return activity;
	}

	......
}1、至此,Launcher进程Binder子线程池在给主线程发送消息后,又进入睡眠等待状态。onCreate是通过消息机制,在主线程中执行的。
2、System进程又在线程池(主线程和子线程)继续等待了。消息机制在子线程中循环。
3、Zygote进程等待连接请求,创建新的应用程序进程。
以上是关于Home界面的启动的主要内容,如果未能解决你的问题,请参考以下文章