Liferay7 BPM门户开发之38: OSGi Bndtools开发入门
Posted 昕友软件开发
tags:
篇首语:本文由小常识网(cha138.com)小编为大家整理,主要介绍了Liferay7 BPM门户开发之38: OSGi Bndtools开发入门相关的知识,希望对你有一定的参考价值。
前言
OSGi是目前动态模块系统的事实上的工业标准,它适用于任何需要模块化、面向服务、面向组件的应用程序。Eclipse如此庞大和复杂的插件体系,就是基于OSGi。Liferay也是基于OSGi。
OSGi是模块化设计的一种标准,适用于大中型项目。在一些小型项目中,开发者也可以自己设计私有的classLoader机制来实现插件开发环境,比如openfire
OSGi是在Java平台上开发模块化应用程序的一种方式。它允许你构建模块(称之为bundle),它们彼此之间是隔离的,具备明确的和可管理的依赖。
我们的关注点在于依赖,比如说特定的bundle能不能安装到我们的环境之中,是不是还要添加额外的依赖,它对其他模块的影响是什么等等。
OSGi长期以来的工具支持比较糟糕,OSGi本来是轻量级的技术,但因为难以使用而广受诟病,Bndtools是快速开发OSGi bundle和应用的IDE,用于快速的编码/运行/测试。它貌似只支持Eclipse,还不支持其他IDE,IntelliJ有Osmorc 项目,NetBeans会使用Maven Bundle Plugin
Bndtools是由Peter Kriens (OSGi联盟的技术总监)开发的,由Neil Bartlett维护。BndTools希望你可以使用OSGi声明式服务以POJO样式编写组件,而不依赖于OSGi。这样,这些组件就可以在OSGi之外进行单元测试,并在非OSGi的生产环境——像Sprint或JavaEE——中使用。
BndTools的“本地”构建系统是bnd本身,它支持Apache Ant同时构建多个项目,这也是OSGi联盟构建他们的1300多个bundle的方式。Bnd拥有插件化的库系统(pluggable repository system),这让我们可以使用任何一种后端的库技术,包括Ivy。
不贴代码了,直接看下面:
Bndtools OSGi对企业开发带来的好处:
http://www.infoq.com/cn/articles/agile-and-structural-modularity-part3?utm_source=tuicool&utm_medium=referral
案例:西门子公司通过OSGi实现结构性的模块化,由此达到敏捷的目标,与此同时也实现了社交和流程方面的敏捷开发。Bndtools是促成这一解决方案的关键。同时,西门子公司的业务需求也反过来促进和形成了Bndtools的关键功能。
Bndtools安装
http://bndtools.org/installation.html
Bndtools开发入门
http://bndtools.org/tutorial.html
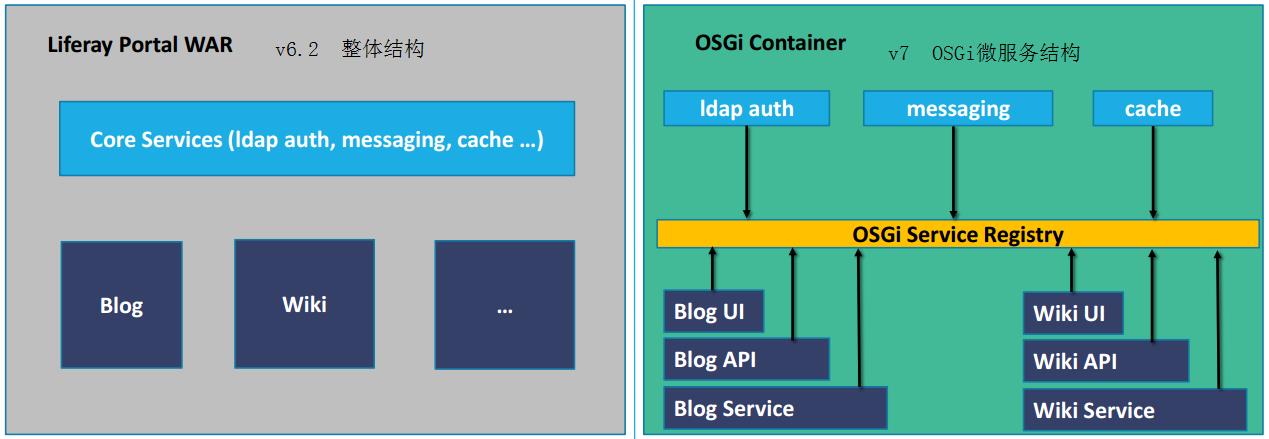
有人说liferay v7像个玩具?那么先来看看它和v6.2的架构区别:

- liferay v7.0通过微服务改造提取的bundles超过300个;
- liferay v7.0的扩展集成点超过200,这个在v6.2是不可想象的;
所以继续做v6.2是没有任何意义了。
目前我在不断整理集成点的开发,见:
http://www.cnblogs.com/starcrm/p/6062914.html
如何在Liferay开发中自动把插件构建到osgi容器
这里简单举例说明,先写一个portlet:
注意,@Component是osgi的注解,用于注册组件,组件可以理解为最后颗粒度的类元素。
- immediate元素控制是否立即激活Component configuration;
- service元素描述了Component实现的接口,这些接口一定是对外提供服务接口;
- property元素定义了配置参数
- 当有依赖项时,还需要有reference元素
package 你的包名;

import java.io.IOException;
import java.io.PrintWriter;
import javax.portlet.GenericPortlet;
import javax.portlet.Portlet;
import javax.portlet.PortletException;
import javax.portlet.RenderRequest;
import javax.portlet.RenderResponse;

import org.osgi.service.component.annotations.Component;


@Component(
    immediate = true,
    property = {
        "com.liferay.portlet.display-category=category.sample",
        "com.liferay.portlet.instanceable=true",
        "javax.portlet.display-name=YourPortlet",
        "javax.portlet.security-role-ref=power-user,user"
    },
    service = Portlet.class
)
public class YourPortlet extends GenericPortlet {

    @Override
    protected void doView(RenderRequest request, RenderResponse response)
        throws IOException, PortletException {

        PrintWriter printWriter = response.getWriter();

        printWriter.print("Hello World!");
    }

}
Bndtools方式
自动化构建:
只需要运行XXXX.run文件:
-runremote: liferay;shell=-1

-runbundles: \\

  你的Porject目录;version=latest,\\


-runpath: \\
  ../cnf/local/biz.aQute.remote.launcher/biz.aQute.remote.launcher-3.0.0.jar;version=file
注意:biz.aQute.remote.agent-X.X.X.jar这个必须要先存在。
在“你的Porject目录”里必须有这个文件:bnd.bnd
内容:
Bundle-Version: 1.0.0
-sources: true

Private-Package: 你的包名.YourPortlet
-buildpath:\\
javax.portlet;version=\'2.0.0\',\\
org.osgi.service.component.annotations;version=\'1.3.0\'
OSGi原来复杂的构建过程,现在已自动化了。
Maven方式
也可以通过Maven 构建

<build>
<plugins>
<plugin>
<groupId>org.apache.maven.plugins</groupId>
<artifactId>maven-compiler-plugin</artifactId>
<version>3.1</version>
<configuration>
<source>1.7</source>
<target>1.7</target>
</configuration>
</plugin>
<plugin>
<groupId>org.apache.maven.plugins</groupId>
<artifactId>maven-jar-plugin</artifactId>
<version>2.6</version>
<configuration>
<archive>
<manifestFile>${project.build.outputDirectory}/META-INF/MANIFEST.MF</manifestFile>
</archive>
</configuration>
</plugin>
<plugin>
<groupId>biz.aQute.bnd</groupId>
<artifactId>bnd-maven-plugin</artifactId>
<version>3.2.0</version>
<executions>
<execution>
<id>default-bnd-process</id>
<goals>
<goal>bnd-process</goal>
</goals>
</execution>
</executions>
<dependencies>
<dependency>
<groupId>biz.aQute.bnd</groupId>
<artifactId>biz.aQute.bndlib</artifactId>
<version>3.2.0</version>
</dependency>
<dependency>
<groupId>com.liferay</groupId>
<artifactId>com.liferay.ant.bnd</artifactId>
<version>2.0.28</version>
</dependency>
</dependencies>
</plugin>
</plugins>
</build>
gradle方式
貌似更简单
build.gradle:
dependencies {
compile \'com.liferay.portal:com.liferay.portal.kernel:2.0.0\'
compile \'javax.portlet:portlet-api:2.0\'
compile \'org.osgi:org.osgi.service.component.annotations:1.3.0\'
}
version = \'1.0.0\'
bnd.bnd 可以大大简略:
Bundle-Version: 1.0.0
-sources: true
运行:
../../gradlew deploy
更多其他osgi参考资料
osgi大纲(v6.0 2015年版)
https://osgi.org/download/r6/osgi.cmpn-6.0.0.pdf
osgi学习资源:
https://www.osgi.org/developer/resources/learning-resources-tutorials/
http://enroute.osgi.org/book/150-tutorials.html
一个非常好的例子:
http://www.vogella.com/tutorials/OSGi/article.html
Apache Felix OSGi Tutorial:
http://felix.apache.org/documentation/tutorials-examples-and-presentations/apache-felix-osgi-tutorial.html
Neil Bartlett:
http://njbartlett.name/osgibook.html
http://njbartlett.name/files/osgibook_preview_20091217.pdf
Bndtools Tutorial:
http://bndtools.org/tutorial.html
Eclipse Equinox教程
http://www.eclipse.org/equinox/documents/quickstart-framework.php
Beginer Tutorial
http://www.javaworld.com/article/2077837/java-se/java-se-hello-osgi-part-1-bundles-for-beginners.html
以上是关于Liferay7 BPM门户开发之38: OSGi Bndtools开发入门的主要内容,如果未能解决你的问题,请参考以下文章
