rsyslog+loganalyzer+mysql部署日志服务器
Posted
tags:
篇首语:本文由小常识网(cha138.com)小编为大家整理,主要介绍了rsyslog+loganalyzer+mysql部署日志服务器相关的知识,希望对你有一定的参考价值。
rsyslog是一个用来管理系统日志的开源程序,是早前syslog的升级版,对原有的日志系统进行了功能的扩展。
rsyslog守护进程可以被配置成两种环境,一种是配置成日志收集服务器,rsyslog进程可以从网络中收集其它主机上的日志数据,这些主机会将日志配置为发送到另外的远程服务器。另外就是可以配置为客户端,用来过滤和发送内部日志数据到本地文件夹(如/var/log)或一台远程rsyslog服务器上。
一、rsyslog特性
多线程
支持通过TCP,SSL,TLS,RELP协议实现日志数据的可靠传输
支持输出日志到mysql, PGSQL, Oracle等多种关系型数据中
强大的过滤器,可实现过滤系统信息中的任意部分
可自定义输出格式
支持数据的加密和压缩传输
适用于企业级别日志记录需求
二、rsyslog配置
rsyslog的主配置文件:/etc/rsyslog.conf
1、定义过滤和输出规则的格式为:
facility.priority Target
⑴facility:设施,产生日志消息的子系统,从功能或程序上分类
可选值:auth,authpriv,cron,daemon,ftp,kern,lpr,mail,mark,news,security,syslog,user,uucp,local0~local7
指定设施时可以使用通配符:
*:所有
f1,f2,f3,...:列表
!:取反
⑵priority:日志级别
从低到高依次为:debug(7),info(6),notice(5),warning(4),err(3),crit(2),alert(1),emerg(0)
通配符:
*:所有级别
none:没有任何级别
示例:
mail.info:info级别及比info级别更高级别的日志消息都会被记录
mail.=info:仅记录info级别
mail.!info:除了info级别的都会被记录
*.info:所有facility的info(及以上)级别
mail.*:mail的所有级别
mail.notice;news.info:
mail,news.info:mail和news的info(及以上)级别
⑶Target:
文件路径:例如/var/log/messages
系统日志是比较重要的信息,一般是同步写入磁盘,但这样也会影响性能,路径前若带有“-”则表示异步写入
用户:*,当前系统上所有已登录的用户
日志服务器:@SERVER_IP
管道:| COMMAND
2、启用日志服务器功能
# Provides UDP syslog reception
$ModLoad imudp
$UDPServerRun 514
# Provides TCP syslog reception
$ModLoad imtcp
$InputTCPServerRun 514
[[email protected] ~]# rpm -q rsyslog
rsyslog-5.8.10-10.el6_6.x86_64
[[email protected] ~]# rpm -ql rsyslog
/etc/logrotate.d/syslog
/etc/pki/rsyslog
/etc/rc.d/init.d/rsyslog
/etc/rsyslog.conf
/etc/rsyslog.d
/etc/sysconfig/rsyslog
/lib64/rsyslog
...
[[email protected] ~]# vim /etc/rsyslog.conf
...
#### MODULES ####

$ModLoad imuxsock # provides support for local system logging (e.g. via logger command)
$ModLoad imklog   # provides kernel logging support (previously done by rklogd)
#$ModLoad immark  # provides --MARK-- message capability

# Provides UDP syslog reception
$ModLoad imudp
$UDPServerRun 514

# Provides TCP syslog reception
$ModLoad imtcp
$InputTCPServerRun 514
...
...
#### RULES ####

# Log all kernel messages to the console.
# Logging much else clutters up the screen.
#kern.*                                                 /dev/console

# Log anything (except mail) of level info or higher.
# Don‘t log private authentication messages!
*.info;mail.none;authpriv.none;cron.none                /var/log/messages

# The authpriv file has restricted access.
authpriv.*                                              /var/log/secure

# Log all the mail messages in one place.
mail.*                                                  -/var/log/maillog  #前面的“-”表示异步写入磁盘


# Log cron stuff
cron.*                                                  /var/log/cron

# Everybody gets emergency messages
*.emerg                                                 *

# Save news errors of level crit and higher in a special file.
uucp,news.crit                                          /var/log/spooler

# Save boot messages also to boot.log
local7.*                                                /var/log/boot.lo
...
[[email protected] ~]# service rsyslog restart
Shutting down system logger:                               [  OK  ]
Starting system logger:                                    [  OK  ]
[[email protected] ~]# netstat -tuanp | grep ‘rsyslogd‘
tcp        0      0 0.0.0.0:514                 0.0.0.0:*                   LISTEN      5063/rsyslogd
tcp        0      0 :::514                      :::*                        LISTEN      5063/rsyslogd
udp        0      0 0.0.0.0:514                 0.0.0.0:*                               5063/rsyslogd
udp        0      0 :::514                      :::*                                    5063/rsyslogd
[[email protected] ~]# vim /etc/rsyslog.conf
...
*.info;mail.none;authpriv.none;cron.none                @192.168.30.20
...
[[email protected] ~]# service rsyslog restart
Shutting down system logger:                               [  OK  ]
Starting system logger:                                    [  OK  ]
[[email protected] ~]# yum -y install tree
...
[[email protected] ~]# tail /var/log/messages
...
Feb 20 23:56:06 node3 kernel: imklog 5.8.10, log source = /proc/kmsg started.
Feb 20 23:56:06 node3 rsyslogd: [origin software="rsyslogd" swVersion="5.8.10" x-pid="5442" x-info="http://www.rsyslog.com"] start
Feb 20 23:56:19 node3 yum[5447]: Installed: tree-1.5.3-3.el6.x86_64
3、rsyslog支持将日志存储于MySQL服务器中:
①安装rsyslog-mysql包;
②创建rsyslog依赖的数据库:
# mysql < /usr/share/doc/rsyslog-5.8.10/createDB.sql
③启用相关模块
在#### Modules #####段启用模块:
$ModLoad ommysql
在####rules####段中定义记录日志信息于数据库中
facility.priority :ommysql:SERVER_IP,DATABASE,USERNAME,PASSWORD
④重启rsyslog服务
[[email protected] ~]# yum -y install rsyslog-mysql
...
[[email protected] ~]# rpm -ql rsyslog-mysql
/lib64/rsyslog/ommysql.so
/usr/share/doc/rsyslog-mysql-5.8.10
/usr/share/doc/rsyslog-mysql-5.8.10/createDB.sql
[[email protected] ~]# mysql < /usr/share/doc/rsyslog-mysql-5.8.10/createDB.sql
[[email protected] ~]# mysql
Welcome to the MariaDB monitor.  Commands end with ; or \g.
Your MariaDB connection id is 4
Server version: 5.5.36-MariaDB-log MariaDB Server

Copyright (c) 2000, 2014, Oracle, Monty Program Ab and others.

Type ‘help;‘ or ‘\h‘ for help. Type ‘\c‘ to clear the current input statement.

MariaDB [(none)]> show databases;
+--------------------+
| Database           |
+--------------------+
| information_schema |
| Syslog             |
| mysql              |
| performance_schema |
| test               |
| vsftpd             |
+--------------------+
6 rows in set (0.26 sec)

MariaDB [(none)]> use Syslog
Database changed
MariaDB [Syslog]> show tables;
+------------------------+
| Tables_in_Syslog       |
+------------------------+
| SystemEvents           |
| SystemEventsProperties |
+------------------------+
2 rows in set (0.00 sec)

MariaDB [Syslog]> grant all on Syslog.* to [email protected] identified by ‘logpass‘;
Query OK, 0 rows affected (0.24 sec)

MariaDB [Syslog]> grant all on Syslog.* to [email protected] identified by ‘logpass‘;
Query OK, 0 rows affected (0.00 sec)

MariaDB [Syslog]> flush privileges;
Query OK, 0 rows affected (0.08 sec)

MariaDB [Syslog]> exit

[[email protected] ~]# vim /etc/rsyslog.conf
...
#### MODULES ####
...
$ModLoad ommysql
...
#### RULES ####
...
*.info;mail.none;authpriv.none;cron.none :ommysql:127.0.0.1,Syslog,loguser,logpass
...
[[email protected] ~]# service rsyslog restart
Shutting down system logger:                               [  OK  ]
Starting system logger:                                    [  OK  ]
[[email protected] ~]# yum -y remove tree
...
[[email protected] ~]# mysql
...
MariaDB [(none)]> use Syslog
Database changed

MariaDB [Syslog]> select * from SystemEvents\G
...
*************************** 3. row ***************************
                ID: 3
        CustomerID: NULL
        ReceivedAt: 2016-02-19 01:29:14
DeviceReportedTime: 2016-02-21 00:59:50
          Facility: 1
          Priority: 6
          FromHost: node3
           Message:  Erased: tree
        NTSeverity: NULL
...
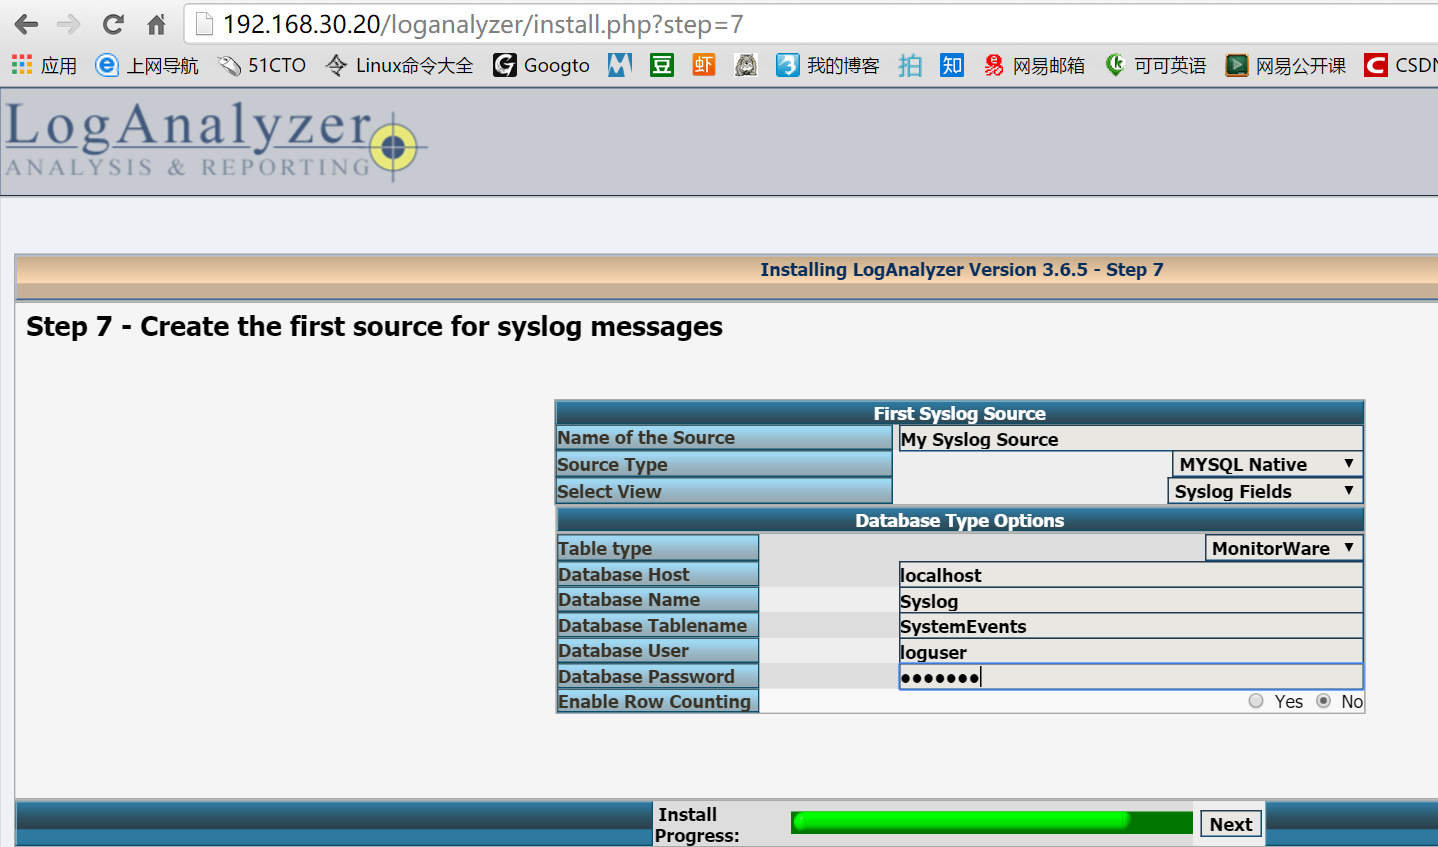
4、loganalyzer:一款通过webGUI展示日志信息的工具
# yum -y install httpd php php-mysql php-gd
# tar xf loganalyzer-3.6.5.tar.gz
# mkdir /var/www/html/loganalyzer
# cp -r loganalyzer-3.6.5/src/* /var/www/html/loganalyzer/
# cp -r loganalyzer-3.6.5/contrib/* /var/www/html/loganalyzer/
# cd /var/www/html/loganalyzer/
# chmod +x configure.sh secure.sh
# ./configure.sh
# ./secure.sh
# chmod 666 config.php
# chown -R apache.apache ./* #编译安装的httpd其服务进程是以daemon用户的身份运行的
访问:http://SERVER_IP/loganalyzer/
[[email protected] ~]# tar xf loganalyzer-3.6.5.tar.gz
[[email protected] ~]# ls loganalyzer-3.6.5
ChangeLog  contrib  COPYING  doc  INSTALL  src
[[email protected] ~]# less loganalyzer-3.6.5/INSTALL
...
 Installation in Detail
 ----------------------

  1. Upload all files from the loganalyzer/src/ folder to you webserver.
     The other files are not needed on the webserver.

  2. If your webserver has write access to the LogAnalyzer folder,
     you can skip the following step:

         Upload the scripts configure.sh and secure.sh from the
         contrib folder to your webserver, into the same folder
         where you uploaded the other LogAnalyzer files into. Then set
         the execution flag to them (chmod +x configure.sh secure.sh).

         Now run ./configure.sh, this will create a blank config.php,
         and will also set write access to everyone to it.

         You can of course do this manually if you want.
...
[[email protected] ~]# mkdir /web/htdocs/loganalyzer   #本例中web服务器的站点根目录为/web/htdocs
[[email protected] ~]# cp -r loganalyzer-3.6.5/src/* /web/htdocs/loganalyzer/
[[email protected] ~]# cp -r loganalyzer-3.6.5/contrib/* /web/htdocs/loganalyzer/
[[email protected] ~]# cd /web/htdocs/loganalyzer/
[[email protected] htdocs]# ls
admin               chartgenerator.php  convert.php  details.php  favicon.ico  index.php    lang                 reports.php  statistics.php  userchange.php
asktheoracle.php    classes             cron         doc          images       install.php  login.php            search.php   templates
BitstreamVeraFonts  configure.sh        css          export.php   include      js           reportgenerator.php  secure.sh    themes
[[email protected] htdocs]# chmod +x configure.sh secure.sh
[[email protected] htdocs]# ./configure.sh
[[email protected] htdocs]# ./secure.sh
[[email protected] htdocs]## ls   #执行以上两个脚本后会生成文件config.php
admin               chartgenerator.php  configure.sh  css          export.php   include      js         reportgenerator.php  secure.sh       themes
asktheoracle.php    classes             convert.php   details.php  favicon.ico  index.php    lang       reports.php          statistics.php  userchange.php
BitstreamVeraFonts  config.php          cron          doc          images       install.php  login.php  search.php           templates
[[email protected] htdocs]# chmod 666 config.php
[[email protected] htdocs]# chown -R daemon.daemon ./*   #本例中的httpd是编译安装的,其服务进程以daemon用户身份运行
以上是关于rsyslog+loganalyzer+mysql部署日志服务器的主要内容,如果未能解决你的问题,请参考以下文章

