UITableView全面解析
Posted st646889325
tags:
篇首语:本文由小常识网(cha138.com)小编为大家整理,主要介绍了UITableView全面解析相关的知识,希望对你有一定的参考价值。
基本介绍
UITableView有两种风格:UITableViewStylePlain和UITableViewStyleGrouped。这两者操作起来其实并没有本质区别,只是后者按分组样式显示前者按照普通样式显示而已。大家先看一下两者的应用:
1>分组样式
2>不分组样式
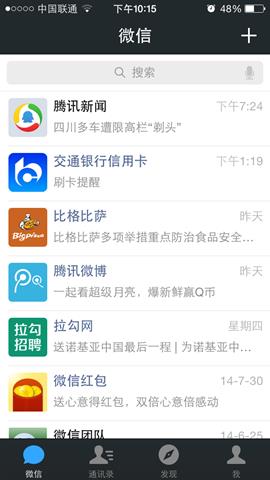
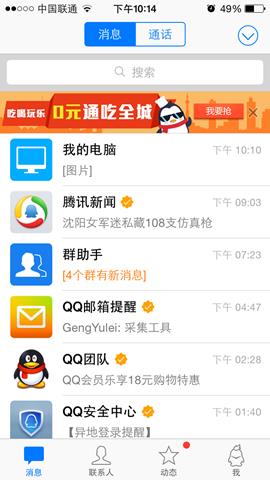
大家可以看到在UITableView中数据只有行的概念,并没有列的概念,因为在手机操作系统中显示多列是不利于操作的。UITableView中每行数据都是一个UITableViewCell,在这个控件中为了显示更多的信息,ios已经在其内部设置好了多个子控件以供开发者使用。如果我们查看UITableViewCell的声明文件可以发现在内部有一个UIView控件(contentView,作为其他元素的父控件)、两个UILable控件(textLabel、detailTextLabel)、一个UIImage控件(imageView),分别用于容器、显示内容、详情和图片。使用效果类似于微信、QQ信息列表:
当然,这些子控件并不一定要全部使用,具体操作时可以通过UITableViewCellStyle进行设置,具体每个枚举表示的意思已经在代码中进行了注释:
typedef NS_ENUM(NSInteger, UITableViewCellStyle) {
    UITableViewCellStyleDefault,    // 左侧显示textLabel(不显示detailTextLabel),imageView可选(显示在最左边)
    UITableViewCellStyleValue1,        // 左侧显示textLabel、右侧显示detailTextLabel(默认蓝色),imageView可选(显示在最左边)
    UITableViewCellStyleValue2,        // 左侧依次显示textLabel(默认蓝色)和detailTextLabel,imageView可选(显示在最左边)
    UITableViewCellStyleSubtitle    // 左上方显示textLabel,左下方显示detailTextLabel(默认灰色),imageView可选(显示在最左边)
};
数据源
由于iOS是遵循MVC模式设计的,很多操作都是通过代理和外界沟通的,但对于数据源控件除了代理还有一个数据源属性,通过它和外界进行数据交互。 对于UITableView设置完dataSource后需要实现UITableViewDataSource协议,在这个协议中定义了多种 数据操作方法,下面通过创建一个简单的联系人管理进行演示:
首先我们需要创建一个联系人模型KCContact
KCContact.h
//
//  Contact.h
//  UITableView
//
//  Created by Kenshin Cui on 14-3-1.
//  Copyright (c) 2014年 Kenshin Cui. All rights reserved.
//

#import <Foundation/Foundation.h>

@interface KCContact : NSObject

#pragma mark 姓
@property (nonatomic,copy) NSString *firstName;
#pragma mark 名
@property (nonatomic,copy) NSString *lastName;
#pragma mark 手机号码
@property (nonatomic,copy) NSString *phoneNumber;

#pragma mark 带参数的构造函数
-(KCContact *)initWithFirstName:(NSString *)firstName andLastName:(NSString *)lastName andPhoneNumber:(NSString *)phoneNumber;

#pragma mark 取得姓名
-(NSString *)getName;


#pragma mark 带参数的静态对象初始化方法
+(KCContact *)initWithFirstName:(NSString *)firstName andLastName:(NSString *)lastName andPhoneNumber:(NSString *)phoneNumber;
@end
KCContact.m
//
//  Contact.m
//  UITableView
//
//  Created by Kenshin Cui on 14-3-1.
//  Copyright (c) 2014年 Kenshin Cui. All rights reserved.
//

#import "KCContact.h"

@implementation KCContact

-(KCContact *)initWithFirstName:(NSString *)firstName andLastName:(NSString *)lastName andPhoneNumber:(NSString *)phoneNumber{
    if(self=[super init]){
        self.firstName=firstName;
        self.lastName=lastName;
        self.phoneNumber=phoneNumber;
    }
    return self;
}

-(NSString *)getName{
    return [NSString stringWithFormat:@"%@ %@",_lastName,_firstName];
}

+(KCContact *)initWithFirstName:(NSString *)firstName andLastName:(NSString *)lastName andPhoneNumber:(NSString *)phoneNumber{
    KCContact *contact1=[[KCContact alloc]initWithFirstName:firstName andLastName:lastName andPhoneNumber:phoneNumber];
    return contact1;
}

@end
为了演示分组显示我们不妨将一组数据也抽象成模型KCContactGroup
KCContactGroup.h
//
//  KCContactGroup.h
//  UITableView
//
//  Created by Kenshin Cui on 14-3-1.
//  Copyright (c) 2014年 Kenshin Cui. All rights reserved.
//

#import <Foundation/Foundation.h>
#import "KCContact.h"

@interface KCContactGroup : NSObject

#pragma mark 组名
@property (nonatomic,copy) NSString *name;

#pragma mark 分组描述
@property (nonatomic,copy) NSString *detail;

#pragma mark 联系人
@property (nonatomic,strong) NSMutableArray *contacts;

#pragma mark 带参数个构造函数
-(KCContactGroup *)initWithName:(NSString *)name andDetail:(NSString *)detail andContacts:(NSMutableArray *)contacts;

#pragma mark 静态初始化方法
+(KCContactGroup *)initWithName:(NSString *)name andDetail:(NSString *)detail andContacts:(NSMutableArray *)contacts;

@end
KCContactGroup.m
//
//  KCContactGroup.m
//  UITableView
//
//  Created by Kenshin Cui on 14-3-1.
//  Copyright (c) 2014年 Kenshin Cui. All rights reserved.
//

#import "KCContactGroup.h"

@implementation KCContactGroup


-(KCContactGroup *)initWithName:(NSString *)name andDetail:(NSString *)detail andContacts:(NSMutableArray *)contacts{
    if (self=[super init]) {
        self.name=name;
        self.detail=detail;
        self.contacts=contacts;
    }
    return self;
}

+(KCContactGroup *)initWithName:(NSString *)name andDetail:(NSString *)detail andContacts:(NSMutableArray *)contacts{
    KCContactGroup *group1=[[KCContactGroup alloc]initWithName:name andDetail:detail andContacts:contacts];
    return group1;
}
@end
然后在viewDidLoad方法中创建一些模拟数据同时实现数据源协议方法:
KCMainViewController.m
//
//  KCMainViewController.m
//  UITableView
//
//  Created by Kenshin Cui on 14-3-1.
//  Copyright (c) 2014年 Kenshin Cui. All rights reserved.
//

#import "KCMainViewController.h"
#import "KCContact.h"
#import "KCContactGroup.h"

@interface KCMainViewController ()<UITableViewDataSource>{
    UITableView *_tableView;
    NSMutableArray *_contacts;//联系人模型
}

@end

@implementation KCMainViewController

- (void)viewDidLoad {
    [super viewDidLoad];

    //初始化数据
    [self initData];

    //创建一个分组样式的UITableView
    _tableView=[[UITableView alloc]initWithFrame:self.view.bounds style:UITableViewStyleGrouped];

    //设置数据源,注意必须实现对应的UITableViewDataSource协议
    _tableView.dataSource=self;

    [self.view addSubview:_tableView];
}

#pragma mark 加载数据
-(void)initData{
    _contacts=[[NSMutableArray alloc]init];

    KCContact *contact1=[KCContact initWithFirstName:@"Cui" andLastName:@"Kenshin" andPhoneNumber:@"18500131234"];
    KCContact *contact2=[KCContact initWithFirstName:@"Cui" andLastName:@"Tom" andPhoneNumber:@"18500131237"];
    KCContactGroup *group1=[KCContactGroup initWithName:@"C" andDetail:@"With names beginning with C" andContacts:[NSMutableArray arrayWithObjects:contact1,contact2, nil]];
    [_contacts addObject:group1];


    KCContact *contact3=[KCContact initWithFirstName:@"Lee" andLastName:@"Terry" andPhoneNumber:@"18500131238"];
    KCContact *contact4=[KCContact initWithFirstName:@"Lee" andLastName:@"Jack" andPhoneNumber:@"18500131239"];
    KCContact *contact5=[KCContact initWithFirstName:@"Lee" andLastName:@"Rose" andPhoneNumber:@"18500131240"];
    KCContactGroup *group2=[KCContactGroup initWithName:@"L" andDetail:@"With names beginning with L" andContacts:[NSMutableArray arrayWithObjects:contact3,contact4,contact5, nil]];
    [_contacts addObject:group2];


    KCContact *contact6=[KCContact initWithFirstName:@"Sun" andLastName:@"Kaoru" andPhoneNumber:@"18500131235"];
    KCContact *contact7=[KCContact initWithFirstName:@"Sun" andLastName:@"Rosa" andPhoneNumber:@"18500131236"];

    KCContactGroup *group3=[KCContactGroup initWithName:@"S" andDetail:@"With names beginning with S" andContacts:[NSMutableArray arrayWithObjects:contact6,contact7, nil]];
    [_contacts addObject:group3];


    KCContact *contact8=[KCContact initWithFirstName:@"Wang" andLastName:@"Stephone" andPhoneNumber:@"18500131241"];
    KCContact *contact9=[KCContact initWithFirstName:@"Wang" andLastName:@"Lucy" andPhoneNumber:@"18500131242"];
    KCContact *contact10=[KCContact initWithFirstName:@"Wang" andLastName:@"Lily" andPhoneNumber:@"18500131243"];
    KCContact *contact11=[KCContact initWithFirstName:@"Wang" andLastName:@"Emily" andPhoneNumber:@"18500131244"];
    KCContact *contact12=[KCContact initWithFirstName:@"Wang" andLastName:@"Andy" andPhoneNumber:@"18500131245"];
    KCContactGroup *group4=[KCContactGroup initWithName:@"W" andDetail:@"With names beginning with W" andContacts:[NSMutableArray arrayWithObjects:contact8,contact9,contact10,contact11,contact12, nil]];
    [_contacts addObject:group4];


    KCContact *contact13=[KCContact initWithFirstName:@"Zhang" andLastName:@"Joy" andPhoneNumber:@"18500131246"];
    KCContact *contact14=[KCContact initWithFirstName:@"Zhang" andLastName:@"Vivan" andPhoneNumber:@"18500131247"];
    KCContact *contact15=[KCContact initWithFirstName:@"Zhang" andLastName:@"Joyse" andPhoneNumber:@"18500131248"];
    KCContactGroup *group5=[KCContactGroup initWithName:@"Z" andDetail:@"With names beginning with Z" andContacts:[NSMutableArray arrayWithObjects:contact13,contact14,contact15, nil]];
    [_contacts addObject:group5];

}

#pragma mark - 数据源方法
#pragma mark 返回分组数
-(NSInteger)numberOfSectionsInTableView:(UITableView *)tableView{
    NSLog(@"计算分组数");
    return _contacts.count;
}

#pragma mark 返回每组行数
-(NSInteger)tableView:(UITableView *)tableView numberOfRowsInSection:(NSInteger)section{
    NSLog(@"计算每组(组%i)行数",section);
    KCContactGroup *group1=_contacts[section];
    return group1.contacts.count;
}

#pragma mark返回每行的单元格
-(UITableViewCell *)tableView:(UITableView *)tableView cellForRowAtIndexPath:(NSIndexPath *)indexPath{
    //NSIndexPath是一个结构体,记录了组和行信息
    NSLog(@"生成单元格(组:%i,行%i)",indexPath.section,indexPath.row);
    KCContactGroup *group=_contacts[indexPath.section];
    KCContact *contact=group.contacts[indexPath.row];
    UITableViewCell *cell=[[UITableViewCell alloc]initWithStyle:UITableViewCellStyleDefault reuseIdentifier:nil];
    cell.textLabel.text=[contact getName];
    cell.detailTextLabel.text=contact.phoneNumber;
    return cell;
}

#pragma mark 返回每组头标题名称
-(NSString *)tableView:(UITableView *)tableView titleForHeaderInSection:(NSInteger)section{
    NSLog(@"生成组(组%i)名称",section);
    KCContactGroup *group=_contacts[section];
    return group.name;
}

#pragma mark 返回每组尾部说明
-(NSString *)tableView:(UITableView *)tableView titleForFooterInSection:(NSInteger)section{
    NSLog(@"生成尾部(组%i)详情",section);
    KCContactGroup *group=_contacts[section];
    return group.detail;
}
@end
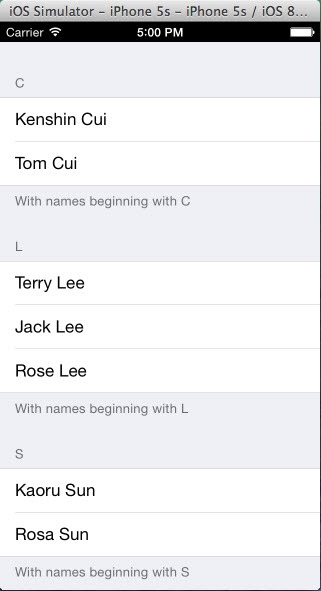
运行可以看到如下效果:
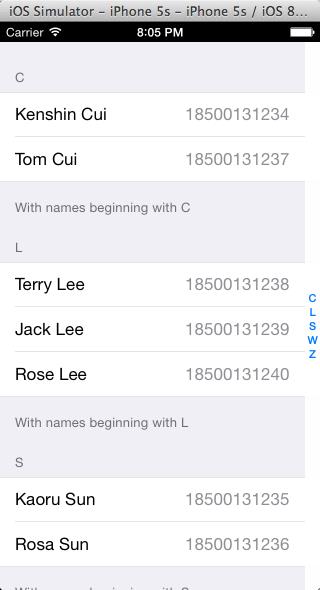
大家在使用iPhone通讯录时会发现右侧可以按字母检索,使用起来很方便,其实这个功能使用UITableView实现很简单,只要实现数据源协议的一个方法,构建一个分组标题的数组即可实现。数组元素的内容和组标题内容未必完全一致,UITableView是按照数组元素的索引和每组数据索引顺序来定位的而不是按内容查找。
#pragma mark 返回每组标题索引
-(NSArray *)sectionIndexTitlesForTableView:(UITableView *)tableView{
    NSLog(@"生成组索引");
    NSMutableArray *indexs=[[NSMutableArray alloc]init];
    for(KCContactGroup *group in _contacts){
        [indexs addObject:group.name];
    }
    return indexs;
}
效果如下:
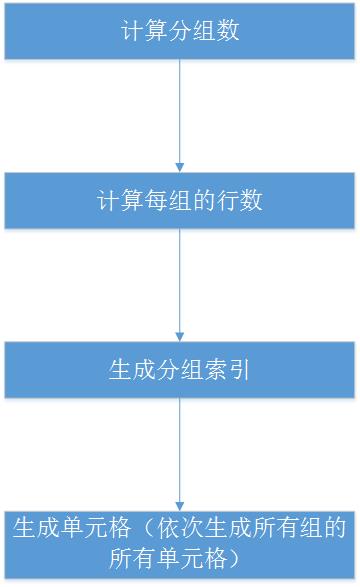
需要注意的是上面几个重点方法的执行顺序,请看下图:
值得指出的是生成单元格的方法并不是一次全部调用,而是只会生产当前显示在界面上的单元格,当用户滚动操作时再显示其他单元格。
注意:随着我们的应用越来越复杂,可能经常需要调试程序,在iOS中默认情况下不能定位到错误代码行,我们可以通过如下设置让程序定位到出错代码行:Show the Breakpoint navigator—Add Exception breakpoint。
代理
上面我们已经看到通讯录的简单实现,但是我们发现单元格高度、分组标题高度以及尾部说明的高度都需要调整,此时就需要使用代理方法。UITableView代理方法有很多,例如监听单元格显示周期、监听单元格选择编辑操作、设置是否高亮显示单元格、设置行高等。
1.设置行高
#pragma mark - 代理方法
#pragma mark 设置分组标题内容高度
-(CGFloat)tableView:(UITableView *)tableView heightForHeaderInSection:(NSInteger)section{
    if(section==0){
        return 50;
    }
    return 40;
}

#pragma mark 设置每行高度(每行高度可以不一样)
-(CGFloat)tableView:(UITableView *)tableView heightForRowAtIndexPath:(NSIndexPath *)indexPath{
    return 45;
}

#pragma mark 设置尾部说明内容高度
-(CGFloat)tableView:(UITableView *)tableView heightForFooterInSection:(NSInteger)section{
    return 40;
}
2.监听点击
在iOS中点击某联系个人就可以呼叫这个联系人,这时就需要监听点击操作,这里就不演示呼叫联系人操作了,我们演示一下修改人员信息的操作。
KCMainViewContrller.m
// // KCMainViewController.m // UITableView // // Created by Kenshin Cui on 14-3-1. // Copyright (c) 2014年 Kenshin Cui. All rights reserved. // #import "KCMainViewController.h" #import "KCContact.h" #import "KCContactGroup.h" @interface KCMainViewController ()<UITableViewDataSource,UITableViewDelegate,UIAlertViewDelegate>{ UITableView *_tableView; NSMutableArray *_contacts;//联系人模型 NSIndexPath *_selectedIndexPath;//当前选中的组和行 } @end @implementation KCMainViewController - (void)viewDidLoad { [super viewDidLoad]; //初始化数据 [self initData]; //创建一个分组样式的UITableView _tableView=[[UITableView alloc]initWithFrame:self.view.bounds style:UITableViewStyleGrouped]; //设置数据源,注意必须实现对应的UITableViewDataSource协议 _tableView.dataSource=self; //设置代理 _tableView.delegate
