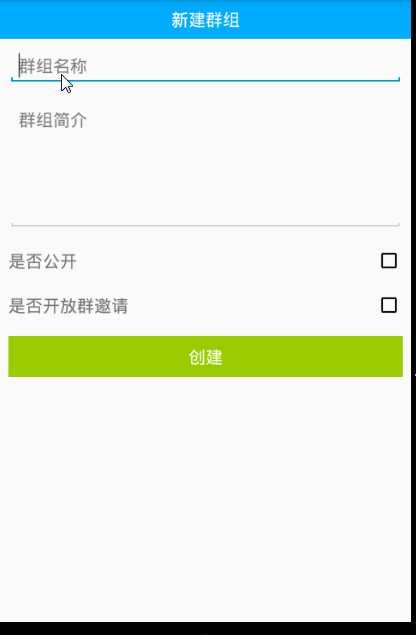
硅谷社交13--新建群页面
Posted
tags:
篇首语:本文由小常识网(cha138.com)小编为大家整理,主要介绍了硅谷社交13--新建群页面相关的知识,希望对你有一定的参考价值。

1)页面布局
<?xml version="1.0" encoding="utf-8"?>
<LinearLayout xmlns:android="http://schemas.android.com/apk/res/android"
    xmlns:app="http://schemas.android.com/apk/res-auto"
    xmlns:tools="http://schemas.android.com/tools"
    android:layout_width="match_parent"
    android:layout_height="match_parent"
    android:orientation="vertical">

    <com.hyphenate.easeui.widget.EaseTitleBar
        android:layout_width="match_parent"
        android:layout_height="wrap_content"
        app:titleBarTitle="新建群组">

    </com.hyphenate.easeui.widget.EaseTitleBar>

    <EditText
        android:id="@+id/et_newgroup_name"
        android:layout_width="match_parent"
        android:layout_height="wrap_content"
        android:layout_margin="5dp"
        android:hint="群组名称"
        android:textSize="20sp" />

    <EditText
        android:id="@+id/et_newgroup_desc"
        android:layout_width="match_parent"
        android:layout_height="150dp"
        android:layout_margin="5dp"
        android:gravity="start"
        android:hint="群组简介"
        android:textSize="20sp" />

    <LinearLayout
        android:layout_width="match_parent"
        android:layout_height="wrap_content"
        android:layout_margin="5dp">

        <TextView
            android:layout_width="0dp"
            android:layout_height="wrap_content"
            android:layout_weight="1"
            android:text="是否公开"
            android:textSize="20sp" />

        <CheckBox
            android:id="@+id/cb_newgroup_public"
            android:layout_width="wrap_content"
            android:layout_height="wrap_content" />
    </LinearLayout>

    <LinearLayout
        android:layout_width="match_parent"
        android:layout_height="wrap_content"
        android:layout_margin="5dp">

        <TextView
            android:layout_width="0dp"
            android:layout_height="wrap_content"
            android:layout_weight="1"
            android:text="是否开放群邀请"
            android:textSize="20sp" />

        <CheckBox
            android:id="@+id/cb_newgroup_invite"
            android:layout_width="wrap_content"
            android:layout_height="wrap_content" />
    </LinearLayout>

    <Button
        android:id="@+id/bt_newgroup_create"
        android:layout_width="match_parent"
        android:layout_height="wrap_content"
        android:layout_margin="5dp"
        android:background="@android:color/holo_green_light"
        android:text="创建"
        android:textColor="@android:color/white"
        android:textSize="20sp" />
</LinearLayout>
2)创建群按钮的监听
// 创建按钮的点击事件
bt_new_group_create.setOnClickListener(new View.OnClickListener() {
	@Override
	public void onClick(View v) {
		// 跳转到联系页面获取联系人数据
		Intent intent = new Intent(NewGroupActivity.this, PickContactsActivity.class);
		startActivityForResult(intent, 110);
	}
});
3)选择联系人页面的回调监听
@Override
protected void onActivityResult(int requestCode, int resultCode, Intent data) {
	super.onActivityResult(requestCode, resultCode, data);
	if (resultCode == RESULT_OK) {
		// 创建群
		createGroup(data.getExtras().getStringArray("members"));
	}
}
4)创建群
// 创建群
private void createGroup(final String[] memberses) {
	// 获取群名称
	final String groupName = et_new_group_name.getText().toString();
	// 获取群的描述信息
	final String groupDesc = et_new_group_desc.getText().toString();

	// 联网
	Model.getInstace().getGolbalThreadPool().execute(new Runnable() {
		@Override
		public void run() {
			String reason = "申请加入群";
			EMGroupManager.EMGroupStyle groupStyle = null;

			// 群公开
			if (cb_new_group_public.isChecked()) {
				if (cb_new_group_invite.isChecked()) {// 群邀请公开
					groupStyle = EMGroupManager.EMGroupStyle.EMGroupStylePublicOpenJoin;
				} else {// 群邀请不公开
					groupStyle = EMGroupManager.EMGroupStyle.EMGroupStylePublicJoinNeedApproval;
				}
			} else {// 群不公开
				if (cb_new_group_invite.isChecked()) {// 群邀请公开
					groupStyle = EMGroupManager.EMGroupStyle.EMGroupStylePrivateMemberCanInvite;
				} else {// 群邀请不公开
					groupStyle = EMGroupManager.EMGroupStyle.EMGroupStylePrivateOnlyOwnerInvite;
				}
			}

			// 群参数设置
			EMGroupManager.EMGroupOptions options = new EMGroupManager.EMGroupOptions();
			// 群最多多少人
			options.maxUsers = 200;
			// 创建群的类型
			options.style = groupStyle;

			try {
				// 联网创建群
				EMClient.getInstance().groupManager().createGroup(groupName, groupDesc, memberses, reason, options);


				// 更新ui
				runOnUiThread(new Runnable() {
					@Override
					public void run() {
						Toast.makeText(NewGroupActivity.this, "创建群:" + groupName + "成功", Toast.LENGTH_SHORT).show();
						// 结束当前页面
						finish();
					}
				});

			} catch (HyphenateException e) {
				e.printStackTrace();

				// 更新ui
				runOnUiThread(new Runnable() {
					@Override
					public void run() {
						Toast.makeText(NewGroupActivity.this, "创建群:" + groupName + "失败", Toast.LENGTH_SHORT).show();
					}
				});
			}
		}
	});
}
以上是关于硅谷社交13--新建群页面的主要内容,如果未能解决你的问题,请参考以下文章