Day2
Posted 在路上的少年
tags:
篇首语:本文由小常识网(cha138.com)小编为大家整理,主要介绍了Day2相关的知识,希望对你有一定的参考价值。
Relationship Configuration
一、one to many
直接上代码
 1 from sqlalchemy import create_engine
 2
 3 engine = create_engine("mysql+pymysql://root:max123@127.0.0.1/test?charset=utf8", echo=False)
 4
 5 from sqlalchemy import *
 6 from sqlalchemy.ext.declarative import declarative_base
 7 from datetime import datetime, date
 8
 9 Base = declarative_base()
10
11
12 class Parent(Base):
13     __tablename__ = \'perent\'
14
15     id = Column(Integer(), primary_key=True)
16     name = Column(String(50))
17     children = relationship(\'Child\')
18
19
20 class Child(Base):
21     __tablename__ = \'child\'
22
23     id = Column(Integer(), primary_key=True)
24     name = Column(String(50))
25     parent_id = Column(Integer(), ForeignKey(\'parent.id\'))
现在Parent类就定义了one to many 的relationship, Child类没有定义任何relationship. backref一般用于单边的relationship,下图是官方文档的说明。

1 child_one = Child(name=\'purk\')
2 parent = Parent(name=\'Wu\', children=[child_one])
3 db.add(parent)
4 db.commit()
结果如下,在add parent时,关联的child 也 add 到数据库了。
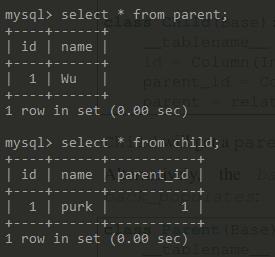
现在分开操作,先add child,在add parent
1 child_one =  Child(name=\'purk\')
2 db.add(child_one)
3 db.commit()
结果如下,parent_id是null值

在执行如下代码
1 parent = Parent(name=\'Wu\', children=[child_one])
2 db.add(parent)
3 db.commit()
结果如下,打开echo,可以看到SQL是先insert parent,然后update child.
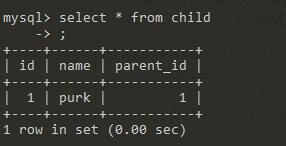
二、many to one
直接上代码,现在Child对Parent就是many to one的关系
 1 class Parent(Base):
 2     __tablename__ = \'parent\'
 3
 4     id = Column(Integer(), primary_key=True)
 5     name = Column(String(50))
 6     children = relationship(\'Child\', back_populates=\'parent\')
 7
 8
 9 class Child(Base):
10     __tablename__ = \'child\'
11
12     id = Column(Integer(), primary_key=True)
13     name = Column(String(50))
14     parent_id = Column(Integer(), ForeignKey(\'parent.id\'), nullable=True)
15     parent = relationship(\'Parent\', back_populates=\'children\')
通过relationship处理的类,可以直接用属性的方式访问到关联的父级或子级
 1 from sqlalchemy.orm import sessionmaker
 2
 3 Session = sessionmaker(bind=engine)
 4
 5 db = Session()
 6
 7 child_one = Child(name=\'purk\')
 8 parent = Parent(name=\'Wu\', children=[child_one])
 9 db.add(parent)
10 db.commit()
11
12 child = db.query(Child).get(1)
13 print(child.parent.name)
结果如下

三、one to one
只需给relationship的uselist赋值为False, parent 对child就成了one to one的关系,只要保证many 的那一方加上uselist=False就可以了。
 1 class Parent(Base):
 2     __tablename__ = \'parent\'
 3
 4     id = Column(Integer(), primary_key=True)
 5     name = Column(String(50))
 6     child = relationship(\'Child\', back_populates=\'parent\', uselist=False)
 7
 8
 9 class Child(Base):
10     __tablename__ = \'child\'
11
12     id = Column(Integer(), primary_key=True)
13     name = Column(String(50))
14     parent_id = Column(Integer(), ForeignKey(\'parent.id\'), nullable=True)
15     parent = relationship(\'Parent\', back_populates=\'child\')
之前的方式把child继续当成一个list就会报错了
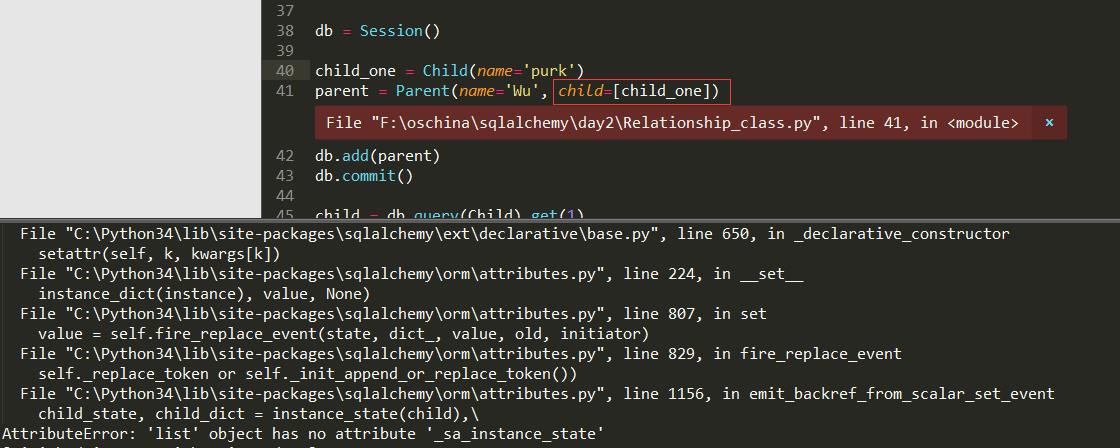
不当成list,

四、many to many
方式一: 可以看出many to many 会有一个中间表,通过secondary指定,这个中间表是不需要维护的,做增删改时自动维护了,但是此中间表就没有有价值的字段,如果中间表需要增加一些除了外键的字段,就是下面的方 式二
 1 from sqlalchemy import create_engine
 2
 3 engine = create_engine("mysql+pymysql://root:max123@127.0.0.1/test?charset=utf8", echo=False)
 4
 5 from sqlalchemy import *
 6 from sqlalchemy.orm import relationship
 7 from sqlalchemy.ext.declarative import declarative_base
 8 from datetime import datetime, date
 9
10 Base = declarative_base()
11
12
13 class ParentChild(Base):
14     __tablename__ = \'parent_child\'
15
16     id = Column(Integer(), primary_key=True)
17     child_id = Column(Integer(), ForeignKey(\'child.id\'), nullable=False)
18     parent_id = Column(Integer(), ForeignKey(\'parent.id\'), nullable=False)
19
20
21 class Parent(Base):
22     __tablename__ = \'parent\'
23
24     id = Column(Integer(), primary_key=True)
25     name = Column(String(50))
26     children = relationship(\'Child\', back_populates=\'parents\', secondary=ParentChild.__table__)
27
28
29 class Child(Base):
30     __tablename__ = \'child\'
31
32     id = Column(Integer(), primary_key=True)
33     name = Column(String(50))
34     parents = relationship(\'Parent\', back_populates=\'children\', secondary=ParentChild.__table__)
35
36 Base.metadata.drop_all(engine)
37 Base.metadata.create_all(engine)
38
39
40 from sqlalchemy.orm import sessionmaker
41
42 Session = sessionmaker(bind=engine)
43
44 db = Session()
45
46 child_one = Child(name=\'purk1\')
47 child_two = Child(name=\'purk2\')
48 child_three = Child(name=\'purk3\')
49 child_four = Child(name=\'purk4\')
50 parent_one = Parent(name=\'Wu1\')
51 parent_two = Parent(name=\'Wu2\')
52 parent_one.children.extend([child_one, child_two])
53 parent_two.children.extend([child_two, child_three])
54 child_four.parents.extend([parent_one, parent_two])
55 db.add_all([parent_one, parent_two, child_four])
56 db.commit()
结果如下
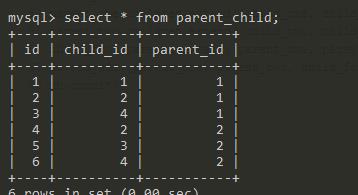
加上如下的delete操作代码
1 parent_one.children.remove(child_one)
2 db.merge(parent_one)
3 db.commit()
4 db.delete(child_three)
5 db.commit()
结果如下
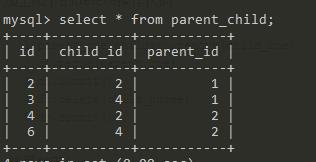
方式二:many to one 然后 one to many,这样就可以把中间表利用起来了
 1 from sqlalchemy import create_engine
 2
 3 engine = create_engine("mysql+pymysql://root:max123@127.0.0.1/test?charset=utf8", echo=False)
 4
 5 from sqlalchemy import *
 6 from sqlalchemy.orm import relationship
 7 from sqlalchemy.ext.declarative import declarative_base
 8 from datetime import datetime, date
 9
10 Base = declarative_base()
11
12
13 class Parent(Base):
14     __tablename__ = \'parent\'
15
16     id = Column(Integer(), primary_key=True)
17     name = Column(String(50))
18     children = relationship(\'ParentChild\', back_populates=\'parent\')
19
20
21 class Child(Base):
22     __tablename__ = \'child\'
23
24     id = Column(Integer(), primary_key=True)
25     name = Column(String(50))
26     parents = relationship(\'ParentChild\', back_populates=\'child\')
27
28
29 class ParentChild(Base):
30     __tablename__ = \'parent_child\'
31
32     id = Column(Integer(), primary_key=True)
33     child_id = Column(Integer(), ForeignKey(\'child.id\'), nullable=False)
34     parent_id = Column(Integer(), ForeignKey(\'parent.id\'), nullable=False)
35     description = Column(String(100))
36
37     parent = relationship(\'Parent\',back_populates=\'children\')
38     child = relationship(\'Child\',back_populates=\'parents\')
39
40
41 Base.metadata.drop_all(engine)
42 Base.metadata.create_all(engine)
43
44
45 from sqlalchemy.orm import sessionmaker
46
47 Session = sessionmaker(bind=engine)
48
49 db = Session()
50
51 child_one = Child(name=\'purk1\')
52 child_two = Child(name=\'purk2\')
53 child_three = Child(name=\'purk3\')
54 child_four = Child(name=\'purk4\')
55 parent_one = Parent(name=\'Wu1\')
56 parent_two = Parent(name=\'Wu2\')
57 parent_child_one = ParentChild(description=\'association one\')
58 parent_child_two = ParentChild(description=\'association two\')
59 parent_child_one.child = child_one
60 parent_child_two.child = child_two
61 parent_one.children.extend([parent_child_one, parent_child_two])
62
63 db.add_all([parent_one, parent_two, child_four])
64 db.commit()
结果如下
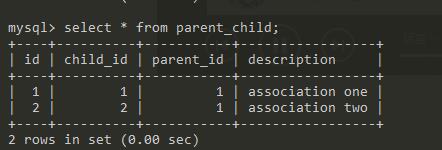
加入如下代码
1 parent_one.children.pop(0)
2 # parent_one.children[1].append(child_three)
3 db.merge(parent_one)
4 db.commit()
报错了如下,当然前面定义中间表的时候定义了nullable= False, 可是SQL要强行把起更新为Null,肯定报错咯。虽然去掉nullable=False的限制,但是这可能也不是我想要的,我想要的是直接删掉这条记录的。


想到就去做,给relationship加上cascade=\'all,delete-orphan\', cascade官方解释如下
2.5.3 Cascades
Mappers support the concept of configurable cascade behavior on relationship() constructs. This refers to how
operations performed on a “parent” object relative to a particular Session should be propagated to items referred to
by that relationship (e.g. “child” objects), and is affected by the relationship.cascade option.
The default behavior of cascade is limited to cascades of the so-called save-update and merge settings. The typical
“alternative” setting for cascade is to add thedeleteand delete-orphanoptions; these settings are appropriate for related
objects which only exist as long as they are attached to their parent, and are otherwise deleted.
Cascade behavior is configured using the by changing the cascade option on relationship():
1 class Order(Base):
2 __tablename__ = \'order\'
3 items = relationship("Item", cascade="all, delete-orphan")
4 customer = relationship("User", cascade="save-update")
To set cascades on a backref, the same flag can be used with the backref() function, which ultimately feeds its
arguments back into relationship():
1class Item(Base):
2 __tablename__ = \'item\'
3 order = relationship("Order",
4 backref=backref("items", cascade="all, delete-orphan")
5 )
加上cascade以后,在删除children时,就会把parent_child表里面的记录删掉了。
1 class Parent(Base):
2     __tablename__ = \'parent\'
3
4     id = Column(Integer(), primary_key=True)
5     name = Column(String(50))
6     children = relationship(\'ParentChild\', back_populates=\'parent\',cascade=\'all,delete-orphan\')
结果如下

backref与relationship同功能的属性有 uselist和cascade。
lazy =\'select\' :
1) select: lazy加载模式,只在真正调用这个属性时才会去访问数据库
1 class Parent(Base):
2     __tablename__ = \'parent\'
3
4     id = Column(Integer(), primary_key=True)
5     name = Column(String(50))
6     children = relationship(\'ParentChild\', back_populates=\'parent\', cascade=\'all,delete-orphan\', lazy=\'select\')
7
8 parent = db.query(Parent).get(1)
9 db.close()
结果是没有去请求parent_child的数据

1 parent = db.query(Parent).get(1)
2 parent.children
3 db.close()
结果如下,对比这两个结果,可以看出,parent.children在执行的时候才去请求的数据。

2) immediate: 直接加载,随父级以子查询的方式一同访问数据库。
1 parent = db.query(Parent).get(1)
2 # parent.children
3 db.close()
结果是,在parent加载的时候就已经加载数据了。

3) joined: 直接加载,随父级以join的方式一同访问数据库,具体是 inner join还是outer join(left join)就看relationship的innerjoin属性时True还是False了。
class Parent(Base):
    __tablename__ = \'parent\'

    id = Column(Integer(), primary_key=True)
    name = Column(String(50))
    children = relationship(\'ParentChild\', back_populates=\'parent\', cascade=\'all,delete-orphan\', lazy=\'joined\')

parent = db.query(Parent).get(1)
# parent.children
db.close()
结果可以看出parent加载数据的时候就join出了children的数据

 1 class Parent(Base):
 2     __tablename__ = \'parent\'
 3
 4     id = Column(Integer(), primary_key=True)
 5     name = Column(String(50))
 6     children = relationship(\'ParentChild\', back_populates=\'parent\', cascade=\'all,delete-orphan\', lazy=\'joined\', innerjoin=True)
 7
 8 parent = db.query(Parent).get(1)
 9 # parent.children
10 db.close()
innerjoin参数的作用

4) subquery: 结果集连接查询的方式跟随parent一起加载出数据
1 children = relationship(\'ParentChild\', back_populates=\'parent\', cascade=\'all,delete-orphan\', lazy=\'subquery\')
2
3 parent = db.query(Parent).get(1)
4 # parent.children
5 db.close()
5) noload:no loading should occur at any time. This is to support “write-only” attributes,
or attributes which are populated in some manner specific to the application. 官方文档解释,感觉没有什么实际意思。
6) dynamic: 返回query对象,可一直使用filter等条件过滤。
1 children = relationship(\'ParentChild\', back_populates=\'parent\', cascade=\'all,delete-orphan\', lazy=\'dynamic\')
2
3 parent = db.query(Parent).get(1)
4 parent.children.all()
5 db.close()
结果如下,看代码就明白其意义了。

以上是关于Day2的主要内容,如果未能解决你的问题,请参考以下文章