I2C实时时钟rx-8025板卡实际应用
Posted yuxi_o
tags:
篇首语:本文由小常识网(cha138.com)小编为大家整理,主要介绍了I2C实时时钟rx-8025板卡实际应用相关的知识,希望对你有一定的参考价值。
rx-8025是片外I2C实时时钟,其应用于9260板卡方法如下。总体思想是配置内核添加驱动(I2C驱动,内核已提供的很完备),板级文件添加设备,添加设备文件以应用程序操作。
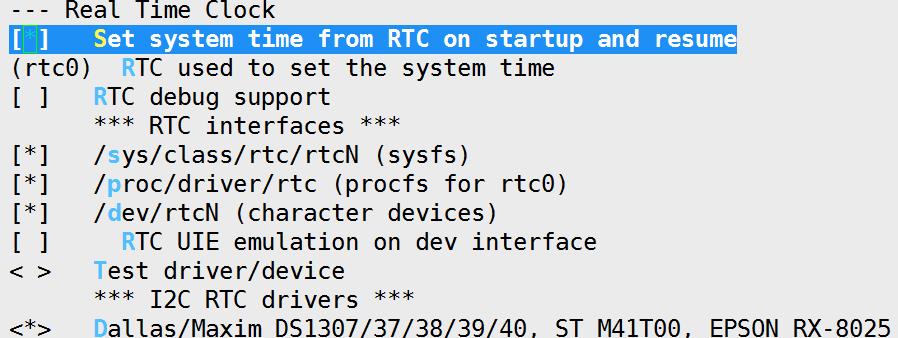
1. 配置内核
1)I2C支持(可选择debug信息)。

2)I2Chw选择gpio作为I2C硬件。

3)不选择片上RTT,选择芯片RX-8025。


其中rtc0为设备启动时钟。
2. 添加设备
/arch/arm/mach-at91/board-sam9260ek.c中添加以下语句:
static struct i2c_board_info __initdata ek_i2c_devices[] = {
{
I2C_BOARD_INFO("24c512", 0x50),
.platform_data = &at24c512,
},
/* more devices can be added using expansion connectors */
/* Added for R8025 rtc 20120914 */
{
I2C_BOARD_INFO("rx8025", 0x32),
}
};
----------------------------------------------------------------------------------------------------------
/**
* I2C_BOARD_INFO - macro used to list an i2c device and its address
* @dev_type: identifies the device type
* @dev_addr: the device\'s address on the bus.
*
* This macro initializes essential fields of a struct i2c_board_info,
* declaring what has been provided on a particular board. Optional
* fields (such as associated irq, or device-specific platform_data)
* are provided using conventional syntax.
*/
#define I2C_BOARD_INFO(dev_type, dev_addr) \\
.type = dev_type, .addr = (dev_addr)
/driver/rtc/rtc-s1370.c
static const struct i2c_device_id ds1307_id[] = {
{ "ds1307", ds_1307 },
{ "ds1337", ds_1337 },
{ "ds1338", ds_1338 },
{ "ds1339", ds_1339 },
{ "ds1340", ds_1340 },
{ "m41t00", m41t00 },
{ "rx8025", rx_8025 },
{ }
};
注:I2C_BOARD_INFO()中,第一项为type,第二项为addr,
dev_type必须与驱动中i2c_device_id数组中name匹配,其也是I2C设备与驱动匹配的基础。
添加硬件相关引脚支持(总线支持),arch/arm/mach-at91/at91sam9260_devices.c
/* --------------------------------------------------------------------
 *  TWI (i2c)
 * -------------------------------------------------------------------- */

/*
 * Prefer the GPIO code since the TWI controller isn\'t robust
 * (gets overruns and underruns under load) and can only issue
 * repeated STARTs in one scenario (the driver doesn\'t yet handle them).
 */

#if defined(CONFIG_I2C_GPIO) || defined(CONFIG_I2C_GPIO_MODULE)

static struct i2c_gpio_platform_data pdata = {
    .sda_pin        = AT91_PIN_PA23,
    .sda_is_open_drain  = 1,
    .scl_pin        = AT91_PIN_PA24,
    .scl_is_open_drain  = 1,
    .udelay         = 2,        /* ~100 kHz */
};

static struct platform_device at91sam9260_twi_device = {
    .name           = "i2c-gpio",
    .id         = -1,
    .dev.platform_data  = &pdata,
};

void __init at91_add_device_i2c(struct i2c_board_info *devices, int nr_devices)
{
    at91_set_GPIO_periph(AT91_PIN_PA23, 1);     /* TWD (SDA) */
    at91_set_multi_drive(AT91_PIN_PA23, 1);

    at91_set_GPIO_periph(AT91_PIN_PA24, 1);     /* TWCK (SCL) */
    at91_set_multi_drive(AT91_PIN_PA24, 1);

    i2c_register_board_info(0, devices, nr_devices);
    platform_device_register(&at91sam9260_twi_device);
}

#elif defined(CONFIG_I2C_AT91) || defined(CONFIG_I2C_AT91_MODULE)
static struct resource twi_resources[] = {
    [0] = {
        .start  = AT91SAM9260_BASE_TWI,
        .end    = AT91SAM9260_BASE_TWI + SZ_16K - 1,
        .flags  = IORESOURCE_MEM,
    },
    [1] = {
        .start  = AT91SAM9260_ID_TWI,
        .end    = AT91SAM9260_ID_TWI,
        .flags  = IORESOURCE_IRQ,
    },
};

static struct platform_device at91sam9260_twi_device = {
    .name       = "at91_i2c",
    .id     = -1,
    .resource   = twi_resources,
    .num_resources  = ARRAY_SIZE(twi_resources),
};
void __init at91_add_device_i2c(struct i2c_board_info *devices, int nr_devices)
{
    /* pins used for TWI interface */
    at91_set_A_periph(AT91_PIN_PA23, 0);        /* TWD */
    at91_set_multi_drive(AT91_PIN_PA23, 1);

    at91_set_A_periph(AT91_PIN_PA24, 0);        /* TWCK */
    at91_set_multi_drive(AT91_PIN_PA24, 1);

    i2c_register_board_info(0, devices, nr_devices);
    platform_device_register(&at91sam9260_twi_device);
}
#else
void __init at91_add_device_i2c(struct i2c_board_info *devices, int nr_devices) {}
#endif
3. 创建设备文件
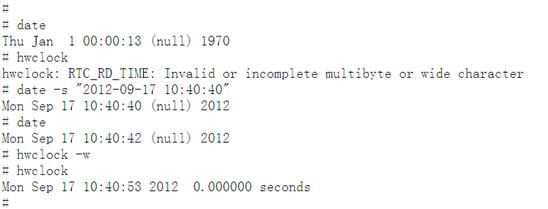
在根文件系统中,创建设备文件
mknod /dev/rtc0 c 10 135
注:rtc0与内核配置启动时钟吻合。
4. 编译内核,查看启动信息。

注:i2c设备驱动需支持两层:适配器(bus,主端),设备(从端),两者需要不同的驱动。
GPIO-based bitbanging是I2Cbus总线支持,芯片也需要单独的驱动。
BSP除了要添加芯片设备外(I2C_BOARD_INFO),还要增加CPU端适配器的支持。
以上是关于I2C实时时钟rx-8025板卡实际应用的主要内容,如果未能解决你的问题,请参考以下文章