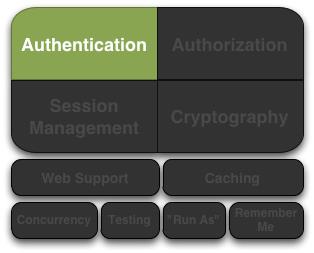
Shiro 的认证和签权可以通过 JDBC、LDAP 或者 Active Directory 来访问数据库、目录服务器或者 Active Directory 中的人员以及认证 / 签权信息。SessionManager 通过会话 DAO 可以将会话保存在 cache 中,或者固化到数据库或文件系统中。
2,到shiro主页下载shiro.
 // get the currently executing user:
 Subject currentUser = SecurityUtils.getSubject();
 // Do some stuff with a Session (no need for a web or EJB container!!!)
        Session session = currentUser.getSession();
        session.setAttribute("someKey", "aValue");
        String value = (String) session.getAttribute("someKey");
        if (value.equals("aValue")) {
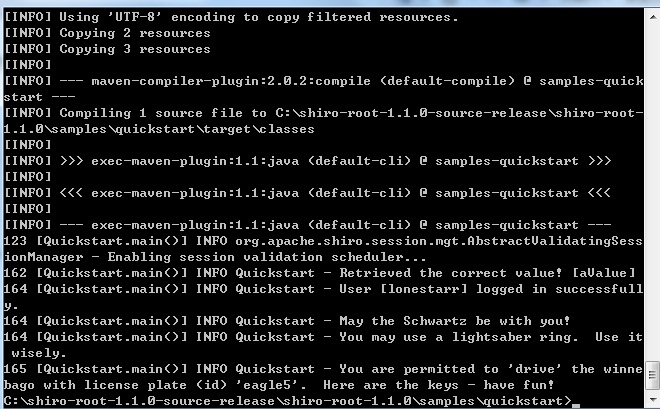
            log.info("Retrieved the correct value! [" + value + "]");
        }
如果在web应用程序中部署应用,默认情况下,应用将以HttpSession为基础。在企业级应用中,你在多个应用中可以使用相同的API,无论部署环境。而且使用任何客户端技术你都可以共享会话数据。
 // let\'s login the current user so we can check against roles and permissions:
        if (!currentUser.isAuthenticated()) {
            UsernamePasswordToken token = new UsernamePasswordToken("lonestarr", "vespa");
            token.setRememberMe(true);
            try {
                currentUser.login(token);
            } catch (UnknownAccountException uae) {
                log.info("There is no user with username of " + token.getPrincipal());
            } catch (IncorrectCredentialsException ice) {
                log.info("Password for account " + token.getPrincipal() + " was incorrect!");
            } catch (LockedAccountException lae) {
                log.info("The account for username " + token.getPrincipal() + " is locked.  " +
                        "Please contact your administrator to unlock it.");
            }
            // ... catch more exceptions here (maybe custom ones specific to your application?
            catch (AuthenticationException ae) {
                //unexpected condition?  error?
            }
        }
//say who they are:
        //print their identifying principal (in this case, a username):
        log.info("User [" + currentUser.getPrincipal() + "] logged in successfully.");
//test a role:
        if (currentUser.hasRole("schwartz")) {
            log.info("May the Schwartz be with you!");
        } else {
            log.info("Hello, mere mortal.");
        }
//test a typed permission (not instance-level)
        if (currentUser.isPermitted("lightsaber:weild")) {
            log.info("You may use a lightsaber ring.  Use it wisely.");
        } else {
            log.info("Sorry, lightsaber rings are for schwartz masters only.");
        }
 //a (very powerful) Instance Level permission:
        if (currentUser.isPermitted("winnebago:drive:eagle5")) {
            log.info("You are permitted to \'drive\' the winnebago with license plate (id) \'eagle5\'.  " +
                    "Here are the keys - have fun!");
        } else {
            log.info("Sorry, you aren\'t allowed to drive the \'eagle5\' winnebago!");
        }
//all done - log out!
        currentUser.logout();
认证就是用户确认身份的过程,确认登录的用户身份能够操作的内容。
使用shiro认证分为以下几个步骤:
1,得到主体的认证和凭据。
if (!currentUser.isAuthenticated()) { |
UsernamePasswordToken token = newUsernamePasswordToken("lonestarr", "vespa"); |
token.setRememberMe(true); |
2,提交认证和凭据给身份验证系统。
Subject currentUser = SecurityUtils.getSubject(); |
currentUser.login(token); |
3,判断是否允许访问,重试认证或者阻止访问。
currentUser.login(token); |
} catch (UnknownAccountException uae) { |
log.info("There is no user with username of " + token.getPrincipal()); |
} catch (IncorrectCredentialsException ice) { |
log.info("Password for account "+ token.getPrincipal() + " was incorrect!"); |
} catch (LockedAccountException lae) { |
log.info("The account for username "+ token.getPrincipal() + " is locked. " + |
"Please contact your administrator to unlock it."); |
catch (AuthenticationException ae) { |
其中Remember Me的功能包括两个方法,一个是
isRemembered
boolean isRemembered()
非匿名登录的用户可以记住上次使用的主题的信息。
isAuthenticated
boolean isAuthenticated()
在此期间需要使用有效的凭据登录系统,否则值为false.
授权操作
授权的例子就是是否可以访问某个页面,可以操作某个按钮,是否可以编缉对应的数据等。
如何在shiro中使用授权
1,使用编程方式
判断是否有管理员角色
if (currentUser.hasRole("admin")) { |
判断用户是否有打印的权限
Permission printPermission = new PrinterPermission(“laserjet3000n”,“print”); |
If (currentUser.isPermitted(printPermission)) {
也可以使用字符串的方式验证
String perm = “printer:print:laserjet4400n”; |
if(currentUser.isPermitted(perm)){ |
2,使用注释方式
判断用户是否有 创建账户权限
@RequiresPermissions(“account:create”) |
public void openAccount( Account acct ) { |
判断用户角色,如果符合角色,可以使用对应方法
@RequiresRoles( “teller” ) |
public void openAccount( Account acct ) { |
3,使用jsp taglib
判断用户是否有管理权限
<%@ taglib prefix=“shiro” uri=http: |
<shiro:hasPermission name=“users:manage”> |
<a href=“manageUsers.jsp”> |
Click here to manage users |
<shiro:lacksPermission name=“users:manage”> |
No user management for you! |
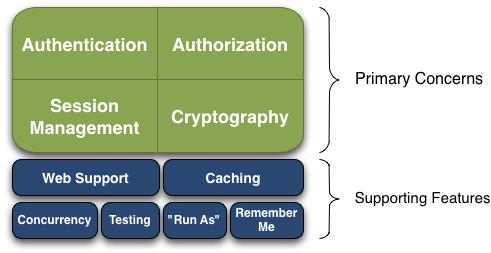
从高的级别来看shiro:
看一下官方的图

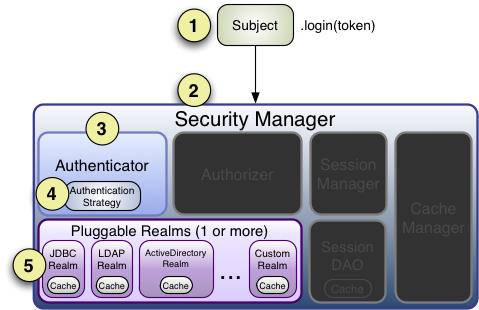
应用程序调用subject(主题),主题可以是一个用户也可以是与系统交互的另一个系统,主题绑定shiro的权限管 理,SecurityManager(安全管理),它控制与有与主题相关的安全操作。Realm(桥梁)它是安全与数据之间的桥,它封装了比如DAO的配 置信息,可以指定连接的数据源,也可使用其它的认证方式,如LDAP等。
然后看一下详细的架构图:

Subject (org.apache.shiro.subject.Subject)
主题:与系统交互的第三方如(用户,cron服务,第三方应用)等。
SecurityManager (org.apache.shiro.mgt.SecurityManager)
shiro系统的核心,协调主题使用的操作,验证,配置等。
Authenticator (org.apache.shiro.authc.Authenticator)
身份验证组件,对企图登录系统的用户进行身份的验证。其中包含一个Authentication Strategy
(org.apache.shiro.authc.pam.AuthenticationStrategy)组件。配置验证成功与失败的条件。
Authorizer (org.apache.shiro.authz.Authorizer)
授权组件,指用户访问特定应用程序的机制。
SessionManager (org.apache.shiro.session.mgt.SessionManager)
管理会话如何创建生命周期。其中包括的sessiondao是管理会议数据的持久操作:SessionDAO (org.apache.shiro.session.mgt.eis.SessionDAO),代表执行sessionManager的CRUD操作。
CacheManager (org.apache.shiro.cache.CacheManager)
缓存管理模块。
Cryptography (org.apache.shiro.crypto.*)
加密模块。
Realms (org.apache.shiro.realm.Realm)
多种方式处理的桥梁。
多种配置方式:
与spring,jboss,guice等进行配置。
1,编程方式配置
例如:
SecurityManager securityManager = new DefaultSecurityManager(realm); |
SecurityUtils.setSecurityManager(securityManager); |
2,sessionManager对象图
如果你想使用sessionManager配置自定义的sessionDao信息,进行自定义会话管理
DefaultSecurityManager securityManager = new DefaultSecurityManager(realm); |
SessionDAO sessionDAO = new CustomSessionDAO(); |
((DefaultSessionManager)securityManager.getSessionManager()).setSessionDAO(sessionDAO); |
3,INI配置
1) 创建一个INI从SecurityManager
可以从多种方式读取INI配置文件的信息,如文件系统,类路径等
import org.apache.shiro.SecurityUtils; |
import org.apache.shiro.util.Factory; |
import org.apache.shiro.mgt.SecurityManager; |
import org.apache.shiro.config.IniSecurityManagerFactory; |
Factory<SecurityManager> factory = newIniSecurityManagerFactory("classpath:shiro.ini"); |
SecurityManager securityManager = factory.getInstance(); |
SecurityUtils.setSecurityManager(securityManager); |
2) 通过Ini实例读取
类似于Properties的方式
import org.apache.shiro.SecurityUtils; |
import org.apache.shiro.util.Factory; |
import org.apache.shiro.mgt.SecurityManager; |
import org.apache.shiro.config.Ini; |
import org.apache.shiro.config.IniSecurityManagerFactory; |
Factory<SecurityManager> factory = new IniSecurityManagerFactory(ini); |
SecurityManager securityManager = factory.getInstance(); |
SecurityUtils.setSecurityManager(securityManager); |
加载之后就可以操作INI的配置了。
4,INI配置
每一个节点都是单独的,不可以重复,注释可以使用#或者;
配置示例
# ======================= |
# Shiro INI configuration |
# ======================= |
# Objects and their properties are defined here, |
# Such as the securityManager, Realms and anything |
# else needed to build the SecurityManager |
# The \'users\' section is for simple deployments |
# when you only need a small number of statically-defined |
# The \'roles\' section is for simple deployments |
# when you only need a small number of statically-defined |
# The \'urls\' section is used for url-based security |
# in web applications. We\'ll discuss this section in the |
1) [main]
配置sessionManager的实例和它的依赖。
配置示例
sha256Matcher = org.apache.shiro.authc.credential.Sha256CredentialsMatcher |
myRealm = com.company.security.shiro.DatabaseRealm |
myRealm.connectionTimeout = 30000 |
myRealm.username = jsmith |
myRealm.password = secret |
myRealm.credentialsMatcher = $sha256Matcher |
securityManager.sessionManager.globalSessionTimeout = 1800000 |
定义一个对象
myRealm = com.company.shiro.realm.MyRealm |
简单的属性设置
myRealm.connectionTimeout = 30000 |
myRealm.username = jsmith |
配置信息将转入到对应的set方法中
myRealm.setConnectionTimeout(30000); |
myRealm.setUsername("jsmith"); |
参考值
你可以使用$符号引用先前定义的一个对象的实例
sha256Matcher = org.apache.shiro.authc.credential.Sha256CredentialsMatcher |
myRealm.credentialsMatcher = $sha256Matcher |
嵌套属性
securityManager.sessionManager.globalSessionTimeout = 1800000 |
将被注入到下面的程序中
securityManager.getSessionManager().setGlobalSessionTimeout(1800000); |
引用其它的属性
sessionListener1 = com.company.my.SessionListenerImplementation |
sessionListener2 = com.company.my.other.SessionListenerImplementation |
securityManager.sessionManager.sessionListeners = $sessionListener1, $sessionListener2 |
以键值的配置方式
object1 = com.company.some.Class |
object2 = com.company.another.Class |
anObject = some.class.with.a.Map.property |
anObject.mapProperty = key1:$object1, key2:$object2 |
2) [users]
在用户比较少的情况下这种配置信息是有效的
lonestarr = vespa, goodguy, schwartz |
darkhelmet = ludicrousspeed, badguy, schwartz |
3) [roles]
如果角色信息比较少的情况下可以使用这项配置
# \'admin\' role has all permissions, indicated by the wildcard \'*\' |
# The \'schwartz\' role can do anything (*) with any lightsaber: |
# The \'goodguy\' role is allowed to \'drive\' (action) the winnebago (type) with |
# license plate \'eagle5\' (instance specific id) |
goodguy = winnebago:drive:eagle5 |
4) [urls]
配置url等可访问的资源信息。
shiro(3)-shiro核心
身份认证

身份认证分三个步骤
1)提交主题和凭据
2)进行身份认证
3)判断是通过,重新提交还是不通过
验证顺序

1)调用subject的login方法,提交主体和凭据。
2)得到对应操作的Security Manager
3)通过Sceurity Manager得到对应的Autherticator实例
4)根据配置策略查找对应的桥信息
5)通过桥信息到对应的配置处理进行身份验证
验证器
如果你想配置一个自定义的验证器
可以在配置文件中使用
[main]
...
authenticator = com.foo.bar.CustomAuthenticator

securityManager.authenticator = $authenticator
配置策略信息
AtLeastOneSuccessfulStrategy 如果一个验证成功,则验证结果为成功
FirstSuccessfulStrategy 只有第一个成功,才算成功
AllSuccessfulStrategy 所有的都必须成功
对应的在配置文件中的策略使用如下
shiro.ini

[main]
...
authcStrategy = org.apache.shiro.authc.pam.FirstSuccessfulStrategy

securityManager.authenticator.authenticationStrategy = $authcStrategy

...
执行顺序
1)隐式顺序
blahRealm = com.company.blah.Realm
...
fooRealm = com.company.foo.Realm
...
barRealm = com.company.another.Realm
按上下顺序执行
2)指定顺序
blahRealm = com.company.blah.Realm
...
fooRealm = com.company.foo.Realm
...
barRealm = com.company.another.Realm

securityManager.realms = $fooRealm, $barRealm, $blahRealm
...
按指定的顺序执行
授权

控制谁有权限访问应用程序
授权的几个要素:权限,角色和用户。
三种权限的判
以上是关于Shiro 权限框架使用总结的主要内容,如果未能解决你的问题,请参考以下文章


