Centos 6.4 x86_64 最小化安装后的优化
Posted 左扬(你们的胃叫胃,孤的叫胃PLUS)
tags:
篇首语:本文由小常识网(cha138.com)小编为大家整理,主要介绍了Centos 6.4 x86_64 最小化安装后的优化相关的知识,希望对你有一定的参考价值。
1)更新yum官方源
2)关闭不需要的服务
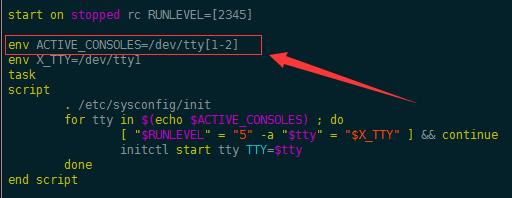
3)关闭不需要的TTY
4)对TCP/IP网络参数进行调整
_4.1) 优化Linux下的内核TCP参数以提高系统性能
5)设置时间同步
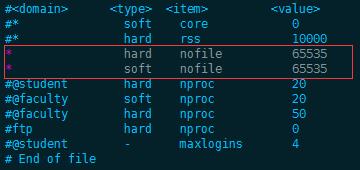
6)优化最大文件数限制
7)关闭SELINUX
8)修改SSH登录配置
9)清理登陆的时候显示的系统及内核版本
10)删除不必要的系统用户和群组
11)关闭重启ctl-alt-delete组合键
12)设置一些全局变量
13)设置history历史记录
14)centos6.4最小化安装后启动网卡
15)添加普通用户,设置sudo权限
16)禁止root远程用户登录
17)sed修改远程端口
18)防火墙iptables配置
19)修改默认DNS
20)安装必要软件,更新yum源 [epel源]
21)更新内核和软件到最新版本
22)去除上次登录的信息
mkdir -p /etc/yum.repos.d/yum_bak
mv /etc/yum.repos.d/* /etc/yum.repos.d/yum_bak/

wget -O /etc/yum.repos.d/CentOS-Base.repo http://mirrors.aliyun.com/repo/Centos-6.repo
2) 执行yum源更新,命令如下:
yum clean all
yum makecache
yum update
yum clean all #清除yum缓存
- crontab:自动计划任务。
- network:Linux系统的网络服务,很重要,若不开启此服务的话,服务器就不能联网。
- sshd:OpenSSH服务器守护进程。
- rsyslog:Linux系统的日志系统服务(Centos 5.8下此服务名称为syslog),必须要启动。
for sun in `chkconfig --list|grep 3:on|awk \'{print $1}\'`;do chkconfig --level 3 $sun off;done
#或者
for sun in `chkconfig --list|grep 3:启用|awk \'{print $1}\'`;do chkconfig --level 3 $sun off;done
for sun in crond rsyslog sshd network;do chkconfig --level 3 $sun on;done
for sun in crond rsyslog sshd network iptables ip6tables;do chkconfig --level 3 $sun on;done

[root@realserver1 ~]# vim /etc/sysctl.conf
net.ipv4.ip_forward = 1
net.ipv4.conf.default.rp_filter = 1
net.ipv4.conf.default.accept_source_route = 0
kernel.sysrq = 0
kernel.core_uses_pid = 1
net.ipv4.tcp_syncookies = 1        #可以加强对抗SYN Flood的能力
kernel.msgmnb = 65536
kernel.msgmax = 65536
kernel.shmmax = 68719476736
kernel.shmall = 4294967296
net.ipv4.tcp_max_tw_buckets = 6000
net.ipv4.tcp_sack = 1
net.ipv4.tcp_window_scaling = 1
net.ipv4.tcp_rmem = 4096 87380 4194304
net.ipv4.tcp_wmem = 4096 16384 4194304
net.core.wmem_default = 8388608
net.core.rmem_default = 8388608
net.core.rmem_max = 16777216
net.core.wmem_max = 16777216
net.core.netdev_max_backlog = 262144
net.core.somaxconn = 262144
net.ipv4.tcp_max_orphans = 3276800
net.ipv4.tcp_max_syn_backlog = 262144
net.ipv4.tcp_timestamps = 0
net.ipv4.tcp_synack_retries = 1
net.ipv4.tcp_syn_retries = 1
net.ipv4.tcp_tw_recycle = 1
net.ipv4.tcp_tw_reuse = 1
net.ipv4.tcp_mem = 94500000 915000000 927000000
net.ipv4.tcp_fin_timeout = 1
net.ipv4.tcp_keepalive_time = 1200
net.ipv4.ip_local_port_range = 1024 65535
[root@realserver1 ~]# sysctl -p #使配置生效
4.1 优化Linux下的内核TCP参数以提高系统性能
- 防止上一次连接中的包迷路后重新出现,影响新的连接(经过2MSL时间后,上一次连接中所有重复的包都会消失)。
- 为了可靠地关闭TCP连接。主动关闭方发送的最后一个ACK(FIN)有可能会丢失,如果丢失,被动方会重新发送FIN,这时如果主动方处于CLOSED状态,就会响应RST而不是ACK。所以主动方要处于TIME_WAIT状态,而不能是CLOSED状态。另外,TIME_WAIT并不会占用很大的资源,除非受到攻击。
netstat -n |awk \'/^tcp/ {++S[$NF]} END{for(a in S) print a, S[a]}\'
net.ipv4.tcp_fin_timeout = 30
net.ipv4.tcp_keepalive_time = 1200
net.ipv4.tcp_syncookies = 1
net.ipv4.tcp_tw_reuse = 1
net.ipv4.tcp_tw_recycle = 1
net.ipv4.ip_local_port_range = 1024    65000
net.ipv4.tcp_max_syn_backlog = 8192
net.ipv4.tcp_max_tw_buckets = 5000
说明:
net.ipv4.tcp_syncookies = 1
net.ipv4.tcp_tw_reuse = 1
net.ipv4.tcp_tw_recycle = 1
net.ipv4.ip_local_port_range = 1024    65000
执行以下命令使配置生效:/sbin/sysctl -p
net.ipv4.tcp_fin_timeout = 30
net.ipv4.tcp_keepalive_time = 300
net.ipv4.tcp_tw_reuse = 1
net.ipv4.tcp_tw_recycle = 1
net.ipv4.ip_local_port_range = 5000 65000
kernel.shmmax = 134217728
yum install -y ntpdate
crontab -e
crontab -l

*/5 * * * *  /usr/sbin/ntpdate s2m.time.edu.cn &> /dev/null
系统时间更新和设定定时任务 第一种:更新时间并且写入BOIS
ntpdate s2m.time.edu.cn && hwclock -w && hwclock --systohc

# This file controls the state of SELinux on the system.
# SELINUX= can take one of these three values:
# enforcing - SELinux security policy is enforced.
# permissive - SELinux prints warnings instead of enforcing.
# disabled - No SELinux policy is loaded.
SELINUX=disabled
# SELINUXTYPE= can take one of these two values:
# targeted - Targeted processes are protected,
# mls - Multi Level Security protection.
SELINUXTYPE=targeted
重启生效,也可以不修改配置文件临时生效,但不建议这样设置,因为重启后会失效。
Port 65232
Protocol 2
PermitRootLogin no
UseDNS no
cat /etc/redhat-release
cat /etc/issue
#清理登陆信息
echo >/etc/redhat-release
echo >/etc/issue
userdel adm
userdel lp
userdel sync
userdel shutdown
userdel halt
userdel news
userdel uucp
userdel operator
userdel games
userdel gopher
userdel ftp
#删除不必要的群组
groupdel adm
groupdel lp
groupdel news
groupdel uucp
groupdel games
groupdel dip
groupdel pppusers
#注释掉
#exec /sbin/shutdown -r now "Control-Alt-Deletepressed"
12、设置一些全局变量
#设置自动退出终端,防止非法关闭ssh客户端造成登录进程过多,可以设置大一些,单位为秒
echo "TMOUT=3600">> /etc/profile
#历史命令记录数量设置为100条
sed -i "s/HISTSIZE=1000/HISTSIZE=10/" /etc/profile
#立即生效
source /etc/profile
13、设置history历史记录
echo \'
export HISTFILE=$HOME/.bash_history
export HISTSIZE=4000
export HISTFILESIZE=4000
export HISTTIMEFORMAT="%F %T `whoami` "
export PROMPT_COMMAND="history -a; history -c; history -r;"
shopt -s histappend
typeset -r PROMPT_COMMAND
typeset -r HISTTIMEFORMAT \' > /etc/profile.d/history.sh
source /etc/profile
14、centos6.4最小化安装后启动网卡
#centos6.x最小化安装后,网卡默认不是启动状态
ifup eth0
15、添加普通用户,设置sudo权限
username=\'zuoyang\'
password=\'zuoyang2016\'
useradd $username ; echo $password | passwd --stdin $username
sed -i "98 a$username    ALL=(ALL)       NOPASSWD: ALL" /etc/sudoers
16、禁止root远程用户登录
sed -i \'s/#PermitRootLogin yes/PermitRootLogin no/\' /etc/ssh/sshd_config
17、sed修改远程端口
sed -i \'s/#Port 22/Port 9527/\' /etc/ssh/sshd_config
/etc/init.d/sshd restart
18、防火墙iptables配置
/etc/init.d/iptables restart
iptables -F
iptables -X
iptables -Z
iptables -A INPUT -p icmp -j ACCEPT
iptables -A INPUT -i lo -j ACCEPT
#允许某个IP段远程访问ssh
iptables -A INPUT -p tcp -m tcp --dport 9527 -s 192.168.64.0/24 -j ACCEPT
#开启80端口
iptables -A INPUT -P tcp -m tcp --dropt 80 -j ACCEPT
#允许某个IP的所有请求
iptables -A INPUT -p all -s 124.43.56.90/30 -j ACCEPT
iptables -A INPUT -m state --state RELATED,ESTABLISHED -j ACCEPT
iptables -P INPUT DROP
iptables -P OUTPUT ACCEPT
iptables -P FORWARD DROP
/etc/init.d/iptables save
/etc/init.d/iptables restart
19、修改默认DNS
echo "nameserver 223.5.5.5" > /etc/resolv.conf
echo "nameserver 223.6.6.6" >> /etc/resolv.conf
20、安装必要软件,更新yum源 [epel源]
#根据个人公司情况,这里只列举了自己常用的软件和yum源,根据实际情况更改yum源
yum -y install gcc gcc-c++ openssl-devel openssh-clients wget make lrzsz unzip zip xz ntpdate lsof telnet epel-release vim tree kernel-devel kernel
21、更新内核和软件到最新版本
yum -y upgrade
22、去除上次登录的信息
touch ~/.hushlogin
23、优化内核参数 [根据实际情况调整]
echo -e "net.core.somaxconn = 262144" >> /etc/sysctl.conf
echo -e "net.core.netdev_max_backlog = 262144" >> /etc/sysctl.conf
echo -e "net.core.wmem_default = 8388608" >> /etc/sysctl.conf
echo -e "net.core.rmem_default = 8388608" >> /etc/sysctl.conf
echo -e "net.core.rmem_max = 16777216" >> /etc/sysctl.conf
echo -e "net.core.wmem_max = 16777216" >> /etc/sysctl.conf
echo -e "net.ipv4.route.gc_timeout = 20" >> /etc/sysctl.conf
echo -e "net.ipv4.ip_local_port_range = 1024 65535" >> /etc/sysctl.conf
echo -e "net.ipv4.tcp_retries2 = 5" >> /etc/sysctl.conf
echo -e "net.ipv4.tcp_fin_timeout = 30" >> /etc/sysctl.conf
echo -e "net.ipv4.tcp_syn_retries = 1" >> /etc/sysctl.conf
echo -e "net.ipv4.tcp_synack_retries = 1" >> /etc/sysctl.conf
echo -e "net.ipv4.tcp_timestamps = 0" >> /etc/sysctl.conf
echo -e "net.ipv4.tcp_tw_recycle = 1" >> /etc/sysctl.conf
echo -e "net.ipv4.tcp_tw_reuse = 1" >> /etc/sysctl.conf
echo -e "net.ipv4.tcp_keepalive_time = 120" >> /etc/sysctl.conf
echo -e "net.ipv4.tcp_keepalive_probes = 3" >> /etc/sysctl.conf
echo -e "net.ipv4.tcp_keepalive_intvl = 15" >> /etc/sysctl.conf
echo -e "net.ipv4.tcp_max_tw_buckets = 36000" >> /etc/sysctl.conf
echo -e "net.ipv4.tcp_max_orphans = 3276800" >> /etc/sysctl.conf
echo -e "net.ipv4.tcp_max_syn_backlog = 262144" >> /etc/sysctl.conf
echo -e "net.ipv4.tcp_wmem = 8192 131072 16777216" >> /etc/sysctl.conf
echo -e "net.ipv4.tcp_rmem = 32768 131072 16777216" >> /etc/sysctl.conf
echo -e "net.ipv4.tcp_mem = 94500000 915000000 927000000" >> /etc/sysctl.conf
echo -e "net.ipv4.tcp_slow_start_after_idle = 0" >> /etc/sysctl.conf
echo -e "vm.swappiness = 0" >> /etc/sysctl.conf
echo -e "kernel.panic = 5" >> /etc/sysctl.conf
echo -e "kernel.panic_on_oops = 1" >> /etc/sysctl.conf
echo -e "kernel.core_pipe_limit = 0" >> /etc/sysctl.conf
#iptables 防火墙
echo -e "net.nf_conntrack_max = 25000000" >> /etc/sysctl.conf
echo -e "net.netfilter.nf_conntrack_max = 25000000" >> /etc/sysctl.conf
echo -e "net.netfilter.nf_conntrack_tcp_timeout_established = 180" >> /etc/sysctl.conf
echo -e "net.netfilter.nf_conntrack_tcp_timeout_time_wait = 120" >> /etc/sysctl.conf
echo -e "net.netfilter.nf_conntrack_tcp_timeout_close_wait = 60" >> /etc/sysctl.conf
echo -e "net.netfilter.nf_conntrack_tcp_timeout_fin_wait = 120" >> /etc/sysctl.confo
注意:
[history历史记录设置]
  有时候我们需要对线上用户操作记录进行历史记录待出现问题追究责任人,但Linux系统自带的history命令用户有自行删除权限,那怎么设置可以让用户的操作记录实时记录,并保证普通用户无权删除呢,具体参考上文history历史记录设置,这里我只列出部分需要注意的事项,后面还要待补充和整理:
  1. 首先root用户创建的HISTORY_FILE默认情况下只有root用户有rw权限,其它用户只有r的权限,这就导致其它用户的操作记录无法写入,需要将HISTORY_FILE赋予所有的读写权限。
  2. export PROMPT_COMMAND 如果将PROMPT_COMMAND导出到用户工作区,那么对于有经验的用户就可以做赋值操作 export PROMPT_COMMAND =“” ,简单的语法就会导致记录功能当前session端不可用,所以PROMPT_COMMAND必须设置成只读的属性,readonly PROMPT_COMMAND,但是这里只显示了命令,并没有显示执行命令的时间,因为保存历史命令的~/.bash_history里并没有保存时间。通过设置环境变量 export HISTTIMEFORMAT="%F %T `whoami` " 给history加上时间戳可以看到,历史命令的时间,用户已经加上了,但是.bash_history里并没有加上这个时间。
以上是关于Centos 6.4 x86_64 最小化安装后的优化的主要内容,如果未能解决你的问题,请参考以下文章